Little Giant Ladders 17220 Manuel utilisateur
- Taper
- Manuel utilisateur

Operating & Safety Instructions
•
Mode d’emploi et consignes de sécurité
•
Instrucciones para el uso seguro
HYPERLITE
®
SUMOSTANCE
®
&

Equipo de atención al cliente: 800-453-1192 • De lunes a viernes de 7 a.m. a 5 p.m.,
MST (hora de la montaña)
Little Giant Ladder Systems • 1198 North Spring Creek Place • Springville, UT 84663 • EE.UU.
www.LittleGiantLadders.com
Équipe de service à la clientèle: 800-453-1192 •
Du lundi au vendredi de 7h à 17h HNR
Little Giant Ladder Systems • 1198 N. Spring Creek Place • Springville, UT 84663
www.LittleGiantLadders.com
Customer Experience Team: 800-453-1192 •
Monday - Friday, 7 a.m. - 5 p.m. MST
Little Giant Ladder Systems • 1198 North Spring Creek Place • Springville, UT 84663 • USA
www.LittleGiantLadders.com
LittleGiantLadderSystems
Little Giant Ladders @RealLittleGiant
LittleGiantLadderSystems
2
Congratulations on your purchase of the LITTLE GIANT
®
HYPERLITE
®
or
SUMOSTANCE®!
These instructions will help you make the most of your LITTLE GIANT HYPERLITE by learning
how to use it safely. Please do not ignore the instructions, study them! If you have questions
about how to operate your ladder, please search our safety resources at
www.LittleGiantLadders.com/SafetyToolbox, scan the QR code, or call us before using your
ladder. Your safety and satisfaction is most important to us.
Welcome to the LITTLE GIANT family!
Félicitations d'avoir acheté l’échelle LITTLE GIANT HYPERLITE ou SUMOSTANCE!
Ces instructions vous aideront à tirer profit au maximum de votre échelle LITTLE GIANT
HYPERLITE en apprenant comment l’utiliser en toute sécurité. N'ignorez pas les instructions,
étudiez-les! Si vous avez des questions sur la façon d'utiliser votre échelle, nous vous invitons
à effectuer une recherche dans nos ressources sur le site
www.LittleGiantLadders.com/SafetyToolbox, balayez le code QR ou contactez-nous avant
d'utiliser celui-ci. Votre sécurité et votre satisfaction nous tiennent véritablement à cœur.
Bienvenue dans la famille de LITTLE GIANT!
Felicitaciones por comprar LITTLE GIANT
HYPERLITE
o SUMOSTANCE
Estas instrucciones le enseñarán a usar su LITTLE GIANT HYPERLITE de manera segura y así
podrá aprovecharla al máximo. Sigas estas instrucciones y memorícelas. Si tiene alguna
pregunta sobre cómo usar su escalera, busque nuestros recursos de seguridad en línea en
www.LittleGiantLadders.com/SafetyToolbox, escanee el código QR o comuníquese con
nosotros antes de usar la escalera. Su opinión y su satisfacción son lo más importante para
nosotros.
¡Bienvenido a la familia LITTLE GIANT!

3
Table of Contents
Table des matières
Tabla de contenido
Get to know your new LITTLE GIANT
®
ladder..................................................................................... 4
Description - LITTLE GIANT
HYPERLITE
®
and SUMOSTANCE
®
Extension Ladder........................... 5
Operating and Adjusting the Ladder................................................................................................... 5
The Rope...................................................................................................................................... 5
The Rung Locks........................................................................................................................... 5
The Feet ....................................................................................................................................... 6
The Bubble Levels ....................................................................................................................... 6
The SUMOSTANCE Outriggers ................................................................................................... 7
General Operating Safety Tips.................................................................................................... 8
Ladder Setup Instructions........................................................................................................... 9
Important Safety and Use Information ....................................................................................10
LITTLE GIANT Warranty .....................................................................................................................11
Standards Compliance and Certifications .......................................................................................12
Legal Notices .....................................................................................................................................12
Preoperational Ladder Inspection Checklist....................................................................................13
Apprendre à connaître votre nouvelle échelle LITTLE GIANT.......................................................... 14
Description - Échelle à extension LITTLE GIANT
HYPERLITE et SUMOSTANCE ............................15
Utiliser et ajuster l’échelle .................................................................................................................15
La corde ..................................................................................................................................... 15
Les verrous d'échelon ............................................................................................................... 15
Les pieds....................................................................................................................................16
Les niveaux à bulle....................................................................................................................16
Les bâtons d’appui SUMOSTANCE .......................................................................................... 17
Consignes de sécurité pour l'utilisation générale ...................................................................18
Instructions d’installation de l’échelle...................................................................................... 19
Importante information d’utilisation et de sécurité.................................................................20
Garantie LITTLE GIANT ...................................................................................................................... 21
Certifications et conformité aux normes .........................................................................................22
Avis juridique......................................................................................................................................22
Liste d’inspection de l’échelle avantchaque utilisation ...................................................................23
Llegar a conocer su nueva escalera LITTLE GIANT ......................................................................... 24
Descripción - Escalera de extensión LITTLE GIANT
HYPERLITE y SUMOSTANCE ........................ 25
Uso y ajuste de la escalera................................................................................................................ 25
La cuerda ................................................................................................................................... 25
Las trabas de los peldaños...................................................................................................... .25
Las patas ................................................................................................................................... 26
Los niveles de la burbuja ..........................................................................................................26
Los estabilizadores SUMOSTANCE ......................................................................................... 27
Consejos generales para un uso seguro.................................................................................. 28
Instrucciones para armar la escalera....................................................................................... 29
Información importante de seguridad y uso ...........................................................................30
Garantía de LITTLE GIANT ................................................................................................................. 31
Cumplimiento de normas y certificaciones .....................................................................................32
Advertencias legales ......................................................................................................................... 32
Lista de verificación de inspección preoperativa de la escalera .................................................... 33

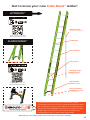
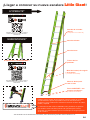
*Depending on your ladder model, these items may or may not be included.
4
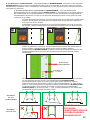
SUMOSTANCE Outriggers*
Fly Section
Rung Locks
Climbing Angle
Bubble Level*
(on select models)
Side-To-Side
Bubble Level
Patent Pending
SURE-SET
™
Feet*
(on select models)
Base Section
Side-pull Rope
(not available on 16’ model)
®
Bottom Rung Signal*
As many as 20 percent of injuries occur when the operator
accidentally misses the bottom rung while descending the ladder,
which commonly results in severe ankle, knee, and back injuries.
The patent-pending GROUND CUE
®
bottom rung signal (on select
models) trains the operator to feel and hear an audible alert
reminding him or her it is safe to step off the ladder.
Get to know your new Little Giant
®
ladder!
SCAN THE QR CODE TO VIEW
INSTRUCTION & SAFETY VIDEO
HYPERLITE
®
SUMOSTANCE
®
SCAN THE QR CODE TO VIEW
INSTRUCTION & SAFETY VIDEO

OK NOT OK
5
Operating Instructions for LITTLE GIANT
®
HYPERLITE
®
and SUMOSTANCE
®
extension
ladders
I. Description - LITTLE GIANT HYPERLITE and SUMOSTANCE Extension Ladder
A. Extension Ladder Unit - Comprised of two basic components - a base ladder section and fly
ladder section which telescopes over the base.
1. Rung Locks on the fly section permit the ladder to be adjusted in length. These Rung
Locks fit onto the rungs of the base section, allowing foot-by-foot adjustment of the
ladder.
B. Model Specification Table
HYPERLITE:
Model Storage Height Max Working Length Highest Standing Level Max Reach*
16' 8'8" [2.64 m] 13'4" [4.06 m] 9'5" [2.87 m] 15'11" [4.85 m]
20' 10'8" [3.24 m] 17'3" [5.26 m] 13'3" [4.04 m] 19'9" [6.02 m]
24' 12'7" [3.84 m] 21'2" [6.46 m] 17'1" [5.20 m] 23'7" [7.18 m]
28' 14'7" [4.44 m] 25'2" [7.66 m] 20'10" [6.36 m] 27'4" [8.34 m]
32' 16'6" [5.04 m] 29'1" [8.86 m] 24'8" [7.54 m] 31'3" [9.52 m]
36' 18'6" [5.64 m] 31'0" [9.46 m] 27'7" [8.41 m] 34'1" [10.39 m]
40' 20'6" [6.24 m] 35'0" [10.66 m] 30'5" [9.27 m] 36'11" [11.25 m]
SUMOSTANCE:
Model Storage Height Max Working Length Highest Standing Level Max Reach*
16' 8'8" [2.64 m] 13'5" [4.10 m] 9'6" [2.90 m] 16'0" [4.88 m]
20' 10'8" [3.24 m] 17'5" [5.30 m] 13'4" [4.07 m] 19'10"[6.05 m]
24' 12'7" [3.84 m] 21'4" [6.50 m] 17'2" [5.23 m] 23'8" [7.21 m]
28' 14'7" [4.44 m] 25'3" [7.70 m] 21'0" [6.40 m] 27'6" [8.38 m]
32' 16'6" [5.04 m] 29'2" [8.90 m] 24'10" [7.57 m] 31'4" [9.55 m]
36' 18'6" [5.64 m] 31'2" [9.50 m] 27'8" [8.43 m] 34'2" [10.41 m]
40' 20'6" [6.24 m] 35'1" [10.70 m] 30'7" [9.31 m] 37'0" [11.29 m]
*based on a 5'6" [1.68 m] person with a 12" [30 cm] vertical reach.
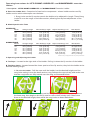
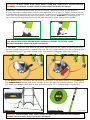
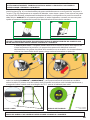
II. Operating and Adjusting the Ladder
A. The Rope - Located at the right side of the ladder. Pulling it raises the fly section of the ladder.
B. The Rung Locks - Located toward the lower portion of the fly section, they lock the ladder at the
desired working height.
1. To raise the ladder - Pull the rope until the ladder is at the desired height, and the
rung locks swing in over the base section rung. Release the rope slowly, and make sure
that the rung locks are fully seated over the rung, as illustrated below:
2. To lower the ladder - Pull the rope until the rung lock flippers are completely above
the base rung, then begin to let the fly section come down slowly until it has come
down to the desired height, then relock the rung locks as described above.

6
A B
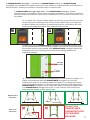
SIDE-TO-SIDE CLIMBING ANGLE*
* on select models
WARNING: ALWAYS MAKE SURE BOTH RUNG LOCKS ARE COMPLETELY LOCKED BEFORE
CLIMBING THE LADDER. FAILURE TO DO SO MAY RESULT IN INJURY OR DEATH.
WARNING: ALWAYS MAKE SURE BOTH FEET ARE IN THE SAME POSITION. NEVER USE THE
PICK POSITION ON HARD IMPENETRABLE SURFACES. FAILURE TO FOLLOW THESE
INSTRUCTIONS MAY RESULT IN INJURY OR DEATH.
WARNING: ALWAYS MAKE SURE YOUR LADDER IS LEVEL SIDE-TO-SIDE BEFORE CLIMBING.
FAILURE TO DO SO MAY RESULT IN INJURY OR DEATH.
C. The Feet - Located at the bottom ends of the ladder. They can be used in a flat position
(Fig. A) with slip-resistant rubber pads for hard surfaces, or in a “pick” or “spike” position (Fig. B)
to penetrate soft surfaces, such as dirt or grass. To set the feet in the desired position, simply lift
them from the ground and flip them into position with your toe. SURE-SET™, if equipped, are
spring-assisted to help keep the feet in the desired position while setting up the ladder.
1. Nail Slots - The feet have slots at the front, which give you the option of nailing the feet in
position, giving extra protection against slip outs. Do not hit your ladder’s feet with a hammer. We
recommend driving in the nails outside of the feet and then sliding the ladder into position.
D. The Bubble Levels - Located in the leg brace at the bottom of the base section on all HYPERLITE
and SUMOSTANCE models, and on the outside of the right side rail on select models. They inform
you when your ladder is level side-to-side and at the proper 75.5° climbing angle, respectively.

7
E. SUMOSTANCE® Outriggers - Standard on SUMOSTANCE models, the SUMOSTANCE
outriggers provide additional width at the base of the ladder for added stability, and function as
built-in levelers, allowing the ladder to be used safely in unlevel areas.
1. SUMOSTANCE Outrigger Operation - The SUMOSTANCE outrigger release
mechanisms are located at the top of the outrigger assemblies. They have a pressure
sensitive safety mechanism, which doesn’t allow them to be released if someone is on
the ladder.
a) To unlock, lift or tilt the ladder slightly to remove any pressure on the foot
of the side you’re adjusting, then lift up on the release with your fingertips.
b) While holding the release in the unlocked position, press down the lock
housing and nudge the ladder foot outward with your toe.
c) When you get the SUMOSTANCE outrigger to the desired position, let go
of the release and move the housing slightly until you feel it lock into place.
Even when used on level ground, both SUMOSTANCE outriggers should be
extended to the first locking position below the storage position for
additional stability.
d) To avoid injuries caused by misstepping as you dismount the ladder, it is
highly recommended that the SUMOSTANCE outriggers are used for
leveling only, and not for gaining additional height. Try to keep the bottom
rung height approximately 12" from the ground, and never fully extend both
SUMOSTANCE outriggers at the same time. When leveling the ladder, keep
one SUMOSTANCE outrigger set in the 1
st
Use Position, then extend the
other until the ladder is level side-to-side.
Storage
Position
1
st
Use
Position
Advised Use
Positions
Non- Use
Positions
DO NOT USE
SUMOSTANCE
LADDER WITHOUT
OUTRIGGERS
ENGAGED.
12”
[30 cm]
>

F. General Operating Safety Tips
WARNING: LITTLE GIANT
®
LADDER SYSTEMS ASSUMES NO LIABILITY FOR DAMAGE OR
INJURY THAT MAY RESULT FROM FAILING TO FOLLOW ALL INSTRUCTIONS CORRECTLY.
LADDERS AND HEIGHTS ARE INHERENTLY DANGEROUS AND MAY CAUSE SERIOUS INJURY OR
DEATH; HEED THE FOLLOWING SAFETY PRECAUTIONS:
1. For your safety, set up the ladder so the rungs are always level from front to back
and from side to side. Confirm with the Bubble Levels.
2. To avoid pinching, keep clothing, jewelry, and body parts out of all moving
mechanisms, including rung locks and pulleys, and away from rungs when
telescoping the fly section.
3. Use extreme caution when using the ladder around electricity. Do not let ladders of
any material come in contact with live electrical circuits.
4. For your safety, never exceed the weight limit of the ladder. Depending on the
model, your ladder has one of the following ANSI duty ratings:
a) 375 lb [170 kg] - Special Duty Type IAA
b) 300 lb [136 kg] - Extra Heavy Duty Type IA
This information can be found on the NOTICE label attached to the ladder
5. Keep all ladder rungs, ladder feet, platforms, and other standing and gripping
surfaces clean and free from foreign materials (i.e. mud, paint, ice, oil, etc.).
6. Do not lean too far over the side of the ladder, and keep both feet on the rungs at
all times; as a rule of thumb, keep your navel between the side rails.
7. Inspect ladder feet for wear; replace them when necessary.
8. Read all labels on the ladder before use. Replace labels if damaged or worn.
9. Do not use ladder in high winds or storms.
10. Always face the ladder and use both hands when climbing up or down.
11. Inspect the ladder before each use. Never climb a damaged, bent or broken ladder.
If you need replacement parts, please contact our Customer Experience Team at
800-453-1192. If the ladder cannot be repaired, destroy it and remove it from
service.
12. Do not spend long periods on a ladder without regular breaks.
13. Remove any rings and jewelry, and wear sturdy, slip-resistant shoes when climbing
a ladder.
14. To aid in carrying the ladder, pick it up at the
balance point, as marked with this symbol:
8
For additional safety training visit www.laddersafety.org
ALI MEMBER

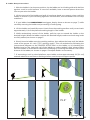
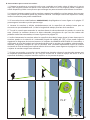
G. Ladder Setup instructions
1. With the ladder in its shortest position, lay the ladder on its climbing side with the feet
against a wall or solid surface. If none are available, have a second person brace the
feet as you raise the ladder.
2. Lift the top end of the ladder and walk it hand-over-hand, one rung at a time, until the
ladder is vertical. If you’re working against a solid surface, lean the ladder into it to help
stabilize it.
3. If your ladder has SUMOSTANCE outriggers, deploy them as shown on page 7, while
carefully securing the ladder and preventing it from tipping.
4. Lift the ladder and carefully move it back from the working surface until you are back
approximately 1/4 of the planned working length of the ladder.
5. While maintaining control of the ladder, pull the rope to extend the ladder to the
desired height. When the ladder reaches the desired height, make sure both rung locks
are fully seated, as shown on page 5.
6. Slowly lean the ladder onto the working surface, then adjust the base until the ladder
rests at the proper 4:1 ratio (75.5° working angle). This can acheived by following the
instructional diagram on the PROPER SETUP label on the ladder, or by checking the
Bubble Level on the right side rail of the ladder on select models. Also, always make
sure the ladder is level side-to-side before climbing by checking the Bubble Level at the
bottom of the ladder, as shown on page 6. Readjust ladder as necessary.
7. If accessing a roof or raised platform, erect ladder so that approximately 36" [91 cm]
extends above the roof line or working surface, and tie top at support points.
9
75.5°
2
3
4
1
1

H. Important Safety and Use Information
PROPER SELECTION
1. Select ladder of proper size to reach working height.
2. IMPORTANT: Ladders are designed to support one person plus materials and tools. Do not
apply more than the working load indicated on the notice label on the ladder.
INSPECTION
1. Inspect upon receipt and before each use; never climb a damaged, bent or broken ladder. All
parts must be in good working order.
2. Make sure all rivets, joints, nuts, and bolts are tight; rungs secure, ladder extension locks and
feet functioning; rope properly attached and in good condition.
3. Keep your ladder clean, free from grease, oil, mud, snow, wet paint, and other slippery
material. Keep your shoes clean; leather soles should not be used.
4. Never make temporary repairs of damaged or missing parts.
5. Destroy ladder and remove from service if broken, worn or if exposed to fire or chemical
corrosion.
PROPER SET UP
1. DANGER! METAL CONDUCTS ELECTRICITY! Do not let ladders of any material come in
contact with live electrical wires.
2. Secure base when raising extension and never set up ladder when it is extended.
3. Set a single or extension ladder at proper 75.5° angle by bracing ladder base a distance equal
to 1/4 total working length of ladder away from base of vertical support. If distance is less
than 36" [91 cm], place base of ladder a minimum of 36" [91 cm] from vertical support.
4. Set your ladder on firm ground. Do not lean sideways. Do not use on ice or snow or slippery
surfaces without non-skid devices or securing feet. Wear slip resistant shoes.
5. Erect ladder so that approximately 36" [91 cm] extends above roof line or working surface; tie
top at support points.
6. Extend top section only from ground, never by “bouncing” or from the roof.
7. Do not over-extend. Maintain a minimum overlap of 34" [86 cm] for ladders up to 32' [9.8 m],
and 58" [147 cm] for 40' [12.2 m] ladders.
8. Place on firm, level surface with a secure footing. Do not use on slippery surfaces. Do not
place on boxes, unstable bases or on scaffolds. Do not tie or fasten ladders together to gain
additional height.
9. Do not place in front of door opening toward ladder.
10. When possible use a second person to hold the ladder.
11. Follow all applicable local and federal safety codes and regulations.
12. If ladder is equipped with SUMOSTANCE outriggers, they must be deployed before climbing.
PROPER CLIMBING AND USE
1. DO NOT USE LADDERS if you tire easily, are subject to fainting spells, are using medicine or
alcohol, or are physically impaired.
2. To protect children, do not leave ladder set up and unattended.
3. Securely engage ladder locks before climbing. Check that top and bottom ends of ladder rails
are firmly supported.
4. Face the ladder when climbing up or down; keep body centered between side rails. Move
ladder as needed.
5. Maintain a firm grip. Use both hands while climbing.
6. Do not climb onto a ladder from the side unless the ladder is secured against side-wise
motion. Do not climb from one ladder to another.
7. Do not stand closer than 36" [91 cm] from the top. Never climb above the top support point.
8. Do not use ladder in high winds or storms.
9. Never use a ladder as a platform, plank or hoist. Never use ladder on a scaffold. Do not
overload. Extension ladders are meant for one person.
10. Keep your ladder close to your work; avoid over-reaching, pushing or pulling off to side of
ladder.
11. Never drop ladder or apply an impact load to ladder.
12. Do not “walk” or “shift” the ladder while standing on it.
13. Use extreme caution getting on and off the ladder.
10

PROPER CARE AND STORAGE
1. Hang your ladder on racks in a dry place at intervals of 6' [1.8 m] for support.
2. Properly secure and support your ladder while in transit.
3. Never store materials on your ladder.
4. Keep your ladder clean and free of all foreign materials.
5. To ensure smooth operation of the SUMOSTANCE outriggers use a dry lubricant (We
recommended DuPont
™
Teflon
®
, Tri-Flow
®
or B’laster
®
dry lubricants). Extend both
SUMOSTANCE outriggers, and spray the outside surface of the aluminum tracks; the
lubricant will dry in seconds. Wipe off all excess over spray with a dry clean cloth. Do not use
oil.
WARNING: KEEP ALL LADDER RUNGS, LADDER FEET, AND ALL STANDING SURFACES FREE
FROM ALL LUBRICANTS.
11
III. LITTLE GIANT
®
Warranty
Note: Different ladder models have different warranty periods. To find the duration of the
warranty for your particular ladder, please visit www.LittleGiantLadders.com/warranties or
contact our Customer Experience Team at 800-453-1192. You can register your product by going
online to www.LittleGiantLadders.com/registration.
LITTLE GIANT Warranty Terms and Conditions
Little Giant Ladder Systems warrants each new product to the original purchaser
thereof, to be free from defects in workmanship and materials when operated under
normal conditions and maintained properly. This warranty covers all parts of the
product, and shall be in lieu of any other warranty, expressed or implied, including, but
not limited to, any implied warranty of merchantability or fitness for a particular
purpose.
In the unlikely event that within the warranty period from the date of the original
purchase, there is a problem caused by defects in either workmanship or materials,
Little Giant Ladder Systems will repair or replace, at its option and without cost to the
original purchaser. All freight to and from the factory is to be paid by the customer. If a
replacement is necessary and your product is no longer available, a comparable
product will be substituted.
The liability of Little Giant Ladder Systems under this warranty shall be limited solely to
the repair or replacement of the product within the warranty period. Little Giant Ladder
Systems shall not be liable, under any circumstances, for consequential or incidental
damages, including, but not limited to, personal injury or labor costs. Some states do
not allow the exclusion of incidental or consequential damages, so the above
limitations or exclusions may not apply to you. This warranty gives you specific legal
rights, and you may have other rights which vary from state to state.
Under no circumstances will Little Giant Ladder Systems be responsible for any
expense in connection with any repairs made by anyone other than the factory or
authorized service provider unless such repairs have been specifically authorized in
writing by Little Giant Ladder Systems. This warranty applies only to North America.
Manufacturing specifications are subject to change without notice.

12
IV. Standards Compliance and Certifications
1. ANSI (American National Standards Institute)
a) All LITTLE GIANT
®
HYPERLITE
®
™ extension ladders are built and tested to meet or
exceed all applicable criteria of ANSI-ASC A14.5-2017 (fiberglass) standards, with the
exception of rung spacing, which complies with OSHA and international standards.*
* OSHA 1910.23, OSHA 1926.1053, EN 131-1, CSA Z11, AS/NZS 1892.2.6.2
2. OSHA (Occupational Safety and Health Administration)
a) All LITTLE GIANT
®
HYPERLITE
®
™ extension ladders are built and tested to meet or
exceed all applicable criteria of OSHA ladder standards 29 CFR 1910.23 and 29 CFR
1926.1053.
3. CSA (Canadian Standards Association)
a) All LITTLE GIANT
®
HYPERLITE
®
™
ladders are CSA certified. To view the full list of
certified products,visit www.LittleGiantLadders.com/csa.
V. Legal Notices
LITTLE GIANT, LITTLE GIANT LADDER SYSTEMS, HYPERLITE, CLIMB ON, and
SUMOSTANCE are registered trademarks of Wing Enterprises, Inc. in the United
States. LITTLE GIANT and SUMOSTANCE are registered in Canada. HYPERLITE and
SUMOSTANCE are registered in Mexico.
SURE-SET, QR SAFETY SCAN and PREVENTING INJURIES, SAVING LIVES are
trademarks of Wing Enterprises, Inc.
The American Ladder Institute logo is a registered trademark of the American Ladder
Institute.
DuPont and Teflon are trademarks or registered trademarks of E.I. du Pont de
Nemours and Company or its affiliates, Tri-Flow is a registered trademark of
Sherwin-Williams, and B’laster is a registered trademark of The B’laster Corporation.
Neither Little Giant Ladder Systems nor Wing Enterprises, Inc. are associated with E.I.
du Pont de Nemours and Company, Sherwin-Williams, The B’laster Corporation, or
their affiliates.
LITTLE GIANT
®
HYPERLITE
®
and SUMOSTANCE
®
ladders may be protected by one or
more U.S. or international patents, and/or may have additional patents pending. Visit
www.LittleGiantLadders.com/patents for details. This web page is provided in
compliance with the virtual patent marking provisions of the America Invents Act.

13
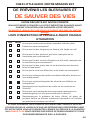
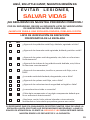
FOR YOUR SAFETY, GO THROUGH THE FOLLOWING INSPECTION
CHECKLIST BEFORE EACH USE.
NEVER CLIMB A DAMAGED, BENT, OR BROKEN LADDER!
Are any of the rungs loose, bent, cracked or missing?
Are any of the side rails cracked, bent, split or frayed?
Are any of the feet worn, broken, missing or not functioning
correctly?
Are any of the rung locks bent, broken, missing or not
functioning correctly?
Are any of the rivets, screws or bolts loose, broken or
missing?
Is the rope frayed, worn, broken or missing?
Are any of the pulleys loose, broken, or missing?
Are any of the safety labels unreadable or missing?
Is there any rust or corrosion on the ladder?
Are there any missing or damaged components not
mentioned above?
Is there any mud, oil, ice, wet paint or other slippery
substance on the ladder that could lead to a fall?
IF YOU ANSWERED YES TO ANY OF THESE POINTS, REMOVE THE
LADDER FROM SERVICE UNTIL THE NECESSARY REPAIRS HAVE BEEN
MADE. PLEASE CONTACT OUR CUSTOMER EXPERIENCE TEAM AT
800-453-1192 FOR REPLACEMENT PART AND WARRANTY INFORMATION.
YES NO
YOUR SAFETY IS OUR TOP PRIORITY!
HERE AT LITTLE GIANT, OUR MISSION IS
PREOPERATIONAL LADDER INSPECTION CHECKLIST

Apprendre à connaître votre nouvelle échelle
Little Giant
®
!
*Selon votre modèle d’échelle, ces éléments peuvent être inclus ou peuvent ne pas être inclus.
14
Bâtons d’appui SUMOSTANCE
®
*
Section supérieure
Verrous d’échelon
Niveau à bulle de
angle de travail*
(inclus sur certains modèles)
Niveau à bulle latéral
Pieds SURE-SET
™
en
instance de brevet*
(inclus sur certains modèles)
Section de la base
Corde pour extension
de l’échelle
(Non disponible sur modèle 16’)
®
signal d'échelon inférieur*
Jusqu'à 20% des blessures surviennent lorsque l'opérateur manque
accidentellement le barreau inférieur en descendant l'échelle, ce
qui entraîne souvent des blessures graves à la cheville, au genou et
au dos.
Le signal d'échelon inférieur GROUND CUE
®
(sur certains modèles),
en instance de brevet, permet à l'opérateur de ressentir et
d'entendre une alerte sonore lui rappelant qu'il est prudent de
descendre de l'échelle.
HYPERLITE
®
SUMOSTANCE
®
BALAYEZ LE CODE QR POUR
VISUALISER LA VIDÉO D'INSTRUCTION
ET SUR LA SÉCURITÉ
BALAYEZ LE CODE QR POUR
VISUALISER LA VIDÉO D'INSTRUCTION
ET SUR LA SÉCURITÉ

CORRECT INCORRECT
15
Instructions d’utilisation de l’échelle à extension LITTLE GIANT
®
HYPERLITE
®
et
SUMOSTANCE
®
.
I. Description - Échelle à extension LITTLE GIANT HYPERLITE et SUMOSTANCE
A. Unité d'extension de l’échelle - Se compose de deux éléments de base - une section de base de
l’échelle et une section supérieure d’échelle qui peut se prolonger sur la base.
1. Les verrous d’échelon sur la section supérieure permettent à l’échelle d’être ajustée
en hauteur. Ces verrous d’échelon se positionnent sur la section de la base de l’échelle,
permettant un ajustement en hauteur échelon par échelon.
B. Tableau de spécification du modèle
HYPERLITE:
Modèle Hauteur d’entreposage Longueur maximale de travail Niveau maximal de montée Porté maximale*
16' 2,64m [8pi 8po] 4,06m [13pi 4po] 2,87m [9pi 5po] 4,85m [15pi 11po]
20' 3,24m [10pi 8po] 5,26m [17pi 3po] 4,04m [13pi 3po] 6,02m [19pi 9po]
24' 3,84m [12pi 7po] 6,46m [21pi 2po] 5,20m [17pi 1po] 7,18m [23pi 7po]
28' 4,44m [14pi 7po] 7,66m [25pi 2po] 6,36m [20pi 10po] 8,34m [27pi 4po]
32' 5,04m [16pi 6po] 8,86m [29pi 1po] 7,54m [24pi 8po] 9,52m [31pi 3po]
36' 5,64m [18pi 6po] 9,46m [31pi 0po] 8,41m [27pi 7po] 10,39m [34pi 1 po]
40' 6,24m [20pi 6po] 10,66m [35pi 0po] 9,27m [30pi 5po]
11,25m [36pi 11po]
SUMOSTANCE:
Modèle Hauteur d’entreposage Longueur maximale de travail Niveau maximal de montée Porté maximale*
16' 2,64m [8pi 8po] 4,10m [13pi 5po] 2,90m [9pi 6po] 4,88m [16pi 0po]
20' 3,24m [10pi 8po] 5,30m [17pi 5po] 4,07m [13pi 4po] 6,05m [19pi 10po]
24' 3,84m [12pi 7po] 6,50m [21pi 4po] 5,23m [17pi 2po] 7,21m [23pi 8po]
28' 4,44m [14pi 7po] 7,70m [25pi 3po] 6,40m [21pi 0po] 8,38m [27pi 6po]
32' 5,04m [16pi 6po] 8,90m [29pi 2po] 7,57m [24pi 10po] 9,55m [31pi 4po]
36' 5,64m [18pi 6po] 9,50m [31pi 2po] 8,43m [27pi 8po] 10,41m [34pi 2po]
40' 6,24m [20pi 6po] 10,70m [35pi 1po] 9,31m [30pi 7po] 11,29m [37pi 0po]
*basé sur une personne de 1,68m [5pi 6po] avec une portée verticale de 30cm [12po].
II. Utiliser et ajuster l’échelle
A. La corde - Située du côté droit de l’échelle. Tirez sur celle-ci pour sortir la section supérieure de
l’échelle.
B. Les verrous d’échelon - Situés sur la partie inférieure de la section supérieure de l'échelle, ils
permettent de verrouiller l'échelle à la hauteur de travail désirée.
1. Pour augmenter la hauteur de l’échelle - Tirez sur la corde jusqu’à ce que l’échelle soit
à la hauteur désirée et que les verrous d’échelon soient bien positionnés sur l’échelon
de la section de la base. Relâchez la corde lentement et assurez-vous que les verrous
d’échelon sont correctement appuyés sur l’échelon, comme illustré ci-dessous:
2. Pour descendre l’échelle - Tirez sur la corde jusqu’à ce que les ressorts de verrou
d’échelon soient complètement par-dessus l’échelon de la base, puis commencé à
laisser la section supérieure descendre lentement jusqu’à ce qu’il soit à la hauteur
désirée, puis verrouillez à nouveau les verrous d’échelon comme décrit ci-dessus.

16
AVERTISSEMENT: ASSUREZ-VOUS TOUJOURS QUE LES DEUX VERROUS D’ÉCHELON SONT
COMPLÈTEMENT VERROUILLÉS AVANT DE GRIMPER DANS L’ÉCHELLE. OMETTRE DE LE FAIRE POURRAIT
ENTRAÎNER DES BLESSURES OU LA MORT.
C. Les pieds - Situés dans la partie inférieure de l’échelle. Ils peuvent être utilisés en position
horizontale (Fig. A) avec des pieds caoutchoutés antidérapants sur les surfaces dures ou en
position «pointe» «pique» (Fig. B) pour pénétrer les surfaces souples, comme la terre ou le
gazon. Pour ajuster les pieds à la position désirée, soulevez-les simplement du sol et pliez-les en
position à l’aide de vos orteils. Les pieds SURE-SET™ en instance de brevet, si elles sont équipées,
ont des ressorts pour aider à garder les pieds en position désirée tout en plaçant l’échelle.
AVERTISSEMENT: ASSUREZ-VOUS TOUJOURS QUE LES DEUX PIEDS SONT À LA MÊME
POSITION. N’UTILISEZ JAMAIS LA POSITION EN POINTE SUR LES SURFACES DURES
IMPÉNÉTRABLES. OMETTRE D’OBSERVER CES INSTRUCTIONS POURRAIT ENTRAÎNER DES
BLESSURES OU MÊME LA MORT.
1. Fentes pour clou - Les pieds possèdent des fentes à l’avant, ce qui vous permet de
clouer les pieds pour disposer d’une protection supplémentaire contre le glissement.
Ne frappez pas les pieds de votre échelle avec un marteau. Nous recommandons de
clouer les clous sans l’échelle et de glisser l’échelle en position.
D. Les niveaux à bulle - Situés dans le support de patte dans le bas de la section de la base sur
tous les modèles HYPERLITE et SUMOSTANCE, et à l'extérieur du montant de droite sur certains
modèles. Ils vous informent si l’échelle est au niveau d’un côté à l’autre à un angle de travail de
75,5º, respectivement.
AVERTISSEMENT: ASSUREZ-VOUS TOUJOURS QUE VOTRE ÉCHELLE EST AU NIVEAU D’UN CÔTÉ À L’AUTRE
AVANT DE GRIMPER. OMETTRE DE LE FAIRE POURRAIT ENTRAÎNER DES BLESSURES OU LA MORT.
A B
D’UN CÔTÉ À L'AUTRE ANGLE DE TRAVAIL*
* inclus sur certains modèles

17
E. Bâtons d’appui SUMOSTANCE
®
- Standard sur les modèles SUMOSTANCE, les bâtons d’appui
SUMOSTANCE offrent une largeur supplémentaire à la base de l’échelle pour augmenter la
stabilité, en plus d’avoir des niveaux intégrés, permettant à l'échelle d’être utilisées de manière
sécuritaire dans les zones inégales.
1. Utilisation des bâtons d’appui SUMOSTANCE - Le mécanisme de libération des
bâtons d'appui SUMOSTANCE est situé sur la partie supérieure des assemblages des
bâtons d'appui. Ils possèdent un mécanisme de sécurité sensible à la pression, qui
empêche qu’ils soient relâchés si quelqu’un est sur l’échelle.
a) Pour les déverrouiller, soulevez ou inclinez légèrement l’échelle pour
enlever la pression sur le pied situé du côté que vous ajustez, puis soulevez
le mécanisme avec vos doigts lorsqu’il se libère.
b) Pendant que vous tenez le mécanisme de libération en position
déverrouillée, appuyez vers le bas sur le boîtier de verrou et poussez le pied
de l’échelle vers l'extérieur avec votre orteil.
c) Lorsque les bâtons d’appui SUMOSTANCE sont à la position désirée, laissez
le mécanisme se libérer et déplacez le bloc de verrouillage jusqu’à ce que vous
sentiez qu’il est enclenché. Même lorsque vous l’utilisez sur une surface au
niveau, les bâtons d'appui SUMOSTANCE peuvent être prolongés à la première
position sous la position de rangement pour ajouter de la stabilité.
d) Pour éviter les blessures provoquées par les faux pas pendant que vous
descendez de l’échelle, il est hautement recommandé que les bâtons
d'appui SUMOSTANCE soient utilisés pour la mise au niveau seulement et
non pas pour augmenter la hauteur. Essayez de garder l’échelon du bas à
une hauteur approximative d’environ 30,5(12po) du sol et n’agrandissez
jamais complètement les deux bâtons d’appui SUMOSTANCE en même
temps. Lorsque vous mettez l’échelle au niveau, gardez un des bâtons
d’appui SUMOSTANCE à la première position, puis agrandissez l’autre
jusqu’à ce que l’échelle soit au niveau d’un côté à l’autre.
Position
d'entreposage
1re position
d’utilisation
Positions
d’utilisation
suggérées
Positions en
non-utilisation
NE MONTEZ PAS
DANS L’ÉCHELLE
SUMOSTANCE
SANS QUE LES
BÂTONS D’APPUI NE
SOIENT ENGAGÉS
12”
[30 cm]
>

F. Consignes de sécurité pour l'utilisation générale
AVERTISSEMENT: LITTLE GIANT LADDER SYSTEMS N’ASSUME AUCUNE RESPONSABILITÉ POUR LES
DOMMAGES OU BLESSURES ENCOURUS SI LES INSTRUCTIONS NE SONT PAS SUIVIES
CORRECTEMENT. LES ÉCHELLES ET LES HAUTEURS COMPORTENT CERTAINS DANGERS ET PEUVENT
ENTRAÎNER DES BLESSURES GRAVES OU LA MORT. VEUILLEZ SUIVRE LES PRÉCAUTIONS DE
SÉCURITÉ SUIVANTES:
1. Pour votre sécurité, les échelons doivent toujours être de niveau de l’avant à
l’arrière et d’un côté à l’autre. Confirmez avec les niveaux à bulle.
2. Afin d'éviter tout pincement, gardez les vêtements, les bijoux et les différentes
parties du corps éloignés de tous les mécanismes mobiles, incluant les verrous
d’échelon et les poulies ainsi que les échelons lors du télescopage de la partie
supérieure de l’échelle.
3. Faites preuve d'extrêmes précautions lorsque l’échelle est utilisée près de sources
d'électricité. Ne laissez pas les échelles, peu importe le matériel qui les compose,
toucher des circuits électriques sous alimentation.
4. Pour votre sécurité, ne dépassez jamais la limite de poids de l’échelle. Selon le
modèle, votre échelle est homologuée pour un des types d’homologation ANSI
suivants:
a) 375lb [170kg] - Service particulier de type IAA
b) 300lb [136kg] - Service très intensif de type IA
Cette information se retrouve sur l’étiquette d'avis accolé à l’échelle
5. Conservez tous les échelons de l’échelle, les pieds de l’échelle, les plateformes
ainsi que les autres surfaces d’appui et de prise, propres et libres de tous corps
étrangers (c.-à-d. boue, peinture, glace, huile, etc.).
6. Ne vous penchez pas trop sur les côtés de l'échelle et placez toujours les deux
pieds sur les échelons. En règle générale, le nombril devrait toujours être
positionné entre les barres latérales.
7. Inspectez le niveau d'usure des pieds de l’échelle et les remplacer, le cas échéant.
8. Lisez toutes les étiquettes sur l'échelle avant de l’utiliser. Remplacez les étiquettes,
si elles sont endommagées ou usées.
9. N'utilisez pas l'échelle lorsque les vents sont importants ou pendant une tempête.
10. Faites toujours face à l'échelle et utilisez les deux mains lorsque vous grimpez ou
descendez.
11. Inspectez l'échelle avant chaque utilisation. Ne montez jamais sur une échelle
cassée, inclinée ou endommagée. Si vous devez remplacer des pièces, veuillez
contacter notre équipe de service à la clientèle au 800-453-1192. Si l’échelle ne
peut être réparée, détruisez-la et mettez-la hors service.
12. Ne passez pas beaucoup de temps sur un escabeau sans prendre de pauses
fréquentes.
13. Enlevez les bagues et les bijoux, et portez des chaussures antidérapantes robustes
lorsque vous montez dans l’échelle.
14. Pour vous aider à transporter l’échelle, prenez-là au
point d’appui équilibré qui est marqué de ce symbole :
18
Pour obtenir une formation supplémentaire en matière de
sécurité, visitez le www.laddersafety.org
MEMBRE ALI

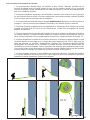
G. Instructions d’installation de l’échelle
1. En positionnant l’échelle dans sa position la plus courte, déposez l’échelle sur la
section à grimper avec les pieds contre un mur ou une surface solide. S'il n'y a pas de
mur ou de surface solide, demandez à une autre personne de retenir les pieds pendant
que vous soulevez l'échelle.
2. Soulevez l'extrémité supérieure de l'échelle et avancez d'un échelon à la fois jusqu'à
ce que l'échelle soit verticale. Si vous travaillez sur une surface solide, inclinez l’échelle
sur la surface afin de permettre de la stabiliser.
3. Si votre échelle possède des bâtons d’appui SUMOSTANCE, déployez-les comme illustré à
la page 17, tout en positionnant solidement l’échelle et afin d’éviter qu’elle ne bascule.
4. Soulevez l'échelle et déplacez-la tranquillement en l’éloignant de la surface de travail
jusqu’à ce qu’elle soit à environ à une distance de 1/4 de fois la longueur de travail
planifié de l’échelle.
5. Tout en conservant le contrôle de l'échelle, tirez sur la corde pour rallonger l’échelle à
la hauteur désirée. Lorsque l'échelle atteint la hauteur désirée, assurez-vous que les
deux verrous d'échelon sont complètement enclenchés, comme illustrée à la page 15.
6. Inclinez lentement l’échelle sur la surface de travail, et ajustez la base jusqu’à ce que
l’échelle repose au bon rapport 4:1 (angle de travail approprié de 75,5°). Cela peut se
faire en suivant le schéma d'instructions figurant sur l'étiquette INSTALLATION
APPROPIÉE de l'échelle ou en vérifiant le niveau de bulle sur le rail latéral droit de
l'échelle sur certains modèles. Aussi, assurez-vous toujours que l’échelle est au niveau
d’un côté à l’autre avant de grimper en vérifiant le niveau à bulle dans le bas de l’échelle
comme illustré à la page 16. Ajustez à nouveau l’échelle si nécessaire.
7. Si vous accédez à un toit ou une plateforme surélevée, déployez l’échelle de manière
à ce qu’elle dépasse d’environ 36 po [91 cm] la ligne du toit ou la surface de travail et
attachez la partie supérieure à des points d'appui.
19
75,5°
2
3
4
1
1

H. Importante information d’utilisation et de sécurité
SÉLECTION APPROPRIÉE
1. Sélectionnez une échelle d'une taille appropriée selon la hauteur du travail à atteindre.
2. IMPORTANT: Les échelles sont conçues pour supporter une personne avec les équipements
et les outils. Ne pas appliquer une charge de travail plus élevé que celle indiquée sur
l’étiquette d'avis accolé à l'échelle.
INSPECTION
1. Inspectez l'échelle lors de sa réception et avant chaque utilisation; ne montez jamais sur une échelle
endommagée, pliée ou brisée. Toutes les pièces doivent être en bon état de fonctionnement.
2. Assurez-vous que tous les rivets, joints, écrous et boulons sont bien serrés, que les échelons
sont solides, que la rallonge se verrouille bien et que les pieds sont fonctionnels, que la corde
est bien attachée et en bon état.
3. Gardez votre échelle propre et libre de peinture fraîche, de boue, de neige, de graisse, d'huile
et de tout autre produit glissant. Gardez vos souliers propres; les semelles de cuir ne
devraient pas être utilisées.
4. N'effectuez jamais de réparations provisoires sur les pièces endommagées ou manquantes.
5. Détruisez l'échelle et ne l'utilisez plus si celle-ci est brisée, usée ou qu'elle a été exposée à un
incendie ou de la corrosion chimique.
INSTALLATION APPROPRIÉE
1. DANGER! LE MÉTAL CONDUIT L'ÉLECTRICITÉ! Ne laissez pas les échelles, peu importe le
matériel qui les compose, entrer en contact avec des fils électriques sous alimentation.
2. Fixez la base lorsque vous déployez la rallonge et n'installez jamais l'échelle lorsque celle-ci
est déployée.
3. Placez l'échelle simple ou déployée à un angle de 75,5° en positionnant la base de l'échelle à
une distance égale au 1/4 de la longueur totale de l'échelle par rapport au support vertical. Si
la distance est inférieure à 91cm (36po), placez la base de l'échelle à un minimum de 91cm
(36po) par rapport au support vertical.
4. Placez votre échelle sur une surface solide. Ne vous penchez pas de chaque côté. Ne l'utilisez
pas sur de la glace, de la neige ou des surfaces glissantes sans utiliser de dispositifs
antidérapants ou sans fixer solidement les pattes au sol. Portez des chaussures antidérapantes.
5. Déployez l'échelle afin que celle-ci dépasse d'environ 91cm (36po) au-dessus du toit ou de la
surface de travail; fixez la partie du haut aux points d'appui.
6. Déployez la section du haut seulement à partir du sol, jamais en la faisant «sauter» ou à
partir du toit.
7. N'essayez pas de vous allonger excessivement. Maintenez un chevauchement de 86cm [34po]
pour les échelles de plus de 9,8m [32pi] et 147cm [58po] pour les échelles de 12,2m [40pi].
8. Placez sur une surface ferme et au niveau avec un bon appui au sol. N'utilisez pas l'échelle
sur des surfaces glissantes. Ne la placez pas sur des boîtes, des bases instables ou sur un
échafaud. N'attachez pas deux échelles ensemble pour obtenir une échelle plus longue.
9. Ne placez pas l'échelle devant une ouverture de porte en direction de l'échelle.
10. Lorsque cela est possible, demandez à une autre personne de tenir l'échelle.
11. Suivez tous les codes et règlements relatifs à la sécurité qui sont applicables au niveau
régional et fédéral.
12. Si l'échelle est pourvue de bâtons d'appui SUMOSTANCE, ceux-ci doivent être déployés avant
de monter sur l'échelle.
UTILISATION ET MONTÉE DE FAÇON APPROPRIÉE
1. N'UTILISEZ PAS D’ÉCHELLES si vous fatiguez facilement, que vous êtes sujet(te) à des
évanouissements, que vous prenez des médicaments ou que vous prenez de l'alcool ou que
vous êtes handicapé(e).
2. Afin de protéger les enfants, veuillez ne pas laisser l'échelle en place et sans surveillance.
3. Engagez de manière sécuritaire les verrous avant de monter. Vérifiez que les extrémités
supérieures et inférieures des barres latérales de l'échelle sont bien appuyées.
4. Faites face à l'échelle lorsque vous montez ou descendez; conservez votre corps centré entre
les deux rampes. Déplacez l'échelle si nécessaire.
5. Maintenez une bonne prise. Utilisez vos deux mains pour monter.
6. Ne montez pas sur une échelle à partir du côté à moins que l'échelle ne soit sécurisée afin
d’empêcher les mouvements latéraux. Ne passez pas d'une échelle à une autre.
7. NE MONTEZ PAS PLUS HAUT QU’À 91cm (36po) DU HAUT. Ne montez jamais au-dessus de
la partie supérieure du point de support.
8. N'utilisez pas l'échelle lorsque les vents sont importants ou pendant une tempête.
9. N'utilisez jamais d'échelle comme plateforme, planche ou palan. N'utilisez jamais l'échelle sur un
échafaudage. Ne surchargez pas l'échelle. Les échelles à rallonge sont conçues pour une personne.
10. Conservez votre échelle près de votre travail; évitez de vous pencher, de pousser ou tirez sur
le côté de l'échelle pour atteindre votre travail.
11. Ne laissez jamais laisser tomber ou n'appliquez jamais une charge d'impact sur l'échelle.
12. Ne «déplacez» ou «glissez» jamais une échelle pendant que vous êtes sur celle-ci.
13. Prenez toutes les précautions nécessaires pour monter et descendre de l'échelle.
20
La page est en cours de chargement...
La page est en cours de chargement...
La page est en cours de chargement...
La page est en cours de chargement...
La page est en cours de chargement...
La page est en cours de chargement...
La page est en cours de chargement...
La page est en cours de chargement...
La page est en cours de chargement...
La page est en cours de chargement...
La page est en cours de chargement...
La page est en cours de chargement...
La page est en cours de chargement...
La page est en cours de chargement...
-
 1
1
-
 2
2
-
 3
3
-
 4
4
-
 5
5
-
 6
6
-
 7
7
-
 8
8
-
 9
9
-
 10
10
-
 11
11
-
 12
12
-
 13
13
-
 14
14
-
 15
15
-
 16
16
-
 17
17
-
 18
18
-
 19
19
-
 20
20
-
 21
21
-
 22
22
-
 23
23
-
 24
24
-
 25
25
-
 26
26
-
 27
27
-
 28
28
-
 29
29
-
 30
30
-
 31
31
-
 32
32
-
 33
33
-
 34
34


Little Giant Ladders 17220 Manuel utilisateur
- Taper
- Manuel utilisateur
dans d''autres langues
Documents connexes


Autres documents
-
 MetalTech E-MTL7100AL Mode d'emploi
-
 Ladder Lockdown LLD-RES-001 Manuel utilisateur
-
Brennenstuhl 1420350 spécification
-
 Telesteps 14ES Mode d'emploi
-
Mac Allister Échelle coulissante à corde 6.55 m Manuel utilisateur
-
Power Fist 8690638 Le manuel du propriétaire
-
 Telescopic Access TP001 Guide d'installation


