Ryobi P1104 Manuel utilisateur
- Catégorie
- Tondeuses à gazon
- Taper
- Manuel utilisateur
Ce manuel convient également à

OPERATOR’S MANUAL
MANUEL D’UTILISATION
MANUAL DEL OPERADOR
13 in., 18 VOLT LAWN MOWER
13 po, TONDEUSE 18 V
13 pulg., PODADORA 18 V
P1104
WARNING: To reduce the
risk of injury, the user must read and
understand the operator’s manual
before using this product.
TABLE OF CONTENTS
Important Safety Instructions .......... 2-3
Symbols .......................................... 4-5
Features ..............................................5
Assembly ........................................ 6-7
Operation ........................................ 8-9
Maintenance ................................. 9-10
Troubleshooting ................................11
Parts Ordering/Service ........ Back Page
AVERTISSEMENT : Pour
réduire les risques de blessures,
l’utilisateur doit lire et veiller à bien
comprendre le manuel d’utilisation
avant d’employer ce produit.
TABLE DES MATIÈRES
Instructions importantes
concernant la sécurité..................... 2-3
Symboles ........................................ 4-5
Caractéristiques ..................................5
Assemblage .................................... 6-7
Utilisation ........................................ 8-9
Entretien ........................................ 9-10
Dépannage ........................................ 11
Commande de pièces /
réparation .......................... Páge arrière
ADVERTENCIA: Para reducir
el riesgo de lesiones, el usuario debe
leer y comprender el manual del
operador antes de usar este producto.
ÍNDICE DE CONTENIDO
Instrucciones de seguridad
importantes ..................................... 2-3
Símbolos ......................................... 4-5
Características ....................................5
Armado ........................................... 6-7
Funcionamiento .............................. 8-9
Mantenimiento .............................. 9-10
Correción de problemas ...................11
Pedidos de piezas/
servicio ........................... Pág. posterior
SAVE THIS MANUAL FOR
FUTURE REFERENCE
CONSERVER CE MANUEL
POUR FUTURE RÉFÉRENCE
GUARDE ESTE MANUAL
PARA FUTURAS CONSULTAS

ii
See this fold-out section for all of the figures
referenced in the operator’s manual.
Consulter l’encart à volets afin d’examiner toutes
les figures mentionnées dans le manuel d’utilisation.
Consulte esta sección desplegable para ver todas
las figuras a las que se hace referencia en el manual del operador.
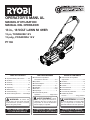
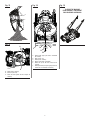
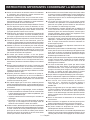
Fig. 1
A - Carrying/lifting handle (poignée de transport/soulèvement, mango de
transporte/elevación)
B - Mulching plug (insert broyeur, tapón para trituración)
C - Battery cover (couvercle des piles, tapa de las baterías)
D - Height adjustment lever (levier de réglage de la hauteur, palanca de
ajuste de altura)
E - Lower handle lock button (bouton de verrouillage pour la poignée
inférieure, botón del seguro para el mango inferior)
F - Lower handle (poignée inférieure, mango inferior)
G - Upper handle lock knobs (bouton de verrou de la poignée supérieure,
perillas del seguro del mango superior)
H - Upper handle (poignée supérieure, mango superior)
I - Bail (anse, asa)
J - Start button (bouton de démarrage, botón de arranque)
K - Grass catcher (collecteur d’herbe, receptor de hierba)
L - Start key (clé de démarrage, llave del arranque)
K
B
C
F
H
I
J
G
A
E
D
L
I

iii
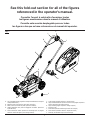
A - Lower handle (poignée inférieure, mango
inferior)
B - Lower handle lock button (bouton de verrou
de la poignée inférieure, botón del seguro
del mango inferior)
C - Mounting hole (trou de montage, orificio de
montaje)
D - Starter cable (câble de démarreur, cable del
arrancador)
E - Notches (encoches, muescas)
A
B
E
D
Fig. 2 Fig. 3
A - Lower handle (poignée inférieure, mango
inferior)
B - Upper handle assembly (ensemble de
poignée supérieure, conjunto del mango
superior)
C - Lock bolt (boulon de verrouillage, perno de
fijación)
D - Upper handle lock knob (bouton de verrou
de la poignée supérieure, perilla del seguro
del mango superior)
A
B
D
C
C
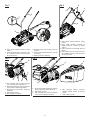
Fig. 4
A
C
A - Rear discharge door (couvercle d’éjection
arrière, puerta de descarga posterior)
B - Rear discharge opening (ouverture d’éjection
arrière, abertura de descarga posterio)
C - Mulching plug (insert broyeur, tapón para
trituración)
D - Slots ( fentes, ranuras)
E - Tabs (languettes, lengüetas)
B
A - Grass catcher handle (poignée de collecteur
d’herbe, mango del receptor de hierba)
B - Slots (fentes, ranuras)
C - Rear discharge door (couvercle d’éjection
arrière, puerta de descarga posterior)
Fig. 5
A
B
C
D
E
B
D - Rear discharge opening (ouverture
d’éjection latérale, abertura de descarga
lateral)
E - Hook (crochet, gancho)
C
D
E
E
D

iv
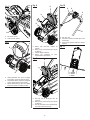
Fig. 9
A - Start key (clé de démarrage, llave del
arranque)
B - Battery cover (couvercle des piles, tapa de
las baterías)
C - Start key slot (fente de la clé de démarrage,
ranura de la llave del arranque)
A - Battery pack (bloc-piles, paquete de
baterías)
B - Battery cover (couvercle des piles, tapa de
las baterías)
C - Latches (loquets, pestillos)
D - Battery port (logement de piles,
compartimiento de la batería)
Fig. 7
A - Height adjustment lever (levier de réglage
de la hauteur, palanca de ajuste de altura)
B - Lowest blade setting (le plus bas réglage de
la lame, ajuste más bajo de la cuchilla)
C - Highest blade setting (le plus haut réglage
de la lame, ajustes de cuchilla más alto)
Fig. 11
A - Bail (anse, asa)
B - Start button (bouton de démarrage, botón
de arranque)
C - Upper handle (poignée supérieure, mango
superior)
Fig. 6
Fig. 8 Fig. 10
A - Slot (fente, ranura)
B - Hook (crochet, gancho)
A
B
C
15° MAXIMUM
15° MAXIMAL
15° MÁXIMA
A
A
B
C
A
D
B
B
C
C
A
C
B
A

v
Fig. 13
A - Blade (lame, cuchilla)
B - Wrench (clé, llave)
C - Block of wood (pièce de bois, bloque de
madera)
A
B
C
Fig. 12
Fig. 14
A - Blade posts (tiges pour lame, montantes
de cuchilla)
B - Shaft (arbre, eje)
C - Blade (lame, cuchilla)
D - Spacer (entretoise, separador)
E - Blade nut (écrou de lame, tuerca de la
cuchilla)
F - Blade post hole (trou pour tiges pour lame,
orificio de la montantes de cuchilla)
A
A
F
C
B
E
D
F
Fig. 15
TO STORE THE MACHINE
POUR REMISER L’ÉQUIPEMENT
PARA GUARDAR LA MÁQUINA

2 — English
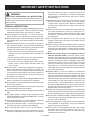
WARNING:
READ AND UNDERSTAND ALL INSTRUCTIONS.
Failure to follow all instructions listed below and on the
machine may result in electric shock, fire, and/or serious
personal injury.
READ ALL INSTRUCTIONS
This cutting machine is capable of amputating hands and
feet and throwing objects. Failure to observe all safety
instructions could result in serious injury or death.
Avoid dangerous environment - Do not use the lawn
mower in damp or wet conditions or operate in the rain.
Keep children away - Keep all bystanders, children, and
pets at least 100 ft. away. Stop machine if anyone enters
the area.
Tragic accidents can occur if the operator is not alert to
the presence of children. Children are often attracted to
the machine and the mowing activity. Never assume that
children will remain where you last saw them.
• Keep children out of the mowing area and under the
watchful care of a responsible adult other than the
operator.
• Be alert and turn mower off if a child enters the area.
• Never allow children to operate the machine.
• Use extra care when approaching blind corners,
shrubs, trees, or other objects that may block your
view of a child.
Dress properly - Wear heavy, long pants, long sleeves,
gloves, and protective footwear that will protect your
feet and improve your footing on slippery surfaces. Do
not wear loose fitting clothing, short pants, sandals, or
go barefoot. Do not wear jewelry of any kind. They can
be caught in moving parts.
Don’t overreach - Keep proper footing and balance at all
times. Overreaching can result in loss of balance.
Do not leave the mower unattended while running or with
the start key installed.
Keep hands and feet away from cutting area. Keep clear
of the discharge opening at all times.
Operate the lawn mower only in daylight or good artificial
light.
Use safety glasses - Always wear eye protection with
side shields marked to comply with ANSI Z87.1. Use face
mask if operation is dusty.
Use the right appliance - Do not use the lawn mower for
any job except that for which it is intended.
Do not force the lawn mower - It will do the job better
and safer at the rate for which it was designed.
Do not charge lawn mower in rain, or in wet locations.
Stay alert - Watch what you are doing and use common
sense when operating the lawn mower. Do not operate
the mower while tired, upset, or under the influence of
drugs, alcohol, or medication. A moment of inattention
while operating the lawn mower may result in serious
personal injury.
Maintain lawn mower with care - Keep machine in good
working condition. Keep blades sharp and guards
in place and in working order. Replace damaged or
unevenly worn blades before using mower for best
performance.
Check all nuts, bolts, and screws at frequent intervals
for proper tightness to be sure the equipment is in
safe working condition. Mower blades are sharp. Wrap
the blade or wear gloves, and use extra caution when
servicing them.
Do not dispose of the battery in a fire. The cell may
explode. Check with local codes for possible special
disposal instructions.
Stop the motor, wait until the blade comes to a complete
stop, and remove the start key and battery pack before
performing any maintenance, cleaning the lawn mower,
removing the grass catcher, or removing the mulching
plug.
Never use a hose, water, or any liquids to clean or
rinse off the lawn mower. Corrosive liquids, water,
fertilizers, and chemicals used to treat lawns can enter
the lawn mower and/or battery compartment and damage
electronic components and/or the battery pack, which
can result in a short circuit, increased risk of fire, and
serious personal injury. Remove any buildup of grass
and leaves on or around the mower housing and/or
underneath the mower deck. Wipe the mower clean with
a dry cloth occasionally.
Replace blade if it is bent or cracked. An unbalanced
blade causes vibration that could damage the motor
drive unit or cause personal injury. Sharpen a dull blade
equally at each end to maintain the balance. Clean the
blade thoroughly and check its balance by supporting
it horizontally on a thin nail through its center hole. The
nail should be in a horizontal position. If either end of
the blade rotates downward, remove some metal from
the heavy of lower end until the blade is balanced. It is
balanced when neither end drops.
Always use safety protective devices. Do not operate the
mower without the entire grass catcher or mulching plug
and rear discharge door in place and working properly.
Do not open or mutilate the battery. Released electrolyte
is corrosive and may cause damage to the eyes or skin.
It may be toxic if swallowed.
Follow manufacturer’s instructions for proper operation
and installation of accessories. Only use accessories
approved by the manufacturer.
Exercise care in handling batteries in order not to short
the battery with conducting materials such as rings,
bracelets, and keys. The battery or conductor may
overheat and cause burns.
IMPORTANT SAFETY INSTRUCTIONS

3 — English
IMPORTANT SAFETY INSTRUCTIONS
Clear the work area before each use. Remove all objects
such as rocks, sticks, tree nuts, metal, wire, bones, toys,
or other objects which can be thrown by the blade.Stay
behind the handle when the motor is running.
Avoid holes, ruts, bumps, rocks, property stakes, or other
hidden objects. Uneven terrain could cause a slip and
fall accident.
Do not mow near drop-offs, ditches, or embankments.
Mow across the face of slopes, never up and down.
Exercise extreme caution when changing direction on
slopes.
Plan your mowing pattern to avoid discharge of material
toward roads, sidewalks, bystanders and the like. Also,
avoid discharging material against a wall or obstruction,
which may cause the material to ricochet back toward
the operator.
Do not mow on wet grass or excessively steep slopes.
Poor footing could cause a slip and fall accident. Walk,
never run.
Use extra care when approaching blind corners, shrubs,
trees, or other objects that may block your view.
Do not pull the mower backward unless absolutely
necessary. If you must back the mower away from a
wall or obstruction, first look down and behind to avoid
tripping or pulling the mower over your feet.
Never direct discharged material toward anyone. Avoid
discharging material against a wall or obstruction.
Material may ricochet back toward the operator. Stop
the blade when crossing gravel surfaces.
Objects struck by the lawn mower blade can cause
severe injuries to persons. The lawn should always be
carefully examined and cleared of all objects prior to
each mowing.
If the lawn mower strikes a foreign object, follow these
steps:
• Stop the lawn mower by releasing the blade control
lever, wait until the blade comes to a complete stop,
and then remove start key.
• Thoroughly inspect the mower for any damage.
• Replace the blade if it is damaged in any way. Repair
any damage before restarting and continuing to oper-
ate the mower.
Stop the motor, wait until the blade comes to a complete
stop, and remove start key before unclogging the chute.
The cutting blade continues to rotate for a few seconds
after the motor is shut off. Never place any part of the
body in the blade area until you are sure the blade has
stopped rotating.
If the mower should start to vibrate abnormally, stop the
motor and check immediately for the cause. Replace
the blade if it is unevenly worn or damaged in any way.
Vibration is generally a warning of trouble.
Service on the product must be performed by qualified
repair personnel only. Service or maintenance performed
by unqualified personnel could result in injury to the user
or damage to the product.
The grass catcher assembly is subject to deterioration
and wear and should be checked each time the mower is
used. If replacement is needed, make sure the new grass
catcher meets original manufacturer’s recommendations
and specifications.
Use only authorized replacement parts when servicing
the product. Use identical replacement blades only. Use
of unauthorized parts may create a risk of serious injury
to the user, or damage to the product.
Maintain or replace safety instructions labels, as
necessary.
Disconnect battery and remove start key- Disconnect
battery pack and remove start key from the appliance
before storing, servicing, or changing accessories such
as blades. Such preventive safety measures reduce the
risk of starting the tool accidentally.
Stop the unit and disconnect battery pack and start key
when not in use. Carry or push the unit with the motor
stopped and the start key removed from the mower.
Battery tools do not have to be plugged into an electrical
outlet; therefore, they are always in operating condition.
Be aware of possible hazards when not using your battery
tool or when changing accessories. Following this rule will
reduce the risk of electric shock, fire, or serious personal
injury.
Do not use battery-operated appliance in rain.
Remove or disconnect battery before servicing, cleaning
or removing material from the gardening appliance.
Use battery only with charger listed. For use with 18V
nickel-cadmium and lithium-ion battery packs. See Tool/
Appliance/Battery Pack/Charger Correlation Supplement
987000-432
.
Store idle lawn mower indoors - When not in use, mower
should be stored indoors in a dry, locked place out of the
reach of children. The start key and battery packs should
also be removed and stored in a separate location out of
the reach of children.
Follow instructions for lubricating and changing
accessories.
Only allow responsible adults, who are familiar with the
instructions, to operate this machine.
Never operate machine in a closed area.
Never tamper with safety devices. Check for proper
operation regularly.
Save these instructions. Refer to them frequently and
use them to instruct others who may use this product. If
you loan someone this tool, loan them these instructions
also.

4 — English
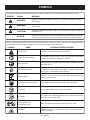
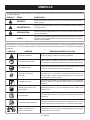
Some of the following symbols may be used on this product. Please study them and learn their meaning. Proper
interpretation of these symbols will allow you to operate the product better and safer.
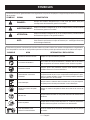
SYMBOL NAME DESIGNATION/EXPLANATION
Safety Alert Indicates a potential personal injury hazard.
Read Operator’s Manual
To reduce the risk of injury, user must read and understand
operator’s manual before using this product.
Eye Protection
Always wear eye protection with side shields marked to comply
with ANSI Z87.1.
Wet Conditions Alert
Risk of fire and burns. Do not expose battery, battery compartment,
or electronic components to rain, water, or liquids. Close cover
during use. Do not operate on wet ground.
Electric Shock
Failure to use in dry conditions and to observe safe practices can
result in electric shock.
Keep Hands and Feet Away Keep hands and feet away from blade and cutting area.
No Reach Do not reach hands or feet under mower deck.
MAX 15˚
No Slope
Do not operate on inclines greater than 15º. Mow across the face
of slopes, never up and down.
Keep Children and
Bystanders Away
Keep all children and bystanders at least 100 ft. away.
Ricochet
Thrown objects can ricochet and result in personal injury or
property damage.
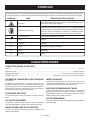
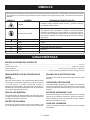
The following signal words and meanings are intended to explain the levels of risk associated with this product.
SYMBOL SIGNAL MEANING
DANGER:
Indicates a hazardous situation, which, if not avoided, will result in death or
serious injury.
WARNING:
Indicates a hazardous situation, which, if not avoided, could result in death or
serious injury.
CAUTION:
Indicates a hazardous situation, that, if not avoided, may result in minor or
moderate injury.
NOTICE:
(Without Safety Alert Symbol) Indicates information considered important, but
not related to a potential injury (e.g. messages relating to property damage).
SYMBOLS

5 — English
Some of the following symbols may be used on this product. Please study them and learn their meaning. Proper
interpretation of these symbols will allow you to operate the product better and safer.
SYMBOL NAME DESIGNATION/EXPLANATION
Recycle Symbol
This product uses lithium-ion (Li-ion) batteries. Local, state, or
federal laws may prohibit disposal of batteries in ordinary trash.
Consult your local waste authority for information regarding
available recycling and/or disposal options.
Direct Current Type or a characteristic of current
V Volts Voltage
A Amperes Current
Hz Hertz Frequency (cycles per second)
W Watt Power
hrs Hours Time
SYMBOLS
FEATURES
KNOW YOUR LAWN MOWER
See Figure 1.
The safe use of this product requires an understanding of the
information on the product and in this operator’s manual as
well as a knowledge of the project you are attempting. Before
use of this product, familiarize yourself with all operating
features and safety rules.
BATTERY COVER
The battery cover protects the battery port from moisture
and debris.
GRASS CATCHER
The grass catcher collects grass clippings and prevents
them from being discharged across your lawn as you mow.
HEIGHT ADJUSTMENT LEVER
The height adjustment lever provides cutting height
adjustments.
MULCHING PLUG
Your mower is equipped with a mulching plug that covers
the rear discharge opening, which allows the mower blade
to cut and recut for finer clippings.
START BUTTON AND BAIL
The start button and bail are located on the upper handle of
the mower. Depress the start button then engage the bail to
start the motor. Release the bail to stop the motor.
START KEY
The start key must be inserted before the mower can be
started.
PRODUCT SPECIFICATIONS
Motor ...................................................................................................................................................................... 18 Volt DC
Cutting Path ................................................................................................................................................................... 13 in.
Height Adjustments .................................................................................................................................... 1.38 in. to 2.96 in.
Wheel Size .............................................................................................................................................5.5 in. front, 7 in. rear

6 — English
ASSEMBLY
UNPACKING
This product requires assembly.
Carefully remove the product and any accessories from
the box. Make sure that all items listed in the Packing
List are included.
WARNING:
Do not use this product if any parts in the Packing List
are already assembled to your product when you unpack
it. Parts on this list are not assembled to the product by
the manufacturer and require customer installation. Use
of a product that may have been improperly assembled
could result in serious personal injury.
Inspect the product carefully to make sure no breakage
or damage occurred during shipping.
Do not discard the packing material until you have
carefully inspected and satisfactorily operated the
product.
If any parts are damaged or missing, please call
1-800-860-4050 for assistance.
PACKING LIST
Lawn Mower
Upper Handle Assembly
Upper Handle Lock Knobs (2)
Upper Handle Bolts (2)
Lower Handles (2)
Start Key
Mulching Plug
Grass Catcher
Operator’s Manual
WARNING:
If any parts are damaged or missing, do not operate this
product until the parts are replaced. Use of this product
with damaged or missing parts could result in serious
personal injury.
WARNING:
Do not attempt to modify this product or create
accessories not recommended for use with this product.
Any such alteration or modification is misuse and could
result in a hazardous condition leading to possible serious
personal injury.
WARNING:
Do not insert start key or battery pack until assembly is
complete and you are ready to mow. Failure to comply
could result in accidental starting and possible serious
personal injury.
WARNING:
To prevent accidental starting, do not make any
adjustments or installations with the start key or battery
pack inserted. Accidental starting of the mower during
assembly could result in serious personal injury.
WARNING:
Never operate the mower without the proper safety
devices in place and working. Never operate the mower
with damaged safety devices. Operating the mower with
missing or damaged parts can result in serious personal
injury.
INSTALLING AND ADJUSTING HANDLE
ASSEMBLY
See Figures 2 - 3.
To install lower handles:
Insert the lower handle into the mounting hole on the deck
as shown.
Depress the lock button at the rear of the mounting hole
to allow the handle to slide into position.
NOTE: There are three height position notches that can
be adjusted by depressing the lock button and raising or
lowering the handle to the desired position.
Release the lock button to secure lower handle in place.
Repeat for other lower handle.
To install upper handle assembly:
Position the upper handle as shown and insert the bolt
through the matching holes at the bottom of the upper
handle and the top of the lower handle.
NOTE: The lower handle has two hole settings for height
adjustment. Make sure you use the same height setting
for each side.
Thread the upper handle lock knob onto the bolt.
Repeat for other side.
Pull up on the upper handle to raise it into operating po-
sition. Make sure that the upper handle is seated in the
grooves at the top of the lower handle.

7 — English
ASSEMBLY
NOTICE:
Do not allow the starter cable to become pinched or
trapped when raising the handle.
To secure the upper handle in place, tighten the upper
handle lock knobs.
NOTE: If the upper handle is loose or separated from the
lower handle, tighten the lock knobs on the upper handle
by turning them clockwise.
To lower the handle assembly:
Loosen the upper handle lock knobs by turning them
counterclockwise.
Lower the upper handle. Avoid pinching or trapping any
cables.
INSTALLING THE MULCHING PLUG
(FOR MULCHING OPERATION)
See Figure 4.
NOTE: When using the mulching plug, do not install the
grass catcher.
Remove start key and battery pack.
Lift and hold the rear discharge door.
Grasp the mulching plug by its handle and insert it at a
slight angle, as shown.
Push the mulching plug securely into place. The tabs on
the mulching plug should be seated in the slots at the
bottom of the rear discharge opening, and the slot on the
mulching plug should go over the tab in the center of the
discharge opening.
Lower the rear discharge door.
Reinstall start key and battery pack when you are ready
to mow.
INSTALLING THE GRASS CATCHER (FOR
REAR BAGGING OPERATION)
See Figures 5 - 6.
NOTE: When using the grass catcher, do not install the
mulching plug.
Remove start key and battery pack.
Lift the rear discharge door.
Lift the grass catcher by its handle and place under the
rear discharge door so that the hooks on the grass catcher
are seated onto the slots on the mower housing.
Release the rear discharge door.
Reinstall start key and battery pack when you are ready
to mow.
SETTING BLADE HEIGHT
See Figure 7.
When shipped, the wheels on the mower are set to a low-
cutting position. Before using the mower for the first time,
raise the cutting position to the height best suited for your
lawn. The average lawn should be between 1-1/2 in. to 2 in.
during cool months and between 2 in. and 3-1/4 in. during
hot months.
To adjust the blade height:
Remove start key and battery pack.
To raise the blade height, grasp the height adjustment
lever and pull it out toward the wheel, then move it toward
the back of the mower.
To lower the blade height, grasp the height adjustment
lever and pull it out toward the wheel, then move it toward
the front of the mower.
Reinstall start key and battery pack when you are ready
to mow.

8 — English
WARNING:
Do not allow familiarity with products to make you
careless. Remember that a careless fraction of a second
is sufficient to inflict serious injury.
WARNING:
Always wear eye protection with side shields marked to
comply with ANSI Z87.1. Failure to do so could result in
objects being thrown into your eyes resulting in possible
serious injury.
WARNING:
Do not use any attachments or accessories not
recommended by the manufacturer of this product. The
use of attachments or accessories not recommended
can result in serious personal injury.
NOTICE:
Before each use, inspect the entire product for damaged,
missing, or loose parts such as screws, nuts, bolts, caps,
etc. Tighten securely all fasteners and caps and do not
operate this product until all missing or damaged parts
are replaced. Please contact customer service or an
authorized service center for assistance.
APPLICATIONS
You may use this product for the purpose listed below:
Mowing your lawn
WARNING:
Always remove battery pack and the start key from the
tool when you are assembling parts, making adjustments,
cleaning, or when not in use. This will prevent accidental
starting that could cause serious personal injury.
INSTALLING/REMOVING BATTERY PACK
See Figure 8.
Raise the battery cover.
Align raised ribs on battery pack with grooves in the
battery port and install the battery pack into the mower.
WARNING:
Make sure the latch on the bottom of the battery pack
snaps in place and the battery pack is fully seated and
secure in the mower’s battery port before beginning
operation. Failure to securely seat the battery pack could
cause the battery pack to fall out, resulting in serious
personal injury.
Lower the battery cover.
To remove battery pack:
Raise the battery cover.
Press and hold the battery latch button at the bottom of
the battery pack.
Remove battery pack from the mower.
For complete charging instructions, refer to the Operator’s
Manuals for your RYOBI battery pack and charger models.
WARNING:
To avoid accidental starting that could result in serious
personal injury, always remove the start key when moving
or transporting the mower.
STARTING/STOPPING THE MOWER
See Figures 8 - 10.
Raise the battery cover.
Install battery pack into the battery port.
Insert the start key into the slot beside the battery port.
Lower the battery cover.
Raise the handle assembly as described earlier.
NOTE: The mower will not start if the handle assembly
is not in the operating position.
Press and hold the start button. Pull the bail toward the
handle and release the button to start the mower.
To stop the mower, release the bail.
MOWING TIPS
Make sure the lawn is clear of stones, sticks, wires, and
other objects that could damage the lawn mower blades
or motor. Do not mow over property stakes or other
metal posts. Such objects could damage the blade or be
accidentally thrown by the mower in any direction and
cause serious personal injury to the operator and others.
For a healthy lawn, always cut off one-third or less of the
total length of the grass.
When cutting heavy grass, reduce walking speed to allow
for more effective cutting and a proper discharge of the
clippings.
Do not cut wet grass. It will stick to the underside of the
deck and prevent proper bagging or mulching of grass
clippings.
New or thick grass may require a narrower cut or a higher
cutting height.
Clean the underside of the mower deck after each use
to remove grass clippings, leaves, dirt, and any other
accumulated debris.
NOTE: Always stop mower, allow blades to completely
stop, remove the start key, and remove the battery pack
from the battery port before cleaning underneath the
mower.
OPERATION

9 — English
WARNING:
Never use a hose, water, or any liquids to clean or
rinse off the lawn mower. Corrosive liquids, water, fer-
tilizers, and chemicals used to treat lawns can enter the
lawn mower and/or battery compartment and damage
electronic components and/or the battery pack, which
can result in a short circuit, increased risk of fire, and
serious personal injury. Remove any buildup of grass
and leaves on or around the mower housing and/or un-
derneath the mower deck. Wipe the mower clean with a
dry cloth occasionally.
NOTICE:
Periodically inspect the entire product for damaged,
missing, or loose parts such as screws, nuts, bolts, caps,
etc. Tighten securely all fasteners and caps and do not
operate this product until all missing or damaged parts
are replaced. Please contact customer service or an
authorized service center for assistance.
OPERATION
SLOPE OPERATION
See Figure 11.
WARNING:
Slopes are a major factor related to slip and fall accidents
that can result in severe injury. Operation on slopes
requires extra caution. If you feel uneasy on a slope, do
not mow it. For your safety, do not attempt to mow slopes
greater than 15 degrees.
Mow across the face of slopes, not up and down. Exercise
extreme caution when changing direction on slopes.
Watch for holes, ruts, rocks, hidden objects, or bumps
which can cause you to slip or trip. Tall grass can hide
obstacles. Remove all objects such as rocks, tree limbs,
etc., which could be tripped over or thrown by the blade.
Always be sure of your footing. A slip and fall can cause
serious personal injury. If you feel you are losing your bal-
ance, release the upper blade control lever immediately.
Do not mow near drop-offs, ditches, or embankments;
you could lose your footing or balance.
EMPTYING THE GRASS CATCHER
See Figure 12.
Stop the mower and allow blades to completely stop.
Open battery cover.
Remove start key and battery pack from the battery port.
Lift the rear discharge door.
Lift the grass catcher by its handle to remove from mower.
Empty grass clippings.
Lift the rear discharge door and reinstall the grass catcher
as described earlier in this manual.
Reinstall start key and battery pack when you are ready
to mow.
WARNING:
Before performing any maintenance or cleaning the lawn
mower, make sure the mower blades come to a complete
stop and the batteries and start key are removed to avoid
accidental starting and possible serious personal injury.
WARNING:
Always wear eye protection with side shields marked to
comply with ANSI Z87.1. Failure to do so could result in
objects being thrown into your eyes resulting in possible
serious injury.
WARNING:
When servicing, use only identical replacement parts.
Use of any other parts can create a hazard or cause
product damage.
MAINTENANCE

10 — English
Remove the blade nut, spacer, and blade.
Place the new blade on the shaft against the blade posts.
Ensure blade is properly seated with shaft going through
center blade hole and the two blade posts inserted
into their respective holes on the blade. Make sure it is
installed with the curved ends pointing up toward the
mower deck and not down toward the ground. When
seated properly, the blade should be flat.
Replace the spacer, then thread the blade nut on the
shaft and finger tighten.
NOTE: Make certain all parts are replaced in the exact
order in which they were removed.
Torque the blade nut down clockwise using a torque
wrench (not provided) to ensure the bolt is properly
tightened. The recommended torque for the blade nut is
310 - 360 in.lbs.
WARNING:
Ensure blade is properly seated and the blade nut is
tightened to the torque specifications above. Failure to
properly attach the blade could cause it to come loose
and result in possible serious personal injury.
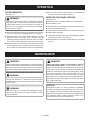
STORING THE MOWER
See Figure 15.
Remove battery pack and start key and store in a secure
location out of the reach of children.
Before storage, wipe any dirt or debris from the battery
area.
Turn mower on its side and clean grass clippings that
have accumulated on the underside of the mower deck.
Wipe the mower clean with a dry cloth.
Check all nuts, bolts, knobs, screws, fasteners, etc., for
tightness.
Inspect moving parts for damage, breakage, and wear.
Have repairs made on any damaged or missing parts.
Check blade for damage, uneven, or excessive wear and
replace blade if these conditions exist.
Lower the handle assembly as described earlier in this
manual.
Store mower indoors in a clean, dry place out of the reach
of children.
Do not store near corrosive materials such as fertilizer or
rock salt.
MAINTENANCE
GENERAL MAINTENANCE
Avoid using solvents when cleaning plastic parts. Most
plastics are susceptible to damage from various types of
commercial solvents and may be damaged by their use. Use
clean cloths to remove dirt, dust, oil, grease, etc.
WARNING:
Do not at any time let brake fluids, gasoline, petroleum-
based products, penetrating oils, etc., come in contact
with plastic parts. Chemicals can damage, weaken, or
destroy plastic which can result in serious personal injury.
NOTICE:
Never use a hose, water, or any liquids to clean the lawn
mower, as water and liquids can damage electronic com-
ponents and the battery pack. Remove any buildup of
grass and leaves on or around the motor cover. Wipe the
mower clean with a dry cloth occasionally.
LUBRICATION
All of the bearings in this product are lubricated with a
sufficient amount of high grade lubricant for the life of the
unit under normal operating conditions. Therefore, no further
bearing lubrication is required.
WARNING:
Always protect hands by wearing heavy gloves and/or
wrapping the cutting edges of the blade with rags and
other material when performing blade maintenance.
Contact with the blade could result in serious personal
injury.
REPLACING THE CUTTING BLADE
See Figures 13 - 14.
NOTE: Only use authorized replacement blades.
Stop the motor and remove the start key. Allow blade to
come to a complete stop.
Remove the battery pack from the battery port.
Turn the mower on its side.
Wedge a block of wood between the blade and mower
deck to prevent the blade from turning.
Loosen the blade nut by turning it counterclockwise (as
viewed from bottom of mower) using a 15 mm wrench
or socket (not provided).

11 — English
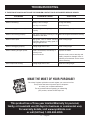
TROUBLESHOOTING
IF THESE SOLUTIONS DO NOT SOLVE THE PROBLEM CONTACT YOUR AUTHORIZED SERVICE DEALER.
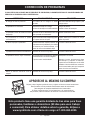
PROBLEM POSSIBLE CAUSE SOLUTION
Handle not in position. Handle locks not locked. Lock upper and lower handle locks.
Mower not starting. Battery is low in charge.
Start key not installed.
Charge the battery.
Install start key.
Mower cutting grass unevenly. Lawn is rough or cutting height not set
properly.
Adjust the cutting height.
Mower not mulching properly. Wet grass clippings sticking to the
underside of the deck.
Wait until the grass dries before mowing.
Mower hard to push. High grass, rear of mower housing
and blade dragging in heavy grass, or
cutting height too low.
Raise cutting height.
Mower not bagging properly. Cutting height set too low. Raise cutting height.
Mower vibrating at higher speed. Blade is unbalanced, excessively or
unevenly worn.
Bent motor shaft.
Replace the blade.
Stop the motor, remove start key and
battery. Inspect for damage. Have re-
paired by an authorized service center
before restarting.
Motor stops while cutting. Cutting height set too low. Raise the cutting height.
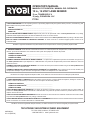
MAKE THE MOST OF YOUR PURCHASE!
Go to http://register.ryobitools.com and register your new tool on-line.
Your product has been fully tested prior to shipment
to ensure your complete satisfaction.
For any questions about operating or maintaining
your product, call the RYOBI Help Line!
This product has a Three-year Limited Warranty for personal,
family, or household use (90 days for business or commercial use).
For warranty details, visit www.ryobitools.com
or call (toll free) 1-800-860-4050.

2 — Français
AVERTISSEMENT :
LISEZ ET VEILLEZ À COMPRENDRE TOUTES LES
INSTRUCTIONS. Le non respect des instructions
énumérées ci-dessous et sur la machine pourrait résulter
en un choc électrique, un incendie, et/ou des blessures
sérieuses.
LIRE TOUTES LES INSTRUCTIONS
Cet outil coupant est capable d’amputer des mains et des
pieds et projeter des objets. Le non respect de toutes les
instructions de sécurité pourrait résulter en des blessures
graves ou la mort.
Éviter les environnements dangereux - N’utilisez pas la
tondeuse dans un environnement mouillé ou humide et ne
l’utilisez pas durant la pluie.
Garder les enfants à l’écart - Garder les badauds, enfants et
animaux domestiques à une distance minimum de 30,5 m
(100 pi). Arrêter la machine si quelqu’un entre dans la zone.
Des accidents tragiques peuvent survenir si l’opérateur n’est
pas conscient de la présence des enfants. Les enfants sont
souvent attirés pas la machine et l’activité de tondaison.
Ne prenez jamais pour acquis que les enfants resteront à
l’endroit où vous les avez vus la dernière fois.
• Assurez-vous que les enfants soient éloignés de la zone
de coupe et qu’ils soient supervisés par un adulte autre
que l’opérateur.
• Soyez vigilant et éteignez la tondeuse si un enfant
s’approche.
• Ne permettez jamais à des enfants d’utiliser la machine.
• Redoublez la prudence quand vous vous approchez des
coins, des arbustes, des arbres ou d’autres objets qui
peuvent masquer la présence d’un enfant.
Porter une tenue appropriée - Porter des pantalons
longs, manches longues, des gants épais et des souliers
de protection qui protègeront vos pieds et amélioreront
votre équilibre sur des surfaces glissantes. Ne pas porter
de vêtements amples, bijoux, shorts, sandales et ne pas
travailler pieds nus. Ne porter aucun bijou. Ils peuvent être
pris dans les parties en mouvement.
Ne pas travailler hors de portée - Toujours se tenir bien
campé et en équilibre. Le travail hors de portée risque de
faire perdre l’équilibre.
Ne laissez pas la tondeuse sans surveillance quand elle est
allumée ou une fois la clé de démarrage fixée.
Éloignez les mains et les pieds de la zone de coupe. Tenez
vous éloigné de l’ouverture de décharge en tout temps.
Utilisez la tondeuse seulement à la lumière du jour ou avec
une bonne lumière artificielle.
Porter des lunettes de sécurité - Toujours porter une
protection oculaire munie d’écrans latéraux certifiée
conforme à la norme ANSI Z87.1. Utilisez une masque faciale
si l’utilisation produit de la poussière.
Utilisez l’outil approprié - N’utilisez pas la tondeuse pour
aucune tâche sauf celle pour laquelle elle est conçue.
Ne forcez pas la tondeuse - Elle exécutera le travail mieux
et de façon plus sécuritaire à la vitesse pour laquelle elle fut
conçue.
Ne pas charger l’outil sous la pluie ou dans un endroit
mouillé.
Restez vigilant - Regardez ce que vous faites et utilisez
votre meilleur jugement lorsque vous utilisez la tondeuse.
N’utilisez pas la tondeuse si vous êtes fatigué, contrarié ou
sous influence de drogues, d’alcool ou de médicaments. Un
moment d’inattention pendant l’utilisation de la tondeuse
peut résulter en une blessure grave.
Faire l’entretien de la tondeuse avec soins - Gardez l’outil
en bon état. Assurez-vous que les lames soient affûtées et
que les dispositifs de protections soient en place et en état
de fonctionnement. Remplacer les lames endommagées ou
usées de façon inégale avant d’utiliser la tondeuse d’obtenir
un rendement optimal.
Vérifiez fréquemment si tous les écrous, boulons et vis sont
serrés pour s’assurer que l’équipement est sécuritaire. Les
lames de tondeuse sont tranchantes. Envelopper la lame ou
porter des gants et prendre beaucoup de précautions lors
de l’entretien.
Ne pas jeter le pile au feu. La cellule peut exploser. Vérifier
les codes locaux pour connaître toute instruction spéciale
relative à l’élimination des piles.
Arrêter le moteur, attendre que la lame s’arrête complètement
et retirer la clé de démarrage et bloc-piles avant de réparation
du produit, de nettoyer la tondeuse, d’enlever le collecteur
d’herbe ou retrait du capuchon du broyeur.
Ne jamais utiliser un boyau, de l’eau ou une autre liquide
pour nettoyer ou rincer la tondeuse. Les liquides corrosifs,
l’eau, l’engrais et les produits chimiques utilisés pour traiter
les pelouses peuvent s’infiltrer dans la tondeuse et/ou le
compartiment de la pile et endommager les composants
électroniques et/ou le bloc-pile, ce qui peut entraîner un
court-circuit, augmenter le risque d’incendie ou des blessures
corporelles graves. Enlever toute accumulation d’herbes ou
de feuilles sur ou autour du corp de la tondeuse et/ou en
dessous de la plateforme de la tondeuse. Essuyer la tondeuse
de temps en temps avec un linge sec.
Remplacer la lame si elle est pliée ou fissurée. Une
lame déséquilibrée provoque des vibrations qui peuvent
endommager le moteur de l’appareil et provoquer
des blessures. Affûter également les extrémités de la
lame émoussée afin de maintenir l’équilibre. Nettoyer
complètement la lame et vérifier son équilibre en la déposant
à l’horizontale et en plaçant l’orifice du centre sur un petit
clou. Le clou doit être placé à l’horizontale. Si l’une des
extrémistes de la lame tourne vers le bas, enlever un peu de
métal de la partie épaisse inférieure de la lame jusqu’à ce que
celle-ci soit équilibrée. Une lame équilibrée lorsqu’aucune
extrémité n’est inclinée.
Toujours, utiliser des dispositifs de protection. N’utilisez pas
la tondeuse sans le collecteur d’herbe ou le capuchon du
broyeur et porte arrière de décharge en place et fonctionne
correctement.
Ne pas ouvrir ou altérer le bloc-piles. L’électrolyte est un
produit corrosif pouvant causer des lésions cutanées ou
oculaires. Il peut être toxique en cas d’ingestion.
INSTRUCTIONS IMPORTANTES CONCERNANT LA SÉCURITÉ

3 — Français
INSTRUCTIONS IMPORTANTES CONCERNANT LA SÉCURITÉ
Suivez les instructions du fabricant relatives à l’installation
et l’utilisation des accessoires. Utilisez seulement des
accessoires approuvés par le fabricant.
Manipuler les batteries avec soin pour éviter des courts-
circuits avec des objets conducteurs comme des anneaux,
des bracelets et des clés. La batterie ou l’objet conducteur
peuvent surchauffer et causer des brûlures.
Nettoyez la zone de travail avant chaque utilisation. Enlevez
tous les objets tels que les roches, les branches, les noix
d’arbres, métal, les fils, les os, les jouets et d’autres objets
qui peuvent être projetés par la lame. Restez en arrière de
la poignée quand le moteur est en marche.
Évitez les trous, les ornières, les roches, bornes de propriété
ou d’autres objets cachés. Un terrain accidenté pourrait
provoquer un glissement et vous faire tomber par accident.
Ne tondez pas près des dépressions, fossés ou des berges.
Tondez les pentes dans le sens transversal, jamais en
montant ou en descendant. Soyez particulièrement prudent
lors des changements de direction sur les terrains en pente.
Planifiez le parcours de la tondeuse pour éviter d’éjecter
les matériaux sur les routes, les trottoirs, les passants, etc.
Évitez également d’éjecter les matériaux sur un mur ou une
obstruction ce qui pourrait causer un matériau d’être projeté
par ricochet en direction de l’opérateur.
Ne tondez pas l’herbe mouillée ou sur des pentes
excessivement raides. Une mauvaise position peut vous faire
glisser et tomber par accident. Marchez, ne courez jamais.
Redoublez la prudence si vous vous approchez des coins,
des arbustes, des arbres ou d’autres objets qui vous cachent
la vue.
Ne tirez jamais la tondeuse vers l’arrière à moins que cela
soit absolument nécessaire. Si vous devez tirer la tondeuse
pour éviter un mur ou une obstruction, commencez par
regarder en bas et en arrière pour ne pas trébucher o tirando
la podadora hacia los pies.
N’éjectez jamais du matériel en direction de quelqu’un.
Évitez d’éjecter le matériel sur un mur ou une obstruction.
Le matériel pourrait être projeté par ricochet en direction
de l’opérateur. Arrêtez la lame quand vous traversez des
surfaces recouvertes de gravier.
Des objets frappés par la lame de la tondeuse peuvent
causer des sérieuses blessures. La pelouse devrait toujours
être examinée attentivement et nettoyée de tout objet avant
la tondaison.
Si la tondeuse frappe un objet étranger, suivez ces étapes:
• Arrêter la tondeuse en relachant l’levier de commande de
la lame, attendre que la lame s’arrête complètement, puis
retirer la clé de démarrage.
• Inspectez attentivement la tondeuse pour desceller les
dommages.
• Remplacer la lame si elle est endommagée de quelque
façon que ce soit Réparez tout dommage avant de
démarrer et de continuer à utiliser la tondeuse.
Arrêter le moteur, attendre que la lame s’arrête complètement
et retirer la clé de démarrage avant de déboucher la goulotte.
La lame continue de tourner pendant quelques secondes
après que le moteur soit arrêté. Ne mettez jamais aucune
partie du corps dans la proximité de la lame avant d’être
certain que la lame a cessé de tourner.
Si la tondeuse commence à vibrer de façon anormale, arrêtez
le moteur et vérifiez immédiatement la cause. Remplacer la
lame si elle est usée de façon inégale ou endommagée de
quelque façon que ce soit. La vibration est généralement un
signe d’un problème.
Le produit doit être réparé par un personnel qualifié
seulement. Des réparations ou l’entretien effectués par un
personnel non qualifié pourrait résulter en des blessures
pour l’utilisateur ou endommager le produit.
L’assemblage du collecteur d’herbe peut se détériorer et
s’user et doit être vérifier chaque fois avant d’utiliser la
tondeuse à gazon. S’il doit être remplacé, s’assurer que le
nouveau collecteur d’herbe répond aux exigences et aux
spécifications du fabricant d’origine.
Lors de réparation du produit, utilisez pièces de remplacement
autorisées. Utiliser uniquement des lames de rechange
identiques. L’utilisation des pièces non autorisées peut
créer un risque d’une blessure sérieuse à l’utilisateur ou
endommager le produit.
Conserver ou remplacer les étiquettes d’instructions de
sécurité, si nécessaire.
Débrancher la pile et retirer la clé de démarrage - Débrancher
le bloc-piles et retirer la clé de démarrage de l’appareil avant
de le ranger, le réparer ou changer les accessoires tels que
des lames. Ces mesures de sécurité réduisent les risques
de démarrage accidentel de l’outil.
Arrêter l’produit et retirer le bloc de piles et clé de démarrage
lorsqu’il n’est pas utilisé. Transporter ou pousser l’appareil
lorsque le moteur est arrêté et d’avoir retirer la clé de
démarrage de la tondeuse.
Les outils fonctionnant piles n’ayant pas besoin d’être
branchés sur une prise secteur, ils sont toujours en état
de fonctionnement. Tenir compte des dangers possibles
lorsque l’outil n’est pas en usage et lors du remplacement
des piles. Le respect de cette règle réduira les risques
d’incendie, de choc électrique et de blessures graves.
Ne pas utiliser un appareil alimenté par pile sous la pluie.
Retirer ou débrancher la pile avant l’entretien ou le nettoyage
de l’outil de jardin ou avant d’en retirer des matériaux.
Pour utiliser avec nickel-cadmium et lithium-ion
bloc-piles. Voir « Consignes de sécurité relatives à
l’outil, appareil, à la pile et au chargeur supplément »
987000-432.
Ranger les appareils qui ne sont pas utilisés à l’intérieur –
lorsque la tondeuse n’est pas utilisé, le ranger à l’intérieur
dans un endroit sec et verrouillé hors de la portée des
enfants. La clé de démarrage et les blocs-piles doivent être
retirés et rangés dans un autre endroit et hors de la portée
des enfants.
Suivre les instructions de lubrification et de changement
d’accessoires.
Faire fonctionner cet appareil ne doit être permis qu’aux
adultes responsables et familiers avec les instructions.
Ne jamais faire fonctionner l’appareil dans un endroit clos.
Ne jamais modifier les dispositifs de sécurité. Vérifier
périodiquement l’état de fonctionnement.
Conserver ces instructions. Les consulter fréquemment et les
utiliser pour instruire les autres utilisateurs éventuels. Si cet
outil est prêté, il doit être accompagné de ces instructions.

4 — Français
Certains des symboles ci-dessous peuvent être utilisés sur produit. Veiller à les étudier et à apprendre leur signification.
Une interprétation correcte de ces symboles permettra d’utiliser produit plus efficacement et de réduire les risques.
SYMBOLE NOM DÉSIGNATION / EXPLICATION
Symbole d’alerte de sécurité Indique un risque de blessure potentiel.
Lire manuel d’utilisation
Pour réduire les risques de blessures, l’utilisateur doit lire et veiller à
bien comprendre le manuel d’utilisation avant d’utiliser ce produit.
Protection oculaire
Toujours porter une protection oculaire munie d’écrans latéraux
certifiée conforme à la norme ANSI Z87.1.
Avertissement concernant
l’humidité
Risque d’incendie et de brûlures. Ne pas exposer la pile, le
compartiment de la pile, ou les composants électroniques à la pluie,
l’eau ou d’autres liquides. Fermer le couvercle pendant l’utilisation.
Ne pas opérer sur un sol humide.
Choc électrique
Ne pas utiliser la machine dans un endroit sec ou ne pas respecter
les pratiques de sécurité peut entraîner un choc électrique.
Garder les mains et les pieds
à l’écart
Garder les mains et les pieds à l’écart de la lame et de la zone de
coupe.
Se tenir loin
Ne pas mettre ses mains ou ses pieds en dessous du châssis de la
tondeuse.
MAX 15˚
Éviter les pentes
Ne pas utiliser sur des pentes de plus de 15°. Tondre les pentes dans
le sens transversal, jamais en montant ou en descendant.
Tenir les enfants et les
curieux à bonne distance
Tenir les enfants et les curieux à une distance de 30,5 m (100 pi)
au moins.
SYMBOLES
Les termes de mise en garde suivants et leur signification ont pour but d’expliquer le degré de risques associé à l’utilisation
de ce produit.
SYMBOLE SIGNAL SIGNIFICATION
DANGER :
Indique une situation dangereuse qui, si elle n’est pas évitée, aura pour
conséquences des blessures graves ou mortelles.
AVERTISSEMENT :
Indique une situation dangereuse qui, si elle n’est pas évitée, pourrait entraîner
des blessures graves ou mortelles.
ATTENTION :
Indique une situation dangereuse qui, si elle n’est pas évitée, pourraît entraîner
des blessures légères ou de gravité modérée.
AVIS :
(Sans symbole d’alerte de sécurité) Indique les informations jugées importantes
sans toutefois représenter un risque de blessure (ex. : messages concernant
les dommages matériels).

5 — Français
CARACTÉRISTIQUES
APPRENEZ À CONNAÎTRE VOTRE TONDEUSE
Voir la figure 1.
L’utilisation sécuritaire de ce produit nécessite une
compréhension de l’information sur le produit et dans le manuel
de l’utilisation ainsi que la connaissance du projet à effectuer.
Avant d’utiliser ce produit, familiarisez-vous avec toutes les
fonctions d’utilisation et les règles de sécurité.
COUVERCLE DES PILES
Le couvercle de pile protège le logement de piles contre les
débris.
COLLECTEUR D’HERBE
Le collecteur d’herbe recueille les brins d’herbe et empêche
qu’ils soient éparpillés sur le gazon au moment de la tonte.
LEVIER DE RÉGLAGE DE LA HAUTEUR
Le levier de réglage de la hauteur permet d’effectuer des
réglages de la hauteur.
INSERT BROYEUR
La tondeuse est équipée d’un insert broyeur qui recouvre
l’ouverture de décharge arrière, et qui permet de couper et de
recouper l’herbe pour produire des brins plus fins.
BOUTON DE DÉMARRAGE ET ANSE
Le bouton de démarrage et anse sont situés au haut de la
poignée supérieure de la tondeuse. Enfoncer le bouton de
démarrage puis appuyer sur la barre pour démarrer le moteur.
Relâcher la barre pour arrêter le moteur.
CLÉ DE DÉMARRAGE
Vous devez insérer la clé de démarrage avant que la tondeuse
puisse démarrer.
SYMBOLES
Certains des symboles ci-dessous peuvent être utilisés sur produit. Veiller à les étudier et à apprendre leur signification.
Une interprétation correcte de ces symboles permettra d’utiliser produit plus efficacement et de réduire les risques.
SYMBOLE NOM DÉSIGNATION / EXPLICATION
Ricochet
Les objets projetés peuvent ricocher et infliger des blessures ou
causer des dommages matériels.
Symbole de recyclage
Ce produit utilise les piles de lithium-ion (Li-ion). Les réglementations
locales ou gouvernementales peuvent interdire de jeter les piles
dans les ordures ménagères. Consulter les autorités locales
compétentes pour les options de recyclage et/ou l’élimination.
Courant continu Type ou caractéristique du courant
V Volts Tension
A Ampères Intensité
Hz Hertz Fréquence (cycles par seconde)
W Watt Puissance
hrs Heures Durée
CARACTÉRISTIQUES DU PRODUIT
Moteur ................................................................................................................................................................................. 18 V c.c.
Chemin de coupe .................................................................................................................................................. 330,2 mm (13 po)
Réglages de la hauteur .............................................................................................................35 mm à 75 mm (1,38 po à 2,96 po)
Grandeur des roues .........................................................................................140 mm (5,5 po) en avant, 180 mm (7 po) en arrière

6 — Français
ASSEMBLAGE
DÉBALLAGE
Ce produit nécessite l’assemblage.
Retirez prudemment l’outil et les accessoires de la boîte.
Assurez-vous que tous les articles énumérés dans la Liste
d’expédition sont inclus.
AVERTISSEMENT :
Ne pas utiliser le produit si, en le déballant, vous
constatez que des éléments figurant dans la Liste
d’expédition sont déjà assemblés. Certaines pièces
figurant sur cette liste n’ont pas été assemblées par le
fabricant et exigent une installation. Le fait d’utiliser un
produit qui a été assemblé de façon inadéquate peut
entraîner des blessures.
Vérifiez attentivement si l’outil n’a pas subi des dommages
ou des bris pendant le transport.
Ne jetez pas l’emballage avant d’avoir inspecté l’outil et
avant d’avoir vérifié s’il fonctionne correctement.
Si des pièces sont manquantes ou endommagées,
veuillez appeler au 1-800-860-4050 pour obtenir de l’aide.
LISTE D’EXPÉDITION
Tondeuse
Assemblage de poignée supérieure
Boutons de verrou de la poignée supérieure (2)
Boulons de la poignée supérieure (2)
Poignées inférieure (2)
Clé de démarrage
Insert broyeur
Collecteur d’herbe
Manuel d’utilisation
AVERTISSEMENT :
Si des pièces manquent ou sont endommagées, ne pas
utiliser ce produit avant qu’elles aient été remplacées.
Le fait d’utiliser ce produit même s’il contient des pièces
endommagées ou s’il lui manque des pièces peut
entraîner des blessures graves.
AVERTISSEMENT :
N’essayez pas de modifier cet outil ou de créer des
accessoires non recommandés pour utilisation avec ce
produit. Toute transformation ou modification de ce genre
est un cas de mauvais usage qui peut créer des risques
de blessures graves.
AVERTISSEMENT :
Ne insérer la clé de démarrage ou le bloc-piles compléter
l’assemblage vous êtes prêt à tonte. Le non respect de
cet avertissement pourrait résulter en un démarrage
accidentel et des blessures corporelles graves.
AVERTISSEMENT :
Pour empêcher commencer accidentel, ne pas faire
d’ajustement ou des installations avec la clé de
démarrage ou le bloc-piles insérée. Le démarrage
accidentel de la tondeuse pendant l’assemblage peut
entraîner des blessures graves.
AVERTISSEMENT :
N’utilisez jamais la tondeuse sans les dispositifs de
sécurité appropriés en place et en état de marche.
N’utilisez jamais la tondeuse si les dispositifs de sécurité
sont endommagés.Le fait d’utiliser la tondeuse si des
pièces sont manquantes ou endommagées peut entraîner
des blessures graves.
INSTALLATION ET AJUSTEMENT
L’ASSEMBLAGE DE POIGNÉE
Voir les figures 2 et 3.
Pour installer les poignées inférieures :
Insérer la poignée inférieure dans le trou de montage sur
la plate-forme comme indiqué.
Appuyer sur le bouton de verrouillage à l’arrière du trou
de montage pour permettre à la poignée de glisser en
position.
NOTE : Il y a trois hauteurs de position réglables en
appuyant sur le bouton de verrouillage et en soulevant
ou en abaissant la poignée à la position désirée.
Relâcher le bouton de verrouillage afin de fixer le poignée
inférieure en position.
Répéter pour l’autre poignée inférieure.
Pour installer l’assemblage de poignée supérieure :
Placer l’assemblage de la poignée supérieure par-
dessus la poignée inférieure comme indiqué et insérer le
boulon de la poignée supérieure dans les trous des deux
poignées.
NOTE : La poignée inféreiure comprend deux trous de
réglage pour ajuster la hauteur. S’assurer d’utiliser la
même hauteur pour chaque côté.
Enfiler le bouton du verrou de la poignée supérieure sur
le boulon.
Répéter pour l’autre côté.
La page est en cours de chargement...
La page est en cours de chargement...
La page est en cours de chargement...
La page est en cours de chargement...
La page est en cours de chargement...
La page est en cours de chargement...
La page est en cours de chargement...
La page est en cours de chargement...
La page est en cours de chargement...
La page est en cours de chargement...
La page est en cours de chargement...
La page est en cours de chargement...
La page est en cours de chargement...
La page est en cours de chargement...
La page est en cours de chargement...
La page est en cours de chargement...
-
 1
1
-
 2
2
-
 3
3
-
 4
4
-
 5
5
-
 6
6
-
 7
7
-
 8
8
-
 9
9
-
 10
10
-
 11
11
-
 12
12
-
 13
13
-
 14
14
-
 15
15
-
 16
16
-
 17
17
-
 18
18
-
 19
19
-
 20
20
-
 21
21
-
 22
22
-
 23
23
-
 24
24
-
 25
25
-
 26
26
-
 27
27
-
 28
28
-
 29
29
-
 30
30
-
 31
31
-
 32
32
-
 33
33
-
 34
34
-
 35
35
-
 36
36


Ryobi P1104 Manuel utilisateur
- Catégorie
- Tondeuses à gazon
- Taper
- Manuel utilisateur
- Ce manuel convient également à
dans d''autres langues
- español: Ryobi P1104 Manual de usuario
Documents connexes
-
Ryobi RY40180-Y Le manuel du propriétaire
-
-
-
-
-
-
-
-
-
Autres documents
-
Echo CLM-58VBT Guide d'installation
-
PowerStroke PS21ESLM Le manuel du propriétaire
-
PowerSmart DB2821 Manuel utilisateur
-
 HART HAC113MB Le manuel du propriétaire
-
Snapper 1687884 Mode d'emploi
-
Homelite UT13122 Le manuel du propriétaire
-
 EarthWise 65821 Le manuel du propriétaire
-
 Power Stroke PS21ESLM Manuel utilisateur
-
 Lawnmaster LMRM1601 Manuel utilisateur


