
Adjusting The Height Of The Floor Stand
Régler la hauteur du support de plancher
Cómo ajustar la altura del soporte de piso


3
Table of contents
Watch an install video before trying it yourself: nanit.com/install
Limited Warranty: nanit.com/legal/warranty
Français à partir de la page 19
Español a partir de la página 20
• Safety ........................................................................4
• Floor Stand parts ..............................................................5
• Lowering the height of the Floor Stand ...........................................6
• Raising the height of the Floor Stand ............................................ 11
• Nanit compliance .............................................................16

4
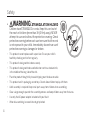
Safety
• WARNING:STRANGULATION HAZARD
Children have STRANGLED in cords. Keep this cord out of
the reach of children (more than 3ft (0.9m) away). NEVER
attempt to use cord without the protective covering. Check
protective covering before each use to ensure that the cord
is not exposed to your child. Immediately discontinue use if
protective covering is damaged or broken.
• This product cannot replace adult supervision. Ensure your child’s
health by checking on him/her regularly.
• This product is designed for indoor use only.
• This product is designed to be used behind or next to a standard crib,
in the middle of the long side of the crib.
• Place the product thoughtfully to avoid tripping over the base or cable.
• This product and its packaging are not toys. Do not allow children to play with them.
• Adult assembly is required. Keep small parts away from children when assembling.
• Clear a large enough space for the assembly process and keep children away from that area.
• Use only the AC power adapter included with your Nanit.
• When disassembling, be careful to not get pinched.

5
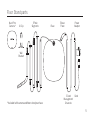
Floor Stand parts
Nanit Pro
Camera*
5 Pole
Segments Base
Elbow
Piece
Power
Adapter
3 Cord
Management
Channels
Cord
U-Clip
Wall
Bracket
*Included with camera and floor stand purchase

6
AB
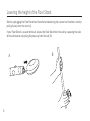
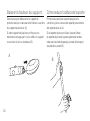
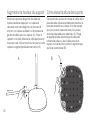
Lowering the height of the Floor Stand
Start by unplugging the Floor Stand from the outlet and detaching the camera from the floor stand by
pulling it away from the stand (A).
If your Floor Stand is secured to the wall, release the Floor Stand from the wall by squeezing the sides
of the wall bracket and pulling the pole away from the wall (B).

7
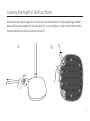
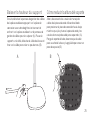
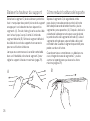
Lowering the height of the Floor Stand
Next, detach the cord management channels from the elbow piece by twisting and pulling the elbow
piece and the cord management channels apart (A). Lay the stand on its side, unthread the cord from
the base and pull the cord to create some slack (B).
AB

8
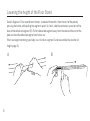
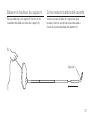
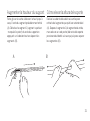
Lowering the height of the Floor Stand
Detach Segment 2 (the second from the top - marked with two dots) from the rest of the pole by
pressing the button while pulling the segments apart (A). Next, slide the cord cover up and out of the
back of the detached segment (B). Pull the detached segment away from the cord and the rest of the
pole and store the detached segment for future use.
When you begin monitoring your baby in a crib, return segment 2 and reassemble the stand to full
height (page 11).
B
A

9
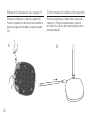
Lowering the height of the Floor Stand
Reconnect all of the remaining segments while pulling the excess cable through the bottom of the
stand (A)
Segment 1
A

10
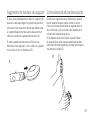
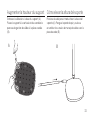
Lowering the height of the Floor Stand
Press the cord into the base of the stand (A). Place the stand upright and reattach the cord
management channels to the elbow piece (B).
AB

11
AB
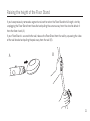
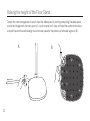
Raising the height of the Floor Stand
If you have previously removed a segment and want to return the Floor Stand to full height, start by
unplugging the Floor Stand from the outlet and pulling the camera away from the stand to detach it
from the floor stand (A).
If your Floor Stand is secured to the wall, release the Floor Stand from the wall by squeezing the sides
of the wall bracket and pulling the pole away from the wall (B).

12
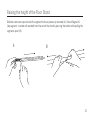
Raising the height of the Floor Stand
Detach the cord management channels from the elbow piece by twisting and pulling the elbow piece
and cord management channels apart (A). Lay the stand on its side, unthread the cord from the base
and pull the cord to create enough slack to make space for the previously removed segment (B).
AB

13
Raising the height of the Floor Stand
Slide the cord cover up and out of the segment that was previously removed (A). Detach Segment 1
(top segment - marked with one dot) from the rest of the stand by pressing the button while pulling the
segments apart (B).
AB

14
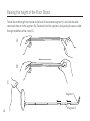
Raising the height of the Floor Stand
Thread the cord through the channel on the back of the removed segment (A) and slide the cable
cover back down on to the segment (B). Reconnect all of the segments while pulling the excess cable
through the bottom of the stand (C).
A
B
Segment 1
C
Segment 2

15
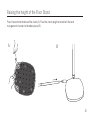
Raising the height of the Floor Stand
Press the cord into the base of the stand (A). Place the stand upright and reattach the cord
management channels to the elbow piece (B).
AB

16
Nanit compliance
EU DECLARATION OF CONFORMITY
Hereby, UdiSense, Inc. (DBA: Nanit), 244 Fifth Avenue, Suite 2702, New York, NY 10001, declares that the radio equipment
Models N301 & N302 are in compliance with Directive 2014/53/EU.
The full text of the EU declaration of conformity, including device frequency bands and maximum radio-frequency power, is available
at the following internet address:
https://www.nanit.com/legal/compliance
PRODUCT USE WARNING
This product is meant for indoor use only.
RADIO FREQUENCY (RF) EXPOSURE STATEMENT
This equipment should be installed and operated with a minimum distance of 20 cm between the camera and the human body.
For full compliance information visit: nanit.com/legal/compliance
This symbol means the product must not be discarded as household waste, and should be delivered to an appropriate collection facility for
recycling. Proper disposal and recycling helps protect natural resources, human health and the environment. For more information on disposal
and recycling of this product, contact your local municipality, disposal service or the shop where you bought this product.

17

18

19
Table des matières
Regardez une vidéo d’installation avant d’essayer d’assembler le produit vous-même :
nanit.com/install
Garantie limitée : nanit.com/legal/warranty
• Sécurité .....................................................................21
• Pièces du support de plancher .................................................23
• Baisser la hauteur du support ..................................................24
• Augmenter la hauteur du support ..............................................29
• Nanit conformité .............................................................34

20
• Seguridad ...................................................................22
• Partes del soporte de piso .....................................................23
• Cómo reducir la altura del soporte ..............................................24
• Cómo elevar la altura del soporte ...............................................29
• Cumplimiento Nanit ..........................................................34
Índice
Vea el video de instalación antes de comenzar: nanit.com/install
Garantía limitada: nanit.com/legal/warranty
La page est en cours de chargement...
La page est en cours de chargement...
La page est en cours de chargement...
La page est en cours de chargement...
La page est en cours de chargement...
La page est en cours de chargement...
La page est en cours de chargement...
La page est en cours de chargement...
La page est en cours de chargement...
La page est en cours de chargement...
La page est en cours de chargement...
La page est en cours de chargement...
La page est en cours de chargement...
La page est en cours de chargement...
La page est en cours de chargement...
La page est en cours de chargement...
-
 1
1
-
 2
2
-
 3
3
-
 4
4
-
 5
5
-
 6
6
-
 7
7
-
 8
8
-
 9
9
-
 10
10
-
 11
11
-
 12
12
-
 13
13
-
 14
14
-
 15
15
-
 16
16
-
 17
17
-
 18
18
-
 19
19
-
 20
20
-
 21
21
-
 22
22
-
 23
23
-
 24
24
-
 25
25
-
 26
26
-
 27
27
-
 28
28
-
 29
29
-
 30
30
-
 31
31
-
 32
32
-
 33
33
-
 34
34
-
 35
35
-
 36
36


dans d''autres langues
- English: nanit Floor Stand User manual
- español: nanit Floor Stand Manual de usuario
Documents connexes


Autres documents
-
Greenlee 884 & 885 Hydraulic Benders Manuel utilisateur
-
Horizon Fitness CE4.3 Mode d'emploi
-
Husqvarna PG 400 Le manuel du propriétaire
-
-
 Merit Fitness 715T Le manuel du propriétaire
-
-
AFG HTM1076-01 Le manuel du propriétaire
-
