ENGLISH
*MFL70921601* https://www.lg.com/global/business/ess/business-resources/download
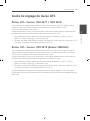
USER MANUAL
Energy Storage
System
Please read this manual carefully before installing
your set and retain it for future reference.
MODEL
LG ESS Home 10 (D010KE1N211)
LG ESS Home 8 (D008KE1N211)
Rev.F 08/04/2022
Copyright © 2019-2022 LG Electronics Inc. All Rights Reserved.

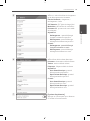
Getting Started
2
Getting Started
1
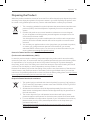
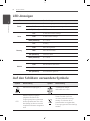
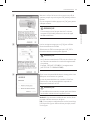
Safety Information
IMPORTANT : THIS PRODUCT SHOULD NOT BE USED FOR ANY PURPOSE OTHER THAN THE
PURPOSE DESCRIBED IN THIS INSTALLATION MANUAL.
WARNING Indicates a potentially dangerous situation. Death or serious
injury may result if appropriate precautions are not taken.
yThere is high possibility of electric shock or serious burns due to the high voltages in power
conditioning circuits.
yHigh voltages on AC and DC cables. Risk of death or serious injury due to electric shock.
yA potentially hazardous circumstance such as excessive heat or electrolyte mist may occur due to
improper operating conditions, damage, misuse and/or abuse.
yThis product have potential danger such as death or serious injury by re, high voltages or
explosion if appropriate precautions are not read or fully understood.
yDo not place ammable or potentially explosive objects near the product.
yDo not place any kind of objects on top of the product during operation.
yAll works on the PV modules, power conditioning system, and battery system must be carried out
by qualied personnel only.
yElectrical installations must be done in accordance with the local and national electrical safety
standards.
yWear rubber gloves and protective clothing (protective glasses and boots) when working on high
voltage/high current systems such as PCS and battery systems.
yThere is a risk of electric shock. Do not remove cover. There is no user serviceable parts inside.
Refer servicing to qualied and accredited service technician.
yElectrical shock hazard. Do not touch uninsulated wires when the product cover is removed.
yIn the event of fault, the system must not be restarted. Product maintenance of repairs must be
performed by qualied personnel, or personnel from an authorized support center.
yIf non LG Electronics batteries are connected to LG PCS, it will void warranty of the PCS and
battery.
CAUTION Indicates a situation where damage or injury could occur. If
it is not avoided, minor injury and/or damage to property
may result.
yThis product is intended for residential use only and should not be used for commercial or
industrial.
yBefore testing electrical parts inside the system, it takes at least 10-minute standby period of
time to complete discharging the system.
yThis inverter includes an integrated residual current device (RCD). If an external residual current
device (RCD) is used, a device of type A or B should be used, with a tripping current of 30 mA or
higher.
Getting Started

Getting Started
3
Getting Started
1
yThe contents included in this box are power conditioning system and its accessories, and the
entire weight is very heavy. Serious injury may occur due to the heavy weight of the package with
PCS and accessories. Therefore, special care must be taken in handling. Make sure to have at least
two persons deliver and remove the package.
yDo not use the damaged, cracked or frayed electrical cables and connectors. Protect the electrical
cables from physical or mechanical abuse, such as being twisted, kinked, pinched, closed in a door
or walked upon. Periodically examine the electrical cables of your product, and if its appearance
indicates damage or deterioration, discontinue use of this product, and have the cables replaced
with an exact replacement part by a qualied personnel.
yEnsure that you connect the earth ground wire to prevent possible electric shock. Do not try to
ground the product by connecting it to telephone wires, lightning rods or gas pipes.
yThe product should not be exposed to water (dripping or splashing) and no objects lled with
liquids, such as vases, should be placed on the product.
yTo prevent re or electric shock hazard, do not expose this production to rain or moisture.
yDo not block any ventilation openings. Ensure reliable operation of the product and protect it
from over heating. The openings shall never be blocked by placing any object on this product.
yThe temperature of metal enclosure may be high during operation.
yIn order to avoid radio-interference, all accessories (like a energy meter) intended for connection
to the product shall be suitable for use in residential, commercial and light-industry areas. Usually
this requirement is fullled if the equipment complies with the class B limits of EN55022.
yThe product must be disposed of according to local regulations.
yThe electrical installation of this unit must only be performed by LGE service person or trained
installer, qualied to install PCS.
yIf the AC circuit breaker is turned off and the PCS is not operated for a long time, the battery may
be overdischarged.
yConnect the DC+ and DC- cables to the correct DC+ and DC- terminals on the product.
yDanger of damaging the PCS by overload. Only connect the proper wire to DC terminal block.
Refer to the installation wiring diagram for details.
yDo not step on the product or the product package. The product may be damaged.
yDo not leave the ESS in the Fault standby state for a long time because of the battery discharge
may occur during the long standby state.
yIf the battery fault occurs immediately after starting PCS it means Battery failure. Check the
battery SOC also voltage and fault information, and turn off the power of the ESS until service
action is taken.
yIf the battery SOC is low, the battery may charge from the grid for self-protection. (Emergency
Charging) This function is to prevent shutdown of the ESS, deep discharge and failure of the
battery. An Emergency Charge is not an ESS fault.
yIf the battery SoC is too low during the backup operation of a power outage, the PCS will only
charge the battery from Solar PV. It means no power is supplied to the home load.
Emergency Charging(backup) will charge the battery up to the backup SoC level that you set
(30% by default). Emergency Charging(backup) is not an ESS fault.
yInstall the PCS where the noise from the PCS will not inconvenience the neighbors. Failure to do
so may result in conict between neighbors.

Getting Started
4
Getting Started
1
NOTE Indicates a risk of possible damage to the product.
yBefore making connections, please make sure the PV array open circuit voltage is within 1000 V.
Otherwise the product could be damaged.
yNever use any solvents, abrasives or corrosive materials to clean this product.
yDo not store on or place against any objects to the product. It may cause serious defects or
malfunction.
yBefore making a connection, make sure the PV switch on this product is switched off.
yThis unit is designed to feed power to the public grid only. Do not connect this unit to an AC
source or generator. Connecting the product to external devices could result in serious damage to
your equipment.
yServing of batteries should be performed or supervised by LG service person or trained installer.
yThe battery does not discharged when the load is under the certain level.
yThis product can cause current with a DC component. Where a Residual Current-operated
protective (RCD) or monitoring (RCM) device is used for protection in case of direct or indirect
contact, only an RCD or RCM of Type A (or type B) is allowed on the supply side of this product.
yThis product is designed to be installed indoor use only. Do not install this product outdoor.
yThis document is for your reference only. Read the installation manual on the website below.
yPlease check the following website for warranty policy.
https://www.lg.com/global/business/ess/business-resources/download

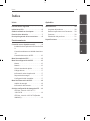
Table of contents
5
1
2
3
4
Getting Started
Safety Information ......................2
LED Indications .........................6
Symbol used on the Label ................6
Choice of Location .......................7
Connection Overview ....................8
Operating
Connecting to a Mobile Device ............9
Installing 'LG EnerVu Plus' App ..........9
Connect via Home WLAN .............10
Connect directly to ESS ...............10
ESS Status Menu ......................12
ESS Setting Menu .....................16
Language .............................16
Battery ...............................16
Quick Install Guide ....................16
Open source ..........................17
Application Information ...............17
Energy Device ........................17
Installer Settings ......................17
ESS Information Menu ..................18
Energy Analysis .......................18
System Information ...................18
ATS time setting guide ..................19
ATS Box - Version 10013677 /
10013678 ...........................19
ATS Box - Version 10013679 (Bender
VMD460) .............................19
Appendix
Maintenance ...........................20
Cleaning the Product ..................20
Inspecting Regularly ...................20
Contact ..............................20
Disposing the Product .................21
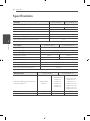
Specifications ..........................22
Table of Contents

Getting Started
6
Getting Started
1
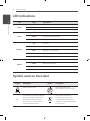
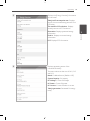
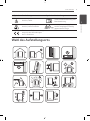
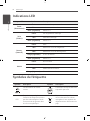
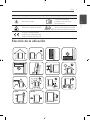
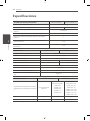
LED Indications
LED Color Description
Power
Off Grid is not connected.
White Grid is connected.
White (Blink) PCS Fault
Solar
Off Energy is not being generated.
Green Energy is being generated.
White (Blink) PCS Fault
Battery
Off Stand by
Green Battery is in charging
Blue Battery is in discharging
Red (Blink) Battery error
White (Blink) PCS Fault
WLAN
Off Not connected
Green Network connected
Blue WLAN network connected
Red (Blink) Network disconnected
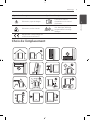
Symbol used on the Label
Symbol Description Symbol Description
Direct current input Three phase four wire
alternating current conductor
IP21
This product is protected against
insertion of ngers and will not
damaged during a specied
test in which it is exposed to
vertically dripping water.
This product should not
be disposed of with other
household waste. Disposal
regulations should be observed
in this country.

Getting Started
7
Getting Started
1
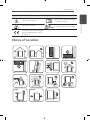
Symbol Description Symbol Description
Caution, risk of danger Refer to the installation manual
or operating manual.
Caution, hot surface Caution, risk of electric shock,
energy storage timed discharge
The relevant equipment complies
with the requirements in the EU
guidelines.
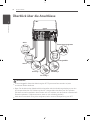
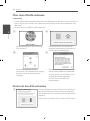
Choice of Location
> 85%
DUST
NOISE
HOT

Getting Started
8
Getting Started
1
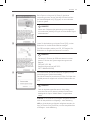
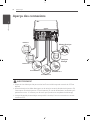
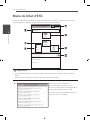
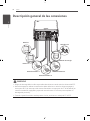
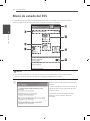
Connection Overview
PV Array 3
Battery 2
PV Array 1
PV Array 2
Battery 1
Energy meter
Grid
WARNING
yElectrical shock hazard. Do not touch uninsulated wires when the PCS cover is removed.
yBefore starting electrical cable connections or removing the cover, turn off the AC circuit
breaker, PV switch and DC circuit breaker of the battery. (In case of re-installation, turn them off
and wait at least 10-minute standby period of time for complete discharge within this product.)
yWhen the photovoltaic array is exposed to light, it supplies a DC voltage to the PCS.

Operating
9
Operating
2
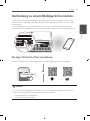
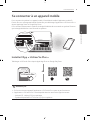
Connecting to a Mobile Device
To connect the system to a mobile device, the LG EnerVu Plus mobile application must be installed
on your mobile device. Search and download ‘LG EnerVu Plus’ application from Apple App store or
Google Play store.
To connect to the system directly, the WLAN dongle must be connected to the system. Make sure
that the supplied WLAN dongle is connected to the system.
Installing 'LG EnerVu Plus' App
Download ‘LG EnerVu Plus’ on the Apple App Store or Google Play Store.
OR
LG EnerVu Plus
NOTE
yDepending on the device, ‘LG EnerVu Plus’ app may not work.
yLG EnerVu Plus app will be available in version of the software as follow;
-Android O/S : Lollipop (5.0) or later
-iOS O/S : iPhone 6 (9.0) or later
Operating

Operating
10
Operating
2
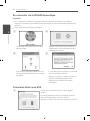
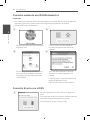
Connect via Home WLAN
Preparation
yTo connect the mobile device with the system via home network, the system must be connected
to your home network. Check the [Network] setting menu on the system.
yNote the SSID of your home network.
ab
Run ‘LG EnerVu Plus’ app on your mobile
device.
Tap [Connect via Home WLAN] in the
connection method selection screen.
cd
The connection will automatically be
proceeded and main screen appears when
the connection is successful.
If the connection fails, a pop-up message
appears on the screen.
Tap [OK] to move to the WLAN selection
menu of the mobile device.
Select the SSID of your home network.
Connect directly to ESS
aRun ‘LG EnerVu Plus’ app on your mobile device.
If it is the rst time to connect to the system, connection
method selection screen appears.
Tap [Connect directly to ESS] option.

Operating
11
Operating
2
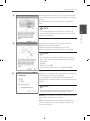
bPress and hold the wireless connection button on the
system until [WLAN] LED is lights in blue.
On your mobile device, tap [OK] to go to the next step.
NOTE
If the connection has not been made for 5 minutes,
the [WLAN] LED lights green and the WLAN signal is
disabled.
cRead the guidance and tap [OK] to display WLAN
selection screen.
Select the SSID which starts with ‘LGE_ESS’.
The password input screen appears.
NOTE
The last 2 characters of the SSID are the same as the
last 2 characters of the system registration number.
Example :
SSID (LGE_ESS-5E)
Registration No. (LGE-ESS-DE1710BKRH00685E)
dInput WLAN password in the password eld to connect
to the system.
The WLAN password is 8 digit numbers. Find the
‘WLAN password’ printed in the label outside of the
PCS.
NOTE
If the connection failed, try after turning off the mobile
data option on your mobile device.
Android : If the connection is successful, main screen
appears as shown in the gure.
iOS : If the connection is successful, run [LG EnerVu
Plus] app to display the main screen as shown in the
gure.

Operating
12
Operating
2
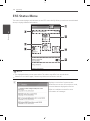
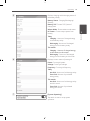
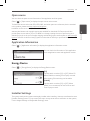
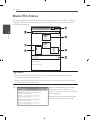
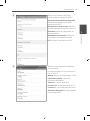
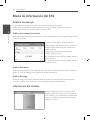
ESS Status Menu
The main screen displays and indicates current ESS status briey. When you select an area indicated
above, it displays detailed information.
NOTE
yThe displayed values are not exact values. The values may differ from actual values.
yPlease turn on the AP again, if there is a problem at connection with AP.
aDisplays a notice list of system status.
When there is an error occurred, error code,
time and date are displayed on the list.
Refer to installation manual for more
information of messages.

Operating
13
Operating
2
bDisplays the [Energy Overview] information
on the screen.
Today’s self-consumption rate : Displays
rate of the consumed energy amount from
ESS today.
This month’s CO2 reduction : Displays
monthly amonut of CO2 reduction.
Generation: Displays generated energy
information.
Feed-in : Displays consumed energy
information.
PCS : Displays PCS information.
cDisplays generating status of the
connected PV briey.
The status values are the sum of PV1, PV2
and PV3.
Brand : PV Manufacturer (Default : LGE)
System Capacity : PV capacity
DC Voltage : Current PV voltage
DC Power : Current PV power
DC Current : Current PV electric current
Today’s generation: Generated PV energy
today.

Operating
14
Operating
2
dDisplays detailed status of energy
consumed in household.
Load Power : Current power consumed in
household
Today
Total consumption : Amount of
consumed energy today
From PV : Amount of energy from PV
to household today
From Battery : Amount of energy from
the battery to household today
From Grid : Amount of energy from the
power grid to household today
This month
Total consumption : Amount of
consumed energy this month
From PV : Amount of energy from PV
to household this month
From Battery : Amount of energy from
the battery to household this month
From Grid : Amount of energy from the
power grid to household this month

Operating
15
Operating
2
EDisplays charging and discharging status of
the battery briey.
Battery Status : Charging/Discharging/
Standby
Battery SOC: Current SOC (state of
charge) level
Winter Mode : Shows winter mode status.
DC Power : Current output power from
battery
Today
Charging : Amount of charged energy
to the battery today.
Discharging : Amount of discharged
energy from the battery today
This month
Charging : Amount of charged energy
to the battery in this month
Discharging : Amount of discharged
energy from the battery in this month
FDisplays current status of power grid.
Power: Current grid power
Voltage: Current grid voltage
Frequency : Current grid frequency
Today
Into Grid : Amount of sold energy today
From Grid : Amount of purchased
energy today
This month
Into Grid : Amount of sold energy today
and this month
From Grid : Amount of purchased
energy this month
G[System Operating]
Tap switch to start or stop system
operation.

Operating
16
Operating
2
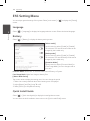
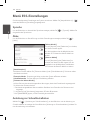
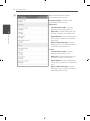
ESS Setting Menu
You can adjust general settings of the system. Select [main screen] > [ ] to display the [Setting]
screen.
Language
Select [ ] > [Language] to display the language selection screen. Select the desired language.
Battery
Select [ ] > [Battery] to display the battery setting screen.
[Winter mode]
Tap this switch to select [Enable] or [Disable].
The minimum SOC level of winter mode can be
changed by the installer only.
[Backup mode]
Tap this switch to select [Enable] or [Disable].
The minimum SOC level of Backup mode can be
changed by the installer only.
[Operation Mode]
Tap this switch to select [Economic Mode] or
[Fast Charge Mode]. You can change mode on
your own.
Economic Mode : Make Feed- in more and make more efciency to System.
Fast Charge Mode : Make fast charge to battery rst.
[Winter Mode Period]
Tap current value to display the setting menu. You can change the period
1. Select the currently selected value. Period setting menu is displayed.
2. Adjust [Month] and [Day] using S or W.
3. Select [APPLY] to complete the setting.
Quick Install Guide
Select [ ] > [Quick install guide] to display the install guidance screen.
You can check the brief installation instruction on the [Quick install Guide] screen.

Operating
17
Operating
2
Open source
You can check the open source information of the application and the system.
Select [ ] > [Open source] to display the open source notice screen.
To obtain the source code under GPL, LGPL, MPL, and other open source licenses, that is contained
in this product, please visit http://opensource.lge.com.
In addition to the source code, all referred license terms,
warranty disclaimers and copyright notices are available for download. LG Electronics will also
provide open source code to you on CD-ROM for a charge covering the cost of performing such
distribution (such as the cost of media, shipping, and handling) upon email request to opensource@
lge.com. This offer is valid for three(3) years from the date on which you purchased the product.
Application Information
Select [ ] > [Application information] to display the application information screen.
You can check the information of this application
such as application name and application version.
Energy Device
Select [ ] > [Energy Device] to display the Energy Device screen.
[EV]
Tap this switch to select [On] or [Off]. When ‘EV
Meter Enable’ not setting, Error Popup occurred.
After setting, EV monitoring can be enable.
[AWHP]
Tap this switch to select [On] or [Off]. When
AWHP is not connected, can not be set on and
Error Popup occurred.
Installer Settings
The system needs various system settingsby installer when installing. Users are not allowed to enter
[Installer Settings] menu. Try not to enter the menu. It may cause serious malfuction on the system,
if user changes settings on the[Installer Settings] menu.

Operating
18
Operating
2
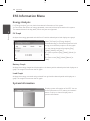
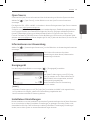
ESS Information Menu
Energy Analysis
On [Energy Analysis], you can check the statistical information of this system.
You can review the amount of energy generated, consumed, sold and purchased on this system.
The statistical data of the day, week, month and year are supported.
PV Graph
Analyzes the energy generated and sold from PV within selected period and displays as a graph.
Select [PV Graph] on [Energy Analysis].
Generated energy is marked with green and sold
energy is marked with purple on the line graph.
You can change the period by tapping [Day],
[Week], [Month] and [Year].
A : Goes to previous [Day], [Week], [Month] or
[Year].
D : Goes to next [Day], [Week], [Month] or
[Year].
Battery Graph
Analyzes the energy charged and discharged on the battery within selected period and displays as a
graph. The usage is the same as the PV graph.
Load Graph
Analyzes the energy consumed and purchased from grid within selected period and displays as a
graph. The usage is the same as the PV graph.
System Information
Displays system information of this ESS. You can
check information on PCS, battery and network
status. Scroll up or down to display next or
previous information.

Operating
19
Operating
2
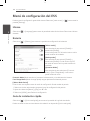
ATS time setting guide
ATS Box - Version 10013677 / 10013678
After 5 seconds of recovering grid power from the outage, the PCS stops the backup mode. At
the same time, supplies power to the critical load and the PCS. The PCS will be restarted in normal
mode.
Using the EnerVu application, you can set the interval of restarting the system after power recovery.
Follow the steps as described below.
1. In the EnerVu application, select [Installer settings] > [PCS] > [Grid] > [Reconn. Condition
(Tripping)] > [Observation Time].
2. Enter an interval value in the [Observation Time] option. The default value is 60 (sec) and the
minimum value you can set is 30 (sec).
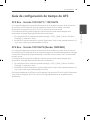
ATS Box - Version 10013679 (Bender VMD460)
After 5 seconds of recovering grid power from the outage, the PCS stops the backup mode. The
power will be supplied to the critical load and the PCS after the time set by the ATS box.
And then, the PCS automatically restarts in normal mode.
Using the EnerVu application, you can set the interval of restarting the system after power recovery.
Follow the steps as described below.
1. In the EnerVu application, select [Installer settings] > [PCS] > [Grid] > [Reconn. Condition
(Tripping)] > [Observation Time].
2. Enter an interval value in the [Observation Time] option. The default value is 60 (sec) and the
minimum value you can set is 30 (sec).
If the time setting in ATS box is 30 seconds and the PCS settings in [Observation Time] option is 60
seconds, the PCS restarts in 90 seconds after power recovery.

Appendix
20
Appendix
3
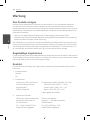
Maintenance
Cleaning the Product
Wipe off the outside of the product with a soft towel with lukewarm water and wipe it with a clean
hand towel so that dirt will not occur when using a neutral detergent. When cleaning the outside
of the product, do not brush it with a rough brush, toothpaste, or ammable materials. Do not use
cleaning agents containing ammable substances.
-It may cause discoloration of the product or damage to the product.
-Flammable substances : Alcohol (Ethanol, Methanol, Isopropyl alcohol, Isobutyl alcohol, etc.),
Thinner, Benzene, Flammable liquid, Abrasive etc.)
Wiping with strong pressure may damage the surface. Do not leave rubber or plastic products in
contact with the product for a long period of time.
When cleaning the air duct, shut off all the systems including PCS, PV module, battery, AC circuit
breaker. After that, clean the lter with soft brush.
Inspecting Regularly
It is recommended to check the operating status and connection status once a year. It should be
done by technician or authorized people. Contact authorized dealer or where you purchased.
Contact
If you have technical problems or questions, contact installation company or LG Electronics.
1. Installation Company
Address : Tel :
2. Customer Service
LG Electronics ESS | Solar Service
E-Service Haberkorn GmbH
Augustenhöhe 7
06493 Harzgerode
Tel : Germany: 0049 (0)39484 / 976 380
Austria: 0043 (0)720 / 11 66 01
Switzerland: 0041 (0)44 / 505 11 42
Belgium, Netherlands, Luxembourg:
0031 20 / 456 1660
E-Mail : [email protected]
3. LG Electronics Contact
LG Electronics Deutschland GmbH
Alfred-Herrhausen-Allee 3-5
65760 Eschborn
Tel. : + 0049 18 06 807 020
E-Mail: [email protected]
LG Electronics Benelux
Krijgsman 1, 1186 DM, Amstelveen,
The Netherlands
Tel: +0031 (0)20 456 3100
E-Mail: [email protected]
Appendix
La page est en cours de chargement...
La page est en cours de chargement...
La page est en cours de chargement...
La page est en cours de chargement...
La page est en cours de chargement...
La page est en cours de chargement...
La page est en cours de chargement...
La page est en cours de chargement...
La page est en cours de chargement...
La page est en cours de chargement...
La page est en cours de chargement...
La page est en cours de chargement...
La page est en cours de chargement...
La page est en cours de chargement...
La page est en cours de chargement...
La page est en cours de chargement...
La page est en cours de chargement...
La page est en cours de chargement...
La page est en cours de chargement...
La page est en cours de chargement...
La page est en cours de chargement...
La page est en cours de chargement...
La page est en cours de chargement...
La page est en cours de chargement...
La page est en cours de chargement...
La page est en cours de chargement...
La page est en cours de chargement...
La page est en cours de chargement...
La page est en cours de chargement...
La page est en cours de chargement...
La page est en cours de chargement...
La page est en cours de chargement...
La page est en cours de chargement...
La page est en cours de chargement...
La page est en cours de chargement...
La page est en cours de chargement...
La page est en cours de chargement...
La page est en cours de chargement...
La page est en cours de chargement...
La page est en cours de chargement...
La page est en cours de chargement...
La page est en cours de chargement...
La page est en cours de chargement...
La page est en cours de chargement...
La page est en cours de chargement...
La page est en cours de chargement...
La page est en cours de chargement...
La page est en cours de chargement...
La page est en cours de chargement...
La page est en cours de chargement...
La page est en cours de chargement...
La page est en cours de chargement...
La page est en cours de chargement...
La page est en cours de chargement...
La page est en cours de chargement...
La page est en cours de chargement...
La page est en cours de chargement...
La page est en cours de chargement...
La page est en cours de chargement...
La page est en cours de chargement...
La page est en cours de chargement...
La page est en cours de chargement...
La page est en cours de chargement...
La page est en cours de chargement...
La page est en cours de chargement...
La page est en cours de chargement...
La page est en cours de chargement...
La page est en cours de chargement...
La page est en cours de chargement...
La page est en cours de chargement...
La page est en cours de chargement...
La page est en cours de chargement...
La page est en cours de chargement...
La page est en cours de chargement...
La page est en cours de chargement...
La page est en cours de chargement...
La page est en cours de chargement...
La page est en cours de chargement...
La page est en cours de chargement...
La page est en cours de chargement...
-
 1
1
-
 2
2
-
 3
3
-
 4
4
-
 5
5
-
 6
6
-
 7
7
-
 8
8
-
 9
9
-
 10
10
-
 11
11
-
 12
12
-
 13
13
-
 14
14
-
 15
15
-
 16
16
-
 17
17
-
 18
18
-
 19
19
-
 20
20
-
 21
21
-
 22
22
-
 23
23
-
 24
24
-
 25
25
-
 26
26
-
 27
27
-
 28
28
-
 29
29
-
 30
30
-
 31
31
-
 32
32
-
 33
33
-
 34
34
-
 35
35
-
 36
36
-
 37
37
-
 38
38
-
 39
39
-
 40
40
-
 41
41
-
 42
42
-
 43
43
-
 44
44
-
 45
45
-
 46
46
-
 47
47
-
 48
48
-
 49
49
-
 50
50
-
 51
51
-
 52
52
-
 53
53
-
 54
54
-
 55
55
-
 56
56
-
 57
57
-
 58
58
-
 59
59
-
 60
60
-
 61
61
-
 62
62
-
 63
63
-
 64
64
-
 65
65
-
 66
66
-
 67
67
-
 68
68
-
 69
69
-
 70
70
-
 71
71
-
 72
72
-
 73
73
-
 74
74
-
 75
75
-
 76
76
-
 77
77
-
 78
78
-
 79
79
-
 80
80
-
 81
81
-
 82
82
-
 83
83
-
 84
84
-
 85
85
-
 86
86
-
 87
87
-
 88
88
-
 89
89
-
 90
90
-
 91
91
-
 92
92
-
 93
93
-
 94
94
-
 95
95
-
 96
96
-
 97
97
-
 98
98
-
 99
99
-
 100
100