
Writer: Beth Snowberger Saved by: Fleur Saved date: 08/17/99 1:44 AM
Page:
i of 192 Words: 23298 File name: Parrot15_RefGuide_final_0810
Aero 2100 Series
Color Palm-size PC
Reference Guide

Writer: Beth Snowberger - Saved by: Fleur - Saved date: 08/17/99 1:44 AM
File name: Parrot15_RefGuide_final_0810
NOTICE
The information in this reference guide is subject to change without
notice.
COMPAQ COMPUTER CORPORATION SHALL NOT BE LIABLE
FOR TECHNICAL OR EDITORIAL ERRORS OR OMISSIONS
CONTAINED HEREIN; NOR FOR INCIDENTAL OR
CONSEQUENTIAL DAMAGES RESULTING FROM THE
FURNISHING, PERFORMANCE, OR USE OF THIS MATERIAL.
This reference guide contains information protected by copyright. No part
of this reference guide may be photocopied or reproduced in any form
without prior written consent from Compaq Computer Corporation.
© 1999 Compaq Computer Corporation.
All rights reserved.
COMPAQ, AERO and the Compaq logo are registered in the U.S. Patent
and Trademark Office. Microsoft, MS, ActiveSync, Active Desktop,
Outlook, Windows, Windows NT, and the Windows CE logo are either
registered trademarks or trademarks of Microsoft Corporation in the
United States and/or other countries. Microsoft products are licensed to
OEMs by Microsoft Licensing, Inc., a wholly owned subsidiary of
Microsoft Corporation.
The software described in this reference guide is furnished under a
Program License Agreement or nondisclosure agreement. The software
may be used or copied only in accordance with the terms of such
agreement. Product names mentioned herein may be trademarks and/or
registered trademarks of their respective companies.
R
EFERENCE GUIDE
Aero 2100 Series Color Palm-size PC
Second Edition August 1999
Compaq Computer Corporation

Writer: Beth Snowberger - Saved by: Fleur - Saved date: 08/17/99 1:44 AM
File name: Parrot15_RefGuide_final_0810
TABLE OF CONTENTS
preface: Before You Begin
chapter 1: Introducing the Device
chapter 2: Basic Operations
chapter 3: Using Power
chapter 4: Software Functions
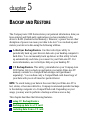
chapter 5: Backup and Restore
chapter 6: Pocket Outlook
chapter 7: Voice Recorder
chapter 8: Note Taker
chapter 9: Picture Viewer
chapter 10: AudiblePlayer
chapter 11: Infrared Feature
chapter 12: CompactFlash Cards
chapter 13: ActiveSync
chapter 14: Channels
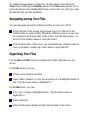
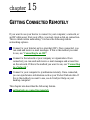
chapter 15: Getting Connected Remotely
chapter 16: Upgrading the Memory Module
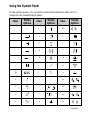
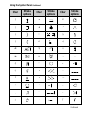
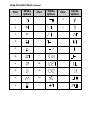
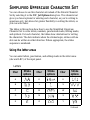
chapter 17: Using Jot Character Recognizer
chapter 18: Tips & Troubleshooting
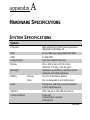
appendix A: Hardware Specifications
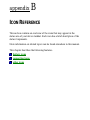
appendix B: Icon Reference
appendix C: Regulatory Notices

Writer: Beth Snowberger - Saved by: Fleur - Saved date: 08/17/99 1:44 AM
File name: Parrot15_RefGuide_final_0810
preface
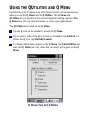
BEFORE YOU BEGIN
Before using your Compaq Aero 2100 Series, be sure to read through the
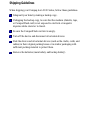
Quick Start Guide. Read this chapter for information about:
documentation and online help
customer registration
symbols and conventions used in this guide
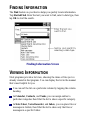
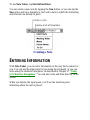
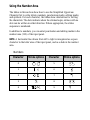
FINDING INFORMATION
References are provided as printed materials and as online information
that is accessible from your desktop computer and your Aero 2100. In
addition to this guide the following references come with your Aero 2100:
Quick Start Guide
Pocket Reference Guide
Accessories Information
Accessories Business Card
Important Safety Information
Register Now Card (North America only)
For Help... (warranty and service information)
Program License Agreement
Microsoft® ActiveSync booklet (with Microsoft ActiveSync CD)

Writer: Beth Snowberger - Saved by: Fleur - Saved date: 08/17/99 1:44 AM
File name: Parrot15_RefGuide_final_0810
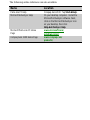
The following online references are also available:
Name Location
Palm-size PC Help
Compaq Aero 2100. Tap Start
ààHelp.
Microsoft ActiveSync Help On your desktop computer. Install the
Microsoft ActiveSync software. Next,
click on the Microsoft ActiveSync icon
on your desktop, then click
HelpààActiveSync Help.
Microsoft Palm-size PC Home
Page
www.microsoft.com/
windowsce/ppc
Compaq Aero 2100 Home Page
www.compaq.com/
products/

Writer: Beth Snowberger - Saved by: Fleur - Saved date: 08/17/99 1:44 AM
File name: Parrot15_RefGuide_final_0810
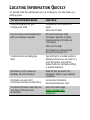
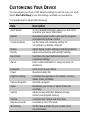
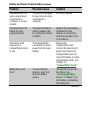
LOCATING INFORMATION QUICKLY
To quickly find the information you’re looking for, use this table as a
starting point.
To Find Information About: Look Here:
Using the programs on your
Compaq Aero 2100
Compaq Aero 2100 Reference
Guide
Palm-size PC Help
Synchronizing and exchanging files
with your desktop computer
Microsoft ActiveSync Help.
ActiveSync Help also includes
troubleshooting information on
connections.
Palm-size PC Help
The booklet accompanying the
Microsoft ActiveSync CD
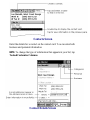
Toolbar buttons and dialog box
items
Tap and hold on a toolbar button or
dialog box item to see its name or a
short description. Drag off the
toolbar button or item before lifting
to avoid activating it.
Information on this release of
Windows CE and ActiveSync
Read Me files (located in the
ActiveSync folder on your desktop
computer).
Information on Aero 2100
accessories and how to order them
Accessories Information
Accessories Business Card
The latest information and offers for
your Aero 2100 device and
accessories
Aero 2100 Home Page
(www.compaq.com/
products/)

Writer: Beth Snowberger - Saved by: Fleur - Saved date: 08/17/99 1:44 AM
File name: Parrot15_RefGuide_final_0810
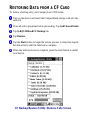
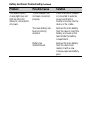
CUSTOMER REGISTRATION
In North America
To receive the latest information on your Compaq Aero 2100 Series, as
well as special offers on device accessories and software, be sure to
register with Compaq by completing and mailing the Register Now card
included with your Palm-size PC.
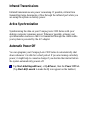
Outside of North America
Outside of North America, use the Compaq Info Messenger service to
obtain Internet and e-mail access to the latest software updates and service
documentation for your device.
Once you register with this free service at www.compaq.com/
infomessenger and build your profile(s), Info Messenger searches the
Compaq Web site and collects information specific to your Compaq Aero
2100 Series environment. Info Messenger then sends an e-mail alerting
you when new and/or updated information is available on a Compaq
customized Web page.

Writer: Beth Snowberger - Saved by: Fleur - Saved date: 08/17/99 1:44 AM
File name: Parrot15_RefGuide_final_0810
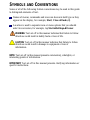
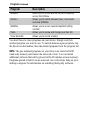
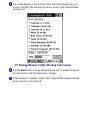
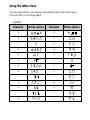
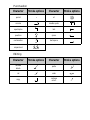
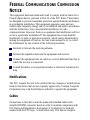
SYMBOLS AND CONVENTIONS
Some or all of the following format conventions may be used in this guide
to distinguish elements of text:
Names of menus, commands and icons are shown in bold type as they
appear on the display, for example, Start, Close all tasks, Q.
An arrow is used to separate icons or menu options that you should
select in succession, for example, tap Start
ààSettingsààOwner.
WARNING: Text set off in this manner indicates that failure to follow
directions could result in bodily harm or loss of life.
CAUTION: Text set off in this manner indicates that failure to follow
directions could result in damage to equipment or loss of
information.
NOTE: Text set off in this manner presents commentary, sidelights, or
interesting points of information.
IMPORTANT: Text set off in this manner presents clarifying information or
specific instructions.

Writer: Beth Snowberger - Saved by: Fleur - Saved date: 08/17/99 1:44 AM
File name: Parrot15_RefGuide_final_0810
chapter 1
INTRODUCING THE DEVICE
Welcome to the colorful world of the Compaq Aero 2100 Series (referred
to as the "device" throughout this reference guide). Powered by
Microsoft's Windows CE operating system, the Aero 2100 is designed to
provide you quick and convenient access to critical information while
away from your PC. It fits neatly in your pocket and acts as a mobile
extension to your PC, letting you access and organize important
information such as your contacts, schedule and task list wherever you go.
Best of all, the Aero 2100 Series features a bright, high resolution, color
TFT display that greatly enhances the crispness of text and pictures so that
you can view more information at a glance. New reflective technology
ensures the Compaq Aero 2100 Series display is as easy to read in bright
outdoor environments as it is in low-light indoor settings. You can even
make changes to your data or add new data by using the stylus and the
software keyboard or the Jot handwriting recognition system. Because its
Windows CE interface closely emulates the Windows interface on your
PC, the Aero 2100 Series is the most intuitive way to stay productive and
access, organize and exchange information with a Windows-based PC.
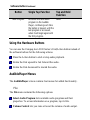
This chapter describes the following features:
front side components
left side components
top edge components
bottom edge components
back side components
cradle components and auto-sync cable

Writer: Beth Snowberger - Saved by: Fleur - Saved date: 08/17/99 1:44 AM
File name: Parrot15_RefGuide_final_0810
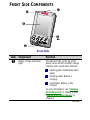
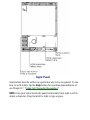
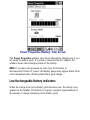
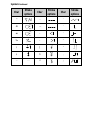
FRONT SIDE COMPONENTS
Ê
Í
Ë
Ì
Ì
Î
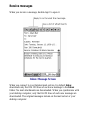
Front Side
Item Component Function
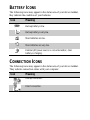
Ê
Battery Charge and Alarm
Light
The indicator light on the top of the
device serves as both a battery charge
indicator and a visual alarm indicator.
Flashing green: Notification alarm
signal.
Flashing amber: Battery is
charging.
Solid amber: Battery is fully
charged.
For more information, see "Charging
the Battery Pack" in Chapter 3, and
"Setting Notification Alarms" in
Chapter 4.
Continued

Writer: Beth Snowberger - Saved by: Fleur - Saved date: 08/17/99 1:44 AM
File name: Parrot15_RefGuide_final_0810
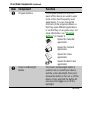
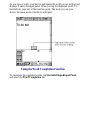
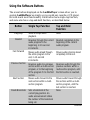
Front Side Components Continued
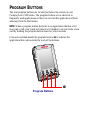
Item Component Function
The program buttons on the front
panel of the device are used to open
some of the most frequently used
applications. You can change the
shortcuts of the program buttons so
that they open different applications,
or so that they act as game keys. For
more information, see "Program
Buttons" in Chapter 6.
Opens the Calendar
application.
Opens the Contacts
application.
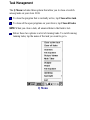
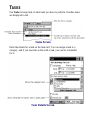
Opens the Tasks
application.
Ë
Program Buttons
Opens the Note Taker
application.
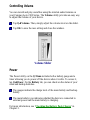
Ì
Power and Backlight
Button
The Power and Backlight button is
used to turn on and off your device
and the screen backlight. Press and
release the button to turn on or off the
device. Press and hold the button for
one second to toggle on or off the
backlight.
Continued

Writer: Beth Snowberger - Saved by: Fleur - Saved date: 08/17/99 1:44 AM
File name: Parrot15_RefGuide_final_0810
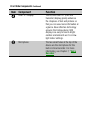
Front Side Components Continued
Item Component Function
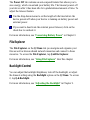
Í
Color TFT Display The 65,536-color TFT (thin-film
transistor) display greatly enhances
the crispness of text and pictures so
that you can view more information at
a glance. New reflective technology
ensures the Compaq Aero 2100
display is as easy to read in bright
outdoor environments as it is in low-
light indoor settings.
Î
Microphone The two small holes at the top of the
device are the microphone for the
built-in Voice Recorder. For more
information, see Chapter 7, "Voice
Recorder."

Writer: Beth Snowberger - Saved by: Fleur - Saved date: 08/17/99 1:44 AM
File name: Parrot15_RefGuide_final_0810
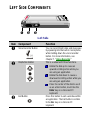
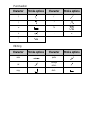
LEFT SIDE COMPONENTS
Ê
Ë
Ì
Left Side
Item Component Function
Ê
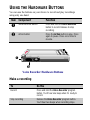
Voice Recorder Button You can record brief notes and messages
by speaking into the built-in microphone
while holding down the voice recorder
button. For more information, see
Chapter 7, "Voice Recorder."
Ë
Dial/Action Button This is a wheel with three functions.
Rotate the dial up to cause an
upward scrolling action while you
are using an application.
Rotate the dial down to cause a
downward scrolling action while you
are using an application.
Press the center of the dial to use it
as an action button, much like the
Enter key on a full-sized PC
keyboard.
Ì
Exit Button Press this button to exit a window within
an application. The Exit button is similar
to the Esc key on a full-size PC
keyboard.

Writer: Beth Snowberger - Saved by: Fleur - Saved date: 08/17/99 1:44 AM
File name: Parrot15_RefGuide_final_0810
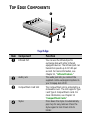
TOP EDGE COMPONENTS
Ì
Ê
Ë
Í
Top Edge
Item Component Function
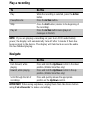
Ê
Infrared Port You can use the infrared port to
exchange data with other infrared-
equipped devices. The infrared port can
transmit at speeds up to 115 Kb per
second. For more information, see
Chapter 11, "Infrared Feature."
Ë
Audio Jack The audio jack lets you connect the
supplied combo earplug/microphone to
your Compaq Aero 2100.
Ì
CompactFlash Card Slot The CompactFlash slot is protected by a
removable cover. The slot supports Type
I and Type II CompactFlash cards. For
more information, see Chapter 12
"CompactFlash Cards."
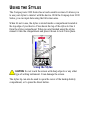
Í
Stylus Press down the stylus to automatically
pop it up for easy removal. Press the
stylus again to lock it back into its
holder.

Writer: Beth Snowberger - Saved by: Fleur - Saved date: 08/17/99 1:44 AM
File name: Parrot15_RefGuide_final_0810
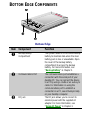
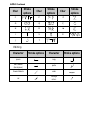
BOTTOM EDGE COMPONENTS
Ê
Ë
Ì
Bottom Edge
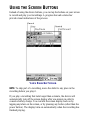
Item Component Function
Ê
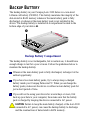
Backup Battery
Compartment
The system relies on a coin-sized backup
battery to maintain data when the main
battery pack is low or unavailable. Open
the cover of the backup battery
compartment to access the backup
battery. For more information, see
"Backup Battery" in Chapter 3.
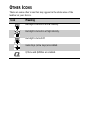
Ë
Communications Port The communications port establishes a
connection with the serial port of your
desktop PC. You can connect the device
to a PC by using a cradle or an auto-sync
cable. For information on using the
communications port to establish a
connection to a PC, see ActiveSync Help
on your desktop computer.
Ì
DC Jack The DC jack allows you to connect to
external power with the supplied AC
adapter. For more information, see
"Using AC Power" in Chapter 3.

Writer: Beth Snowberger - Saved by: Fleur - Saved date: 08/17/99 1:44 AM
File name: Parrot15_RefGuide_final_0810
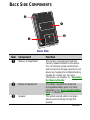
BACK SIDE COMPONENTS
Ê
Ì
Í
Ë
Back Side
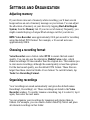
Item Component Function
Ê
Memory Compartment The memory compartment holds the
memory module installed in the device.
You can improve system performance
and increase the storage capacity of your
device by changing the installed memory
module for a larger one. For more
information, see Chapter 15, "Upgrading
the Memory Module."
Ë
Battery Compartment The battery compartment holds the
rechargeable battery pack. For more
information, see "Rechargeable Battery
Pack" in Chapter 3.
Ì
Speaker The system sounds alarms and plays
back sound recordings through this
speaker.
Continued

Writer: Beth Snowberger - Saved by: Fleur - Saved date: 08/17/99 1:44 AM
File name: Parrot15_RefGuide_final_0810
Back Side Components Continued
Item Component Function
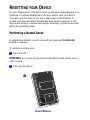
The Reset button is recessed inside the
case of the device. Occasionally, some
hardware or software malfunctions can
prevent the device from responding. To
get the device working again, use the tip
of the stylus to press the Reset button.
For more information, see "Resetting
Your Device" in Chapter 3.
Í
Reset Button
CAUTION: When you use the
Reset button, you will lose any
data that has not been saved.

Writer: Beth Snowberger - Saved by: Fleur - Saved date: 08/17/99 1:44 AM
File name: Parrot15_RefGuide_final_0810
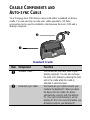
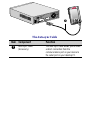
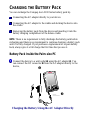
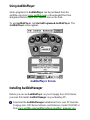
CRADLE COMPONENTS AND
AUTO-SYNC CABLE
Your Compaq Aero 2100 Series comes with either a standard or deluxe
cradle. You can also buy an auto-sync cable separately. All three
accessories can be used to establish a link between the Aero 2100 and a
desktop computer.
Ê
Ë
Standard Cradle
Item Component Function
Ê
Standard Cradle The cradle links your Aero 2100 to your
desktop computer. You can also recharge
the main unit's battery by docking the main
unit in the cradle while the cradle is
attached to external power.
Ë
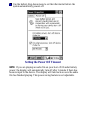
Fixed Auto-sync Cable The fixed auto-sync cable connects your
cradle to the desktop PC. When you dock
the device into the cradle, the device
automatically connects with the desktop
PC. (You must install ActiveSync on the
desktop PC first.) For more information, see
ActiveSync Help on your desktop PC.

Writer: Beth Snowberger - Saved by: Fleur - Saved date: 08/17/99 1:44 AM
File name: Parrot15_RefGuide_final_0810
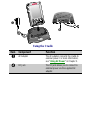
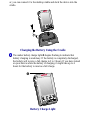
Ì
Using the Cradle
Item Component Function
Ì
AC Adapter The AC adapter connects the cradle to
external power. For more information,
see "Using AC Power" in Chapter 3.
Í
DC Jack The DC jack allows you to connect to
external power via the supplied AC
adapter.
Í

Writer: Beth Snowberger - Saved by: Fleur - Saved date: 08/17/99 1:44 AM
File name: Parrot15_RefGuide_final_0810
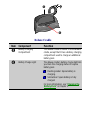
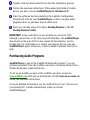
Deluxe Cradle
Item Component Function
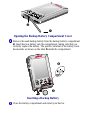
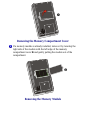
Î
Battery Charging
Compartment
The deluxe cradle is similar to the standard
cradle, except that it has a battery-charging
compartment used to charge an additional
battery pack.
Ï
Battery Charge Light The deluxe cradle's battery charge light lets
you track the charging status of a spare
battery pack.
Flashing amber: Spare battery is
charging.
Sold amber: Spare battery is fully
charged.
For more information, see "Charging the
Battery Pack" in Chapter 3.
Ï
Î
La page est en cours de chargement...
La page est en cours de chargement...
La page est en cours de chargement...
La page est en cours de chargement...
La page est en cours de chargement...
La page est en cours de chargement...
La page est en cours de chargement...
La page est en cours de chargement...
La page est en cours de chargement...
La page est en cours de chargement...
La page est en cours de chargement...
La page est en cours de chargement...
La page est en cours de chargement...
La page est en cours de chargement...
La page est en cours de chargement...
La page est en cours de chargement...
La page est en cours de chargement...
La page est en cours de chargement...
La page est en cours de chargement...
La page est en cours de chargement...
La page est en cours de chargement...
La page est en cours de chargement...
La page est en cours de chargement...
La page est en cours de chargement...
La page est en cours de chargement...
La page est en cours de chargement...
La page est en cours de chargement...
La page est en cours de chargement...
La page est en cours de chargement...
La page est en cours de chargement...
La page est en cours de chargement...
La page est en cours de chargement...
La page est en cours de chargement...
La page est en cours de chargement...
La page est en cours de chargement...
La page est en cours de chargement...
La page est en cours de chargement...
La page est en cours de chargement...
La page est en cours de chargement...
La page est en cours de chargement...
La page est en cours de chargement...
La page est en cours de chargement...
La page est en cours de chargement...
La page est en cours de chargement...
La page est en cours de chargement...
La page est en cours de chargement...
La page est en cours de chargement...
La page est en cours de chargement...
La page est en cours de chargement...
La page est en cours de chargement...
La page est en cours de chargement...
La page est en cours de chargement...
La page est en cours de chargement...
La page est en cours de chargement...
La page est en cours de chargement...
La page est en cours de chargement...
La page est en cours de chargement...
La page est en cours de chargement...
La page est en cours de chargement...
La page est en cours de chargement...
La page est en cours de chargement...
La page est en cours de chargement...
La page est en cours de chargement...
La page est en cours de chargement...
La page est en cours de chargement...
La page est en cours de chargement...
La page est en cours de chargement...
La page est en cours de chargement...
La page est en cours de chargement...
La page est en cours de chargement...
La page est en cours de chargement...
La page est en cours de chargement...
La page est en cours de chargement...
La page est en cours de chargement...
La page est en cours de chargement...
La page est en cours de chargement...
La page est en cours de chargement...
La page est en cours de chargement...
La page est en cours de chargement...
La page est en cours de chargement...
La page est en cours de chargement...
La page est en cours de chargement...
La page est en cours de chargement...
La page est en cours de chargement...
La page est en cours de chargement...
La page est en cours de chargement...
La page est en cours de chargement...
La page est en cours de chargement...
La page est en cours de chargement...
La page est en cours de chargement...
La page est en cours de chargement...
La page est en cours de chargement...
La page est en cours de chargement...
La page est en cours de chargement...
La page est en cours de chargement...
La page est en cours de chargement...
La page est en cours de chargement...
La page est en cours de chargement...
La page est en cours de chargement...
La page est en cours de chargement...
La page est en cours de chargement...
La page est en cours de chargement...
La page est en cours de chargement...
La page est en cours de chargement...
La page est en cours de chargement...
La page est en cours de chargement...
La page est en cours de chargement...
La page est en cours de chargement...
La page est en cours de chargement...
La page est en cours de chargement...
La page est en cours de chargement...
La page est en cours de chargement...
La page est en cours de chargement...
La page est en cours de chargement...
La page est en cours de chargement...
La page est en cours de chargement...
La page est en cours de chargement...
La page est en cours de chargement...
La page est en cours de chargement...
La page est en cours de chargement...
La page est en cours de chargement...
La page est en cours de chargement...
La page est en cours de chargement...
La page est en cours de chargement...
La page est en cours de chargement...
La page est en cours de chargement...
La page est en cours de chargement...
La page est en cours de chargement...
La page est en cours de chargement...
La page est en cours de chargement...
La page est en cours de chargement...
La page est en cours de chargement...
La page est en cours de chargement...
La page est en cours de chargement...
La page est en cours de chargement...
La page est en cours de chargement...
La page est en cours de chargement...
La page est en cours de chargement...
La page est en cours de chargement...
La page est en cours de chargement...
La page est en cours de chargement...
La page est en cours de chargement...
La page est en cours de chargement...
La page est en cours de chargement...
La page est en cours de chargement...
La page est en cours de chargement...
La page est en cours de chargement...
La page est en cours de chargement...
La page est en cours de chargement...
La page est en cours de chargement...
La page est en cours de chargement...
La page est en cours de chargement...
La page est en cours de chargement...
La page est en cours de chargement...
La page est en cours de chargement...
La page est en cours de chargement...
La page est en cours de chargement...
La page est en cours de chargement...
La page est en cours de chargement...
La page est en cours de chargement...
La page est en cours de chargement...
La page est en cours de chargement...
La page est en cours de chargement...
La page est en cours de chargement...
La page est en cours de chargement...
La page est en cours de chargement...
La page est en cours de chargement...
La page est en cours de chargement...
La page est en cours de chargement...
La page est en cours de chargement...
La page est en cours de chargement...
La page est en cours de chargement...
-
 1
1
-
 2
2
-
 3
3
-
 4
4
-
 5
5
-
 6
6
-
 7
7
-
 8
8
-
 9
9
-
 10
10
-
 11
11
-
 12
12
-
 13
13
-
 14
14
-
 15
15
-
 16
16
-
 17
17
-
 18
18
-
 19
19
-
 20
20
-
 21
21
-
 22
22
-
 23
23
-
 24
24
-
 25
25
-
 26
26
-
 27
27
-
 28
28
-
 29
29
-
 30
30
-
 31
31
-
 32
32
-
 33
33
-
 34
34
-
 35
35
-
 36
36
-
 37
37
-
 38
38
-
 39
39
-
 40
40
-
 41
41
-
 42
42
-
 43
43
-
 44
44
-
 45
45
-
 46
46
-
 47
47
-
 48
48
-
 49
49
-
 50
50
-
 51
51
-
 52
52
-
 53
53
-
 54
54
-
 55
55
-
 56
56
-
 57
57
-
 58
58
-
 59
59
-
 60
60
-
 61
61
-
 62
62
-
 63
63
-
 64
64
-
 65
65
-
 66
66
-
 67
67
-
 68
68
-
 69
69
-
 70
70
-
 71
71
-
 72
72
-
 73
73
-
 74
74
-
 75
75
-
 76
76
-
 77
77
-
 78
78
-
 79
79
-
 80
80
-
 81
81
-
 82
82
-
 83
83
-
 84
84
-
 85
85
-
 86
86
-
 87
87
-
 88
88
-
 89
89
-
 90
90
-
 91
91
-
 92
92
-
 93
93
-
 94
94
-
 95
95
-
 96
96
-
 97
97
-
 98
98
-
 99
99
-
 100
100
-
 101
101
-
 102
102
-
 103
103
-
 104
104
-
 105
105
-
 106
106
-
 107
107
-
 108
108
-
 109
109
-
 110
110
-
 111
111
-
 112
112
-
 113
113
-
 114
114
-
 115
115
-
 116
116
-
 117
117
-
 118
118
-
 119
119
-
 120
120
-
 121
121
-
 122
122
-
 123
123
-
 124
124
-
 125
125
-
 126
126
-
 127
127
-
 128
128
-
 129
129
-
 130
130
-
 131
131
-
 132
132
-
 133
133
-
 134
134
-
 135
135
-
 136
136
-
 137
137
-
 138
138
-
 139
139
-
 140
140
-
 141
141
-
 142
142
-
 143
143
-
 144
144
-
 145
145
-
 146
146
-
 147
147
-
 148
148
-
 149
149
-
 150
150
-
 151
151
-
 152
152
-
 153
153
-
 154
154
-
 155
155
-
 156
156
-
 157
157
-
 158
158
-
 159
159
-
 160
160
-
 161
161
-
 162
162
-
 163
163
-
 164
164
-
 165
165
-
 166
166
-
 167
167
-
 168
168
-
 169
169
-
 170
170
-
 171
171
-
 172
172
-
 173
173
-
 174
174
-
 175
175
-
 176
176
-
 177
177
-
 178
178
-
 179
179
-
 180
180
-
 181
181
-
 182
182
-
 183
183
-
 184
184
-
 185
185
-
 186
186
-
 187
187
-
 188
188
-
 189
189
-
 190
190
-
 191
191
-
 192
192


dans d''autres langues
- English: Compaq Aero 2180 Reference guide
Documents connexes
-
Compaq Aero 1525 Guide de référence
-
Compaq Compaq Presario,Presario 2838 Network Manual
-
-
-
-
-
-
-
 Wyse Technology DYDWT3235 Manuel utilisateur
-

Autres documents
-
 CJ GLOBAL 24714 Manuel utilisateur
-
Juniper FIELD PC Manuel utilisateur
-
 Tobii Dynavox I-SERIES Manuel utilisateur
-
Palm Ultra-Thin Keyboard Manuel utilisateur
-
-
LG D010KE1N211, D008KE1N211 Energy Storage System Manuel utilisateur
-
Brady LOCKOUT PRO 2.0 Mode d'emploi
-
 Psion Teklogix Notebook Pro Manuel utilisateur
-
-
LG KS20.AORPBK Manuel utilisateur


