Kichler Lighting 16200BBR30 Manuel utilisateur
- Taper
- Manuel utilisateur

FOR USE WITH LANDSCAPE LIGHTING SYSTEMS ONLY.
1) The device is accepted as a component of a landscape lighting system
where the suitability of the CSA or UL labeled combination shall be
determined by CSA, UL respectively or the local inspection authorities
having jurisdiction.
2) Fixture shall be connected to an extra low voltage transformer approved
for use with landscape lighting systems.
3) Thisxtureistobeconnectedtoasecondarywiringofthefollowing
type:
12 GA 60°C minimum type;
SPT-3 suitable for outdoor use; or
approved landscape lighting cable.
4) WARNING: Thisxtureisnottobeinstalledwithin10feet(3M)ofapool,
spa or fountain.
5) Wiring connections must be made with approved/listed wire connection
device(s)suitablefortheapplication.Donotexceedmanufacturers’wiring
combinationspecicationsforsizeandquantityofconductors.
CAUTION
WHEN INSTALLING KICHLER LANDSCAPE LIGHTING (LINE VOLTAGE OR LOW VOLTAGE),
CARE SHOULD BE TAKEN TO KEEP CLEAR OF POTENTIALLY COMBUSTIBLE MATERIALS.
WHEN MAINTAINING THE FIXTURES, BE SURE TO REMOVE LEAVES, PINE NEEDLES,
GRASS CLIPPINGS, MULCH, OR ANY DEBRIS THAT HAS ACCUMULATED ON THE LIGHT
BULB, LENS, OR BODY OF THE FIXTURE.
ASSEMBLY AND INSTALLATION
1) Determinedesiredlocationformountingxture.
2) At desired location, hammer stake into ground. To avoid damage to stake,
place a board on top of stake while hammering. If ground is hard and
stakeisdifculttoinstall,makeacrosscutingroundusingaatshovel.
3) Clear away area in ground at wireway slot in top of stake.
4) Lay12Vcableintowirewayslotandscrewxtureintostake.Aimxture
in desired direction and secure by tightening locknut. If necessary, use
wrenchorpliersfornaltighteningofnut.
5) Adjust angle of accent light by loosening Phillips head screw.
6) Adjust angle of cowl by loosening thumb screw.
7) TURN OFF POWER.
8) Firstconnectthegreengroundwirefromxturetothe120Vsupplyground
wire.
9) Makeremainingwireconnections(connectorsnotprovided).Reference
chart for correct connections and wire accordingly.
A UTILISER UNIQUEMENT POUR LES SYSTÈMES D’ÉCLAIRAG PAYSAGER
1) Ledispositifestacceptéentantquecomposantd’unsystèmed’é
clairagepaysagerlorsquelacompatibilitédelacombinaisonétiquetée
ULouCSA(ACNOR)doitêtredéterminéeparCSA,ULrespectivement
oulesautoritésd’inspectionlocalesayantcompétence.
2) L’appareildoitétreconnectéàuntransformateursupplémentaireà
basse tension approuvé pour une utilisation avec les systémes
d’éclairagepaysager.
3) Cetapareildoitétreconnectéàuncâblagesecondairedutypesuivant:
12GA 60°C type minimum;
SPT-3 combatible pour utilisation extreme;
oucâbled’éclairagepaysageragréé.
4) AVERTISSEMENT :Nepasinstallerleluminairedansles3md’une
piscine, spa ou fontaine.
5) Lesraccordementsdescâblesdoiventêtreeffectuésavecdesdispositifs
pourraccordementdecâbleadaptésàl’application.Respecterstrictement
lesspécicationsdecombinaisonsdecâbledufabricantpourlatailleetla
quantitédeconducteurs.
ATTENTION
LORS DE L’INSTALLATION D’ECLAIRAGE DE JARDIN KICHLER 9TNESION DU SECTEUR OU
BASSE TENSION), PRENEZ SOIN DE LE MAINTENIR DEGAGE DE TOUT MATERIAU
COMBUSTIBLE.
LORS DE L’ENTRETIEN DE LA LAMPE, ASSUREZ - VOUS DE RETIRER LES FEULLES, LES
AIGUILLES DE PIN, LES BRINS D’HERBE, L’HUMUS, ET TOUT DEBRIS QUI S’EST ACCUMULE
SUR L’AMPOULE DE LA LAMPE, LE DIFFUSEUR OU LE CORP DE LA LAMPE.
MONTAGE ET INSTALLATION
1) Déterminerl’emplacementoùinstallerleluminaire.
2) Planterlepoteaudanslesol.Pouréviterd’endommagerlepoteauavecle
marteau,poserdessusunmorceaudebois.Silesolesttrèsdur,faire
deux entailles en croix dans le sol avec une pelle plate.
3) Dégagerlesolauniveaudelafenteguide-lssituéesurlapartie
supérieure du poteau.
4) Passerlelde12Vdanslafenteguide-lsetvisserleluminairesurle
poteau.Dirigerleluminairedansladirectionsouhaitéeetxerenserrant
un contre-écrou.. Si besoin, utiliser des clés ou des pinces pour le serrage
naldel’écrou.
5) Ajusterl’angledelalumièreaccentuationendesserrantlavisàtête
Phillips.
6) Réglerl’angleducapotendesserrantlavisàtêtemoletée.
DateIssued:3/30/12 IS-16200-CB
OUTDOOR USE ONLY
DOM ETRE INSTALLE A L’EXTERIEUR
INSTRUCTIONS
For Assembling and Installing Fixtures in Canada
Pour L’assemblage et L’installation Au Canada
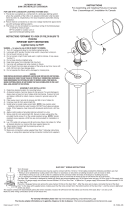
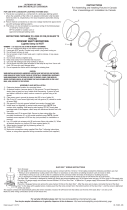
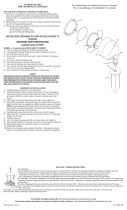
FIXTURE
LUMINAIRE
LOCKNUT
CONTRE-ÉCROU
STAKE
POTEAU
For warranty information please visit: http://www.landscapelighting.com/portal/warranty_page
Pour de plus amples informations sur la garantie, cliquez sur le lien ci-dessous : http://www.landscapelighting.com/portal/warranty_page
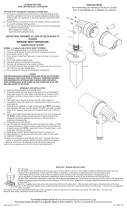
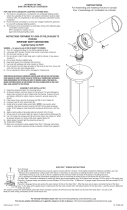
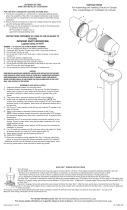
FIXTURE
LUMINAIRE
LOCKNUT
CONTRE-ÉCROU
STAKE
POTEAU
PHILLIPSHEADSCREWTO
ADJUSTANGLEOFFIXTURE
VIS À TÊTE PHILLIPS POUR
AJUSTERL’ANGLE
DULUMINAIRE
PHILLIPSHEADSCREWTO
ADJUSTANGLEOFFIXTURE
SERRER LA VIS POUR
AJUSTERL’ANGLE
DULUMINAIRE
THUMBSCREWTOADJUST
ANGLE OF COWL OR TO
LOOSENANDREMOVECOWL
VIS À OREILLES POUR
RÉGLERL’ANGLEDUCAPOT
OUPOURDESSERRERET
ENLEVER
SHOWN WITH OPTIONAL
COWLREMOVED
ILLUSTRATION SANS
LE CAPOT
WIRELEAD
CONDUCTEURDEFIL
WIRELEAD
CONDUCTEURDEFIL
Connect Black or
Red Supply Wire to:
Connect
White Supply Wire to:
Black White
Insulated wire (other than green)
with copper conductor
Insulated wire (other than green)
with silver conductor
Connecter le fil noir ou
rouge de la boite
Connecter le fil blanc de la boîte
A Noir A Blanc
Fil isolé (sauf fil vert) avec
conducteur en cuivre
Fil isolé (sauf fil vert) avec
conducteur en argent
7) COUPERLECOURANTD’ALIMENTATION.
8) Connecterd’abordleldeterrevertduluminaireauldeterre
d’alimentationde120V.
9) Effectuerleraccordementdeslsrestants(connecteursnonfournis).Se
reporterautableaupourlesconnexionsappropriéesetacheminerlesls
selon les instructions.
-
 1
1
Kichler Lighting 16200BBR30 Manuel utilisateur
- Taper
- Manuel utilisateur
dans d''autres langues
Documents connexes
-
Kichler Lighting 16154AZT27 Manuel utilisateur
-
 Kichler Lighting 15384AZT Manuel utilisateur
-
 Kichler Lighting 15397AZT Manuel utilisateur
-
 Kichler Lighting 15398AZT Manuel utilisateur
-
 Kichler Lighting 15382BK Manuel utilisateur
-
 Kichler Lighting 15381AZT Manuel utilisateur
-
 Kichler Lighting 15390AZT Manuel utilisateur
-
 Kichler Lighting 15374AZT Manuel utilisateur
-
Kichler Lighting 15395AZT Manuel utilisateur
-
Kichler Lighting 15476CBR Manuel utilisateur


