Kichler Lighting 15476CBR Manuel utilisateur
- Taper
- Manuel utilisateur

FOR USE WITH LANDSCAPE LIGHTING SYSTEMS ONLY.
1) The device is accepted as a component of a landscape lighting system where
the suitability of the CSA or UL labeled combination shall be determined by
CSA, UL respectively or the local inspection authorities having jurisdiction.
2) Fixture shall be connected to an extra low voltage transformer approved for
use with landscape lighting systems.
3) This fixture is to be connected to a secondary wiring of the following type:
12 GA 60°C minimum type;
SPT-3 suitable for outdoor use; or
approved landscape lighting cable.
CAUTION
WHEN INSTALLING KICHLER LANDSCAPE LIGHTING (LINE VOLTAGE OR LOW VOLTAGE), CARE
SHOULD BE TAKEN TO KEEP CLEAR OF POTENTIALLY COMBUSTIBLE MATERIALS.
WHEN MAINTAINING THE FIXTURES, BE SURE TO REMOVE LEAVES, PINE NEEDLES, GRASS
CLIPPINGS, MULCH, OR ANY DEBRIS THAT HAS ACCUMULATED ON THE LIGHT BULB, LENS, OR
BODY OF THE FIXTURE.
ASSEMBLY AND INSTALLATION
1. TURN OFF POWER.
2. Determine desired location for mounting fixture.
3. At desired location, hammer stake into ground. To avoid damage to stake,
place a board on top of stake or use a rubber mallet. If ground is hard and
stake is difficult to install, make a crosscut in ground using a flat shovel.
4. Clear away area in ground at wireway opening in stake.
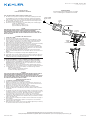
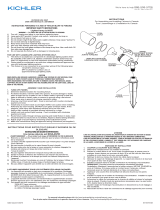
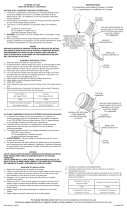
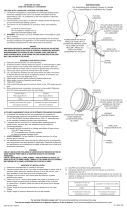
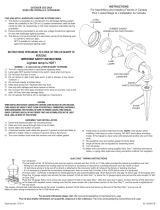
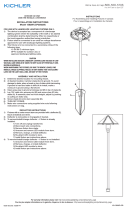
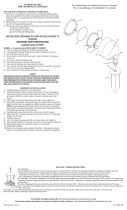
5. Remove (2) screws holding cowl in place and remove cowl and lens assembly.
6. Install recommended lamp (not supplied) in socket inside fixture.
7. Fixture is supplied with three glass lens options to create desired lighting
effect. To change lens, removed gasket from around glass and replace with
selected glass. Reinstall lens and gasket assembly into cowl. Re-assemble
cowl onto housing and secure with (2) screws.
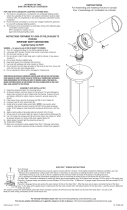
8. Route fixture cable through wireway opening and screw stem into stake.
Adjust to desired aiming direction. Care should be taken to ensure wire is not
twisted
9. Adjust angle of accent light by loosening swivel adjustment screw.
10. If assembly does not look straight, adjust by pushing or pulling on stake only
11. Make wire connections using an approved wiring connectors (not supplied)
following instructions provided by manufacturer.
A UTILISER UNIQUEMENT POUR LES SYSTÈMES D’ÉCLAIRAG PAYSAGER
1) Le dispositif est accepté en tant que composant d’un système d’éclairage
paysager lorsque la compatibilité de la combinaison étiquetée UL ou CSA
(ACNOR) doit être déterminée par CSA, UL respectivement ou les autorités
d’inspection locales ayant compétence.
2) L’appareil doit étre connecté à un transformateur supplémentaire à basse
tension approuvé pour une utilisation avec les systémes d’éclairage paysager.
3) Cet apareil doit étre connecté à un câblage secondaire du type suivant:
12GA 60°C type minimum;
SPT-3 combatible pour utilisation extreme;
ou câble d’éclairage paysager agréé.
ATTENTION
LORS DE L’INSTALLATION D’ECLAIRAGE DE JARDIN KICHLER (TENSION DU SECTEUR OU BASSE
TENSION), PRENEZ SOIN DE LE MAINTENIR DEGAGE DE TOUT MATERIAU COMBUSTIBLE.
LORS DE L’ENTRETIEN DE LA LAMPE, ASSUREZ - VOUS DE RETIRER LES FEULLES, LES AIGUILLES
DE PIN, LES BRINS D’HERBE, L’HUMUS, ET TOUT DEBRIS QUI S’EST ACCUMULE SUR L’AMPOULE
DE LA LAMPE, LE DIFFUSEUR OU LE CORP DE LA LAMPE.
MONTAGE ET INSTALLATION
1. COUPER LE COURANT ÉLECTRIQUE.
2. Déterminer l’emplacement où installer le luminaire.
3. Planter le poteau dans le sol. Pour éviter d’endommager le poteau avec le
marteau, poser dessus un morceau de bois. Si le sol est très dur, faire deux
entailles en croix dans le sol avec une pelle plate.
4. Nettoyer la terre au niveau du chemin de câble dans le piquet.
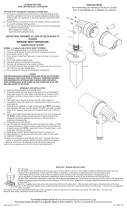
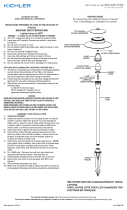
5. Retirer les (2) vis retenant le capot puis dégager le capot et la lentille.
6. Installer une ampoule recommandée (non fournie) dans la douille à l’intérieur
de luminaire.
7. Le luminaire est fourni avec trois options de lentilles en verre pour créer l’effet
d’éclairage souhaité. Pour changer la lentille, retirer le joint autour du verre et
le remplacer par verre sélectionné. Réinstaller la lentille et le joint dans le
capot. Remonter le capot sur le boîtier et le fixer avec les deux (2) vis.
8. Acheminer le câble du luminaire par le chemin de câbles et visser la tige dans
le piquet. Ajuster dans la direction visée. Prendre toute les précautions nécessaires
pour ne pas tordre le fil.
9. Ajuster l’angle de l’éclairage d’accentuation en desserrant la vis de réglage à
tête oscillante.
10. Si le montage ne paraît pas droit, ajuster en enfonçant ou en ressortant le
piquet (n’ajuster que le piquet).
11. Raccorder les fils à l’aide de connecteurs de câblage approuvés (non fournis)
en suivant les instructions fournies par le fabricant.
Date Issued: 5/8/15 IS-15476-CB
OUTDOOR USE ONLY
DOM ETRE INSTALLE A L’EXTERIEUR
INSTRUCTIONS
For Assembling and Installing Fixtures in Canada
Pour L’assemblage et L’installation Au Canada
For warranty information please visit: http://www.landscapelighting.com/portal/warranty_page
Pour de plus amples informations sur la garantie, cliquez sur le lien ci-dessous : http://www.landscapelighting.com/portal/warranty_page
COWL SCREW
VIS DE CAPOT
COWL
CAPOT
LENS ASSEMBLY
LENTILLE
SOCKET
DOUILLE
LAMP
L’AMPOULE
SWIVEL
SCREW
VIS DE
RÉGLAGE
À TÊTE
OSCILLANTE
SWIVEL
TÊTE
OSCILLANTE
STAKE
PIQUET
We’re here to help 866-558-5706
Hrs: M-F 9am to 5pm EST
-
 1
1

Kichler Lighting 15476CBR Manuel utilisateur
- Taper
- Manuel utilisateur
dans d''autres langues
Documents connexes
-
 Kichler Lighting 15475CBR Manuel utilisateur
-
 Kichler Lighting 15397AZT Manuel utilisateur
-
 Kichler Lighting 15480CBR Manuel utilisateur
-
 Kichler Lighting 16200BBR30 Manuel utilisateur
-
 Kichler Lighting 16202BBR30 Manuel utilisateur
-
 Kichler Lighting 15309AZT Manuel utilisateur
-
 Kichler Lighting 15826AZT27R Manuel utilisateur
-
 Kichler Lighting 15390AZT Manuel utilisateur
-
 Kichler Lighting 15398AZT Manuel utilisateur
-
 Kichler Lighting 15384AZT Manuel utilisateur


