
MODELMODÈLE:LW5012
FRANÇAIS
OWNER’S MANUAL
GUIDE D’UTILISATION
S'il vous plaît lisez attentivement ce manuel avant d'utiliser
votre appareil et le conserver pour référence future.
AIR CONDITIONER
Please read this manual carefully before operating
your set and retain it for future reference.
P/NO:MFL67415501
www.LG.com
CLIMATISEUR DE PIÈCE
MFL67415501

2 Room Air Conditioner
FOR YOUR RECORDS
Write the model and serial numbers here:
Model #
Serial #
You can find the numbers on a label on the side of the
product.
Dealer's Name
Date Purchased
Staple your receipt to this page in the event you need it to
prove date of purchase or for warranty issues.
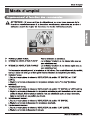
READ THIS MANUAL
PRECAUTION
Window-Type Air Conditioner Owner’s Manual
TABLE OF CONTENTS
Safety Precautions ..........................3
Before Operation ............................7
Introduction ................................... 8
Symbols Used in this Manual ..........8
Features .......................................... 8
Electrical Safety ............................. 9
Installation ....................................11
Window Requirements .................. 11
Size ................................................ 11
Location ......................................... 12
Clearance ......................................12
Preparation of Chassis .................13
Unit Installation ..............................14
Operating Instructions ................15
Location and function
of Controls......................................15
Additional Features........................ 16
Air Direction ...................................16
Drain Pipe.......................................16
Removal from Window....................16
Maintenance and Service ........... 17
Air Filter .........................................17
Cleaning the Air Conditioner.......... 17
How to Remove the
Front Grille .....................................17
Common Problems and
Solutions.........................................18
Troubleshooting.............................. 19
Inside you will find many helpful hints on how to use and
maintain your air conditioner properly. Just a little preventive
care on your part can save you a great deal of time and
money over the life of your air conditioner.
You'll find many answers to common problems in the chart
of troubleshooting tips.If you review our chart of
Troubleshooting Tips first, you may not need to call
forservice at all.
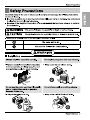
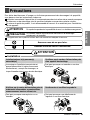
• Contact an Authorized Service Center for repair or
maintenance of this unit.
• The air conditioner is not intended for use by young
children or invalids without supervision.
• Young children should be supervised to ensure that
they do not play with the air conditioner.
• If the power cord requires replacement, have an
Authorized Servicer install an exact replacement part.
• Installation work must be performed in accordance
with the National Electric Code by qualified nad
authorized personnel only.
• Contact the installer for installation of this unit.


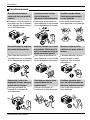
For inner cleaning, contact an Authorized Service Center or a dealer.
Do not use harsh detergent that causes corrosion or damage on the unit.
Harsh detergent may also cause failure of product, fire, or electronic shock.

y
y

Owner's Manual 7
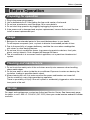
Before Operation
Before Operation
Preparing for operation
Usage
Cleaning and maintenance
Service
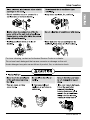
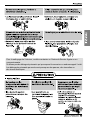
1. Plug in the power plug properly.
2. Use a dedicated circuit. Overloading the line could create a fire hazard.
3. Do not use an extension cord.See page 10 for more details.
4. Do not start/stop operation by plugging/unplugging the power cord.
5. If the power cord is damaged and requires replacement, have an Authorized Servicer
install an exact replacement part.
1. Being ew for an extended period of time could behazardous to your health.
Do not expose occupants, pets, or plants to directw for extended periods of time.
2. Due to the possibility of oxygen deficiency, ventilate the room when usedtogether
with stoves or other heating devices.
3. Do not use this air conditioner fposes (e.g.preserving precision devices, food, pets,
plants, and art objects). Such usagecould damage the items.
4. The air conditioner is a consumer comfort appliance, not a precision climatecontrol
system.
1. Do not touch the metal parts of the unit when remo.Injuries canoccur when handling
sharp metal edges.
2. Do not use water to clean inside the air conditioner. Exposure to water can destroy the
insulation, leading to possible electric shock.
3. When cleaning the unit, first make sure that the power and breaker are turned off.
The fan rotates at a very high speed during operation.
There is apossibility of injury if the unit's power is accidentally triggered on while cleaning
inner parts of the unit.
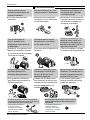
For repair and maintenance, contact an Authorized Service Center. See thewarranty page
for details or call 1-888-LG-CANADA (542 2623).Have your model number andserial number
available.
ENGLISH

8 Room Air Conditioner
Introduction
This symbol alerts you to the risk of electric shock.
This symbol alerts you to hazards that could cause harm to
theair conditioner.
This symbol indicates special notes.
NOTICE
WARNING: This appliance should be installed in accordance with the
National Electric Code.
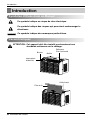
Introduction
Symbols Used in this Manual
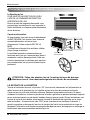
Features
CABINET
AIR FILTER
KNOB
HORIZONTAL
AIR DEFLECTOR
ROCKER SWITCHS
FRONT GRILLE

Owner’s Manual 9
ENGLISH
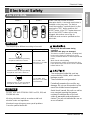
Electrical Safety
Electrical Safety
Electrical Data
115V~ 230V~
Power cord may include a current
interrupter device. A test and reset button is
provided on the plug case. The device
should be tested on a periodic basis by first
pressing the TEST button and then the
RESET button. If the TEST button does not
trip or if the RESET button will not stay
engaged, discontinue use of the air
conditioner and contact a qualified service
technician.
Use Wall Receptacle Power Supply
Standard 125V, 3-wire grounding
receptacle rated 15A, 125V AC
Standard 250V, 3-wire grounding
receptacle rated 15A, 250V AC
Use 15 AMP. time
delay fuse or 15 AMP.
circuit breaker.
Use 20 AMP. time
delay fuse or 20 AMP.
circuit breaker.
Standard 250V, 3-wire grounding
receptacle rated 20A, 250V AC
The shape may be different according to its model.
NOTICE
DO NOT USE AN EXTENSION CORD on 230, 208, and
230/208 Volt units.
All wiring should be made in accordance with local
electrical codes and regulations.
Aluminum house wiring may pose special problems.
Consult a qualified electrician.
NOTICE
Never push the test button during
operation
Otherwise this plug can damaged.
This device contains chemical, including lead,
known to the State of California to cause
cancer, and birth defects or other reproductive
harm.
Wash hands after handling.
Do not remove, modify or immerse this plug.
If this device trips, the cause it to be corrected
before further use.
The conductors inside this cord are
surrounded by shields, which monitor
leakage current.
These shields are not grounded.
Periodically examine the cord for any
damage. Do not use this product in the
event the shields become exposed.
Avoid shock hazard, this unit can not be
user serviced opening the tamper
resistant. Sealed portion of the unit
voids all warranties and performance
claims.This unit not intended for use as
an on-off switch.

10 Room Air Conditioner
Electrical Safety
Electrical Safety
IMPORTANT
(PLEASE READ CAREFULLY)
FOR THE USER'S PERSONAL SAFETY, THIS
APPLIANCE MUST BE PROPERLY GROUNDED
The power cord of this appliance is equipped with a
three-prong (grounding) plug. Use this with a standard
three-slot (grounding) wall power outlet to minimize the
hazard of electric shock. The customer should have the
wall receptacle and circuit checked by a qualified
electrician to make sure the receptacle is properly
grounded.
DO NOT CUT OR REMOVE THE THIRD (GROUND)
PRONG FROM THE POWER PLUG.
A. SITUATIONS WHEN THE APPLIANCE WILL BE
DISCONNECTED OCCASIONALLY:
Because of potential safety hazards, we strongly
discourage the use of an adapter plug. However, if you
wish to use an adapter, a TEMPORARY CONNECTION
may be made. Use UL-listed adapter, available from
most local hardware stores.
The large slot in the adapter must be aligned with the
large slot in the receptacle to assure a proper polarity
connection.
:
Attaching the adapter ground terminal to the wall
receptacle cover screw does not ground the appliance
unless the cover screw is metal, and not insulated, and
the wall receptacle is grounded through the house
wiring. The customer should have the circuit checked
by a qualified electrician to make sure the receptacle
is properly grounded.
Disconnect the power cord from the adapter, using one
hand on each. Otherwise, the adapter ground terminal
might break. DO NOT USE the appliance with a broken
adapter plug.
B. SITUATIONS WHEN THE APPLIANCE WILL BE
DISCONNECTED OFTEN.
Do not use an adapter plug in these situations.
Unplugging the power cord frequently can lead to an
eventual breakage of the ground terminal. The wall
power outlet should be replaced by a three-slot
(grounding) outlet instead.
USE OF EXTENSION CORDS
Because of potential safety hazards, we strongly
discourage the use of an extension cord. However, if
you wish to use an extension cord, use a CSA
certified/UL-listed 3-wire (grounding) extension cord,
rated at 15A, 125V.
Use of adapter plugs not pemitted in Canada.

(
min
HSILGNE

12 Room Air Conditioner
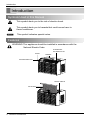
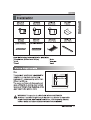
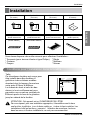
Installation

Owner's Manual 13
Installation
Seal Strip
(Type E)
Room Side
Center Line
Inner Sill
Outside
Inside
L
Bracket
Outer Sill
Inner Sill
Type A
191mm
191mm
Center Line
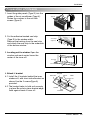
Preparation of Chassis
1. Insert the guide panels (Type G) into the
guides of the air conditioner (Type H).
Fasten the curtains to the unit with
screws (Type A).
2. Cut the adhesive-backed seal strip
(Type E) to the window width.
Remove the backing from the seal strip
and attach the seal strip to the underside
of the bottom window.
3. Locating unit in window Open the
window and mark center lineon the
center of the inner sill.
4. Attach L bracket
4-1. Install the L brackets behind the inner
window sill, with short side ofbracket as
shown.Use the 2 screws(Type A)
provided.
4-2. The bracket helps to hold unit securely
in place. Be sure to place bracket edge
flush against back of inner sill.
Type A
Type A
Type A
ENGLISH

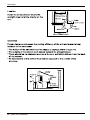
14 Room Air Conditioner
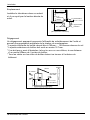
Installation
SEAL
WINDOW FRAME
BOTTOM
GUIDE
ABOUT
1
/4"
L
BRACKET
UPPER GUIDE
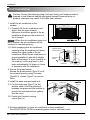
Unit Installation
1. Install the air conditioner in the
window
1-1. Carefully lift the air conditioner and
slide it into the open window.
Makesure the bottom guide of the air
conditioner drops into the notches of
the L bracket.
:
When the air conditioner drops into
the L bracket, the air conditioner will be
centered in window opening.
1-2. While steadying the air conditioner,
carefully bring the window sash down
behind the upper guide of the air
conditioner.When the air conditioner is
properlyinstalled, it should tilt slightly
down at the back.If it is set correctly in
the window, it will hang lower in the
back automatically.If it does not, there
is aproblem with the installation.
2. Secure the guide panels
Extend the guide panels (Type G) to fill
the window opening using 2 screws
(Type B) 2, screws (Type C) to secure
them.
3. Install the sash seal and sash lock
3-1. Cut the sash seal (Type F) to the
window width. Stuff the sash seal
between the glass and the window to
prevent air and insects from getting
into the room.
3-2. Fasten the Lbracket using a
screw(Type A).
Caution: During the following step, hold unit firmly until window sash is
lowered to top channel behind side panel frames.Personal injury or
property damage may result if unit falls from window.
NOTICE
4. Window installation of room air conditioner is now completed.
See ELECTRICAL DATE for attaching power cord to electrical outlet.
L BRACKET
SASH SEAL
(
Type
F)
Type A
Type B


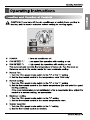
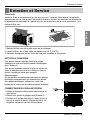
Additional Features
Air Direction
Adjusting the air direction using the
horizontal.
Using the control tabs, the air flow can be
directed to the left, right, straight ahead,or
any combination of these directions.
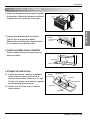
Drain Pipe
In humid weather, excess water may
cause the Base Pan to over flow. To
drain the water, remove the Drain Cap
and secure the Drain Pipe to the rear
hole of the Base Pan.
Press the drain pipe into the hole by
pushing down and a way from the fins
to avoid injury.
This air conditioner is equipped with
as slinger f
an.(See drawing, below.) The
fan has an outer r
ing that runs inthe
water that collects in the base panif it
gets deep.That condensate is thenpicked
up by the fan and expelledthrough the
condenser, making the air conditioner
more efficient.
CAUTION: Be careful when inserting the drain pipe. Push away from the
sharp fin area to avoid slipping injuring yourself.
Removal From Window
Turn the air conditioner off, disconnect the power cord, remove the L bracket, the
screws and Support Bracket installed through the top and bottom of the guide panels,
and save for reinstallation later. Close the guide panels.Keeping a firm grip on the air
conditioner, raise the sash, and carefully tilt the air conditioner backward, draining any
condensate.Lift the air conditioner from the window and remove the sash seal from
between the windows.Be sure to drain ALL condensate from the air conditioner.If you
don't, it could run out while you carry the unit.making a mess and creating a slipping
hazard. This simple step will save you much cleaning and make a safer work
environment.
DRAIN PIPE
DRAIN CAP
Ring
16 Room Air Conditioner
Operating Instructions

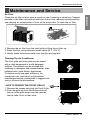
Maintenance and Service
Air Filter
Check the air filter at least twice a month to see if cleaning is necessary. Trapped
particles in the filter can build up and block the air flow, reducing cooling capacty
and causing an accumulation of frost on the evaporator. To clean the air filter:
1. Remove the air filter from the front grille by lifting the air filter up.
2. Wash the filter using lukewarm water below 40˚C (104˚F)
3. Gently shake the excess water from the filter and replace.
Cleaning The Air Conditioner
The front grille and Inlet grille may be wiped
with a cloth dampened in a mild detergent
solution. The cabinet may be washed with
mildsoap or detergent and lukewarmwater, then
polished with Liquid Waxfor Appliances.
To ensure contin use peak efficiency, the
condenser coils (outside of unit)should be
checked periodically andcleaned if clogged with
soot or dirtfrom the atmosphere.
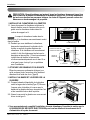
• HOW TO REMOVE THE FRONT GRILLE
1. Remove the screws securing the Front Grille.
2. Push the grille up from the bottom and pull
the top of the grille away from the case as
the top tabs lift out of their slots.
Owner's Manual 17
Maintenance and Service
ENGLISH

18 Room Air Conditioner
Maintenance and Service
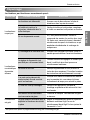
Common Problems and Solutions
Before Calling for Service
If you have problems with your air conditioner, read the following information and
try to solve the problem.If you cannot find a solution, turn off the air conditioner
and contact your dealer.
Air conditioner does not operate
1. Ensure that the air conditioner is plugged into a proper outlet.
2. Check the fuse or circuit breaker.3.Check whether the voltage is unusually high
or low.
Air does not feel cold enough on the cooling setting
1. Ensure that the temperature settings are correct.
2. Check to see if the air filter is clogged with dust If so, clean the filter.
3. Ensure that the air flow from the outside is not obstructed and that there is
aclearance of over 508mm between the back of the air conditioner and the wall or
fence behind it.
4. Close all doors and windows and check for any source of heat in the room.
The air conditioner is operating normally when:
• You hear a pinging noise.This is caused by water being picked up by the fan on
rainy days or in highly humid conditions.This feature is designed to help remove
moisture in the air and improve cooling efficiency.
See the section on Slinger Fan, page 16.
• You hear the thermostat click.This is caused by the compressor cycle starting
and stopping.
• You see water dripping from the rear of the unit.Water may be collected in the
base pan in highly humid conditions or on rainy days.This water overflows and
drips from the rear of the unit.
• You hear the fan running while the compressor is silent.This is a normal
operational feature.
Before calling for service, please review the following list of common
problems and solutions.

Owner's Manual 19
Maintenance and Service
The air conditioner may be operating abnormally when:
Problem
What To DoPossible Causes
* You can refer to the Energy Star program in detail at www.energystar.gov.
Troubleshooting
Air
conditioner
does not star
Air
conditioner
does not
cool as it
should
Air
conditioner
freezing up
The air conditioner is
unplugged.
Make sure the air conditioner plug is
pushed completely into the outlet.
Check the house fuse/circuit breaker
box and replace the fuseor reset the
breaker.
Make sure there are no curtains,
blinds, or furniture blocking the front
of the air conditioner.
Turn the knob to a higher number.
The highest setting provides
maximum cooling.
Clean the filter at every 2 weeks.
See the care and Maintenance
section.
When the air conditioner is first turned
on, you need to allow time for the
room to cool down.
Set the mode control at High Fan or
High Cool with thermostat at 1or 2.
Check for open furnace floor regsters
and cold air returns.
See Air Conditioner Freezing Up
below.
If power failure occurs, turn themode
control to off.
When power is restored, wait 3
minutes to restart the air conditioner
to prevent tripping ofthe compressor
overload.
The fuse is blown/circuit
breaker is tripped.
Power failure.
Airflow is restricted.
The air filter is dirty.
The room may have been
hot.
Cold air is escaping.
Cooling coils have iced up.
Ice blocks the air flow and
stops the air conditioner
from cooling the room.
The thermostat may not be
set high enough.
ENGLISH

20 Room Air Conditioner
POUR VOS ARCHIVES
Ecrivez le modèle et le numéro de série ci-après:
Modèle nº
Nº de série
Vous les trouverez sur une étiquette dans la partie
latérale de chaque unité.
Manuel de l'utilisateur Climatiseur Type Fenêtre
TABLE DES MATIERES
Précautions
Précédent la mise en service
Introduction
Symboles Utilisés dans ce Manuel
Caractéristiques
Sécurit é électrique
Installation
Conditions pour l’installation...................29
La prèparation de Chàssis
Avant l'installation
Mode d ’emploi
Emplacement et fonction des
commandes
Caractéristiques supplémentaires
Entretien et Service.....................................35
Problèmes fréquents et Solutions...........36
Dépannage..............................................37
Nom du revendeur
Date d'achat
Agrafez votre reçu à cette page au cas où vous en
auriez besoin pour prouver la date d'achat ou pour
vous prévaloir de la garantie.
LISSEZ CE MANUEL
PRECAUTION
Vous trouverez dedans plusieurs conseils utiles sur la
manière d'utiliser et d'entretenir correctement votre
climatiseur. Rien qu'un petit soin préventif de votre part
peut vous épargner une grande quantité de temps et
d'argent pendant la durée de vie de votre climatiseur.
Vous trouverez plusieurs réponses aux problèmes
communs dans la charte de conseils de dépannage. Si
vous lissez d'abord notre charte de Conseils de
dépannage, il est possible que vous n'ayez aucun
besoin d'appeler le service technique.
• Contactez le service technique agréé pour la r éparation ou
l'entretien de cette unité.
• Contactez un installateur pour l'installation de cette unité.
• Le climatiseur n'est pas destiné à l'usage de petits
enfants ou des handicapés sans surveillance.
• Les enfants doivent être surveill és afin de vous assurer
qu'ils ne jouent pas avec le climatiseur.
• Si le cordon d ’alimentation doit être remplac é, faites
installer une pi èce de rechange appropri ée par un
technicien agréé .
• Le travail d'installation doitêtre r éalis é conform ément au
Code Electrique National, seulement par du
personnel qualifi é et agr éé.
.............................................21
....................25
.............................................26
........26
..................................26
...................................27
...............................................29
...................31
................................32
.........................................33
.........................................33
.........34
• Contactez l'installateur pour l'installation de cette unité.
La page est en cours de chargement...
La page est en cours de chargement...
La page est en cours de chargement...
La page est en cours de chargement...
La page est en cours de chargement...
La page est en cours de chargement...
La page est en cours de chargement...
La page est en cours de chargement...
La page est en cours de chargement...
La page est en cours de chargement...
La page est en cours de chargement...
La page est en cours de chargement...
La page est en cours de chargement...
La page est en cours de chargement...
La page est en cours de chargement...
La page est en cours de chargement...
La page est en cours de chargement...
La page est en cours de chargement...
La page est en cours de chargement...
La page est en cours de chargement...
-
 1
1
-
 2
2
-
 3
3
-
 4
4
-
 5
5
-
 6
6
-
 7
7
-
 8
8
-
 9
9
-
 10
10
-
 11
11
-
 12
12
-
 13
13
-
 14
14
-
 15
15
-
 16
16
-
 17
17
-
 18
18
-
 19
19
-
 20
20
-
 21
21
-
 22
22
-
 23
23
-
 24
24
-
 25
25
-
 26
26
-
 27
27
-
 28
28
-
 29
29
-
 30
30
-
 31
31
-
 32
32
-
 33
33
-
 34
34
-
 35
35
-
 36
36
-
 37
37
-
 38
38
-
 39
39
-
 40
40


dans d''autres langues
- English: LG LW5012 Owner's manual
Documents connexes
-
LG HW500CM Le manuel du propriétaire
-
LG LW6017R Le manuel du propriétaire
-
-
-
-
LG LW6015ER Le manuel du propriétaire
-
-
-
-