
www.LG.com
OWNER’S MANUAL
GUIDE D’UTILISATION
Please read this manual carefully before operating
S'il vous plaît lisez attentivement ce manuel avant d'utiliser
votre appareil et le conserver pour référence future.
your set and retain it for future reference.
AIR
CONDITIONER
CLIMATISEUR
DE PIÈCE
MODEL,
NORSK SUOMI DANSK
P/NO : MFL69414105
MODÈLE: LW6017R
FRANÇAIS

2 Room Air Conditioner
FOR YOUR RECORDS
Write the model and serial numbers here:
Model #
Serial #
You can find the numbers on a label on the side of the
product.
Dealer's Name
Date Purchased
Staple your receipt to this page in the event you need it to
prove date of purchase or for warranty issues.
READ THIS MANUAL
PRECAUTION
Window-Type Air Conditioner Owner’s Manual
TABLE OF CONTENTS
Safety Precautions ..........................3
Before Operation ............................7
Introduction ................................... 8
Electrical Safety ............................. 9
Installation ....................................11
Operating Instructions ...................15
Maintenance and Service ........... 19
Inside you will find many helpful hints on how to use and
maintain your air conditioner properly. Just a little preventive
care on your part can save you a great deal of time and
money over the life of your air conditioner.
You'll find many answers to common problems in the chart
of troubleshooting tips.If you review our chart of
Troubleshooting Tips first, you may not need to call
forservice at all.
• Contact an Authorized Service Center for repair or
maintenance of this unit.
• The air conditioner is not intended for use by young
children or invalids without supervision.
• Young children should be supervised to ensure that
they do not play with the air conditioner.
• If the power cord requires replacement, have an
Authorized Servicer install an exact replacement part.
• Installation work must be performed in accordance
with the National Electric Code by qualified nad
authorized personnel only.
• Contact the installer for installation of this unit.


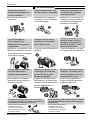
For inner cleaning, contact an Authorized Service Center or a dealer.
Do not use harsh detergent that causes corrosion or damage on the unit.
Harsh detergent may also cause failure of product, fire, or electronic shock.

y
y

Owner's Manual 7
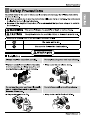
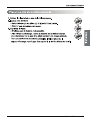
Before Operation
Before Operation
Preparing for operation
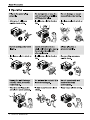
Usage
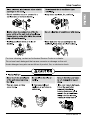
Cleaning and maintenance
Service
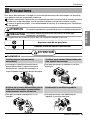
1. Plug in the power plug properly.
2. Use a dedicated circuit. Overloading the line could create a fire hazard.
3. Do not use an extension cord.See page 10 for more details.
4. Do not start/stop operation by plugging/unplugging the power cord.
5. If the power cord is damaged and requires replacement, have an Authorized Servicer
install an exact replacement part.
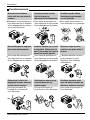
1. Being ew for an extended period of time could behazardous to your health.
Do not expose occupants, pets, or plants to directw for extended periods of time.
2. Due to the possibility of oxygen deficiency, ventilate the room when usedtogether
with stoves or other heating devices.
3. Do not use this air conditioner fposes (e.g.preserving precision devices, food, pets,
plants, and art objects). Such usagecould damage the items.
4. The air conditioner is a consumer comfort appliance, not a precision climatecontrol
system.
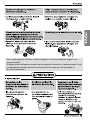
1. Do not touch the metal parts of the unit when remo.Injuries canoccur when handling
sharp metal edges.
2. Do not use water to clean inside the air conditioner. Exposure to water can destroy the
insulation, leading to possible electric shock.
3. When cleaning the unit, first make sure that the power and breaker are turned off.
The fan rotates at a very high speed during operation.
There is apossibility of injury if the unit's power is accidentally triggered on while cleaning
inner parts of the unit.
For repair and maintenance, contact an Authorized Service Center. See thewarranty page
for details or call 1-888-LG-CANADA (542 2623).Have your model number andserial number
available.
ENGLISH

8 Room Air Conditioner
Introduction
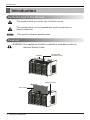
This symbol alerts you to the risk of electric shock.
This symbol alerts you to hazards that could cause harm to
theair conditioner.
This symbol indicates special notes.
NOTICE
WARNING: This appliance should be installed in accordance with the
National Electric Code.
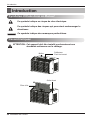
Introduction
Symbols Used in this Manual
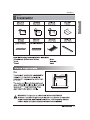
Features
CABINET
AIR FILTER
HORIZONTAL
AIR DEFLECTOR
FRONT GRILLE

Owner’s Manual 9
ENGLISH
Electrical Safety
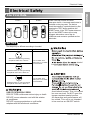
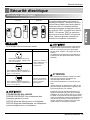
Electrical Safety
Electrical Data
115V~ 230V~
Power cord may include a current
interrupter device. A test and reset button is
provided on the plug case. The device
should be tested on a periodic basis by first
pressing the TEST button and then the
RESET button. If the TEST button does not
trip or if the RESET button will not stay
engaged, discontinue use of the air
conditioner and contact a qualified service
technician.
Use Wall Receptacle Power Supply
Standard 125V, 3-wire grounding
receptacle rated 15A, 125V AC
Standard 250V, 3-wire grounding
receptacle rated 15A, 250V AC
Use 15 AMP. time
delay fuse or 15 AMP.
circuit breaker.
Use 20 AMP. time
delay fuse or 20 AMP.
circuit breaker.
Standard 250V, 3-wire grounding
receptacle rated 20A, 250V AC
The shape may be different according to its model.
NOTICE
USE OF EXTENSION CORDS
RISK OF FIRE could cause serious injury or death
DO NOT use an extension cord with this window
air conditioner
DO NOT use surge protectors or multi-outlet
adapters with this window air conditioner
Avoid shock hazard. This unit cannot
be user-serviced. Do NOT open the
tamper-resistant sealed portion.
All warranties and performance will
be voided. This unit is not intended
to be used as an ON/OFF switch.
should
be


(
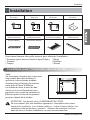
(305mm)
(533mm to 889mm)
min
21″ to 35″
12″
21″ to 35″.
12″
HSILGNE
(10mm)
2/5
(16mm)
5/8
(16mm)
5/8
Installation

12 Room Air Conditioner
Installation
(533mm to 889mm)
21″ to 35″
(305mm)
12″
17 2/7″(439mm)
1/2″ to 1 1/4″
( )
1/2″ (12.7mm)
20″ (508mm)
( )
30″ ~60″
30″ ~60″
12″.
20″

Owner's Manual 13
Installation
Seal Strip
(Type E)
Room Side
Center Line
Inner Sill
Outside
Inside
L
Bracket
Outer Sill
Inner Sill
Type A
(191mm)
Center Line
7 1/2″
(191mm)
7 1/2″
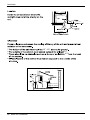
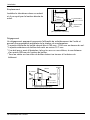
Preparation of Chassis
1. Insert the guide panels (Type G) into the
guides of the air conditioner (Type H).
Fasten the curtains to the unit with
screws (Type A).
2. Cut the adhesive-backed seal strip
(Type E) to the window width.
Remove the backing from the seal strip
and attach the seal strip to the underside
of the bottom window.
3. Locating unit in window Open the
window and mark center lineon the
center of the inner sill.
4. Attach L bracket
4-1. Install the L brackets behind the inner
window sill, with short side ofbracket as
shown.Use the 2 screws(Type A)
provided.
4-2. The bracket helps to hold unit securely
in place. Be sure to place bracket edge
flush against back of inner sill.
Type A
Type A
Type A

SEAL
WINDOW FRAME
BOTTOM
GUIDE
ABOUT
L
BRACKET
UPPER GUIDE
1/2″
14 Room Air Conditioner
Installation
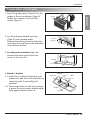
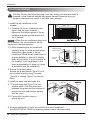
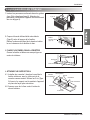
Unit Installation
1. Install the air conditioner in the
window
1-1. Carefully lift the air conditioner and
slide it into the open window.
Makesure the bottom guide of the air
conditioner drops into the notches of
the L bracket.
:
When the air conditioner drops into
the L bracket, the air conditioner will be
centered in window opening.
1-2. While steadying the air conditioner,
carefully bring the window sash down
behind the upper guide of the air
conditioner.When the air conditioner is
properlyinstalled, it should tilt slightly
down at the back.If it is set correctly in
the window, it will hang lower in the
back automatically.If it does not, there
is aproblem with the installation.
2. Secure the guide panels
Extend the guide panels (Type G) to fill
the window opening using 2 screws
(Type B) 2, screws (Type C) to secure
them.
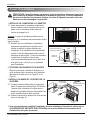
3. Install the sash seal and sash lock
3-1. Cut the sash seal (Type F) to the
window width. Stuff the sash seal
between the glass and the window to
prevent air and insects from getting
into the room.
3-2. Fasten the Lbracket using a
screw(Type A).
Caution: During the following step, hold unit firmly until window sash is
lowered to top channel behind side panel frames.Personal injury or
property damage may result if unit falls from window.
NOTICE
4. Window installation of room air conditioner is now completed.
See ELECTRICAL DATE for attaching power cord to electrical outlet.
L BRACKET
SASH SEAL
(
Type
F)
Type A
Type B

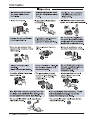
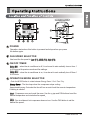
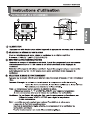
FAN SPEED SELECTOR
ON/OFF TIMER
OPERATION MODE SELECTOR
POWER
Operation starts when this button is pressed and stops when you press
the button again.
Use to set the fan speed to
to 24 hours at its previous mode and fan settings.
Approximately every 3 minutes the fan will turn on and check the room air temperature
if cooling is needed.
desired temperature and circulation fan speed
Push the MODE button to rotate between Energy Saver / Cool / Fan / Dry.
to 24 hours.
Low (F1), MED (F2), High (F3).
- when the air conditioner is off, it can be set to auto matically turn on from 1
Delay ON
- when the air conditioner is on, it can be set to auto matically turn off from 1
Delay OFF
- The fan stops when the compressor stops cooling.
Energy Saver
- Compressor runs and cools the room. Use the and FAN buttons to set the
Cool
desired fan speed
- Fan circulates air but compressor dose not run. Use the FAN button to set the
FAN
7


Additional Features
CAUTION: Be careful when inserting the drain pipe. Push away from the
sharp fin area to avoid slipping injuring yourself.
Removal From Window
Turn the air conditioner off, disconnect the power cord, remove the L bracket, the
screws and Support Bracket installed through the top and bottom of the guide panels,
and save for reinstallation later. Close the guide panels.Keeping a firm grip on the air
conditioner, raise the sash, and carefully tilt the air conditioner backward, draining any
condensate.Lift the air conditioner from the window and remove the sash seal from
between the windows.Be sure to drain ALL condensate from the air conditioner.If you
don't, it could run out while you carry the unit.making a mess and creating a slipping
hazard. This simple step will save you much cleaning and make a safer work
environment.
DRAIN PIPE
DRAIN CAP
Ring
18 Room Air Conditioner
Operating Instructions
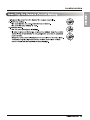
Air Direction
Adjusting the air direction using the
horizontal.
Using the control tabs, the air flow can be
directed to the left, right, straight ahead,or
any combination of these directions.
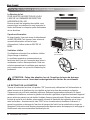
Drain Pipe
In humid weather, excess water may
cause the Base Pan to over flow. To
drain the water, remove the Drain Cap
and secure the Drain Pipe to the rear
hole of the Base Pan.
Press the drain pipe into the hole by
pushing down and a way from the fins
to avoid injury.
This air conditioner is equipped with
as slinger f
an.(See drawing, below.) The
fan has an outer ring that runs inthe
water that collects in the base panif it
gets deep.That condensate is thenpicked
up by the fan and expelledthrough the
condenser, making the air conditioner
more efficient.
Slinger Fan

Maintenance and Service
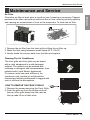
Air Filter
Check the air filter at least twice a month to see if cleaning is necessary. Trapped
particles in the filter can build up and block the air flow, reducing cooling capacity
and causing an accumulation of frost on the evaporator. To clean the air filter:
1. Remove the air filter from the front grille by lifting the air filter up.
2. Wash the filter using lukewarm water below 40°C (104°F)
3. Gently shake the excess water from the filter and replace.
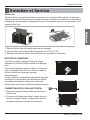
Cleaning The Air Conditioner
The front grille and Inlet grille may be wiped
with a cloth dampened in a mild detergent
solution. The cabinet may be washed with
mildsoap or detergent and lukewarmwater, then
polished with Liquid Waxfor Appliances.
To ensure contin use peak efficiency, the
condenser coils (outside of unit)should be
checked periodically andcleaned if clogged with
soot or dirtfrom the atmosphere.
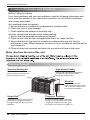
HOW TO REMOVE THE FRONT GRILLE
1. Remove the screws securing the Front Grille.
2. Push the grille up from the bottom and pull
the top of the grille away from the case as
the top tabs lift out of their slots.
Owner's Manual 19
Maintenance and Service

20 Room Air Conditioner
Maintenance and Service
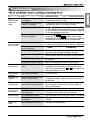
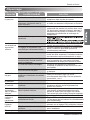
Common Problems and Solutions
Before Calling for Service
If you have problems with your air conditioner, read the following information and
try to solve the problem.If you cannot find a solution, turn off the air conditioner
and contact your dealer.
Air conditioner does not operate
1. Ensure that the air conditioner is plugged into a proper outlet.
2. Check the fuse or circuit breaker.
3. Check whether the voltage is unusually high .
Air does not feel cold enough on the cooling setting
1. Ensure that the temperature settings are correct.
2. Check to see if the air filter is clogged with dust If so, clean the filter.
3. Ensure that the air flow from the outside is not obstructed and that there is
aclearance of over 508mm between the back of the air conditioner and the wall or
fence behind it.
4. Close all doors and windows and check for any source of heat in the room.
Water drip from the rear of the unit
Normal Sound
Today’s high efficiency compressors
may have a high pitched chatter
during the cooling cycle.
Unit may vibrate and
make noise because of poor
wall or window construction
At the front of the unit, you may
hear the sound of rushing air
being moved by the fan.
“Gurgling or hissing” noise may be
heard due to refrigerant passing
through evaporator during normal
operation.
Droplets of water hitting condenser
during normal operation may cause
“pinging or swishing” sounds
See
the section on Slinger Fan, page 16)
High pitched Chatter
Gurgle/Hiss
Pinging or Swishing
or incorrect installation.
Vibration
Sound of Rushing Air
La page est en cours de chargement...
La page est en cours de chargement...
La page est en cours de chargement...
La page est en cours de chargement...
La page est en cours de chargement...
La page est en cours de chargement...
La page est en cours de chargement...
La page est en cours de chargement...
La page est en cours de chargement...
La page est en cours de chargement...
La page est en cours de chargement...
La page est en cours de chargement...
La page est en cours de chargement...
La page est en cours de chargement...
La page est en cours de chargement...
La page est en cours de chargement...
La page est en cours de chargement...
La page est en cours de chargement...
La page est en cours de chargement...
La page est en cours de chargement...
La page est en cours de chargement...
La page est en cours de chargement...
La page est en cours de chargement...
La page est en cours de chargement...
-
 1
1
-
 2
2
-
 3
3
-
 4
4
-
 5
5
-
 6
6
-
 7
7
-
 8
8
-
 9
9
-
 10
10
-
 11
11
-
 12
12
-
 13
13
-
 14
14
-
 15
15
-
 16
16
-
 17
17
-
 18
18
-
 19
19
-
 20
20
-
 21
21
-
 22
22
-
 23
23
-
 24
24
-
 25
25
-
 26
26
-
 27
27
-
 28
28
-
 29
29
-
 30
30
-
 31
31
-
 32
32
-
 33
33
-
 34
34
-
 35
35
-
 36
36
-
 37
37
-
 38
38
-
 39
39
-
 40
40
-
 41
41
-
 42
42
-
 43
43
-
 44
44


dans d''autres langues
- English: LG LW6017R Owner's manual
Documents connexes
-
LG HW500CM Le manuel du propriétaire
-
-
-
-
-
-
-
-
LG LW6017R Le manuel du propriétaire
-