Lasting Impressions 461-403-0006 Guide d'installation
- Taper
- Guide d'installation

PART#461‐403
ASSEMBLYINSTRUCTIONS
INSTRUCTIONSD’ASSEMBLAGE Page|1 10/3/2016
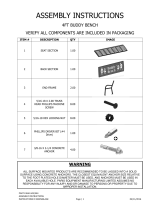
ASSEMBLY INSTRUCTIONS
COMMERCIAL MESH LITTER RECEPTACLE
VERIFY ALL COMPONENTS ARE INCLUDED IN PACKAGING
ITEM # DESCRIPTION QTY IMAGE
1
LITTER RECEPTACLE
FRONT/BACK
2.00
2 BASE 1.00
3 LID 1.00
4 BAG RACK 1.00
5
¼-20 X ½ TRUSS HEAD PHILLIPS
MACHINE SCREW, BLACK ZINC
PLATED
14.00
6 ¼-20 HEX LOCKING NUT 8.00
7 PHILLIPS DRIVER BIT (#3 Drive) 1.00
8
3/8-16 X 2-1/4 CONCRETE
ANCHOR HARDWARE
4.00

PART#461‐403
ASSEMBLYINSTRUCTIONS
INSTRUCTIONSD’ASSEMBLAGE Page|2 10/3/2016
WARNING
ALL SURFACE MOUNTED PRODUCTS ARE RECOMMENDED TO BE LAGGED INTO A SOLID
SURFACE USING CONCRETE ANCHORS. THE CLOSEST EQUIVALENT ANCHOR SIZE RELATIVE
TO THE FOOT PLATES HOLE DIAMETER MUST BE USED, AND ANCHORS MUST BE USED IN
EACH AVAILABLE HOLE. PARIS EQUIPMENT MANUFACTURING LIMITED ASSUMES NO
RESPONSIBLITY FOR ANY INJURY AND/OR DAMAGE TO PERSONS OR PROPERTY DUE TO
IMPROPER INSTALLATION.
Assembly Notes
Portions of this assembly may be easier with two people.
Plastic bag’s surrounding the individual components within the packaging can be dangerous.
Keep the bags away from small children to avoid the danger of suffocation.
Loosely assemble all parts per the step by step procedure shown below prior to tightening each
connection.
Do not over tighten hardware.
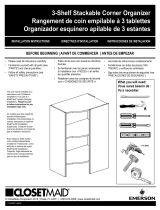
Step 1:
Locate the Base (Item #2) of the litter receptacle
where you plan to permanently install the product.
Mark the (4x) mounting hole locations on the solid
surface beneath the base. Drill a 3/8” Diameter
pilot hole in each of the (4x) locations to a depth of
1-3/4”. Place each of the four supplied anchors
(Item #8) in the holes, then place the base over
the anchors and use the 3/8 flat washer and 3/8-
16 Hex nuts to secure the base to the ground
permanently.
Step 2:
Using the Supplied ¼-20 Truss head hardware
(Item #5), secure the Front surround (Item #1) to
the base (Item #2) in three places shown in detail.
Step 3:
Repeat Step #2 to install the second surround
section on the back side of the litter receptacle.

PART#461‐403
ASSEMBLYINSTRUCTIONS
INSTRUCTIONSD’ASSEMBLAGE Page|3 10/3/2016
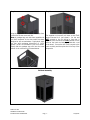
Step 4:
Using the supplied ¼-20 hardware, fasten the front
surround to the rear surround (8x).
Note: A garbage bag rack has been supplied with
your litter receptacle kit, but the product has been
designed to also accommodate a rigid plastic trash
can liner with maximum dimensions of 19.50”
square x 29.00” tall available at your local retailer.
Simply slide the garbage bag rack into the round
sleeves in the container as illustrated below:
Step 5:
The supplied Lid (Item #3) will have an Anti-Theft
lanyard secured to it (not shown). On the end
NOT
secured to the lid will be a loop that is
required to be secured to the TOP,
fastener on the
inside of the trash can body (identified with a red
circle above). Secure the Anti-Theft Lanyard to the
trash can body and then place the lid on top of the
Receptacle.
Finished Assembly

PART#461‐403
ASSEMBLYINSTRUCTIONS
INSTRUCTIONSD’ASSEMBLAGE Page|4 10/3/2016
INSTRUCTIONS DE MONTAGE
CORBEILLE À DÉCHETS COMMERCIALE
VÉRIFIEZ QUE TOUS LES ARTICLES SONT INCLUS DANS LA BOÎTE
ARTICLE DESCRIPTION QTÉ IMAGE
1
FACE AVANT/ARRIÈRE DE
CORBEILLE À DÉCHETS
2
2 FOND 1
3 COUVERCLE 1
4 PORTE-SACS 1
5
¼-20 X ½ VIS CRUCIFORME À
TÊTE BOMBÉE, GALVANISÉE
NOIRE
14
6
¼-20 CONTRE-ÉCROU
HEXAGONAL
8
7
EMBOUT DE TOURNEVIS
CRUCIFORME (n
o
3)
1
8
3/8-16 X 2-1/4 BOULON
D’ANCRAGE POUR BÉTON
4

PART#461‐403
ASSEMBLYINSTRUCTIONS
INSTRUCTIONSD’ASSEMBLAGE Page|5 10/3/2016
AVERTISSEMEN
T
IL EST RECOMMANDÉ DE FIXER TOUS LES PRODUITS MONTÉS EN SURFACE SUR UN PLAN
SOLIDE À L'AIDE D’ANCRAGES POUR BÉTON. IL FAUT UTILISER UN BOULON D’ANCRAGE D’UNE
GROSSEUR ÉQUIVALENTE À LA PLUS PROCHE AU DIAMÈTRE DU TROU DE CHAQUE PLAQUE
DE FIXATION. PARIS EQUIPEMENT MANUFACTURING LIMITED N'ASSUME AUCUNE
RESPONSABILITÉ POUR LES PRÉJUDICES OU DOMMAGES CORPORELS OU MATÉRIELS
CAUSÉS PAR UN MAUVAIS MONTAGE.
Remarques sur le montage
Certaines étapes du montage peuvent être réalisées plus facilement à deux.
Les sacs en plastique enveloppant les articles individuels de la boîte peuvent poser des risques.
Gardez-les hors de la portée des enfants pour éviter tout risque d'étouffement.
Montez toutes les pièces sans les serrer en suivant chaque étape ci-dessous, avant de serrer
définitivement chaque vis.
Ne serrez pas trop vis et boulons.
Étape 1 :
Placez le fond (article n° 2) de la corbeille à
déchets à l’endroit où vous prévoyez d'installer
définitivement le produit. Reportez les (4x) trous
de monta
g
e sur la surface solide sous le fond.
Percez un trou d’un diamètre de 3/8 po et d’une
profondeur de 1-3/4 po dans chacun des 4
emplacements marqués. Placez chacun des quatre
boulons d’ancrage fournis (article n° 8) dans les
trous, puis placez le fond sur les ancrages et
utilisez les rondelles plates 3/8 et les écrous
hexagonaux 3/8-16 pour fixer le fond au sol de
façon permanente.
Étape 2 :
À l’aide des vis à tête bombée ¼-20 fournies
(article n° 5), fixez la face avant de la corbeille à
déchets (article n° 1) au fond (article n° 2) en trois
endroits tel qu’illustré.
Étape 3 :
Répétez l'étape n° 2 pour monter la face arrière
de la corbeille à déchets.

PART#461‐403
ASSEMBLYINSTRUCTIONS
INSTRUCTIONSD’ASSEMBLAGE Page|6 10/3/2016
Étape 4 :
À l’aide des vis à tête bombée ¼-20 fournies, joignez la
face avant à la face arrière en utilisant les (6x) autres
trous pour boulons au-dessus et en dessous du porte-
sacs.
Remarque : un porte-sacs à déchets a été fourni avec votre
corbeille, mais celle-ci a été conçue pour s’adapter aussi à un
bac à déchets rigide en plastique, de dimensions maximales de
19,50 po x 19,50 po x 29,00 po, disponible dans votre magasin
local. Glissez simplement le support de sac poubelle dans les
manchons ronds dans le conteneur, tel qu’illustré ci-dessous :
Étape 5 :
Le couvercle fourni (article n° 3) sera équipé d’un
cordon antivol (non illustré). Sur l'extrémité NON
fixée au couvercle, il y aura un anneau qui doit être
fixé à la partie supérieure, la pièce de fixation étant
à l'intérieur du corps de poubelle (désigné par un
cercle rouge ci-dessus). Fixez le cordon de sécurité
antivol sur le corps de la poubelle, puis placez le
couvercle sur le dessus de la corbeille.
Produit monté
-
 1
1
-
 2
2
-
 3
3
-
 4
4
-
 5
5
-
 6
6


Lasting Impressions 461-403-0006 Guide d'installation
- Taper
- Guide d'installation
dans d''autres langues
Autres documents
-
 Paris 460-343-8002 Mode d'emploi
-
Petsafe ScoopFree PAL19-14656 Mode d'emploi
-
Petsafe PAL17-10786 Le manuel du propriétaire
-
KitchenAid 4KUCS181T Manuel utilisateur
-
Lifetime 1044 Le manuel du propriétaire
-
-
-
-
 ClosetMaid Corner Unit Mode d'emploi
-
Sauder Litter Box Credenza Manuel utilisateur

