Hitachi C 7BD Instruction Manual And Safety Instructions
- Catégorie
- Outils électroportatifs
- Taper
- Instruction Manual And Safety Instructions

MODEL CIRCULAR SAW
MODÈLE SCIE CIRCULAIRE
MODELO SIERRA CIRCULAR
C 7BD
DOUBLE INSULATION
DOUBLE ISOLATION
AISLAMIENTO DOBLE
MODE D’EMPLOI ET INSTRUCTIONS DE SECURITE
AVERTISSEMENT
Une utilisation incorrecte et dangereuse de cet outil motorisé peut entraîner la
mort ou de sérieuses blessures corporelles!
Ce mode d’emploi contient d’importantes informations à propos de la sécurité de
ce produit. Prière de lire et de comprendre ce mode d’emploi avant d’utiliser l’outil
motorisé. Garder ce mode d’emploi à la disponibilité des autres utilisateurs avant
qu’ils utilisent l’outil motorisé.
INSTRUCTION MANUAL AND SAFETY INSTRUCTIONS
WARNING
Improper and unsafe use of this power tool can result in death or serious bodily
injury!
This manual contains important information about product safety. Please read
and understand this manual before operating the power tool. Please keep this
manual available for others before they use the power tool.
MANUAL DE INSTRUCCIONES E INSTRUCCIONES DE SEGURIDAD
ADVERTENCIA
¡La utilización inapropiada e insegura de esta herramienta eléctrica puede resultar
en lesiones serias o en la muerte!
Este manual contiene información importante sobre la seguridad del producto.
Lea y comprenda este manual antes de utilizar la herramienta eléctrica. Guarde
este manual para que puedan leerlo otras personas antes de que utilicen la
herramienta eléctrica.

CONTENTS
Page
SPECIFICATIONS ...................................... 11
ACCESSORIES .......................................... 12
STANDARD ACCESSORIES .................. 12
OPTIONAL ACCESSORIES ................... 12
APPLICATIONS ......................................... 12
PRIOR TO OPERATION ............................. 13
ADJUSTING THE SAW PRIOR TO USE ... 14
CUTTING PROCEDURES .......................... 14
POCKET CUTTING .................................... 15
MOUNTING AND DISMOUNTING
THE SAW BLADE ................................... 16
MAINTENANCE AND INSPECTION ......... 16
SERVICE AND REPAIRS ........................... 17
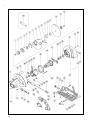
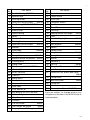
PARTS LIST ............................................... 52
TABLE DES MATIERES
Page
INFORMATIONS IMPORTANTES ............ 18
SIGNIFICATION DES MOTS
D’AVERTISSEMENT .............................. 18
SECURITE
CONSIGNES DE SECURITE IMPORTANTES POUR
L’UTILISATION DE TOUS LES OUTILS ELECTRIQUES
... 19
PIECES DE RECHANGE ............................ 24
FICHE POLARISEES .................................. 24
UTILISATION D’UN CORDON DE RALLONGE
... 25
DOUBLE ISOLATION POUR UN
FONCTIONNEMENT PLUS SUR ........... 26
UTILISATION ET ENTRETIEN
NOM DES PIECES ..................................... 27
Page
SPECIFICATIONS ...................................... 27
ACCESSOIRES .......................................... 28
ACCESSOIRES STANDARD .................. 28
ACCESSOIRES EN OPTION .................. 28
APPLICATIONS ......................................... 28
AVANT L’UTILISATION ............................ 29
REGLAGE DE LA SCIE AVANT L’UTILISATION .............
30
PROCEDURES DE COUPE ........................ 30
COUPE DE POCHES .................................. 31
MONTAGE ET DEMONTAGE DE LA LAME DE SCIE
.........
32
ENTRETIEN ET INSPECTION ................... 33
SERVICE APRES-VENTE ET REPARATIONS .......
34
LISTE DES PIÉCES .................................... 52
ÍNDICE
Página
INFORMACIÓN IMPORTANTE ................. 35
SIGNIFICADO DE LAS PALABRAS DE
SEÑALIZACIÓN ..................................... 35
SEGURIDAD
INSTRUCCIONES IMPORTANTES DE SEGURIDAD
PARA UTILIZACIÓN DE TODAS LAS
HERRAMIENTAS ELÉCTRICAS ........................
36
PIEZAS DE REEMPLAZO .......................... 41
ENCHUFES POLARIZADOS ...................... 41
UTILIZACIÓN DE UN CABLE PROLONGADOR
.. 42
AISLAMIENTO DOBLE PARA OFRECER
UNA OPERACIÓN MÁS SEGURA ........ 43
Página
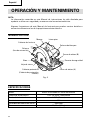
OPERACIÓN Y MANTENIMIENTO
NOMENCLATURA ..................................... 44
ESPECIFICACIONES .................................. 44
ACCESORIOS ............................................ 45
ACCESORIOS ESTÁNDAR .................... 45
ACCESORIOS OPCIONALES ................ 45
APLICACIONES ......................................... 45
ANTES DE LA OPERACIÓN ...................... 46
AJUSTE DE LA SIERRA ANTES DE UTILIZARLA
........... 47
PROCEDIMIENTOS DE CORTE................. 47
CORTE DE INTERIORES ........................... 48
MONTAJE Y DESMONTAJE DE LA CUCHILLA DE LA SIERRA ...
49
MANTENIMIENTO E INSPECCIÓN .......... 50
SERVICIO Y REPARACIONES ................... 51
LISTA DE PIEZAS ...................................... 52
English
Page
IMPORTANT INFORMATION ..................... 3
MEANINGS OF SIGNAL WORDS............... 3
SAFETY
IMPORTANT SAFETY INSTRUCTIONS
FOR USING ALL POWER TOOLS ........... 4
REPLACEMENT PARTS .............................. 9
POLARIZED PLUGS .................................... 9
USE OF EXTENSION CORD ....................... 9
DOUBLE INSULATION FOR SAFER
OPERATION ........................................... 10
OPERATION AND MAINTENANCE
NAME OF PARTS ...................................... 11
Français
Español

English
3
IMPORTANT INFORMATION
Read and understand all of the operating instructions, safety precautions and warnings in
the Instruction Manual before operating or maintaining this power tool.
Most accidents that result from power tool operation and maintenance are caused by the
failure to observe basic safety rules or precautions. An accident can often be avoided by
recognizing a potentially hazardous situation before it occurs, and by observing appropriate
safety procedures.
Basic safety precautions are outlined in the “SAFETY” section of this Instruction Manual and
in the sections which contain the operation and maintenance instructions.
Hazards that must be avoided to prevent bodily injury or machine damage are identified by
WARNINGS on the power tool and in this Instruction Manual.
Never use this power tool in a manner that has not been specifically recommended by
HITACHI, unless you first confirm that the planned use will be safe for you and others.
MEANINGS OF SIGNAL WORDS
WARNING indicates a potentially hazardous situations which, if ignored, could result in
serious personal injury.
CAUTION indicates a hazardous situations which, if ignored, could result in moderate
personal injury, or could cause machine damage.
NOTE emphasizes essential information.

English
4
SAFETY
INPORTANT SAFETY INSTRUCTIONS
FOR USING ALL POWER TOOLSaaaa
WARNING: Death or serious bodily injury could result from improper or unsafe use
of power tools. To avoid these risks, follow these basic safety instruc-
tions:
READ ALL INSTRUCTIONS
1. NEVER TOUCH MOVING PARTS.
Never place your hands, fingers or other body parts near the tool’s moving parts.
2. NEVER OPERATE WITHOUT ALL GUARDS IN PLACE.
Never operate this tool without all guards or safety features in place and in proper working
order. If maintenance or servicing requires the removal of a guard or safety feature, be sure
to replace the guard or safety feature before resuming operation of the tool.
3. ALWAYS WEAR EYE AND EAR PROTECTOR.
Protect yourself from flying or expelled wood chips, metal particles or other debris by
using protective goggles or equivalent eye protector. Wear ear protector to protect
yourself from excessive noise.
4. PROTECT YOURSELF AGAINST ELECTRIC SHOCK.
Prevent body contact with grounded surfaces such as pipes, radiators, ranges and
refrigeration enclosures. Never operate the tool in damp or wet locations.
5. DISCONNECT TOOLS.
Never leave the tool connected to a power source. Always disconnect the tool from its
power source before servicing, inspecting, maintaining, cleaning and before changing or
checking any parts.
6. AVOID UNINTENTIONAL STARTING.
Don’t carry the tool while it is connected to its power source. Don’t carry the tool with your
finger near the power switch. Be sure the power switch is in the “off” position before
connecting the tool to its power source.
7. STORE TOOL PROPERLY.
When not in use, the tool should be stored in a dry place. Keep out of reach of children.
Lock-out the storage area.
8. KEEP WORK AREA CLEAN.
Cluttered areas and benches invite injuries. Clear all work areas and work benches of
unnecessary tools, debris, furniture, etc.
9. CONSIDER WORK AREA ENVIRONMENT.
Don’t expose power tools to rain. Don’t use power tools in damp or wet locations. Keep
work area well lit and well ventilated.
Don’t use tool in presence of flammable liquids or gases.

English
5
Power tools produce sparks during operation. They also spark when switching ON/
OFF. Never use power tools in sites containing lacquer, paint, benzine, thinner,
gasoline, gases, adhesive agents, and other materials which are combustible or
explosive.
10. KEEP CHILDREN AWAY.
Do not let visitors contact tool or extension cord.
All visitors should be kept safely away from work area.
11. DON’T FORCE TOOL.
It will do the job better and safer at the rate for which it was intended.
12. USE RIGHT TOOL.
Don’t force small tool or attachment to do the job of a heavy-duty tool.
Don’t use tool for purpose not intended —for example— don’t use circular saw for cutting
tree limbs or logs.
13. DRESS PROPERLY.
Do not wear loose clothing or jewelry. They can be caught in moving parts.
Rubber gloves and non-skid footwear are recommended when working outdoors.
Wear protective hair covering to contain long hair.
14. USE FACE, DUST MASK OR RESPIRATOR IF OPERATION IS DUSTY.
All persons in the area where power tools are being operated should also wear face, dust
mask or respirator.
15. DON’T ABUSE CORD.
Never carry tool by cord or yank it to disconnect from receptacle.
Keep cord from heat, oil and sharp edges.
16. SECURE WORK.
Use clamps or a vise to hold work. It’s safer than using your hand and it frees both hands
to operate tool.
17. DON’T OVERREACH.
Keep proper footing and balance at all times.
18. MAINTAIN TOOLS WITH CARE.
Keep tools sharp and clean for better and safer performance.
Follow instructions for lubricating and changing accessories.
Inspect tool cords periodically and if damaged, have repaired by an authorized service
center. Inspect extension cords periodically and replace if damaged.
Keep handles dry, clean, and free from oil and grease.
19. REMOVE ADJUSTING KEYS AND WRENCHES.
Keys and adjusting wrenches remove from tool before turning it on.
20. OUTDOOR USE EXTENSION CORD.
When tool is used outdoors, use only extension cord intended for use outdoors and so
marked.
21. STAY ALERT.
Watch what you are doing. Use common sense. Do not operate tool when you are tired.
Tools should never be used by you if you are under the influence of alcohol, drugs or
medication that makes you drowsy.
22. CHECK DAMAGED PARTS.
Before further use of the tool, a guard or other part that is damaged should be carefully
checked to determine that it will operate properly and perform its intended function.
Check for alignment of moving parts, binding of moving parts, breakage of parts,
mounting, and any other conditions that may affect its operation.

English
6
A guard or other part that is damaged should be properly repaired or replaced by an
authorized service center unless otherwise indicated elsewhere in this Instruction
Manual.
Have defective switches replaced by the authorized service center.
Do not use tool if switch does not turn it on and off.
23. NEVER USE A POWER TOOL FOR APPLICATIONS OTHER THAN THOSE SPECIFIED.
Never use a power tool for applications other than those specified in the Instruction
Manual.
24. HANDLE TOOL CORRECTLY.
Operate the tool according to the instructions provided herein. Do not drop or throw the
tool. Never allow the tool to be operated by children, individuals unfamiliar with its
operation or unauthorized personnel.
25. CHECK FOR LIVE WIRES.
Avoid the risk of severe electrical shock by checking for live electrical wires that may be
buried in walls, floors or ceilings. The wires should be de-energized before work begins.
26. KEEP ALL SCREWS, BOLTS AND COVERS TIGHTLY IN PLACE.
Keep all screws, bolts, and plates tightly mounted. Check their condition periodically.
27. DO NOT USE POWER TOOLS IF THE PLASTIC HOUSING OR HANDLE IS CRACKED.
Cracks in the tool’s housing or handle can lead to electric shock. Such tools should not
be used until repaired.
28. BLADES AND ACCESSORIES MUST BE SECURELY MOUNTED TO THE TOOL.
Prevent potential injuries to youself or others. Blades, cutting implements and accessories
which have been mounted to the tool should be secure and tight.
29. KEEP MOTOR AIR VENT CLEAN.
The tool’s motor air vent must be kept clean so that air can freely flow at all times. Check
for dust build-up frequently.
30. OPERATE POWER TOOLS AT THE RATED VOLTAGE.
Operate the power tool at voltages specified on its nameplate.
If using the power tool at a higher voltage than the rated voltage, it will result in
abnormally fast motor revolution and may damage the unit and the motor may burn out.
31. NEVER USE A TOOL WHICH IS DEFECTIVE OR OPERATING ABNORMALLY.
If the tool appears to be operating unusually, making strange noises, or otherwise
appears defective, stop using it immediately and arrange for repairs by a Hitachi
authorized service center.
32. NEVER LEAVE TOOL RUNNING UNATTENDED. TURN POWER OFF.
Don’t leave tool until it comes to a complete stop.
33. CAREFULLY HANDLE POWER TOOLS.
Should a power tool be dropped or struck against hard materials inadvertently, it may be
deformed, cracked, or damaged.
34. DO NOT WIPE PLASTIC PARTS WITH SOLVENT.
Solvents such as gasoline, thinner benzine, carbon tetrachloride, and alcohol may
damage and crack plastic parts. Do not wipe them with such solvents.
Wipe plastic parts with a soft cloth lightly dampened with soapy water and dry
thoroughly.
35. USE ONLY GENUINE HITACHI REPLACEMENT PARTS.
Replacement parts not manufactured by Hitachi may void your warranty and can lead to
malfunction and resulting injuries. Genuine Hitachi parts are available from your dealer.

English
7
36. BE CAREFUL OF BRAKE KICKBACK.
This circular saw features an electric brake that functions when the switch is released. As
there is some kickback when the brake functions, be sure to hold the main body securely.
37. USE ONLY DESIGNATED CARBON BRUSHES.
Use of replacement carbon brushes other than those designated will cause the brake to
malfunction.
38. KEEP GUARDS IN PLACE AND IN WORKING ORDER.
Never wedge or tie lower guard open. Check operation of lower guard before each use.
Do not use if lower guard does not close briskly over saw blade.
CAUTION: If saw is dropped, lower guard may be bent, restricting full return.
39. KEEP BLADES CLEAN AND SHARP.
Sharp blades minimize stalling and kickback.
40. DANGER: KEEP HANDS AWAY FROM CUTTING AREA.
Keep hands away from blades. Do not reach underneath work while blade is rotating. Do
not attempt to remove cut material when blade is moving.
CAUTION: Blades coast after turn off.
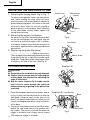
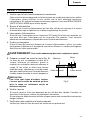
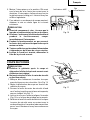
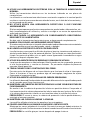
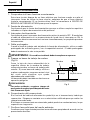
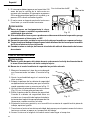
41. SUPPORT LARGE PANELS.
Large panels must be supported as sown in Fig. 1 to minimize the risk of blade pinching
and kickback. When cutting operation requires the resting of saw on the work piece, the
saw shall be rested on the larger portion and the smaller piece cut off.
Fig. 1
42. USE RIP FENCE.
Always use a fence or straight edge guide when ripping.
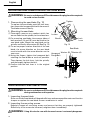
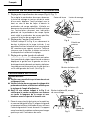
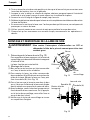
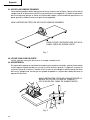
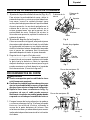
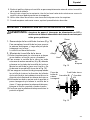
43. WARNING:
It is important to support the work properly and to hold the saw firmly to prevent loss of
control which could cause personal injury. Fig. 2 illustrates typical hand support of the
saw. When operating the saw, keep the cord away from the cutting area and position it
so that it will not be caught on the work piece during the cutting operation.
TO AVOID KICKBACK, SUPPORT
THE PANEL NEAR THE CUT
A TYPICAL ILLUSTRATION OF SUPPORT LARGE PANELS

English
8
A TYPICAL ILLUSTRATION OF PROPER HAND SUPPORT.
WORK SUPPORT, AND SUPPLY CORD ROUTING
Fig. 2
44. GUARD AGAINST KICKBACK.
Kickback occurs when the saw stalls rapidly and is driven back towards the operator.
Release switch immediately if blade binds or saw stalls.
Keep blades sharp.
Support large panels as shown in Fig. 1.
Use fence or straight edge guide when ripping.
Don’t force tool.
Stay alert exercise control.
Don’t remove saw from work during a cut while the blade is moving.
45. LOWER GUARD.
Raise lower guard with the retracting handle (Lever).
46. ADJUSTMENTS.
Before cutting be sure depth and bevel adjustments are tight.
47. USE ONLY CORRECT BLADES IN MOUNTING.
Do not use blades with incorrect size holes. Never use defective or incorrect blade
washers or bolts.
48. AVOID CUTTING NAILS.
Inspect for and remove all nails from lumber before cutting.
49. DO NOT RUN THE SAW WHILE CARRYING IT AT YOUR SIDE.

English
9
REPLACEMENT PARTS
When servicing use only identical replacement parts.
Repairs should be conducted only by a Hitachi authorized service center.
POLARIZED PLUGS
To reduce the risk of electrick shock, this equipment has a polarized plug (one blade is wider
than the other).
This plug will fit in a polarized outlet only one way.
If the plug does not fit fully in the outlet, reverse the plug.
If it still does not fit, contact a qualified electrician to install the proper outlet.
Do not change the plug in any way.
USE OF EXTENSION CORD
Make sure your extension cord is in good condition. When using an extension cord, be sure
to use one heavy enough to carry the current your product will draw.
An undersized cord will cause a drop in line voltage resulting in loss of power and
overheating. Table shows the correct size to use depending on cord length and nameplate
ampere rating. If in doubt, use the next heavier gage. The smaller the gage number, the
heavier the cord.
MINIMUM GAGE FOR CORD SETS
Total Length of Cord in Feet (Meter)
0 – 25 26 – 50 51 – 100 101 – 150
(0 – 7.6) (7.9 – 15.2) (15.5 – 30.5) (30.8 – 45.7)
Ampere Rating AWG
More Not More
Than Than
0 – 618161614
6 – 10 18 16 14 12
10 – 12 16 16 14 12
12 – 16 14 12 Not Recommended
WARNING: Avoid electrical shock hazard. Never use this tool with a damaged or
frayed electrical cord or extension cord.
Inspect all electrical cords regularly. Never use in or near water or in any
environment where electric shock is possible.

English
10
DOUBLE INSULATION FOR SAFER OPERATION
To ensure safer operation of this power tool, HITACHI has adopted a double insulation
design. “Double insulation“ means that two physically separated insulation systems have
been used to insulate the electrically conductive materials connected to the power supply
from the outer frame handled by the operator. Therefore, either the symbol “
” or the words
and “Double insulation” appear on the power tool or on the nameplate.
Although this system has no external grounding, you must still follow the normal electrical
safety precautions given in this Instruction Manual, including not using the power tool in wet
environments.
To keep the double insulation system effective, follow these precautions:
䡬 Only HITACHI AUTHORIZED SERVICE CENTER should disassemble or assemble this
power tool, and only genuine HITACHI replacement parts should be installed.
䡬 Clean the exterior of the power tool only with a soft cloth moistened with soapy water,
and dry thoroughly.
Never use solvents, gasoline or thinners on plastic components; otherwise the plastic
may dissolve.
SAVE THESE INSTRUCTIONS
AND
MAKE THEM AVAILABLE TO
OTHER USERS OF THIS TOOL!

English
11
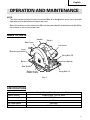
OPERATION AND MAINTENANCE
NOTE:
The information contained in this Instruction Manual is designed to assist you in the safe
operation and maintenance of the power tool.
Some illustrations in this Instruction Manual may show details or attachments that differ
from those on your own power tool
NAME OF PARTS
Fig. 3
Wing Bolt (A)
Lock Spring
Wing Bolt (B)
Lock Lever
Saw Cover
(Lower Guard)
Safety Cover
Saw Blade
Base
(Retracting Handle)
Lever
Handle
Switch
SPECIFICATIONS
Motor Single-Phase, Series Commutator Motor
Power Source Single-Phase 115V AC 60Hz
Max. Cutting Depth 2-3/8" (60mm)
Current 13 A
No-Load Speed 5500 rpm
Weight (with cord) 10.6 lbs (4.8 kg)

English
12
ACCESSORIES
WARNING: Accessories for this power tool are mentioned in this Instruction
Manual.
The use of any other attachment or accessory can be dangerous and
could cause injury or mechanical damage.
STANDARD ACCESSORIES
(1) Saw Blade (See Page 16. ”MOUNTING AND DISMOUNTING THE SAW BLADE“)........................ 1
(2) Wrench (Code No. 957683) .................................................................................................................. 1
(3) Wing Bolt (B) (Code No. 302697) ......................................................................................................... 1
(4) Lock Spring (Code No. 947859) ........................................................................................................... 1
External Diam. Hole Diam. Code No.
7-1/4" (185mm) 5/8" (15.9mm) 302410
OPTIONAL ACCESSORIES....... sold separately
(1) Guide (Code No. 302691)
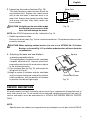
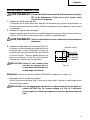
(2) Dust Collector Set (Code No. 302690)
Connect the suction hose to collect saw dust with vacuum cleaner. (See Fig. 4)
Fig. 4 (Attached condition)
NOTE:
Accessories are subject to change without any obligation on the part of the HITACHI.
APPLICATIONS
䡬 Cutting various types of wood.
Fig. 4
Dust Collector

English
13
Fig. 5
Lumber Base
Saw Blade
PRIOR TO OPERATION
1. Check for proper operation of the brake.
This circular saw features an electric brake that functions when the switch is released.
Before using the circular saw, ensure that the electric brake functions properly. If it does
not, bring the tool to a HITACHI AUTHORIZED SERVICE CENTER for repair.
2. Power source
Ensure that the power source to be utilized conforms to the power source requirements
specified on the product nameplate.
3. Power switch
Ensure that the switch is in the OFF position. If the plug is connected to a receptacle while
the switch is in the ON position, the power tool will start operating immediately and can
cause serious injury.
4. Extension cord
When the work area is far away from the power source, use an extension cord of sufficient
thickness and rated capacity. The extension cord should be kept as short as practicable.
WARNING: Damaged cord must be replaced or repaired.
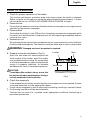
5. Prepare a wooden workbench (Fig. 5)
Since the saw blade will extend beyond the
lower surface of the lumber, place the lumber
on a workbench when cutting. If a square block
is utilized as a workbench, select level ground to
ensure it is properly stabilized. An unstable
workbench will result in hazardous operation.
CAUTION:
To avoid possible accident, always ensure that
the portion of lumber remaining after cutting is
securely anchored or held in position.
6. Check the receptacle
If the receptacle only loosely accepts the plug, the receptacle must be repaired. Contact
a licensed electrician to make appropriate repairs.
If such a fautly receptacle is used, it may cause overheating, resulting in a serious hazard.
7. Confirming condition of the environment:
Confirm that the work site is placed under appropriate conditions conforming to
prescribed precautions.
Workbench

English
14
ADJUSTING THE SAW PRIOR TO USE
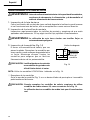
1. Adjusting the cutting depth (Fig. 6, Fig. 7)
To adjust cutting depth, loosen the clamp lever
and, while holding the base with one hand,
move the main unit up and down to obtain the
prescribed cutting depth. Inch scale on the saw
cover and metric scale on the link provide a
general guide to cutting depth. After adjusting
to the prescribed cutting depth, tighten the
clamp lever securely.
2. Adjusting the angle of inclination
As shown in Fig. 8 by loosening the wing-bolt
on the inclined gauge, the saw blade may be
inclined to a maximum angle of 45° in relation
to the base. Always insure that the wing-bolt is
thoroughly tightened after making the desired
adjustment.
3. Regularing the guide (Rip fence)
.......................................... Optional Accessory
The cutting position can be regulated by moving
the guide to the left or right after loosening its
wing-bolt. The guide may be mounted on either
the right or left side of the tool. (See Fig. 9)
CUTTING PROCEDURES
CAUTION:
● Recheck that the saw blade is securely clamped.
● Confirm that the clamp lever for adjusting the
cutting depth, the wing-bolt for adjusting the
angle of inclination.
● Grip the saw as shown in Fig. 2 and be sure the
cord is free to move through the entire cut
without jamming or getting in the path of the
saw blade.
1. Place the saw body (base) on the lumber, and as
in Fig. 10 align the intended line of cut with the
saw blade, using the notch at the front of the
base. This relationship of base to lumber should
remain unchanged regardless of the inclination
of the base.
2. The switch should be turned to the ON position
before the saw blade comes into contact with
the lumber. The switch is turned ON when the
trigger is pulled by one’s finger, and is turned
OFF when the trigger is released.
Fig. 6
Saw Cover
Clamp Lever
Loosen
Tighten
Link
Base
Fig. 7
Inch Scale
Metric Scale
Fig. 8
Wing Bolt (A)
Fig. 9
Wing Bolt (B), Lock Spring
Base
Guide
(Rip Fence)

English
15
3. Moving the saw straight at a constant speed will
produce optimum cutting.
CAUTION:
● Before starting to saw, ensure that the saw
blade has reached full speed revolution.
● Should the saw blade stop or make an abnormal
noise during operation, turn off the switch
immediately.
● During operation, do not cover the slots in the
tail to prevent motor burn.
● Always take care in preventing the power cord
from coming near the revolving saw blade.
● When finished with a job, pull out the plug from
the power receptacle.
POCKET CUTTING
CAUTION:
● Release trigger after cutting work and
disconnect plug from power supply before any
adjustment.
● Never tie or wedge the safety cover in a raised
position.
1. Mark the desired cutting area clearly with lines
all side. (See Fig. 11)
2. Set depth adjustment according to material to
be cut.
3. Push the safety cover lever all the way back so
the blade is exposed as shown in Fig. 11.
4. Tilt saw forward and align the notch (Fig. 10)
with the pre-marked guide line.
5. Release the safety cover lever. When the safety cover contacts the workpiece surface, it
will be in proper position to open freely when cutting is commencend.
6. Holding the saw in position, with the blade not contacting the workpiece surface, pull the
trigger.
7. After the saw has reached full speed, gradually lower rear end of the saw until its base
rests on the work surface.
8. Advance saw along the cutting line up to the corner.
9. Release trigger and allow blade to stop completely before withdrawing the blade from
the workpiece.
䡩 Never under any circumstances pull the saw backwards while the blade is in motion, as
kickback may result.
10. Use a jig saw or hand saw to cut the corners out clean.
11. When starting each new cut, repeat as above.
Fig. 10
When Inclined 45°
When
not
Inclined
Fig. 11
Lever

English
16
MOUNTING AND DISMOUNTING THE SAW BLADE
WARNING: Be sure to switch power OFF and disconnect the plug from the receptacle
to avoid serious trouble.
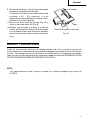
1. Dismounting the saw blade (Fig. 12)
To replace the saw blade, push the lock lever,
then loosen the hexagonal bolt with the wrench.
The blade comes off easily.
2. Mounting the saw blade
(1) Thoroughly remove any sawdust which has
accumulated on the spindle, bolt and washers.
(2) For mounting saw blade, the concave sides of
both washers (A) and (B) must be fitted to the
saw blade sides. Mount the saw blade on the
spindle, and finally affix washer (B) (See Fig. 13)
(3) To assure proper rotation direction of the saw
blade, the arrow direction on the saw blade
must coincide with the arrow direction on the
saw cover.
(4) Using the fingers, tighten the hexagonal bolt
retaining the saw blade as much as possible.
Then depress the lock lever, lock the spindle,
and thoroughly tighten the bolt.
(5) Confirm that the lock lever is in the original
position.
Fig. 12
Tighten
Loosen
Lock
Lever
Wrench
Fig. 13
Hexagonal
Flange Bolt
Washer (A)
Washer (B)
Saw Blade
MAINTENANCE AND INSPECTION
WARNING: Be sure to switch power OFF and disconnect the plug from the receptacle
during maintenance and inspection.
1. Inspecting the saw blade
Since use of a dull saw blade will degrade efficiency and cause possible motor malfunction
sharpen or replace the saw blade as soon as abrasion is noted.
2. Inspecting the mounting screws
Regularly inspect all mounting screws and ensure that they are properly tightened.
Should any of the screws be loosened, retighten them immediately.
WARNING: Using this circular saw with loosened screws is extremely dangerous.

English
17
3. Inspecting the carbon brushes (Fig. 14)
The motor employs carbon brushes which are
consumable parts. Replace the carbon brush
with a new one when it becomes worn to its
wear limit. Always keep carbon brushes clean
and ensure that they slide freely within the
brush holders.
CAUTION: Using this circular saw with a carbon
brush which is worn in excess of the
wear limit will damage the motor.
NOTE: Use HITACHI carbon brush No. indicated in Fig. 14.
䡬 Replacing carbon brushes:
Remove the brush caps (Fig. 1) with a slotted screwdriver. The carbon brushes can then
be easily removed.
CAUTION: When replacing carbon brushes, be sure to use HITACHI No. 38 Carbon
Brushes, as shown in Fig. 14. Use of other carbon brushes will cause the brake
to malfunction.
4. Adjusting the base and saw blade to
maintain perpendicularity
The angle between the base and the saw blade
has been adjusted to 90°, however should this
perpendicularity be lost for some reason, adjust
in the following manner.
(1) Turn the base face up (Fig. 15) and loosen the
Wing-bolt (A) (Fig. 8).
(2) Apply a square to the base and the saw blade
and, turning the slotted set screw with a slotted-
head screwdriver, shift the position of the base
to produce the desired right angle
SERVICE AND REPAIRS
All quality power tools will eventually require servicing or replacement of parts because of
wear from normal use. To assure that only authorized replacement parts will be used, all
service and repairs must be performed by a HITACHI AUTHORIZED SERVICE CENTER,
ONLY.
NOTE:
Specifications are subject to change without any obligation on the part of the HITACHI.
Wear limit
No. of carbon
brush
Fig. 14
Square
Fig. 15
Slotted Set Screw
Base
0.24"(6mm)
38
0.67"
(17mm)

Français
18
INFORMATIONS IMPORTANTES
Lire et comprendre toutes les instructions de fonctionnement, les précautions de sécurité et
les avertissements dans ce mode d’emploi avant d’utiliser ou d’entretenir cet outil motorisé.
La plupart des accidents causés lors de l’utilisation ou de l’entretien de l’outil motorisé
proviennent d’un non respect des règles ou précautions de base de sécurité. Un accident
peut la plupart du temps être évité si l’on reconnaît une situation de danger potentiel avant
qu’elle ne se produise, et en observant les procédures de sécurité appropriées.
Les précautions de base de sécurité sont mises en évidence dans la section “SECURITE” de
ce mode d’emploi et dans les sections qui contiennent les instructions de fonctionnement
et d’entretien.
Les dangers qui doivent être évités pour prévenir des blessures corporelles ou un
endommagement de la machine sont identifiés par AVERTISSEMENTS sur l’outil motorisé
et dans ce mode d’emploi.
Ne jamais utiliser cet outil motorisé d ’une manière qui n’est pas spécifiquement recommandée
par HITACHI sans avoir d’abord vérifié que l’utilisation prévue est sans danger pour vous et
les autres.
SIGNIFICATION DES MOTS D’AVERTISSEMENT
AVERTISSEMENT indique des situations potentiellement dangereuses qui, si elles sont
ignorées, pourraient entraîner de sérieuses blessures personnelles.
PRECAUTION indique des situations dangereuses qui, si elles sont ignorées, pourrait
entraîner de légères blessures personnelles ou endommager la machine.
REMARQUE met en relief des informations essentielles.

Français
19
SECURITE
CONSIGNES DE SECURITE IMPORTANTES POUR IIIII
L’UTILISATION DE TOUS LES OUTILS ELECTRIQUES
AVERTISSEMENT:Une utilisation incorrecte ou dangereuse des outils électriques
peut entraîner la mort ou des blessures graves.
LIRE TOUT CE MODE D’EMPLOI.
1. NE JAMAIS TOUCHER LES PARTIES MOBILES.
Ne jamais placer ses mains, ses doigts ou toute autre partie de son corps près des parties
mobiles de l’outil.
2. NE JAMAIS UTILISER L’OUTIL SANS QUE TOUS LES DISPOSITIFS DE SECURITE NE
SOIENT EN PLACE.
Ne jamais faire fonctionner cet outil sans que tous les dispositifs et caractéristiques de
sécurité ne soient en place et en état de fonctionnement. Si un entretien ou une réparation
nécessite le retrait d’un dispositif ou d’une caractéristique de sécurité, s’assurer de bien
remettre en place le dispositif ou la caractéristique de sécurité avant de recommencer à
utiliser l’outil.
3. TOUJOURS SE PROTEGER LES YEUX ET LES OREILLES.
Pour se protéger des projections de copeaux de bois, particules métalliques ou autres
débris, porter des lunettes de protection ou un masque pour les yeux. Porter des
protections anti-bruit pour se protéger du bruit.
4. SE PROTEGER CONTRE LES DECHARGES ELECTRIQUES.
Empêcher tout contact du corps avec les surfaces mises à la terre, par exemple tuyaux,
radiateurs, plaques de cuisson et enceintes de réfrigération. Ne jamais faire fonctionner
l’outil dans un endroit humide ou mouillé.
5. DEBRANCHER LES OUTILS.
Ne jamais laisser l’outil branché dans une source d’alimentation. Toujours débrancher
l’outil de la source d’alimentation avant tout travail de réparation, d’inspection, d’entretien,
de nettoyage, de remplacement ou de vérification des pièces.
6. EVITER TOUTE MISE EN MARCHE INOPINEE.
Ne pas transporter l’outil pendant qu’il est raccordé à la source d’alimentation. Ne pas
transporter l’outil avec le doigt près de l’interrupteur d’alimentation. Bien s’assurer que
l’interrupteur d’alimentation se trouve sur la position “OFF” (arrêt) avant de raccorder
l’outil à la source d’alimentation.
7. REMISER L’OUTIL CORRECTEMENT.
Lorsqu’on ne se sert pas de l’outil, le remiser dans un endroit sec. Veiller à ce qu’il soit
hors d’atteinte des enfants. Fermer le local de remisage à clé.
8. MAINTENIR L’AIRE DE TRAVAIL PROPRE.
Les aires de travail et les établis encombrés favorisent les accidents. Débarrasser l’aire
de travail et les établis des outils inutiles, débris, meubles, etc.

Français
20
9. CONSIDERER L’ENVIRONNEMENT DE L’AIRE DE TRAVAIL.
Ne pas exposer les outils à la pluie. Ne pas les utiliser dans un endroit humide ou mouillé.
Veiller à ce que l’aire de travail soit bien éclairée et bien aérée.
Ne pas utiliser l’outil en présence de liquides ou de gaz inflammables.
Les outils projettent des étincelles pendant qu’ils fonctionnent. Ne jamais utiliser les
outils dans un lieu renfermant de la laque, de la peinture, du diluant, de l’essence, des gaz,
des produits adhésifs ni aucun autre matériau combustible ou explosif.
10. ELOIGNER LES ENFANTS.
Ne pas laisser les visiteurs toucher l’outil ou le cordon de rallonge.
Tous les visiteurs devront être suffisamment éloignés de l’aire de travail.
11. NE PAS FORCER L’OUTIL.
Il effectuera le travail le meilleur et avec la sécurité maximale au régime pour lequel il a
été conçu.
12. UTILISER L’OUTIL CORRECT
Ne pas forcer sur un petit outil ou accessoire pour faire le travail d’un outil de grande
puissance. Ne pas utiliser un outil pour un usage pour lequel il n’a pas été prévu: par
exemple, ne pas utiliser une scie circulaire pour couper des branches d’arbre ou des
bûches.
13. SE VETIR CORRECTEMENT.
Ne pas porter de vêtements lâches ni de bijoux. Ils pourraient se prendre dans les pièces
en mouvement. Il est recommandé de porter des gants en caoutchouc et des chaussures
anti-glissantes lors d’un travail à l’extérieur.
Porter un couvre-chef qui recouvre les cheveux longs.
14. PORTER UN MASQUE, UN MASQUE ANTI-POUSSIERE OU UN APPAREIL RESPIRATOIRE
SI LE TRAVAIL DOIT DEGAGER DE LA POUSSIERE.
Toutes les personnes présentes sur l’aire de travail devront également porter un masque,
un masque anti-poussière ou un appareil respiratoire.
15. NE PAS MALTRAITER LE CORDON.
Ne jamais transporter l’outil par le cordon ni tirer brusquement sur le cordon pour le
débrancher.
Eloigner le cordon de la chaleur, de la graisse et des surfaces tranchantes.
16. FIXER LA PIECE.
Utiliser des dispositifs de serrage ou un étau pour tenir la pièce. Cela sera plus sûr que
de tenir la pièce à la main et libérera les deux mains pour le travail.
17. NE PAS TROP SE PENCHER.
Garder une bonne assise et un bon équilibre à tout moment.
18. ENTRETENIR LES OUTILS AVEC SOIN.
Maintenir les outils aiguisés et propres pour optimiser le travail et la sécurité.
Suivre les instructions de graissage et de remplacement des accessoires.
Vérifier périodiquement les cordons d’outil et les faire réparer par un centre de réparation
agréé s ’ils sont endommagés. Vérifier périodiquement les cordons de rallonge et les faire
remplacer s’ils sont endommagés. Maintenir les poignées sèches et propres, et enlever
toute graisse et toute huile dessus.
19. RETIRER LES CLAVETTES DE REGLAGE ET LES CLES.
Les clés et les clavettes de réglage devront être retirées de l’outil avant de sa mise en
marche.
La page est en cours de chargement...
La page est en cours de chargement...
La page est en cours de chargement...
La page est en cours de chargement...
La page est en cours de chargement...
La page est en cours de chargement...
La page est en cours de chargement...
La page est en cours de chargement...
La page est en cours de chargement...
La page est en cours de chargement...
La page est en cours de chargement...
La page est en cours de chargement...
La page est en cours de chargement...
La page est en cours de chargement...
La page est en cours de chargement...
La page est en cours de chargement...
La page est en cours de chargement...
La page est en cours de chargement...
La page est en cours de chargement...
La page est en cours de chargement...
La page est en cours de chargement...
La page est en cours de chargement...
La page est en cours de chargement...
La page est en cours de chargement...
La page est en cours de chargement...
La page est en cours de chargement...
La page est en cours de chargement...
La page est en cours de chargement...
La page est en cours de chargement...
La page est en cours de chargement...
La page est en cours de chargement...
La page est en cours de chargement...
La page est en cours de chargement...
La page est en cours de chargement...
La page est en cours de chargement...
La page est en cours de chargement...
-
 1
1
-
 2
2
-
 3
3
-
 4
4
-
 5
5
-
 6
6
-
 7
7
-
 8
8
-
 9
9
-
 10
10
-
 11
11
-
 12
12
-
 13
13
-
 14
14
-
 15
15
-
 16
16
-
 17
17
-
 18
18
-
 19
19
-
 20
20
-
 21
21
-
 22
22
-
 23
23
-
 24
24
-
 25
25
-
 26
26
-
 27
27
-
 28
28
-
 29
29
-
 30
30
-
 31
31
-
 32
32
-
 33
33
-
 34
34
-
 35
35
-
 36
36
-
 37
37
-
 38
38
-
 39
39
-
 40
40
-
 41
41
-
 42
42
-
 43
43
-
 44
44
-
 45
45
-
 46
46
-
 47
47
-
 48
48
-
 49
49
-
 50
50
-
 51
51
-
 52
52
-
 53
53
-
 54
54
-
 55
55
-
 56
56


Hitachi C 7BD Instruction Manual And Safety Instructions
- Catégorie
- Outils électroportatifs
- Taper
- Instruction Manual And Safety Instructions
dans d''autres langues
- English: Hitachi C 7BD
- español: Hitachi C 7BD
Documents connexes
-
Hitachi C 7BD2 Manuel utilisateur
-
Hitachi C7SB2 Manuel utilisateur
-
-
-
-
-
-
-
Hitachi C 18DL Manuel utilisateur
-