
Quality
•
Innovation
•
Style
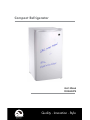
Compact
Refrigerator
User’s Manual
FR326-WHITE

SAFETY PRECAUTIONS
When using this appliance, always exercise basic safety precautions,
including the following:
1) Use this appliance only for its intended purpose as described in this use
and care guide.
2)
This refrigerator must be properly installed in accordance with the installa-
tion instructions before it is used. See grounding instructions in the installa-
tion section.
3)
Never unplug your refrigerator by pulling on the power cord. Always
grasp the plug firmly and pull straight out from the outlet.
4) Repair or replace immediately, all electric service cords that have become
frayed or otherwise damaged. Do not use a cord that shows cracks or
abrasion damage along its length, the plug or the connector end.
5) Unplug your refrigerator before cleaning or before making any repairs.
Note: If for any reason this product requires service, we strongly recom-
mend that a certified technician performs the service.
6) Do not use any electrical device or any sharp instrument in defrosting your
refrigerator.
7) If your old refrigerator is not being used, we recommend that you remove
the doors and leave the shelves in place. This will reduce the possibility of
danger to children.
8) After your refrigerator is in operation, do not touch the cold surfaces in
the refrigerator compartment, particularly when hands are damp or wet.
Skin may adhere to these extremely cold surfaces.
9) This refrigerator should not be recessed or built-in an enclosed cabinet. It is
designed for freestanding installation only.
10) Do not operate your refrigerator in the presence of explosive fumes.
SAVE THESE INSTRUCTIONS
English
1

Thank you for using our
product. This easy-to-use manual
will guide you in getting the best
use of your refrigerator.
Remember to record the model and
serial number. They are on a label
in back of the refrigerator.
Model number
Serial number
Date of purchase
Staple your receipt to your manual.
You will need it to obtain warranty service.
English
2
DANGER
Risk of child entrapment. Before you throw away your old
refrigerator or refrigerator, take off the doors. Leave the
shelves in place so that children may not easily climb inside.

Table Of Contents
PAGE
Safety Precautions ...................................................................... 1
Parts And Features
..................................................................... 4
Installing Your Refrigerator
....................................................... 5
Unpacking Your Refrigerator
............................................................. 5
Proper Air Circulation
....................................................................... 5
Electrical Requirements
..................................................................... 5
Use of Extension
Cords
..................................................................... 6
Install Limitations
.............................................................................. 6
Door Alignment
............................................................................... 7
Refrigerator Features And Use
.....................................................
8
Operating Your Refrigerator
.............................................................. 8
General Features
............................................................................. 8
...............................................................................8
Defrosting And Draining
................................................................... 9
Normal Operating Sounds
................................................................ 9
Proper Refrigerator Care and Cleaning
.................................10
Cleaning and Maintenance
...............................................................10
Power Interruptions
.........................................................................11
Vacation and Moving Care
.............................................................11
Troubleshooting
........................................................................12
English
3
Door Reversal................................................................................... 6
Specifications Model # FR326-WHITE
Electrical Shock Protection Class 1
Voltage 115V/60Hz
Rated Current 1.3 A
Refrigerant R134a/1.41 Oz.
Design Pressure
High Side 250 Psig
Low Side 88 Psig
Dimensions 17.5" x 18.7" x 31.5"
Weight 50.7 LBS
Eraser Board Use

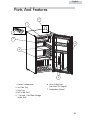
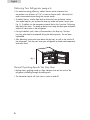
Parts And Features
English
4
1. Freezer Compartment
2. Ice Cube Tray
3. Drip Tray
4. Full Width Shelf
5. 1 Full and 1 Half Door Storage
Width Shelf
6. Write Fridge Front
(See Notes On Page 8)
7. Temperature Control
7
1
2
3
4
6
5

1. Remove all packaging material. This includes the foam base and all
adhesive tape holding the refrigerator accessories inside and outside.
2. Inspect and remove any remains of packing, tape or printed materi-
als before powering on the refrigerator.
• To assure your refrigerator works at the maximum efficiency it was
designed for, you should install it in a location where there is proper
air circulation, plumbing and electrical connections.
• The following are recommended clearances around the refrigerator:
Sides ……………3/4 “(19mm)
Top ....................2” (50mm)
Back ..................2” (50mm)
• Make sure there is a suitable power Outlet (115 volts, 15 amps out-
let) with proper grounding to power the refrigerator.
• Avoid the use of three plug adapters or cutting off the third grounding
in order to accommodate a two plug outlet. This is a dangerous prac-
tice since it provides no effective grounding for the refrigerator and
may result in shock hazard.
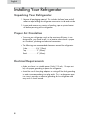
Installing Your Refrigerator
Unpacking Your Refrigerator
Proper Air Circulation
English
5
Electrical Requirements

• Avoid the use of an extension cord because of potential safety haz-
ards under certain conditions. If it is necessary to use an extension
cord, use only a 3-wire extension cord that has a 3-blade grounding
plug and a 3-slot outlet that will accept the plug. The marked rating
of the extension cord must be equal to or greater than the electrical
rating of the appliance.
• Do not install your refrigerator in any location not properly insulated
or heated e.g. garage etc. Your refrigerator was not designed to
operate in temperature settings below 55˚ Fahrenheit.
• Select a suitable location for the refrigerator on a hard even surface
away from direct sunlight or heat source e.g. radiators, baseboard
heaters, cooking appliances etc.
Install Limitations
English
6
Use of Extension Cord
Reversing the Door Hinge
1. Remove the top hinge cover.
2. Using Phillips Head Screwdriver, loosen and remove the screws holding the
top hinge in place.
3. Remove top hinge and carefully lift off the door.
4. Remove the screw hole plugs from the opposite side and insert the plugs in
the screw hole openings of the just removed screws.
5. Remove any loose items in the refrigerator and carefully turn refrigerator on
its back and place in a secure area.
6. Loosen the screws holding the lower hinge bracket to the refrigerator and
remove screws and bracket.
7. Remove (2) screws from the other side and insert in the previously removed
screw holes.
8. Remove door pin by turning counter clockwise and reinsert to the underside
of the bracket and tighten.
9. Align bracket and insert (2) remaining screws into the holes provided .
10. Align hole in the door with the door pin and washer and gently push down
until firm.
11. Align upper hinge bracket with screw holes insert screws and partially
secure, check that door and cabinet are properly aligned and then secure
tightly.
12. Replace hinge cap.

1. Remove the top hinge cover by using a flathead screwdriver. Place
the head under the front edge of the cap and gently lift.
2. Loosen the top hinge screws using a Phillips head screw driver.
3. Adjust the door or put a spacer in between and tighten the screws.
4. Replace the top hinge cover by aligning the rear of the cover with
the rear of the hinge. Press firmly on the front of the cover until it
snaps in place.
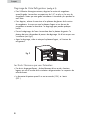
Door Alignment
(see fig. #1)
fig. 1
NOTE: As the door gets pressed in during shipping, after reversing
the door, the gasket may have to be reset. This is done to
prevent the cool refrigerated air from escaping. If there is a
gap between the door gasket and the cabinet, set the gasket by
gently pulling it out to seal the gap.
English
7

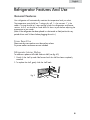
Refrigerator Features And Use
General Features
Your refrigerator will automatically maintain the temperature level you select.
The temperature control dial has 7 settings plus off. 1 is the warmest. 7 is the
coldest. Turning the dial to 0 stops cooling in both the refrigeration and freezer
sections. At first, set the dial to 4 and allow 24 hours to pass before adjusting the
temperature to your needs.
(Note: If the refrigerator has been placed in a horizontal or tilted position for any
period of time wait 24 hours before plugging the unit in.)
Eraser Board Use
Please note dry erase markers must be used on surface.
Dry erase markers and eraser are not included.
Refrigerator Interior Shelves
To remove or replace a full-width slide-out shelf: (see fig. # 2)
1. Gently tilt the shelf up and slide forward until the shelf has been completely
removed.
2. To replace the shelf, gently slide the shelf back.
English
fig. 2
8

English
Defrosting Your Refrigerator
(see fig. # 3)
• For maximum energy efficiency, defrost freezer section whenever frost
accumulates to a thickness of 1/4” or more on freezer walls. Note that frost
tends to accumulate more during the summer months.
• To defrost freezer, remove food and ice cube tray from the freezer section.
Your model requires you to place the drip tray under the freezer section (see
Fig. 3). To defrost turn the temperature control dial to the 0 position. Defrosting
may take a few hours. To speed up defrost time, keep the door open and place
a bowl of warm water in the refrigerator.
• During the defrost cycle, water will accumulate in the drip tray. The drip
tray may also need to be emptied during the defrost process. Do not leave
unattended.
• After defrosting, empty and wipe down the drip tray, as well as the interior of
the refrigerator. You may now reset your refrigerator to the desired temperature
and return food.
Normal Operating Sounds You May Hear
• Boiling water, gurgling sounds or slight vibrations that are the result of the
refrigerant circulating through the cooling coils.
• The thermostat control will click when it cycles on and off.
fig. 3
9

English
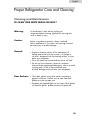
Proper Refrigerator Care and Cleaning
Cleaning and Maintenance
To avoid electric shock always unplug your
refrigerator before cleaning. Ignoring this warning may
result in death or injury.
Before using cleaning products, always read and
follow manufacturer’s instructions and warnings to avoid
personal injury or product damage.
• Prepare a cleaning solution of 3-4 tablespoons of
baking soda mixed with warm water. Use sponge or
soft cloth, dampened with the cleaning solution, to wipe
down your refrigerator.
• Rinse with clean warm water and dry with a soft cloth.
• Do not use harsh chemicals, abrasives, ammonia,
chlorine bleach,concentrated detergents, solvents or metal
scouring pads. SOME of these chemicals may
dissolve, damage and/or discolor your refrigerator.
• Clean door gaskets every three months according to
general instructions. Gaskets must be kept clean and
pliable to assure a proper seal.
• Petroleum jelly applied lightly on the hinge side of gaskets
will keep the gasket pliable and assure a good seal.
Door Gaskets:
General:
Caution:
Warning:
TO CLEAN YOUR WRITE FRIDGE SEE PAGE 7
10

English
11
• Occasionally there may be power interruptions due to thunderstorms or other
causes. Remove the power cord from AC outlet when a power outage occurs.
When power has been restored, replug power cord to AC outlet. If outage is
for a prolonged period, inspect and discard spoiled or thawed food in freezer.
Clean freezer before reusing.
• For long vacations or absences, empty food from refrigerator, move the
temperature DIAL to the “O” position and clean the door gaskets according
to “General cleaning” section. Prop doors open, so air can circulate inside.
When moving always move the refrigerator vertically. Do not move with the
unit lying down. Possible damage to the sealed system could occur.
Power Interruptions
Vacation and Moving Care

English
12
TroubleShooting
Refrigerator Does Not Operate
• Check if thermostat control is not in the “0” position.
• Check if refrigerator is plugged in.
• Check if there is power at the ac outlet, by checking the circuit breaker.
Food temperature appears too warm
• Frequent door openings.
• Allow time for recently added warm food to reach fresh food or freezer
temperature.
• Check gaskets for proper seal.
• Adjust temperature control to colder setting.
Food temperature is too cold
• If temperature control setting is too cold, adjust to a warmer setting and
allow several hours for temperature to adjust.
Refrigerator runs too frequently
• This may be normal to maintain constant temperature during high
temperature and humid days.
• Doors may have been opened frequently or for an extended period of
time.
• Check gasket for proper seal.
• Check to see if doors are completely closed.
Moisture build up on interior or exterior of the
refrigerator:
• This is normal during high humidity periods.
• Prolonged or frequent door openings.
• Check door gaskets for proper seal.
Refrigerator has an odor:
• Interior needs cleaning.
• Foods improperly wrapped or sealed are giving off odors.
Refrigerator door does not shut properly:
• Re-align refrigerator door.
• Check for blockages e.g. food containers, crisper cover, shelves, bins
etc...

Quality
•
Innovation
•
Style
Congélateur Compact
Guide de l’Utilisateur
FR326-WHITE

1
PRECAUTIONS DE
SURETE
Lisez toutes les instructions avant d’utiliser cet appareil. Exercez
toujours les precautions de surete fondamentales avant d’utiliser cet
appareil, y compris les suivants:
1. Utilisez cet appareil uniquement pour son but prevu comme decrit
dans ce manuel d’utilisation et d’entretien.
2. Ce refrigerateur doit etre installe correctement et conformement aux
instructions d’installation avant d’etre utilise. Referez vous aux
instructions de mise a terre dans la section d’installation.
3. Ne debranchez jamais votre refrigerateur en tirant sur la corde d’ali
mentation. Saisissez toujours la fiche et tirez la tout droit hors de la
prise ecletrique.
4. Reparez ou remplacez immediatement , tous les cordons electriques
de service qui sont devenus franges ou autrement endommages.
N’utilisez pas une corde presentant des craquelures ou des abra
sions tout au long de la corde, de la fiche ou de l’extremite du co
necteur.
5. Debranchez votre refrigerateur avant de le nettoyer ou avant n’im
porte quelles reparations.
6. N’utilisez aucun dispositif electrique ou instrument pointu en degri
vant votre refrigerateur.
7. Si vous n’utilisez plus votre ancien refrigerateur, nous vous recom
man dons de retirer les portes. Cela reduira les risques d’accidents
pour les enfants.
8. Apres avoir mis votre refrigerateur en marche, ne touchez pas aux
sur faces froides des compartements du congelateur specialement si
vos mains sont mouillees ou humides. La peau peut adherer a ces
surfaces extremement froides.
9. Ce refrigerateur ne doit pas etre encastre ou place a l’interieur d’une
armoire fermee. Il est designe a etre place sans support.
10. N’operez pas votre refrigerateur dans la presence des vapeurs
explosives.
Français

2
Nous vous remercions d’avoir
achete un produit . Ce manuel
facile a consulter vous guidera a
obtenir la meilleure utilisation de
votre refrigerateur.
N’oubliez pas d’enregistrer les
numeros du model et de serie. Ils
sont affiches sur une etiquette dans
le refrigerateur.
Numero du model
Numero de serie
Date d’achat
Agrafez votre recu d’achat a votre manuel.
Vous en aurez besoin pour obtenir le service de la garantie.
CONSERVEZ CES
INSTRUCTIONS POUR LE
FUTUR.
DANGER
Risque d’entrapement des enfants. Avant de disposer de
votre refrigerateur ou congelateur, enlevez les portes. Laissez
les etageres en place afin que les enfants ne puissent pas
grimper a l’interieur.
Français

Français
3
Table des Matières
PAGE
Precautions de Surete................................................................. 1
Parts et Caracteristiques
............................................................ 4
Installion de Votre Refrigerateur
.............................................. 5
Deballage de Votre Refrigerateur
....................................................... 5
Circulation Propre de L’air
................................................................ 5
Conditions Electriques
...................................................................... 5
Utilisation des Rallonges
................................................................... 6
Limitations d’installation
.................................................................... 6
Alignment de la Porte
....................................................................... 7
Caracterisiques et Utilisation de Refrigerateur
............................
8
L’utilisation Generale
........................................................................ 8
Les Etageres Interieures
..................................................................... 8
...........................................................8
Degrivage de Votre Refrigerateur
....................................................... 9
Les Bruits Normaux que Vous Entendrez
............................................. 9
Entretien et Nettoyage du Refrigerateur
.................................. 10
Nettoyage et Entretien
...................................................................... 10
Coupure de Courant
........................................................................ 10
Entretiens Pendant les Vacances ou Demenagement
............................. 10
Depannage
.................................................................................. 11
Placer la Charnière de Porte sur le Côté Opposé du Réfrigérateur......... 6
Spécifications Model # FR326-WHITE
Protection contre les chocs élec-
triques
Class 1
Tension 115V/60Hz
Courant nominal 1.3 A
Réfrigerant R134a/1.41 Oz.
Pression
Côté haut 250 Psig
Côté bas 88 Psig
Dimensions
Poids 50.7 LBS
17.5" x 18.7" x 31.5"
Utilisation de panneau sec efface

Français
4
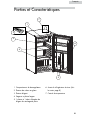
Parties et Caracteristiques
1. Compartiments du decongelateur
2. Plateau des cubes en glace
3. Plateau d’egout
4. Etageres a pleine largeur
5. 1 pleine et 1 demi d’étagère de
largeur de stockage de porte
6. Avant du réfrigérateur écriture (Voir
les notes page 8)
7. Control de temperature
7
1
2
3
4
6
5

Français
5
1. Retirez tous les materiaux d’emballage. Ceci inclus le socle en mousse et tous
les rubans adhesifs retenant les accessoires du refrigerateur a l’interieuret
exterieur.
2. Inspectez et retirez le reste de l’emballage, le ruban adhesif et la
documentation avant de mettre en marche votre refrigerateur.
• Afin de vous assurez que votre refrigerateur fonctionne a maximum efficacite
vous devrez l’installer dans un endroit ou la ventilation , le raccordement
electrique et la connection de plomberie soient absolument correctes.
• On vous recommande de laisser les espaces suivantes tout autour du
refrigerateur.
Cotes.........................3/4” (19mm)
Au-dessus..................2” ( 50mm)
Derriere......................2” (50mm)
• Assurez vous qu’il y a une prise electrique adequate ( 115volts, 15 amperes
prise) avec mise a terre correcte pour mettre le refrigerateur en marche.
• Ne pas utiliser l’adaptateur a 3 broches ou ne pas couper la troisieme broche
pour obtenir un adaptateur a 2 broches . Ceci est une pratique dangereuse
car elle n’offre pas de mise a terre au refrigerateur et peut resulter d’un shoc
electrique.
Installation de Votre Refrigerateur
Deballage de Votre Refrigerateur
Circulation Propre de L’air
Conditons Electriques

Français
6
• Evitez l’usage des rallonges car dans certains cas cela peut entrainer des
risques pour la sante. S’i c’est necessaire d’utiliser une cordon d’extension,
utilisez une rallonge a 3 conducteurs disposant d’une fiche a 3 lames et une
sortie a 3 fentes qui accepteront la prise. Le calibre defini des rallonges doit
etre egal ou superieur a celui de l’equipement.
• N’installez jamais votre refrigerateur dans un endroit insuffisamment isole ou
chauffe, par exemple, le garage etc... Votre refrigerateur n’a pas ete concu
pour operer a une temperature inferieure a 55degres Fahrenheit.
• Choisissez un endroit approprie a votre refrigerateur sur une surface ferme et
plane, loin des rayons directs du soleil ou des sources de chaleur comme les
radiateurs, les radiateurs de plinthes , les appareils de cuisine,etc... N’importe
quelle inegalite du sol doit etre corrigee en reglant les pieds du refrigerateur,
situes au bas.
Limitations d’installation
Utilisation des Rallonges
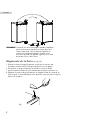
Placer la Charnière de Porte sur le Côté Opposé
du Réfrigérateur
1. Enlevez la couverture superieure de la charniere
2. Desserrez et enlevez a l'aide d'un tournevis Phillips, les vis qui soutiennent la
charniere en place.
3. Enlevez la charniere et retirez la porte soigneusement
4. Enlevez les bouchons des trous des vis du cote oppose et inserrez les dans
les ouvertures des trous des vis que vous venez de retirer
5. Enlevez tous les articles qui ne sont pas attaches du refrigerateur, tournez le
sur son dos soigneusement et mettez les de cote .
6. Desserez les vis qui soutiennent l'equerre de la charniere inferieure du refrig
erateur et enlevez les vis et l'equerre
7. Enlevez les 2 vis du cote oppose et inserrezles dans les trous des vis pre
cedemment enleves .
8. Enlevez la goupille de la porte and tournant le compteur dans le sens
des aiguilles d'une montre et reinserrez au dessous de l'equerre et serrez.
9. Alignez l'equerre et inserrez les 2 vis dans les trous fournis
10. Alignez le trou dans la porte avec la goupille et la rondelle de la porteet
abaissez doucement jusqu'a ce qu'elle soit ferme.
11. Alignez l'equerre de la charniere superieure avec les trous des vis, inserrez
les vis et serrez fermement.
12. Replacez la couverture de la charniere
La page est en cours de chargement...
La page est en cours de chargement...
La page est en cours de chargement...
La page est en cours de chargement...
La page est en cours de chargement...
-
 1
1
-
 2
2
-
 3
3
-
 4
4
-
 5
5
-
 6
6
-
 7
7
-
 8
8
-
 9
9
-
 10
10
-
 11
11
-
 12
12
-
 13
13
-
 14
14
-
 15
15
-
 16
16
-
 17
17
-
 18
18
-
 19
19
-
 20
20
-
 21
21
-
 22
22
-
 23
23
-
 24
24
-
 25
25


Igloo FR326-WHITE Manuel utilisateur
- Taper
- Manuel utilisateur
- Ce manuel convient également à
dans d''autres langues
- English: Igloo FR326-WHITE User manual
