KitchenAid 720-0893D Mode d'emploi
- Catégorie
- Barbecues
- Taper
- Mode d'emploi

19000667A1
720-0893D (LP) / 730-0893D (NG)
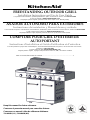
FREESTANDING OUTDOOR GRILL
Installation Instructions and Use & Care Guide
For questions about features, operation/performance, parts, accessories or service, call: 1-877-373-2301
or visit our website at www.Kitchenaidgrills.com
Languages spoken: English, Spanish, French 8 a.m.-5 p.m., PST. Monday-Friday.
ASADOR AUTÓNOMO PARA EXTERIORES
Instrucciones de instalación y Manual de uso y cuidado
Para consultas respecto a características, funcionamiento, rendimiento, piezas, accesorios o servicio técnico, llame al: 1-877-373-2301
o visite nuestro sitio de internet en www.Kitchenaidgrills.com
Lenguages ablados: Ingles, Espanol y Frances de 8 a.m.-5 p.m., PST. Lunes-Viernes.
COMPTOIR POUR GRIL D’EXTÉRIEUR
AUTOPORTANT
Instructions d’installation et Guide d’utilisation et d’entretien
Pour des questions à propos des caractéristiques, du fonctionnement/rendement, des pièces, des accessoires ou du service,
composer le: 1-877-373-2301
ou visiter notre site web www.Kitchenaidgrills.com
Langues parlées: anglais , espagnol, français entre 8 h et 17 h, HNP, du lundi au vendredi.
Table of Contents/Índice/Table des matières................................................................................. 2
Keep this manual for future reference.
Conserve el presente manual para consultas futuras.
Conserver ce manuel à titre de référence ultérieure.

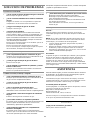
TABLE OF CONTENTS
OUTDOOR GRILL SAFETY…………………………..…………3
PACKAGE PARTS LIST….......................................................5
ASSEMBLY INSTRUCTIONS .…………………....……….……6
INSTALLATION REQUIREMENTS……..….………………....24
Location Requirements………………………………...………24
Product Dimensions………………………………..……….…24
Gas Supply Requirements………………………………………25
Gas Connection Requirements…………………..…..……..…25
Make Gas Connection …………………………………………27
GAS CONVERSION……………………………….............…...28
Tools and Parts for Gas Conversion …………………......…...28
Conversion from LP Gas to Natural Gas………………......….29
Make Gas Connection…………………….............……………29
Checking and Adjusting Burners……………….………….…34
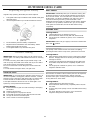
OUTDOOR GRILL USE ….……….…………..…….……….…35
Using Your Outdoor Grill ……………………….…………….…3
Using Your Sear Burner ….….….………………..….……….…37
Using Your Side Burner ….….….………………..….……….…38
TIPS FOR OUTDOOR GRILLING ……………..……………...39
Cooking Methods ………………….…………………………….39
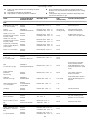
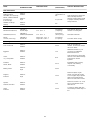
Grilling Chart ………………………….………………...…….….40
OUTDOOR GRILL CARE ………………………………...……42
Replacing the Igniter Battery …….…………….……....……....42
General Cleaning ……………………………………….….....…42
TROUBLESHOOTING ...........................................................44
ASSISTANCE……………………………….…………….…..…44
Accessories………………………………………………...……..44
WARRANTY ……………………………………….…………….45
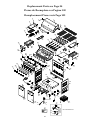
REPLACEMENT PARTS…………………….…………....……98
TABLE DES MATIÈRES
SÉCURITÉ DU GRIL D'EXTÉRIEUR ……….…...…..…….…72
LISTE DES PIÈCES DE L’EMBALLAGE................................5
CONSIGNES POUR L’ASSEMBLAGE…………….......……6
EXIGENCES D’INSTALLATION …………………..…….....…74
Exigences d'emplacement ………………………...…………74
Dimensions du produit ……………………………………...…..74
Spécifications de l'alimentation en gaz …………………..…75
Exigences concernant le raccordement au gaz….…………76
Raccordement au gaz…………………………………………76
CONVERSIONS POUR CHANGEMENT DE GAZ ……...…..78
Outils et pièces pour conversion de gaz ………….………....78
Conversion de propane à gaz naturel ……………….…...…...79
Raccordement au gaz …………………………............…....….79
Contrôle et réglage des brûleurs ………………………….…...84
UTILISATION DU GRIL D’EXTÉRIEUR …………..……...85
Utilisation de votre gril d'extérieur………..…….……..……….85
Utilisation de votre brûleur de flambage ….…..….…..……….87
Utilisation de votre brûleur laterial ………..…….…….……….88
CONSEILS POUR L'UTILISATION DU GRIL
D’EXTÉRIEUR …………………………..………......…...……..89
Méthodes de cuisson …………………..……….…...……….…89
Tableau de cuisson au gril …………………………..……...….90
ENTRETIEN DU GRIL D’EXTÉRIEUR …………..…………...92
Remplacement de la pile de l’allumeur ……..…...………….92
Nettoage général ………………………………...……….…….92
DÉPANNAGE..........................................................................94
ASSISTANCE………………………………….…..………….…94
Accessoires……………………………………………………….94
GARANTIE……………………………………..……..……...…..95
PIÈCES DE RECHANGE …………………..………………...102
ÍNDICE
SEGURIDAD DEL ASADOR PARA EXTERIORES…..........47
LISTA DE CONTENIDO DEL PAQUETE……………….....…..5
INSTRUCCIONE DE MONTAJE…………………..…..………..6
REQUISITOS DE INSTALACIÓN…………..………………....49
Requisitos de ubicación …………………………….….……....49
Medidas del producto …………………………….…………..49
Requisitos del suministro de gas ………………………........50
Requisitos para la conexión de gas …………………..……….51
Conexión del suministro de gas ……………………………..52
CONVERSIONES DE GAS …………………………......….….53
Herramientas y piezas para la conversión de gas .............….53
Conversión de gas LP a gas natural …………………..………54
Conexión del suministro de gas ……………………………..54
Revise y regule los quemadores ……………………….....…...59
USO DEL ASADOR PARA EXTERIORES ……………..60
Cómo usar el asador para exteriores …………………...…..60
Uso del quemador para dorar …..………….……....….......….62
Uso del mechero lateral …..……..…..….….…….....….......….63
CONSEJOS PARA ASAR AL AIRE LIBRE ……………..…..64
Métodos de cocción ……………………………………...…...64
Cuadro para asar ………………………………………….....….65
CUIDADO DEL ASADOR PARA EXTERIORES ……...…….67
Cómo reemplazar labatería del encendedor …………....……67
Limpieza general …………………………………………..…….67
SOLUCIÓN DE PROBLEMAS...............................................69
ASISTENCIA…………………………………………..……..…..69
Accesorios………………………………………………………...69
GARANTÍA ……………………………………………..……......70
PIEZAS DE REPUESTO ……………………………..........…100
2

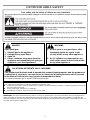
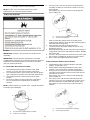
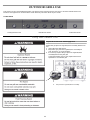
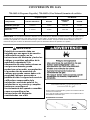
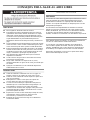
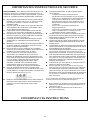
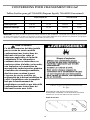
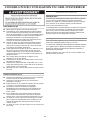
OUTDOOR GRILL SAFETY
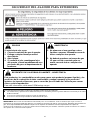
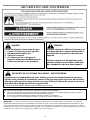
DANGER
If you smell gas:
1. Shut off gas to the appliance.
2. Extinguish any open flame.
3. Open lid.
4. If odor continues, keep away from the
appliance and immediately call your gas
supplier or your fire department.
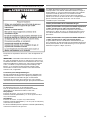
WARNING
1. Do not store or use gasoline or other
flammable liquids or vapors in the
vicinity of this or any other appliance.
2. An LP cylinder not connected for use
shall not be stored in the vicinity of this
or any other appliance.
3
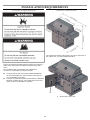
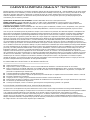
IMPORTANT: This grill is manufactured for outdoor use only. For grills that are to be used at elevations above 2,000 ft (609.6 m)
orifice conversion is required. See “Gas Supply Requirements” section. It is the responsibility of the installer to comply with the
minimum installation clearances specified on the model/serial rating plate. The model/serial rating plate for freestanding models can
be found on the left-hand cabinet door.
In the State of Massachusetts, the following installation instructions apply:
◼ Installations and repairs must be performed by a qualified or licensed contractor, plumber, or gasfitter qualified or licensed by
the State of Massachusetts.
◼ If using a ball valve, it shall be a T-handle type.
◼ A flexible gas connector, when used, must not exceed 3 feet.
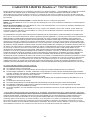
CALIFORNIA RESIDENTS ONLY - WARNING:
This product and the fuels used to operate this product (liquid propane), and the products of
combustion of such fuels, can expose you to chemicals including benzene, which is known
to the State of California to cause cancer and reproductive harm.
For more information go to: www.P65Warnings.ca.gov.

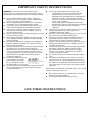
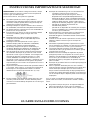
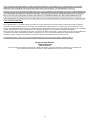
IMPORTANT SAFETY INSTRUCTIONS
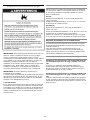
WARNING: To reduce the risk of fire, electrical shock,
Injury to persons, or damage when using the outdoor cooking
gas appliance, follow basic precautions, including the following:
◼ Do not install portable or built-in outdoor cooking gas
appliances in or on a recreational vehicle, portable trailer,
boat or in any other moving installation.
◼ Always maintain minimum clearances from combustible
construction, see “ Location Requirements” section.
◼ The outdoor cooking gas appliance shall not be located
under overhead unprotected combustible construction.
◼ This outdoor cooking gas appliance shall be used only
outdoors and shall not be used in a building, garage, or
any other enclosed area.
◼ Keep any electrical supply cord and fuel supply hose away
from any heated surfaces.
◼ Keep outdoor cooking gas appliance area clear and free
from combustible material, gasoline and other flammable
vapors and liquids.
◼ Do not obstruct the flow of combustion and ventilation air.
Keep the ventilation openings of the cylinder enclosure
free and clear from debris.
◼ Open the cabinet door and inspect the gas cylinder supply
hose before each use of the outdoor cooking gas
appliance. If the hose shows excessive abrasion or wear,
or is cut, it MUST be replaced before using the outdoor
cooking gas appliance. Contact your dealer and use only
replacement hoses specified for use with the outdoor
cooking gas appliance.
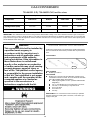
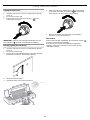
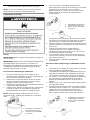
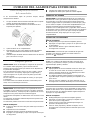
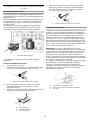
◼ Visually check the burner flames.
They should be blue. Slight
yellow tipping is normal for
LP gas. The flames should
be approximately 1" (2.5 cm) high.
◼ Check and clean burner/venturi tube for insects and insect
nest. A clogged tube can lead to fire under the outdoor
cooking gas appliance.
◼ The LP gas supply cylinder to be used must be:
- constructed and marked in accordance with the
Specification for LP Gas cylinders of the U.S.
Department of Transportation (DOT) or the National
Standard of Canada, CAN/CSA-b339, Cylinders,
Spheres, and Tubes for Transportation of Dangerous
Goods; and Commission.
- provided with a listed overfilling prevention device.
- provided with a cylinder connection device compatible
with the connection for outdoor cooking gas
appliances.
◼ Always check connections for leaks each time you connect
and disconnect the LP gas supply cylinder. See
“Installation Instructions” section.
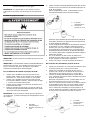
◼ When the outdoor cooking gas appliance is not in use, the
gas must be turned off at the supply cylinder.
◼ Storage of an outdoor cooking gas appliance indoors is
permissible only if the cylinder is disconnected and
removed from the outdoor cooking gas appliance.
◼ Cylinders must be stored outdoors and out of the reach of
children and must not be stored in a building, garage, or
any other enclosed area.
◼ The pressure regulator and hose assembly supplied with
the outdoor cooking gas appliance must be used. A
replacement pressure regulator and hose assembly
specific to your model is available from your outdoor
cooking gas appliance dealer.
◼ Gas cylinder must include a collar to protect the cylinder
valve.
◼ For appliances designed to use a CGA791 connection:
Place a dust cap on cylinder valve outlet whenever the
cylinder is not in use. Only install the type of dust cap on
the cylinder va`lve outlet that is provided with the cylinder
valve. Other types of caps or plugs may result in leakage
of propane.
If the following information is not followed exactly, a fire causing
death or serious injury may occur.
◼ Do not store a spare LP gas cylinder under or near this
outdoor cooking gas appliance.
◼ Never fill the cylinder beyond 80 percent full.
SAVE THESE INSTRUCTIONS
4

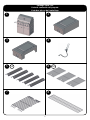
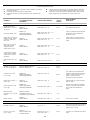
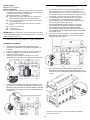
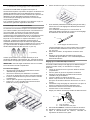
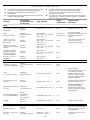
Package Parts List
Lista de contenido del paquete
Liste des pièces de l'emballage
7
3
8
4
1 2
x3
5
x5
6
5

12
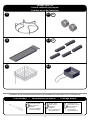
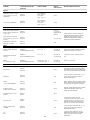
Package Parts List
Lista de contenido del paquete
Liste des pièces de l'emballage
13
11
9 10
x5
x2
14
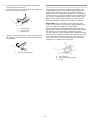
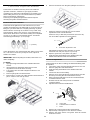
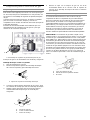
Tools Needed / Herramientas necesarias / Outillage Requis
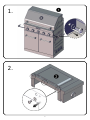
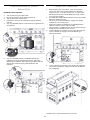
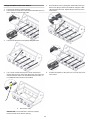
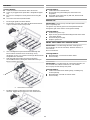
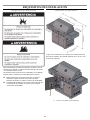
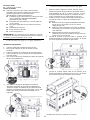
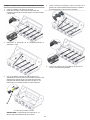
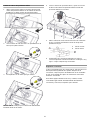
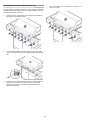
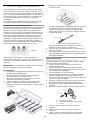
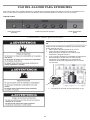
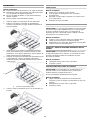
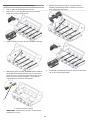
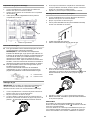
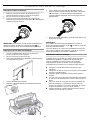
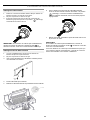
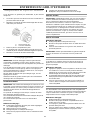
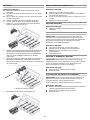
ASSEMBLY INSTRUCTIONS/INSTRUCCIONES DE ENSAMBLAJE/CONSIGNES POUR L’ASSEMBLAGE
Some parts come
with screws pre-
installed.
Loosen and tighten
for final assembly.
Algunas partes
vienen con los
tornillos pre
instalados.
Afloje y apriete para
el ensamble final.
Certaines pièces
sont livrées avec les
vis pré-installées.
Desserrez et
resserrez pour
l'assemblage final.
6

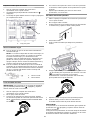
1.
2.
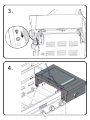
7

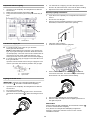
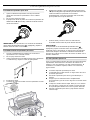
3.
4.
8

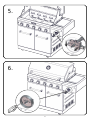
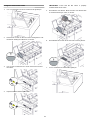
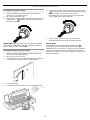
5.
6.
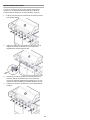
9

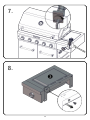
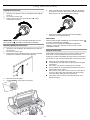
7.
8.
10

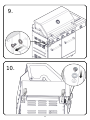
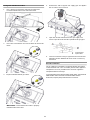
10.
9.
11

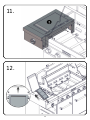
11.
12.
12

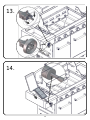
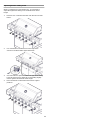
13.
14.
13

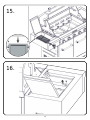
15.
16.
14

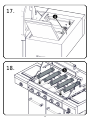
17.
18.
15

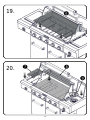
19.
20.
16

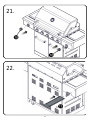
21.
22.
17

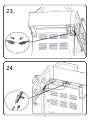
23.
24.
18

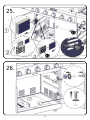
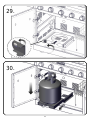
25.
26.
19

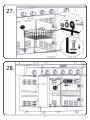
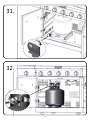
27.
28.
20
La page charge ...
La page charge ...
La page charge ...
La page charge ...
La page charge ...
La page charge ...
La page charge ...
La page charge ...
La page charge ...
La page charge ...
La page charge ...
La page charge ...
La page charge ...
La page charge ...
La page charge ...
La page charge ...
La page charge ...
La page charge ...
La page charge ...
La page charge ...
La page charge ...
La page charge ...
La page charge ...
La page charge ...
La page charge ...
La page charge ...
La page charge ...
La page charge ...
La page charge ...
La page charge ...
La page charge ...
La page charge ...
La page charge ...
La page charge ...
La page charge ...
La page charge ...
La page charge ...
La page charge ...
La page charge ...
La page charge ...
La page charge ...
La page charge ...
La page charge ...
La page charge ...
La page charge ...
La page charge ...
La page charge ...
La page charge ...
La page charge ...
La page charge ...
La page charge ...
La page charge ...
La page charge ...
La page charge ...
La page charge ...
La page charge ...
La page charge ...
La page charge ...
La page charge ...
La page charge ...
La page charge ...
La page charge ...
La page charge ...
La page charge ...
La page charge ...
La page charge ...
La page charge ...
La page charge ...
La page charge ...
La page charge ...
La page charge ...
La page charge ...
La page charge ...
La page charge ...
La page charge ...
La page charge ...
La page charge ...
La page charge ...
La page charge ...
La page charge ...
La page charge ...
La page charge ...
La page charge ...
La page charge ...
-
 1
1
-
 2
2
-
 3
3
-
 4
4
-
 5
5
-
 6
6
-
 7
7
-
 8
8
-
 9
9
-
 10
10
-
 11
11
-
 12
12
-
 13
13
-
 14
14
-
 15
15
-
 16
16
-
 17
17
-
 18
18
-
 19
19
-
 20
20
-
 21
21
-
 22
22
-
 23
23
-
 24
24
-
 25
25
-
 26
26
-
 27
27
-
 28
28
-
 29
29
-
 30
30
-
 31
31
-
 32
32
-
 33
33
-
 34
34
-
 35
35
-
 36
36
-
 37
37
-
 38
38
-
 39
39
-
 40
40
-
 41
41
-
 42
42
-
 43
43
-
 44
44
-
 45
45
-
 46
46
-
 47
47
-
 48
48
-
 49
49
-
 50
50
-
 51
51
-
 52
52
-
 53
53
-
 54
54
-
 55
55
-
 56
56
-
 57
57
-
 58
58
-
 59
59
-
 60
60
-
 61
61
-
 62
62
-
 63
63
-
 64
64
-
 65
65
-
 66
66
-
 67
67
-
 68
68
-
 69
69
-
 70
70
-
 71
71
-
 72
72
-
 73
73
-
 74
74
-
 75
75
-
 76
76
-
 77
77
-
 78
78
-
 79
79
-
 80
80
-
 81
81
-
 82
82
-
 83
83
-
 84
84
-
 85
85
-
 86
86
-
 87
87
-
 88
88
-
 89
89
-
 90
90
-
 91
91
-
 92
92
-
 93
93
-
 94
94
-
 95
95
-
 96
96
-
 97
97
-
 98
98
-
 99
99
-
 100
100
-
 101
101
-
 102
102
-
 103
103
-
 104
104


KitchenAid 720-0893D Mode d'emploi
- Catégorie
- Barbecues
- Taper
- Mode d'emploi
dans d''autres langues
Documents connexes
-
KitchenAid 720-0954GA Le manuel du propriétaire
-
KitchenAid 720-0893 Guide d'installation
-
KitchenAid 730-0893D Le manuel du propriétaire
-
-
-
-
-
KitchenAid 730-0891H NG Manuel utilisateur
-