
F6PWD30**
F7WD30**
F7IWD30O*
F1WD30**
EN
INSTRUCTIONS FOR INSTALLATION AND USE
FR
INSTRUCTIONS POUR L’INSTALLATION ET L’UTILISATION
ES
INSTRUCCIONES PARA LA INSTALACIÓN Y USO
WARMING DRAWER
TIROIR CHAUFFE-PLAT
CAJÓN CALIENTA
ALIMENTOS


EN
1
Dear Customer,
we would like to thank you and congratulate you on your choice.
This new product has been carefully designed and built using top quality materials, and meticulously tested to ensure that it
meets all your culinary requirements.
Please read and observe these simple instructions, which will enable you to achieve excellent results from the very first time
you use it.
This state-of-the-art appliance comes to you with our very best wishes.
The Manufacturer
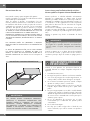
TABLE OF CONTENTS PAGE
Precautions 2
Instructions for recycling - protection of the
environment 2
Opening of the the push to open drawer 3
Opening of the soft closing drawer 3
Before you Begin 3
Heating System 3
Warming Drawer 4
Operation 4
Heating Time 4
Defrosting 4
Leavening 4
Food warmer 4
Slow cooking 5
Warnings for slow cooking 5
Drawer slides 6
Cleaning and Maintenance 7
Front and panel commands 8
Inside space 8
TABLE OF CONTENTS PAGE
Replacing an Drawer Light 8
To Replace a Light Bulb 8
Troubleshooting 9
Appliance installation 9
Tools you will need 9
Packaging 9
Power requirements 9
Choosing drawer location 9
Steps for installation 9
Technical data 10
Installation notes 10
Custom drawer front 12
Electrical Requirements 14
General Information 14
Electrical Connection 14
Installation procedure 16
CONSUMER INSTRUCTIONS:
Includes recommendations for use,
description of commands and correct
procedures for the care and clearing of the
appliance.
INSTALLATION INSTRUCTIONS:
Use intended for qualified technicians.

EN
2
Precautions
This guide is an integral part of the appliance. Keep these
instructions with you during use of your warming drawer.
Read these instructions before installing and using the
appliance. Installation should be performed by qualified
personnel only, in conformity with current law. This appliance
is intended for domestic use only in conformity with current
EEC directives. The manufacturer will not be held liable in
the event of a failure to follow THESE WARNINGS AND
SAFETY INSTRUCTIONS. KEEP THESE INSTRUCTIONS
WITH THE APPLIANCE. IF THE APPLIANCE SHOULD
BE GIVEN TO ANOTHER PERSON MAKE SURE THESE
INSTRUCTIONS ARE SUPPLIED WITH IT.
DO NOT OBSTRUCT THE OPENINGS AND FIXTURES
INTENDED FOR HEAT CIRCULATION.
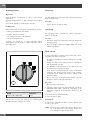
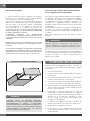
THE LABELS LOCATED ON THE APPLIANCE WHICH
SHOW THE SERIAL NUMBER AND MODEL ARE FOUND
ON THE HEATING BLOCK. Never remove the data label.
LOCATION OF RATING PLATE
WARNING
NEVER USE SHARP METAL OBJECTS OR ABRASIVE
SCRUBBING PADS THAT COULD CAUSE DAMAGE
TO THE SURFACE OF THE APPLIANCE. IF NECESSARY,
USE STANDARD NON-ABRASIVE UTENSILS MADE OF
WOOD OR PLASTIC.
Instructions for recycling - protection of the
environment
Our products are made solely from non-polluting materials that
do not harm the environment and are recyclable. We ask for
your effort and collaboration in disposing of the packaging
in a proper manner. Contact the product retailer or local
organizations for further information on recycling. Dispose
of the packaging properly. Parts of the package especially
plastic, pose a risk for children.
Your old appliance must also be disposed of properly.
IMPORTANT
Consign the appliance to the proper local organization
authorized to collect broken appliances. Proper and
intelligent disposal consists of recovering materials of value.
Remove the plugs or electrical cords of appliances that are
no longer being used so that they no longer pose a threat to
children.
IMPORTANT SAFEGUARDS
When using electrical appliances, basic safety precautions
should always be followed including the following:
1. Read all instructions.
2. Do not touch hot surfaces. Use handles or knobs.
3. To protect against electrical shock do not immerse cord,
plugs, in water or other liquid.
4. Close supervision is necessary when any appliance is
used by or near children.
5. Unplug from outlet when not in use and before cleaning.
Allow to cool before putting on or taking off parts.
6. Do not operate any appliance with a damaged cord
or plug or after the appliance malfunctions or has been
damaged in any manner. Return appliance to the nearest
authorized service facility for examination, repair, or
adjustment.
7. The use of accessory attachments not recommended by
the appliance manufacturer may cause injuries.
8. Do not use outdoors.
9. Do not let cord hang over edge of table or counter, or
touch hot surfaces.
10. Do not place on or near a hot gas or electric burner, or in
a heated oven.
11. Extreme caution must be used when moving an appliance
containing hot oil or other hot liquids.
12. Always attach plug to appliance first, then plug cord into
the wall outlet. To disconnect, turn any control to “off”, then
remove plug from wall outlet.
13. Do not use appliance for other than intended use.

EN
3
14. The inside of the appliance can reach temperatures of
195°F (90°C) depending on the selected temperature and
the time of operation. If necessary use gloves to remove
things from the drawer.
15. Do not lean or sit on the warming drawer when opened,
this could cause damage to the telescopic guide. The
maximum carrying weight of the warming drawer is 80
lbs. (36 kg).
16. Do not keep plastic containers or any flammable objects
in the appliance. Such objects pose a risk of catching fire
once the warming drawer is turned on.
17.
Save these Instructions.
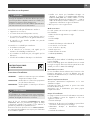
CLEANING:
• Never use a vacuum cleaner. The vacuum could create
pressure on the components causing a short circuit. The
vacuum may also damage the surface and the components
of the appliance: damages for which the manufacturer will
not be liable.
• For cleaning the appliance we recommend following the
suggestions listed under “Cleaning and Maintenance” of
the manual.
ATTENTION
REPAIRS:
Maintenance work and/or repairs must be performed
exclusively by specialized personnel. Incorrect installation
and maintenance can cause personal injury to the
consumer for which the manufacturer will not be liable.
During the warranty period, the appliance may only be
serviced by technicians authorized by the manufacturer or
the warranty will be void.
Before beginning maintenance, installation, or repair work
disconnect the appliance from the electrical outlet.
The appliance is disconnected only if:
- The electrical fuse is disconnected.
- The cord of the appliance is disconnected from the electrical
outlet – to disconnect the appliance from the outlet pull the
cord away from the outlet, manually disconnect the cord.
The manufacturer will not be liable for damage caused
by a failure to follow current regulations or the use of non-
original replacement parts.
CONSUMER INSTRUCTIONS:
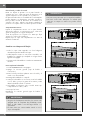
Opening of the the push to open drawer
• To open the drawer press the front of the drawer
• Grasp the drawer pull it towards you until it is opened
completely.
Closing the drawer
• To close the drawer, gently push the drawer back, pushing
the front until it has completely gone back.
Opening of the soft closing drawer
• To open the drawer grasp the handle and pull the drawer.
Closing the drawer
• To close the drawer, gently push the drawer back, until the
soft closing system engage.
Before you Begin
Do not leave parts of the packaging in the home. Separate the
remaining packaging materials by category and deliver them
to your nearest recycling center.
Before using the appliance for the first time, gently clean it
with a moist cloth and dry it completely as described under
“Cleaning and Maintenance”.
Heat the warming drawer for at least two hours. Once heated,
set the temperature to 195°F (90°C). Be sure that the kitchen is
kept well ventilated during the heating period.
The metal parts have been specially treated with a protective
coating that can sometimes cause odors the first time the drawer
is heated. These odors will quickly dissipate and should not be
considered a defect of the appliance.
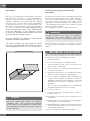
Heating System
The appliance is equipped with a hot air ventilating system. A
fan distributes in an optimal way towards the internal space of
the warming drawer.
The thermostat allows the user to control and set the appliance
at the desired temperature.
The circulation of the air heats the drawer in a rapid and
uniform way.
With the protective measures in place it is not possible to
accidentally touch the heating element or the fan.

EN
4
Warming Drawer
Operation
Open the drawer. Turn the knob in order to set the desired
temperature.
The internal light will turn on and will remain on throughout
use.
To turn off the appliance, turn the knob to the OFF.
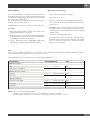
Heating Time
Different factors influence the time in which it takes to heat up:
• Thickness and material of the drawer;
• Number of drawers loaded;
• The arrangement of the loaded drawers;
• The desired temperate set.
So, there is no general rule. To set the temperature above
140°F (60°C) in order to have a stable temperature, follow
these suggestions:
DISHES
TIME (MIN)
DISHES FOR 6 PERSONS 30-35
You can also use your own experience in determining the
optimal temperature setting for your needs.
Defrosting
The defrosting function only uses forced ventilation without any
active heating element.
Procedure
- Turn the knob to the defrost setting.
Leavening
The leavening function maintains the drawer temperature
between 25 and 40°.
Procedure
1. Preheat the drawer for 5 minutes by turning the knob to the
leavening setting.
2. Place the dough, wrapped in a slightly damp cloth, in the
middle of the drawer.
Food warmer
Food recommended for warming: meat, chicken, fish, sauces,
vegetables, side dishes and soups.
- To stop the food spilling over into the drawer, do not overfill
the dishes.
- Arrange the dishes in the drawer and close it carefully so
that any liquids do not spill.
- It is advisable not to warm food for more than an hour to
prevent it from losing nutritional value.
- Cover moist food and liquids with a lid or heat-resistant
cling film. This will prevent the moisture from escaping,
condensation from forming and moisture settling on the
outside the dishes.
- Do not cover roast or fried dishes which need to stay crisp.
Keep these dishes hot at high temperatures.
Procedure
1. Place the dishes in the drawer.
2. Switch the drawer turning the thermostat knob to between
MIN/MED (105/140°F - 40/60°C), depending on the
temperature required, and preheat the drawer for 10
minutes.
3. Put the food in the preheated dishes.
4. Close the drawer again.
Switching off
Turn the knob to OFF. Take the dishes out of the drawer using
a cloth or oven gloves.
NOTE: Never transfer hot dishes directly from the hot stove
top to the glass base of the heating drawer. This
could damage the glass drawer base.

EN
5
Slow cooking
Slow cooking is ideal for cooking tender meat which needs to
be medium rare or rare. This cooking method means the meat
will always be pink inside. This does not, however, mean that
the meat is raw or undercooked.
This cooking method not only keeps the juices inside, but it also
makes it easy to keep the meat hot.
Suitable dishes to use: glass, porcelain or ceramic with a lid.
Procedure
1. Preheat the warming drawer with the chosen dish to the
maximum temperature for 15 minutes.
2. Heat some butter or oil in a pan. Brown the meat well for
the time indicated in the table, then place it immediately in
the preheated pan and cover with the lid.
3. Set the thermostat between MED/MAX (140/195°F
-60/90°C) for the time required to finish the cooking.
Warnings for slow cooking
- Only use fresh meat in perfect condition.
- Trim off any excess fat.
- The pieces of meat do not necessarily have to be turned.
- Once cooked, the meat can be carved immediately; it does
not have to rest.
- Meat that is slow cooked is not as hot as meat cooked in
the traditional way, so it is advisable to put the plates in the
warming drawer on the left-hand side for the last 20-30
minutes as well.
- Serve the meat with piping hot sauces.
- If you want to keep the meat hot after cooking, turn the
thermostat knob to between 40°C and 60°C. The smaller
pieces of meat can be kept hot for 45 minutes and the
larger pieces for two hours.
Table
Slow cooking is suitable for all tender cuts of beef, pork, veal, lamb, game and poultry. The initial browning times and the
subsequent cooking times depend on the size of the slices of meat.
The time parameters refer to meat placed in a pan with preheated butter or oil.
DISH EXAMPLE INITIAL BROWNING LEVEL
Small slices of meat
Strips about 1 - 2 minutes
MED
Small steaks or medallions about 1 - 2 minutes per side
MED
Medium size slices of meat
Tenderloin about 4 - 5 minutes per side
MAX
Lean roast about 10 - 15 minutes per side
MAX
Large slices of meat
Tenderloin (from 900g) about 6 - 8 minutes per side
MAX
Roast beef about 8 - 10 minutes per side
MAX
Vegetables about
30 minutes per side
MED
NOTE: There are 2 settings: MAX and MED.
Guidelines for cooking times are 4 to 5 hours for MAX and 8 to 10 hours for MED.
Smaller quantities of food may require less time, while larger quantities may require more time.

EN
6
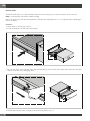
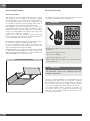
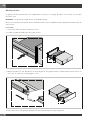
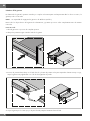
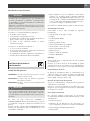
Drawer slides
The drawer slides allow you to fully extend the drawer for easier cleaning. If necessary, the drawer can be removed.
NOTE: Load capacity for the drawer is 80 lbs (36 kg).
Remove all items from inside the warming drawer, and allow the warming drawer to cool completely before attempting to
remove the drawer.
To Remove:
1. Open drawer to its fully open position.
2. Locate the black tabs on both sides of the drawer.
3. Press the tab down on the right side of the drawer and lift tab up on the left side of the drawer at the same time. Then pull
drawer out another inch to disengage latch.
4. Hold the drawer by the sides (not by the front). Pull it slowly all the way out.

EN
7
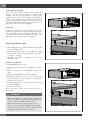
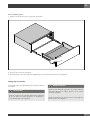
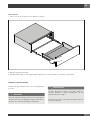
To Replace:
1. Align the drawer rails with the receiving slides.
2. Push drawer in all the way.
3. Gently open and close the drawer to ensure it is seated properly on the slices.
Cleaning and Maintenance
Generally speaking, cleaning is the only form of maintenance
necessary.
ATTENTION
Before you begin cleaning, disconnect the appliance from
the outlet. Disconnect the cord from the outlet and turn off
the appliance.
WARNING
Do not use harsh detergents or abrasive products and/or
scrubbing pads and sponges and sharp objects as they
can stain and damage the appearance of the appliance.
Never use a vacuum cleaner on the internal parts of the
appliance.

EN
8
Front and panel commands
The use of a moist cloth is sufficient when cleaning the
appliance. In the event the appliance requires further
cleaning, add drops of detergent in the water. Dry the
appliance with a dry cloth. The steel front of the appliance
can be cleaned with products specifically designed for steel.
Such products prevent the formation of dirt on the surface of
the drawer. Apply a minimal amount of the product on a soft
and apply it to the surface of the appliance.
Inside space
To clean the inside space use a moist cloth. In the event the
appliance requires further cleaning add drops of detergent
to the water. Dry the surface with a dry cloth. Make sure to
avoid water draining into the ventilation holes. Only use the
appliance after the drawers are dry completely.
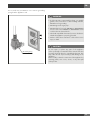
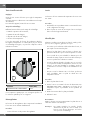
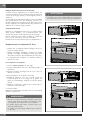
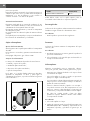
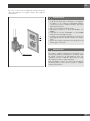
Replacing an Drawer Light
• Each warming drawer is equipped with three halogen lights
located in the lateral walls.
• Each light assembly consists of a removable lens, a light
bulb as well as a light socket housing that is fixed in place.
See figure on this page.
• Light bulb replacement is considered to be a routine
maintenance item.
To Replace a Light Bulb
1. Read WARNING on this page.
2. Turn off power at the main power supply (fuse or breaker
box).
3. Remove the lens between screw and glass using a screw
driver.
4. Remove the light bulb from its socket by pulling it.
5. Replace the bulb with a new one. Avoid touching the
bulb with fingers, as oils from hands can damage the
bulb when it becomes hot.
6. The bulb is halogen: use one with the same type checking
Voltage and Wattage.
7. Place the lens back on.
Turn power back on at the main power supply (fuse or
breaker box).
WARNING
• Make sure the lights are cool and power to the drawer has
been turned off before replacing the light bulb(s). Failure
to do so could result in electrical shock or burns.
• The lenses must be in place when using the drawer.
• The lenses serve to protect the light bulb from breaking.
• The lenses are made of glass. Handle carefully to avoid
breakage. Broken glass could cause an injury.

EN
9
Troubleshooting
ATTENTION
Repairs must only be performed by specialized and
qualified personnel. Any repair work not performed
by professional personnel may cause damage to the
appliance for which the manufacturer will not be liable.
The following problems can be fixed by the consumer
without the assistance of the Service Department.
The drawer is not hot enough. Make sure that:
• The appliance is turned on;
• The correct temperature has been set;
• The opening of the ventilation fan is not blocked by plates
or other large obstructions;
• The drawers have had sufficient time to heat up.
The drawer is not hot at all. Make sure that:
• You hear the fan running;
• If the fan is turned on this means that the heating system
is working;
• If the fan does not work this means it is defective;
• The circuit fuse is blown.
INSTALLATION INSTRUCTIONS:
Appliance installation
IMPORTANT: Save these instructions for the local electrical
inspector use.
INSTALLER: Please leave this manual with owner for future
reference.
OWNER: Please keep this manual for future reference.
WARNING
If the information in this manual is not followed exactly,
a fire or explosion may result causing property damage,
personal injury or death.
Please read these instructions COMPLETELY AND
CAREFULLY. They will save you time and effort and help to
ensure optimum drawer performance.
Be sure to observe all WARNINGS. These installation
instructions are intended for use by a qualified installer.
• Assure that electrical installation is adequate and in
conformance with National Electrical Code, ANSI/
NFPA 70 - latest edition**, or Canadian Electrical Code,
part 1 C22.1 (latest edition)*** and all local codes and
ordinances.
These shall be carefully followed at all times.
Tools you will need
The following tools are needed to install your new warming
dreawer:
• Tape measure and straightedge or ruler
• Pencil
• Phillips screwdriver
• Level
• Wire cutters and wire stripper
• Hand or saber saw
• 1” (2,5cm) Hole saw
• Drill and drill bit
• Safety gloves and goggles
• Volt meter (0-250VAC)
Packaging
Remove all tape and packaging before using the warming
drawer.
Destroy the packaging after unpacking the drawer following
the rules in force in your town. Never allow children to play
with packaging material.
Power requirements
The warming drawer must be supplied with the proper
voltage and frequency. The drawer is manufactured to be
connected to a three-wire, single phase, 120 Volt, 60 Hz
AC electrical supply.
Choosing drawer location
Carefully select the location where the warming drawer will
be placed.
It should be located for convenient use in the kitchen.
Make sure that electrical power can be provided to the location
selected.
Steps for installation
The following pages provide the necessary information for
proper installation of the appliance and are arranged as
follows:
• Technical Data
• Installation Cutout Dimensions, Required Clearances and
Mounting instructions
• Electrical Supply and Wiring Requirements
• Final Checklist

EN
10
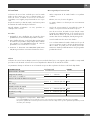
Technical data
Power Supply
120 Volts 60 Hz
Amperes Watts
9,2 1100
Installation notes
1. The warming drawer support surface must be a minimum
3/4” (2cm) thick plywood platform.
It must support 100 pounds.
The platform must be solid, level and flush with the bottom
of the cabinet cut out.
2. Use extreme caution when moving or installing the drawer.
It is very heavy.
DO NOT LIFT THE WARMING DRAWER BY THE DRAWER
HANDLE.
3. Be very careful when moving or installing the warming
drawer to avoid damage to the frame or damage to the
cabinets.
4. For best performance results make sure the warming drawer
is leveled before completing installation. There is no way to
level the warming drawer after it has been installed. If the
installation is not level, the door may slide open or not seal
tightly, allowing heat to escape.
NOTE: If installing the warming drawer below another
product, refer to that product’s literature for any installation
requirements.
5. Be careful when placing drawer. DO NOT pinch the conduit
between the drawer back.
WARNING
Before installing or removing, turn power OFF at the service
panel. Lock service panel to prevent power from being
turned ON accidentally.
Securely fasten drawer to cabinet using the screws provided.
Failure to do so could result in warming dreawer moving or
tipping during use and causing damage to the drawer or
cabinets or personal injury.
Know how to disconnect the power to the warming drawer
at the circuit breaker or fuse box in case of an emergency.
CAUTION
Unit is heavy and requires at least two people or proper
equipment to move.
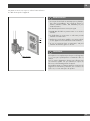
Electrical Location
24" (610)
9-1/4"
(235)
28-7/16
(722)
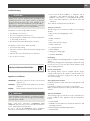
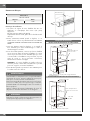
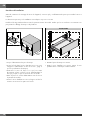
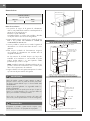
INSTALLATION OPTIONS
INSTALLATION BELOW A SINGLE OVEN
1” Min. Above Toekick or Adjust o Oven Installation Height
24” (610) Min. Inside
Oven
Cutout
3/4” Min.
(2) Min.
9-1/4”
(235)
28-3/8”
(722)
Allow 5/8”
Overlapon All Sides
INSTALLATION BELOW A DOUBLE OVEN
1” Min. Above Toekick
24” (610) Min. Inside
3/4” Min.
(2) Min.
28-3/8”
(722)
9-1/4”
(235)
Oven
Cutout
Allow 5/8” Overlap
on All Sides

EN
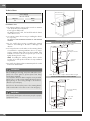
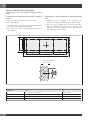
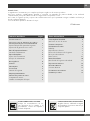
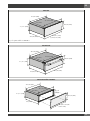
11
PUSH PULL
27-7/8" (707)
23" (583)
29-1/2" (750)
9-1/16" (230)
10-3/8" (264)
29-5/8" (754)
(*) 29-5/16" (745)
23-3/4" (601)
PRO HANDLE
27-7/8" (707)
23" (583)
29-1/2" (750)
9-1/16" (230)
10-3/8" (264)
29-7/8" (758)
23-3/4" (631)
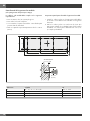
CUSTOM DRAWER FRONT
27-7/8" (707)
23" (583)
29-1/2" (750)
9-1/16" (230)
23" (581)
8-1/4"
(208,5)
10-3/8" (264)
29-5/8” to 29-7/8"
(754 to 758)
(*) only for model F1WD30**

EN
12
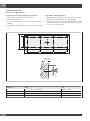
Custom drawer front
(Only for Push to Open Drawer)
Custom panels must meet the following requirements:
• Have a minimum thickness of 3/4” (19 mm).
• Have all edges finished.
• If using wood, the back must be sealed to prevent moisture
damage.
• Be capable of withstanding temperatures above 158 °F (70
°C).
Custom Drawer Front Preparation
1. Mark pilot holes on the back side of the panel according to
the dimensions indicated in the following drawing.
2. Drill pilot holes with a 3/32” (2.5 mm) drill bit. Be careful
not to drill all the way through the panel. Pilot holes should
only be 7/16” (11 mm) deep.
A
B C
D D D ==
==
PILOT HOLES
7/16” (11 mm)
dia. 3/32”
(2.5 mm)
Dimensions
inches mm
A 29 - 5/ 8” to 29 - 7/8” 754 to 758
B 10 - 3/ 8” 264
C 7 - 5/ 8” 193
D 8 - 13/16” 224

EN
13
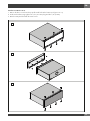
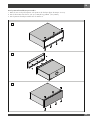
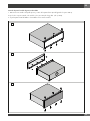
Attach Custom Drawer Front
1. Remove the three screws from the top profile and four from the bottom (see figure A - B - C).
2. Fix the two brackets using eight screws 1/2” (12.7 mm) long and dia. 1/8” (3.5mm).
3. Attach custom panel front with the same screws.
A
B
C

EN
14
Electrical Requirements
General Information
This appliance must be supplied with the proper voltage
and frequency and connected to an individual, properly
grounded branch circuit, protected by a circuit breaker or
fuse having amperage as noted on the rating plate. We
recommend you have the electrical wiring and hookup of
your appliance connected by a qualified electrician.
After installation, have the electrician show you where your
main appliance disconnect is located. Check with your local
utilities for electrical codes which apply in your area. Failure
to wire your warming drawer according to governing codes
could result in a hazardous condition.
If there are no codes, your appliance must be wired and
fused to meet the requirements of the National Electrical
Code, ANSI/NFPA No. 70 - Latest edition.
In Canada your appliance must be wired and fused to meet
the requirements of the Canadian Electrical Code.
Be sure the installation of this product in a mobile home
conforms with the Manufactured Home Construction and
Safety Standard, Title 24 CFR, Part 3280.
If this standard does not apply, you must follow the standard
for Manufactured Home Installations, ANSI A225.1 and
Manufactured Home Installations, Sites and Communities
and ANSI/NFPA 501A or with local codes.
LOCATION OF RATING PLATE
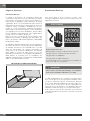
Electrical Connection
An adequate electrical supply and outlet must be used to
operate the electrical parts of your appliance.
WARNING
Electrical Grounding Instruction Plug into a grounded 3
prong outlet.
- Do not remove ground prong.
- Do not use an adapter.
- Do not use an extension cord.
Failure to follow these instructions can result in death, fire,
or electrical shock.
IMPORTANT
FOR PERSONAL SAFETY, THIS APPLIANCE MUST BE
PROPERLY GROUNDED.
The power cord of this appliance is equipped with a 3-prong
(grounding) plug which must be used with a properly
grounded 3-hole outlet with a standard 120 Volt, 60 cycle
AC household current. If you do not have a 3-hole grounded
outlet, have a qualified electrician change your old one.
A grounding adaptor will be needed to convert the old
one until the outlet can be replaced. This method is only
temporary, and a qualified electrician should test it to be
sure it meets requirements.

EN
15
Do not under any circumstances cut or remove grounding
prong from the appliance cord.
N
L
Grounding prong
WARNING
• If cold water pipe is interrupted by plastic, non metallic
gaskets, union connections or other insulating materials,
DO NOT use for grounding.
• DO NOT ground to a gas pipe.
• DO NOT have a fuse in the NEUTRAL or GROUNDING
circuit. A fuse in the NEUTRAL or GROUNDING circuit
could result in an electrical shock.
• Check with a qualified electrician if you are in doubt as to
whether the appliance is properly grounded.
• Failure to follow these instructions could result in serious
injury or death.
CAUTION
Do not repair or replace any part of the appliance
unless specifically recommended in the manual. All other
servicing should be done by a qualified technician. This
may reduce the risk of personal injury and damage to the
appliance.
Never modify or alter the construction of the appliance by
removing panels, wire covers, screws, or any other part
of the product.

EN
16
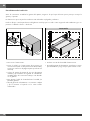
=
=
22 7/8”
(580)
• Turn power off to the electrical outlet.
• Insert plug into three-prong, grounded outlet (see “Power
Requirements and Grounding” on page 2 for electrical
specification).
• Position the drawer so that it is directly centered and slide
warming drawer assembly into cutout until it is flush with
cabinet.
• Avoid pinching the power cord between the unit and
cabinet wall.
• Open the warming drawer to full extension and fix the
structure to the wall with the four screws provided.
INSTALLATION
• Turn power back on to the electrical outlet.
• Turn the warming drawer on. Close the drawer for
approximately 1 minute then check for warmth.
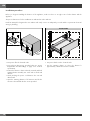
Installation procedure
Before you begin assembling the drawers of the appliance, make sure there is enough room to fit the drawer and the
appliance.
The precise dimensions for the installment are indicated in inches and mm.
Install an anti-tip block against the rear cabinet wall. Verify screws are adequately secured and do not penetrate electrical
wiring or plumbing.

FR
1
Cher Client,
Vous venez d’acheter l’un de nos produits et nous vous en remercions vivement.
Ce nouveau produit, minutieusement conçu et construit avec des matériaux de tout premier choix, a été soigneusement testé
afin de satisfaire chacune de vos exigences en matière de cuisson.
Nous vous prions de lire et de respecter ces instructions simples qui vous permettront d’obtenir d’excellents résultats dès la
première utilisation.
Nous vous souhaitons une bonne cuisine avec cet appareil moderne.
Le Constructeur
INSTRUCTIONS POUR L’UTILISATEUR:
elles comprennent les recommandations
pour l’utilisation, une description des
commandes ainsi que les procédures
correctes pour le nettoyage et le soin de
l’appareil.
INSTRUCTIONS POUR L’INSTALLATION:
elles sont réservées au technicien qualifié
qui s’occupera de l’installation, de la mise
en marche et des essais de l’appareil.
TABLES DES MATIERES PAGE
Precautions d’emploi 2
Instructions pour l’elimination - Notre politique de
sauvegarde de l’environnement 2
Ouverture du tiroir- Pousser pour ouvrir le tiroir. 3
Ouverture du tiroir fermeture silencieuse 3
Avant l’utilisation 3
Système de chauffage 3
Tiroir chauffe-vaisselle 4
Réglages 4
Temps de réchauffage 4
Décongélation 4
Levée 4
Chauffe-plat 4
Cuisson lente 5
Glissières du tiroir 6
Nettoyage et entretien 7
Bandeau frontal et panneau de commandes 8
Compartiment interne 8
Remplacement d’une Ampoule du Tiroir 8
TABLES DES MATIERES PAGE
Pour remplacer une ampoule 8
Que faire en cas de panne? 9
Instructions d’Installation 9
Outils necessaires 9
Emballage 9
Alimentation necessaire 9
Choisir l’emplacement du tiroir 9
Etapes de l’installation 9
Donnees techniques 10
Remeques d’installation 10
Panneau frontal du tiroir personnalisé 12
Exigences électriques 14
Information Général 14
Branchement Electrique 14
Procédure d’installation 16
Installation procedure 16

FR
2
Precautions d’emploi
Le présent manuel fait partie intégrante de l’appareil.
Prenez-en soin et conservez-le à portée de main pendant
toute la durée de vie du tiroir chauffe-vaisselle.
Avant d’utiliser l’appareil, on recommande de lire le présent
manuel et toutes les informations qu’il contient. L’installation
doit être confiée à du personnel qualifié, conformément
aux normes appropriées. Cet appareil est conçu pour un
usage domestique et il est conforme aux directives CE
actuellement en vigueur. LE PRODUCTEUR DÉCLINE TOUTE
RESPONSABILITÉ EN CAS D’UTILISATIONS DIFFÉRENTES
DE CELLES INDIQUÉES CI-DESSUS.
CONSERVEZ TOUJOURS CES INSTRUCTIONS
D’UTILISATION À PORTÉE DE MAIN ET REMETTEZ-LES AU
FUTUR UTILISATEUR ÉVENTUEL EN CAS DE CESSION DE
L’APPAREIL!
N’OBSTRUEZ JAMAIS LES OUVERTURES ET LES FENTES
PRÉVUES POUR L’AÉRATION ET LA DISPERSION DE LA
CHALEUR.
LA PLAQUE DES DONNÉES CONTENANT LES DONNÉES
TECHNIQUES, LE NUMÉRO DE SÉRIE ET LA MARQUE EST
APPLIQUÉE DANS UNE POSITION VISIBLE SUR LE BLOC
CHAUFFANT. N’enlevez jamais l’étiquette des données.
POSITION DE LA PLAQUE SIGNALÉTIQUE
WARNING
N’UTILISEZ JAMAIS DE PAILLETTES ABRASIVES,
MÉTALLIQUES NI DES RACLOIRS ACÉRÉS RISQUANT
D’ENDOMMAGER LA SURFACE. SI NÉCESSAIRE,
UTILISEZ DES PRODUITS STANDARD NON ABRASIFS À
L’AIDE D’OUTILS EN BOIS OU EN PLASTIQUE. RINCEZ
SOIGNEUSEMENT ET SÉCHEZ AVEC UN CHIFFON
DOUX OU UNE PEAU DE CHAMOIS.
Instructions pour l’elimination - Notre politique
de sauvegarde de l’environnement
Nos produits sont généralement emballés avec des matériaux
non polluants, non nocifs pour l’environnement et recyclables.
On demande aux utilisateurs de collaborer, en éliminant
les emballages de manière inadéquate. Contactez votre
revendeur ou les organisations locales compétentes pour
demander les adresses des structures de collecte, de recyclage
et d’élimination.
Ne jetez jamais l’ensemble ou une partie de l’emballage dans
les environs. Les parties de l’emballage et en particulier les
sachets en plastique représentent un risque d’étouffement pour
les enfants.
Votre ancien appareil doit lui aussi être éliminé de façon
adéquate.
IMPORTANT
Remettez l’appareil à l’organisation locale autorisée à
collecter les appareils mis au rebut. Une élimination correcte
permet une récupération intelligente de matériel de valeur.
Les appareils qui ne sont plus utilisés doivent être débranchés
du secteur d’alimentation et il faut enlever tous les fils électriques
conducteurs, de manière à ce qu’ils ne représentent pas un
danger pour les enfants.
CONSIGNES IMPORTANTES
Quand on utilise des appareils électriques, il convient de
toujours respecter des consignes de sécurité de base, y compris
les suivantes :
1. Lire toutes les instructions.
2. Ne pas toucher les surfaces chaudes. Utiliser les poignées
et les boutons.
3. Pour se protéger contre les électrocutions, ne pas mettre le
cordon, les prises dans l’eau ou autre liquide.
4. Une étroite surveillance est nécessaire quant un appareil
est utilisé par des enfants ou à proximité de ces derniers.
5. Débrancher la fiche de la prise quand l’appareil n’est pas
utilisé et avant le nettoyage. Le laisser refroidir avant de
monter ou retirer des pièces.
6. Ne pas utiliser un appareil dont la fiche, le cordon est
endommagé ou après des dysfonctions de l’appareil
ou après que ce dernier a été endommagé de quelque
manière que ce soit. Retourner l’appareil au centre
de service agréé le plus proche pour l’examiner, des
réparations ou des réglages.
7. Le fabricant de l’appareil déconseille l’utilisation de
fixations accessoires qui pourraient causer des blessures.
8. Ne pas utiliser les appareils à l’extérieur.
9. Ne pas laisser le cordon dépasser du bord de la table
ou d’un plan de travail et ne pas le laisser toucher des
surfaces chaudes.
La page est en cours de chargement...
La page est en cours de chargement...
La page est en cours de chargement...
La page est en cours de chargement...
La page est en cours de chargement...
La page est en cours de chargement...
La page est en cours de chargement...
La page est en cours de chargement...
La page est en cours de chargement...
La page est en cours de chargement...
La page est en cours de chargement...
La page est en cours de chargement...
La page est en cours de chargement...
La page est en cours de chargement...
La page est en cours de chargement...
La page est en cours de chargement...
La page est en cours de chargement...
La page est en cours de chargement...
La page est en cours de chargement...
La page est en cours de chargement...
La page est en cours de chargement...
La page est en cours de chargement...
La page est en cours de chargement...
La page est en cours de chargement...
La page est en cours de chargement...
La page est en cours de chargement...
La page est en cours de chargement...
La page est en cours de chargement...
La page est en cours de chargement...
La page est en cours de chargement...
La page est en cours de chargement...
La page est en cours de chargement...
-
 1
1
-
 2
2
-
 3
3
-
 4
4
-
 5
5
-
 6
6
-
 7
7
-
 8
8
-
 9
9
-
 10
10
-
 11
11
-
 12
12
-
 13
13
-
 14
14
-
 15
15
-
 16
16
-
 17
17
-
 18
18
-
 19
19
-
 20
20
-
 21
21
-
 22
22
-
 23
23
-
 24
24
-
 25
25
-
 26
26
-
 27
27
-
 28
28
-
 29
29
-
 30
30
-
 31
31
-
 32
32
-
 33
33
-
 34
34
-
 35
35
-
 36
36
-
 37
37
-
 38
38
-
 39
39
-
 40
40
-
 41
41
-
 42
42
-
 43
43
-
 44
44
-
 45
45
-
 46
46
-
 47
47
-
 48
48
-
 49
49
-
 50
50
-
 51
51
-
 52
52


