Sylvania SCR1320B Le manuel du propriétaire
- Catégorie
- Réveils
- Taper
- Le manuel du propriétaire
Ce manuel convient également à

PROJECTION ALARM
CLOCK RADIO
MODEL: SCR1320B-SILVER

- 1 -
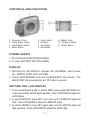
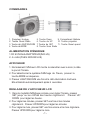
CONTROLS AND FUNCTIONS
POWER SUPPLY
1. DC 6V/500mA ADAPTOR(INCLUDED)
2. 4 x AAA (BATTERY NOT INCLUDED)
DISPLAY
1. Normally the LCD DISPLAY indicates the CALENDAR, which shows
the MONTH, DATE, DAY, and TIME.
2.
Press LIGHT/SNOOZE once and the BACKLIGHT will activate. The
BACKLIGHT will automatically turn OFF after 6 seconds.
SETTING THE LCD DISPLAY
1. In the normal Display mode, to set the TIME, keep pressed SET Button for
8 seconds and the HOUR digits will ash. Press UP/DOWN to adjust the
HOUR digits.
2. To set the MINUTE, press SET once more and the MINUTE digits will
ash. Press UP/DOWN to adjust the MINUTE digits.
3. To set the MONTH, press SET again again and the MONTH digits will
digit will ash. Press UP/DOWN to adjust the DATE digit.
1. Projection Clock
2. Reset Radio button
3. Light/Snooze Button
4. Mode Button
5. Down button
6. Up Button
7. Set Button
8. Scan Radio
9. Battery Pack
10. Projector Switch
11. Reset button

- 2 -
4. To set the DATE, press SET again one more time and the DATE DIGIT
digit will ash. Press UP/DOWN to adjust the DATE digit.
5. To set the DAY, press SET again and the DAY CHARACTERS will
ash. Press UP/DOWN to adjust the DAY.
SETTING THE ALARM
1. In the normal Display mode, press MODE once and the display will
show the ALARM TIME. The "ALARM 1" icon indicates that the
display is showing the ALARM TIME.
2. To set the ALARM TIME, keep pressed SET Button for 8 seconds
and the HOUR digits will ash. Press UP/DOWN to adjust the HOUR
digits.
3. To set the ALARM MINUTE, press SET once more and the MINUTE
digits will ash. Press UP/DOWN to adjust the MINUTE digits.
4. When the Time meets the PRESET ALARM TIME, the alarm sound will
be on. Press SNOOZE (3), and the alarm will turn off, and automati-
cally turn on after 5 minutes.
RADIO FUNCTION
1) Press the SCAN (8) continuously to tune the desired FM station.
2) When the frequency reach 108 MHz, press RESET (2) to re-start from
87.5 MHz
PROJECTION CLOCK
1) To switch ON the projection, move the switch (10) to ON.
2) Press the SNOOZE / LIGHT button
3) to switch ON the projector for 5 seconds.
Focus setting : To adjust the projec tion clock denition by turningthe
FOCUS until the project's time is clearly shown on theceiling or wall.
NOTE : PROJECTS TIME IMAGE ON THE CEILING OR WALL OF A DAR
KENED ROOM. MAXIMUM PROJE-CTION DISTANCE IS 3-9 FEET.

- 3 -
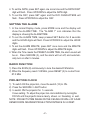
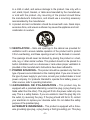
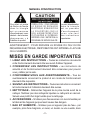
The exclamation point
within the triangle is a
warning sign alerting
you of important
instructions.
This lightning ash and
arrowhead within the
triangle is a warning
sign alerting you of
"dangerous voltage"
inside the product.
CAUTION: TO REDUCE THE RISK
OF ELECTRIC SHOCK, DO NOT
REMOVE COVER (ON BACK). NO
USER SERVICEABLE PARTS INSIDE.
REFER SERVICING TO QUALIFIED
SERVICE PERSONNEL.
IMPORTANT SAFETY INSTRUCTIONS
INSTRUCTION MANUAL
WARNING: TO REDUCE THE RISK OF FIRE OR ELECTRIC SHOCK, DO
NOT EXPOSE THIS APPLIANCE TO RAIN OR MOISTURE.
1. READ INSTRUCTIONS - All the safety and operating Instructions
should be read before the product Is operated.
2. RETAIN INSTRUCTIONS - The safety and operating Instructions
should be retained for future reference.
3. HEED WARNINGS - All warnings on the product and In the operating
Instructions should be adhered to.
4. FOLLOW INSTRUCTIONS - All operating and use Instructions
should be followed.
5. CLEANING - Unplug this product from the wall outlet before cleaning,
Do not use liquid cleaners or aerosol cleaners. Use a damp cloth for
cleaning.
6. ATTACHMENTS - Do not use attachments not recommended by the
product manufacturer as they may cause hazards.
7. WATER AND MOISTURE - Do not use this product near water - for
example, near a bath tub, wash bowl, kitchen sink, or laundry tub; In a wet
basement, or near a swimming pool, and the like.
8. ACCESSORIES - Do not place this product on an unstable cart,
stand tripod, bracket, or table. The product may fall, causing serious Injury

- 4 -
to a child or adult, and serious damage to the product. Use only with a
cart, stand, tripod, bracket, or table recommended by the manufacturer,
or sold with the product. Any mounting of the product should follow
the manufacturer's Instructions, and should use a mounting accessory
recommended by the manufacturer.
9. A product and cart combination should be moved with care. Quick stops,
excessive force, and uneven surfaces may cause the appliance and cart
combination to overturn.
10.VENTILATION - Slots and openings In the cabinet are provided for
ventilation and to ensure reliable operation of the product and to protect
It from overheating, and these openings must not be blocked or covered.
The openings should never be blocked by placing the product on a bed,
sofa, rug, or other similar surface. This product should not be placed In a
built-in Installation such as a bookcase or rack unless proper ventilation Is
provided or the manufacturer's Instructions have been adhered to.
11. POWER SOURCES - This product should be operated only from the
type of power source Indicated on the marking label. If you are not sure of
the type of power supply to you home, consult your product dealer or local
power company. For products Intended to operate from battery power, or
other sources, refer to operating Instruction.
12.GROUNDING OR POLARIZATION - This product may be
equipped with a polarized alternating current line plug (a plug having one
blade wider than the other). This plug will t into the power outlet only one
way. This is a safety feature. If you are unable to insert the plug fully into
the outlet, try reversing the plug. If the plug should still fail to t, contact
your electrician to replace your obsolete outlet. Do not defeat the safety
purpose of the polarized plug.
ALTERNATE WARNINGS - This product is equipped with a three-
wire grounding-type plug, a plug having a third (grounding) pin. This plug

- 5 -
will only t into a grounding-type power outlet. This is a safety feature. If
you are unable to insert the plug into the outlet, contact your electrician
to replace your obsolete outlet, Do not defeat the safety purpose of the
grounding-type plug.
13.POWER - CORD PROTECTION - Power supply cords should
be routed so that they are not likely to be walked on or pinched by items
placed upon or against them, paying particular attention to cords at plugs,
convenience receptacles, and point where they exit from the product.
14.PROTECTIVE ATTACHMENT PLUG - The product is equipped
with an attachment plug having overload protection. This is a safety
feature. See Instruction Manual for replacement or resetting of protective
device. If replacement of the plug is required, be sure the service
technician has used a replacement plug specified by the manufacturer
that has the same overload protection as the original plug.
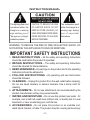
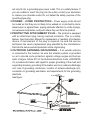
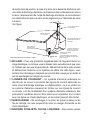
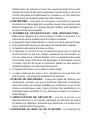
15.OUTDOOR ANTENNA GROUNDING - If an outside antenna
is connected to the receiver, be sure the antenna system is grounded
so as to provide some protection against voltage surges and built-up
static charges. Article 810 of the National Electrical Code, ANSI/NFPA
70, provides information with regard to proper grounding of the mast and
supporting structure, grounding of the lead-in wire to an antenna-discharge
unit, size of grounding conductors, location of antenna-discharge unit,
connection to grounding electrodes, and requirements for the grounding
electrode.
See gure:

- 6 -
16.LIGHTNING - For added protection for this product during a lightning
storm, or when It Is left unattended and unused for long periods of time,
unplug It from the wall outlet and disconnect the antenna or cable system.
This will prevent damage to the product due to lightning and power-line
surges.
17.POWER LINES - An outside antenna system should not be located In
the vicinity of overhead power lines or other electric light or power circuits,
or where It can fall Into such power lines or circuits. When Installing an
outside antenna system, extreme care should be taken to keep from
touching such power lines or circuits as contact with them might be fatal.
18.OVERLOADING - Do not overload wall outlets, extension cords,
or Integral convenience receptacles as this can result In a risk of re or
electric shock.
19.OBJECT AND LIQUID ENTRY - Never push objects of any kind
Into this product through openings as they may touch dangerous voltage
points or short-out parts that could result In a re or electric shock. Never
spill liquid of any kind on the product.
20.SERVICING - Do not attempt to service this product yourself as
opening or removing covers may expose you to dangerous voltage or
other hazards. Refer all servicing to qualied service personnel.
21.DAMAGE REQUIRING SERVICE - Unplug this product from
the wall outlet and refer servicing to qualied service personnel under the
following conditions:
a) When the power-supply cord or plug Is damaged.
b) If liquid has been spilled, or objects have fallen Into the product.
c) If the product has been exposed to rain or water.
d) If the product does not operate normally by following the operating
Instructions, adjust only those controls that are covered by the operating
Instructions as an Improper adjustment of other controls may result In
damage and will often require extensive work by a qualied technician to
restore the product to Its normal operation.
e) If the product has been dropped or damaged In any way, and.
f) When the product exhibits a distinct change In performance - this Indicates
a need for service.

- 7 -
22.
REPLACEMENT PARTS -
When replacement parts are required,
the manufacturer or have the same characteristics as the original part.
Unauthorized substitutions may result in fire, electric shock, or other
hazards.
23.
SAFETY CHECK -
Upon completion of any service or repairs to this
product, ask the service technician to perform safety checks to determine
that the product is in proper operating condition.
24.
WALL OR CEILING MOUNTING -
The product should be
mounted to a wall or ceiling only as recommended by the manufacturer.
25.
HEAT -
The product should be situated away from heat sources such
that produce heat.
Warning:
the party responsible for compliance could void the users' authority to operate
the equipment.

Radio Réveil Ovale
Projection Plafond
MODELE: SCR1320B-SILVER

- 1 -
1. Projecteur Horloge
2. Touche Reset Radio
3. Touche de LIGHT/SNOOZE
4. Touche de MODE
5. Touche Down
6. Touche de UP
7. Touche de SET
8. Touche Scan Radio
9. Compartiment Batterie
10. Touche projection
11. Touche Reset apareil
COMMANDES
ALIMENTATION D'ÉNERGIE
1.DC 6V/500mA ADAPTATEUR(INCLUS)
2. 4 x AAA (PILES NON INCLUS)
AFFICHEUR
1. Normalement l'afcheur LCD montre le calendrier avec le mois, la date
le jour et l'horaire.
2. Pour sélectionner le système d'afchage de l'heure, presser la
touche MODE en séquence.
3. Presser LIGHT/SNOOZE une fois et la rétro-illumination s'activera.
Elle s'éteindra automatiquement après 6 secondes.
REGLAGE DE L'AFFICHEUR LCD
1. Dans la modalité d'afchage normale, pour régler l'horaire, presser
SET jusqu' au les chiffres des heures clignoteront. Presser UP/
DOWN pour régler les heures.
2. Pour régler les minutes, presser SET une fois et les minutes
clignoteront. Presser UP/DOWN pour régler les minutes.
3. Pour régler le mois, presser SET une fois encore et le mois clignotera.
Presser UP/DOWN pour régler le mois.

- 2 -
4. Pour régler la date, presser SET
une fois et la date clignotera. Presser UP/DOWN pour régler la date.
5. Pour régler le jour, presser SET une fois encore et le jour clignotera.
Presser UP/DOWN pour régler le jour.
6. Presser SET encore une fois pour retourner à l'afchage normal.
REGLAGE DE L'ALARME
1. Dans la modalité d'affichage normale, presser MODE une fois et
l'afcheur montrera l'horaire d'alarme. Le symbole ALARM 1 indique
que l'horaire montré est celui de l'alarme.
2. Pour régler l'horaire d'Alarme, presser SET jusqu' au les chifres des
heures clignoteront. Presser UP/DOWN pour régler les heures.
3. Pour régler les minutes de l'alarme,presser SET une fois et les
minutes clignoteront. Presser UP/ DOWN pour régler les minutes.
4. Presser SET encore une fois pour retourner à l'afchage normal.
5. Lorsque l'horaire d'alarme arrive le réveil sonne. En appuyant sur la
touche de SNOOZE (3), on l'arrête momentanément pendant environ
5 minutes, après quoi le réveil recommence à sonner.
RADIO
1. Appuyer sur le bouton SCAN (8) pour sélectionner la station désirée.
2. Appuyer sur le bouton RESET (2) Pour retournér sur 87.5 MHz.
RÉGLAGE DE L'HORAIRE POUR LA PROJECTION
Mettre la commande de la projection (10) sur la position ON.
Réglage du zoom: Pour ajuster la dénition de la projection entournant
le ZOOM jusqu'à ce que le temps de projection soitclairement montré sur
le plafond ou le mur.

- 3 -
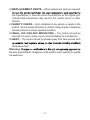
Le point d'exclamation
dans la triangle
est un panneau
d'avertissement
vous alertant
des instructions
importantes.
Ces éclair et pointe
de flèche de foudre
dans la triangle
est un panneau
d'avertissement vous
alertant « de la tension
dangereuse » à
l'intérieur du produit.
PRÉCAUTION : POUR RÉDUIRE
LE RISQUE DE DÉCHARGE
ÉLECTRIQUE, N'ENLEVEZ PAS
LA COUVERTURE (SUR LE
DOS). AUCUNE PIÈCES UTILES
D'UTILISATEUR À L'INTÉRIEUR.
RÉFÉREZ-VOUS L'ENTRETIEN AU
PERSONNEL DE SERVICE QUALIFIÉ.
MISES EN GARDE IMPORTANTES
MANUEL D'INSTRUCTION
AVERTISSEMENT : POUR RÉDUIRE LE RISQUE DU FEU OU DE
DÉCHARGE ÉLECTRIQUE, N'EXPOSEZ PAS CET APPAREIL À LA PLUIE
OU À L'HUMIDITÉ.
1. LISEZ LES INSTRUCTIONS - Toutes les instructions de sécurité
et de fonctionnement devraient être lues avant d'utiliser l'appareil.
2. CONSERVEZ LES INSTRUCTIONS - Les instructions de
sécurité et de fonctionnement devraient être conservées pour pouvoir
vous y référer par la suite.
3. CONFORMEZ-VOUS AUX AVERTISSEMENTS - Tous les
avertissements concernant le produit et son mode de fonctionnement
devraient être respectés.
4. SUIVEZ LES INSTRUCTIONS - Toutes les instructions concernant
le fonctionnement et l'utilisation devraient être suivies.
5. NETTOYAGE - Débranchez l'appareil de la prise murale avant de le
nettoyer. N'utilisez pas des nettoyants liquides ou nettoyants en aérosol.
Servez-vous plutôt d'un linge humide pour le nettoyage.
6. ACCESSOIRES - N'utilisez pas d'accessoires non recommandés par
le fabricant de l'appareil qui pourraient causer des dangers.
7. EAU ET HUMIDITÉ - N'utilisez pas cet appareil près de l'eau - par
exemple, près d'une baignoire, un évier, un lavabo ou une cuvette, dans

- 4 -
un sous-sol humide, près d'une piscine, ou autres.
8. ACCESSOIRES - Ne placez pas cet appareil sur un chariot, un
support, un trépied ou une table instable. L'appareil risquerait de tomber
et de causer des blessures graves à un enfant ou un adulte, ou être
sérieusement endommagé. Utilisez seulement un chariot, support, trépied
ou table recommandé par le fabricant ou vendu avec ce produit. On
devrait suivre les instructions du fabricant lors de tout montage du produit
et utiliser les accessoires de montage recommandés par le fabricant.
9. Déplacez avec soin les combinaisons appareil et chariot. Des arrêts
brutaux, une force excessive ou des surfaces inégales peuvent causer le
renversement de l'ensemble de chariot et appareil.
10. VENTILATION - Les fentes et les ouvertures dans le coffret sont
prévues pour la ventilation et permettre d'assurer un fonctionnement
able de l'appareil et de le protéger contre la surchauffe. Ces ouvertures
ne devraient être ni bouchées ni couvertes. Les ouvertures ne devraient
jamais être bouchées en plaçant l'appareil sur un lit, un divan, un tapis ou
une autre surface similaire. Cet appareil ne devrait pas être placé dans
une installation encastrée, telle qu'une bibliothèque ou une clayette à
moins qu'une installation sufsante soit fournie ou que les instructions du
fabricant aient bien été respectées.
11.SOURCES D'APPROVISIONNEMENT EN COURANT -
Cet appareil doit fonctionner seulement à partir du type de source de
courant indiqué sur la plaque d'évaluation. Si vous n'êtes pas certain du
type d'approvisionnement en courant, consultez votre marchand d'appareil
ou votre compagnie locale d'électricité. Pour les produits conçus pour être
utilisés à partir d'une source de pile ou autres sources, référez-vous aux
instructions de fonctionnement.
12.MISE À LA TERRE OU POLARISATION - Ce produit peut

- 5 -
être équipé d'une che de ligne de courant alternatif polarisée (une che
ayant une lame plus large que l'autre). Cette che entrera dans la prise
de courant dans un sens seulement. Il s'agit d'un dispositif de sécurité.
Si vous êtes incapable d'insérer la fiche entièrement dans la prise,
essayez d'inverser la che. Si la che ne rentre toujours pas dans la prise,
contactez un électricien pour remplacer votre prise désuète. N'essayez
pas de détruire le dispositif de sécurité de la che polarisée.
AUTRES AVERTISSEMENTS -
Ce produit est équipé d'une
che du type avec mise à la terre à trois ls. Il s'agit d'une che ayant un
troisième ergot (prise de terre). Cette che s'adaptera seulement sur une
prise de courant du type avec prise à la terre. Il s'agit d'un dispositif de
sécurité. Si vous êtes incapable d'insérer la che dans la prise de courant,
contactez votre électricien pour remplacer votre prise désuète. Ne passez
pas outre le dispositif de sécurité de la che du type avec prise à la terre.
13.
PROTECTION DU FIL DE COURANT -
Les fils
d'approvisionnement en courant devraient être acheminés de façon à
ce que l'on ne risque pas de marcher dessus ou qu'ils ne soient pas
coincés par des articles placés au-dessus d'eux ou contre eux, en faisant
particulièrement attention aux ls à proximité des ches, prises de courant
de service, et au point où ils sortent de l'appareil.
14.
FICHE DE RACCORDEMENT DE PROTECTION -
Le
produit est équipé d'une fiche de raccordement ayant une protection
contre les surcharges. Il s'agit d'un dispositif de sécurité. Consultez le
manuel d'instructions pour le remplacement ou la remise en marche du
dispositif de protection. Si le remplacement de la fiche est nécessaire,
assurez-vous que le technicien réparateur a bien utilisé une fiche de
remplacement spécifiée par le fabricant, et offrant la même protection
contre les surcharges que la che d'origine.
15.
MISE À LA TERRE DE L'ANTENNE EXTÉRIEURE -
Si
une antenne extérieure est raccordée au récepteur, assurez-vous que le
système est bien mis à la terre de façon à fournir une protection contre la
surcharge de tension et l'accumulation de charges statiques. L'article 810
du National Electrical Code (Code national de l'électricité), ANSI/NFPA 70,
fournit des renseignements au sujet de la bonne mise à la terre du mât et

- 6 -
de la structure de soutien, la mise à la terre de la descente d'antenne vers
une unité de décharge d'antenne, la dimension des conducteurs de mise à
la terre, l'emplacement de l'unité de décharge d'antenne, le raccordement
aux électrodes de mise à la terre et les exigences pour l'électrode de mise
à la terre.
Voir gure:
16.
ÉCLAIR -
Pour une protection supplémentaire de l'appareil durant un
orage électrique, ou lorsque vous le laissez sans surveillance et que vous
ne l'utilisez pas sur une longue période, débranchez-le de la prise murale
et débranchez l'antenne ou le système de câble. De cette façon, vous
éviterez tout dommage à l'appareil qui pourrait être causé par un éclair et
par les surcharges sur la ligne de courant.
17
.LIGNES DE COURANT -
Un système d'antenne extérieure ne
devrait pas se trouver à proximité des lignes de courant aériennes ou
autre circuit d'éclairage électrique ou d'alimentation, ou à un endroit où
ce système d'antenne risquerait de tomber sur ces lignes de courant
ou circuits. Lors de l'installation d'un système d'antenne extérieure, des
précautions extrêmes devront être prises pour empêcher tout contact
avec ces lignes ou circuits électriques, un tel contact pouvant être mortel.
18.
SURCHARGE -
Ne surchargez ni la prise, les prises murales ou les
ls de rallonge, car cela risquerait de créer un danger d'incendie ou de
chocs électriques.
19.
ENTRÉE D'OBJETS OU DE LIQUIDES -
Ne poussez jamais
NEC NATIONAL ELECTRICAL CODE
ÉQUIPEMENT
DE SERVICE
ÉLECTRIQUE
BRIDE DE MISE
À LA TERRE
FIL DE DESCENTE
D'ANTENNE
UNITÉ DE DÉCHARGE
D'ANTENNE DANS LA
SECTION
CONDUCTEURS DE
MISE À LA TERRE
DANS LA SECTION
ÉTRIERS DE MISE
À LA TERRE
SYSTÈME D'ÉLECTRODE DE
MISE À LA TERRE DE SERVICE
ÉLECTRIQUE

- 7 -
d'objets dans cet appareil à travers les ouvertures étant donné qu'ils
risquent de toucher à des points dangereux à haute tension ou de court-
circuiter des pièces qui entraîneraient un incendie ou un choc électrique.
Ne renversez pas de liquide quelconque dans l'appareil.
20.
ENTRETIEN -
N'essayez pas de réparer vous-même cet appareil,
l'ouverture ou le démontage des couvercles pouvant vous exposer à des
tensions dangereuses ou à d'autres dangers. Référez toute réparation à
un personnel de service qualié.
21.
DOMMAGE NÉCESSITANT UNE RÉPARATION -
Débranchez l'appareil de la prise murale et confiez la réparation à un
personnel de service qualié sous les conditions suivantes :
a. Lorsque le l d'approvisionnement en courant ou la che est endommagé.
b. Si du liquide a été renversé ou des objets sont tombés dans l'appareil.
c. Si l'appareil a été exposé à la pluie ou à l'eau.
d. Si l'appareil ne fonctionne pas normalement après que le mode de
fonctionnement ait été suivi. Réglez seulement les commandes qui
sont couvertes par le mode d'utilisation, sinon un ajustement des autres
commandes risque d'entraîner des dommages et nécessitera souvent
un travail important de la part du technicien qualifié qui sera appelé à
remettre l'appareil en bon état de fonctionnement.
e. Si l'appareil est tombé ou si le coffret est endommagé.
f. Lorsque l'appareil fait preuve d'un changement marqué dans ses
performances - ceci indique la nécessité d'une réparation.
22.
PIÈCES DE RECHANGE -
Lorsque des pièces de rechange sont
nécessaires, assurez- vous que le technicien effectuant la réparation
utilise des pièces de rechange spéciées par le fabricant ou qui ont les
mêmes caractéristiques que la pièce d'origine. Des substitutions non
autorisées peuvent entraîner un choc électrique et causer un incendie ou
autres dangers.
23.
VÉRIFICATION DE SÉCURITÉ -
Une fois le service ou la
réparation terminé sur cet appareil, demandez au technicien de service
de réaliser une vérication de sécurité pour déterminer si le produit est en
bonne condition de fonctionnement.
24.
MONTAGE AU MUR OU AU PLAFOND -
Le produit devrait

- 8 -
être monté à un mur ou un plafond seulement comme recommandé par le
fabricant.
25.
CHALEUR -
Ce produit devrait être situé loin de toutes sources de
chauffage telles que les radiateurs, les registres de chaleur, cuisinières, ou
la chaleur.
AVERTISSEMENT:
Toute modification non approuvée par le
responsable de la conformité de cet appareil risque d'annuler le droit
d'exploitation de l'appareil par l'utilisateur.
-
 1
1
-
 2
2
-
 3
3
-
 4
4
-
 5
5
-
 6
6
-
 7
7
-
 8
8
-
 9
9
-
 10
10
-
 11
11
-
 12
12
-
 13
13
-
 14
14
-
 15
15
-
 16
16
-
 17
17


Sylvania SCR1320B Le manuel du propriétaire
- Catégorie
- Réveils
- Taper
- Le manuel du propriétaire
- Ce manuel convient également à
dans d''autres langues
- English: Sylvania SCR1320B Owner's manual
Autres documents
-
Roadstar CLR-2618/N Manuel utilisateur
-
-
Roadstar CLR-450R Le manuel du propriétaire
-
Roadstar LAC-2280 Le manuel du propriétaire
-
-
-
Roadstar HRA-1200W Le manuel du propriétaire
-
Roadstar HRA-500IP Le manuel du propriétaire
-
Roadstar CLR-2540UMPSL Manuel utilisateur