Bodet Seconde Date Mode d'emploi
- Catégorie
- Horloges murales
- Taper
- Mode d'emploi
Ce manuel convient également à

1
Style 5 – Style 5 Seconde – Style 7 – Style 7 Date – Style 7 Ellipse – Style 10
Style 10 Seconde - Style 10 Date - Style 10 Seconde Date
NTP
HORLOGES DIGITALES intérieures
DIGITAL CLOCKS indoor
Notice d’installation et de mise en service
Installation and operation manual
S’assurer à réception que le produit n’a pas été endommagé durant le transport pour réserve au transporteur.
When receiving goods, please check that the item is not broken. If the product is damaged, a claim
should be addressed to the shipping company.
BODET SA
BP30001
49340 TREMENTINES I France
Tél. support France: 02.41.71.72.99
Tel. support (intl): +33 241 71 72 00
Fax France: 02.41.71.72.01
Fax (intl): +33 241 71 72 02
Réf : 607794 H
www.bodet-time.com

2
EN
Table of contents
I – Initial checks 4
1.1 Unpacking the clock 4
1.2 Cleaning 4
1.3 Pre-requisites 5
II – Installation 6
2.1 Wall mounting – Style 5-5S-7-7D-7E 6
2.2 Wall mounting – Style 10-10S-10D-10SD 7
2.3 Recess mounting – Style 5-5S-7-7D-10 8
2.4 Mounting - Style 7-7D-10 waterproof IP55 10
III – Location of "S" and "+" keys 11
IV – Styles 5S & 10S – Timer mode 11
V – Default configuration 12
VI – Basic configuration 13
6.1 Setting time/date/year – all models except Style 7D-10D-10SD 13
6.2 Configuration menu – all models except Style 7D-10D-10SD 13
6.3 Setting time/date/year – Style 7D 14
6.4 Configuration menu – Style 7D 15
6.5 Setting time/date/year – Style 10D-10SD 16
6.6 Configuration menu – Style 10D-10SD 17
VII – Web interface 18
7.1 Home page 18
7.2 Network configuration 19
7.3 Time and synchronisation configuration 20
7.4 Parameters 22
7.5 Alarm configuration 23
7.6 System 25
VIII – Adjusting the brightness 26
IX – Memory backup 26
X – Technical specifications 26
XI – Maintenance menu 29
11.1 Maintenance menu – all models except Style 7D-7E-10D-10SD 29
11.2 Maintenance menu – Style 7D-7E 30
11.3 Maintenance menu – Style 10D-10SD 31
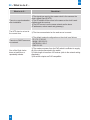
XII – What to do if… 32
XIII – Appendix 33

3
Table des matières
I – Vérification initiale 34
1.1 Déballage de l’horloge 34
1.2 Nettoyage 34
1.3 Pré-requis 35
II – Installation mécanique 36
2.1 Montage mural Style 5-5S-7-7D-7E 36
2.2 Montage mural Style 10-10S-10D-10SD 37
2.3 Montage par encastrement Style 5-5S-7-7D-10 38
2.4 Montage Style 7-7D-10 étanches IP55 40
III – Emplacement des touches «S» et «+» 41
IV – Style 5S & Style 10S – Mode chronomètre 41
V – Configuration par défaut 42
VI – Configuration basique 43
6.1 Réglage Heure/Date/Année toutes versions sauf Style 7D-10D-10SD 43
6.2 Menu configuration toutes versions sauf Style 7D-10D-10SD 43
6.3 Réglage Heure/Date/Année Style 7D 44
6.4 Menu configuration Style 7D 45
6.5 Réglage Heure/Date/Année Style 10D-10SD 46
6.6 Menu configuration Style 10D-10SD 47
VII – Configuration avancée 48
7.1 Accueil 48
7.2 Configuration réseau 49
7.3 Configuration de l’heure et synchronisation 50
7.4 Paramétrage 52
7.5 Configuration des alarmes 53
7.6 Système et protection 55
VIII – Réglage de la luminosité 56
IX – Sauvegarde mémoire 56
X – Caractéristiques techniques 56
XI – Menu technicien 59
11.1 Menu technicien toutes versions sauf Style 7D-7E-10D-10SD 59
11.2 Menu technicien Style 7D-7E 60
11.3 Menu technicien Style 10D-10SD 61
XII – Que faire si...? ...Vérifier. 62
XIII – Annexe 63
FR

4
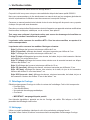
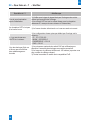
I – Initial checks
Thank you for choosing a BODET clock.
This product has been carefully designed, adhering to ISO 9001 quality processes, to ensure your
satisfaction. We recommend that you read this manual and the general safety measures and
operating instructions carefully before handling the clock.
Retain this manual for reference for the lifespan of your clock.
The information supplied is non-binding; Bodet reserves the right to make changes to equipment,
including functional, technical and aesthetic changes or changes to colours, without notice.
Failure to observe these instructions may cause irreversible damage to the clock and
invalidate the warranty.
These instructions relate to NTP models. For other models, please refer to the corresponding
instructions.
These instructions relate to the following clocks:
Style 5: hours and minutes display. Height of digits: 5 cm.
Style 5S (seconds): hours, minutes and seconds display. Height of digits: 5 cm.
Style 7: hours and minutes display. Height of digits: 7 cm.
Style 7D (date): hours, minutes, date, day and week display. Height of digits: 7 cm; height of
letters: 5 cm.
Style 7E (ellipse): hours, minutes and revolving seconds display on ellipse design. Height of
digits: 7 cm; height of letters: 5 cm.
Style 10: hours and minutes display. Height of digits 10 cm.
Style 10S (seconds): hours, minutes and seconds display. Height of digits: 10 cm.
Style 10D (date): hours, minutes, date, day and week display. Height of digits: 10 cm; height of
letters: 7 cm.
Style 10SD (seconds - date): hours, minutes, seconds, date, day and week display. Height of
digits: 10 cm; height of letters: 7 cm.
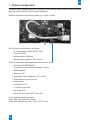
1.1 Unpacking the clock
Carefully unpack the clock and check the contents of the package. This should include:
• Style clock
• 3 screws (Ø4mm)
• Anti-static cleaning kit
• Manual
• IMPORTANT: product identification label
An identification label is affixed to the back of the clock. Use the URL link shown to download these
instructions.
1.2 Cleaning
Use an anti-static product identical to that in the cleaning kit provided.
Never use alcohol, acetone or other solvents, which may damage the clock’s casing or glass.
EN

5
1.3 Pre-requisites
To programme the clock you must install BODET Detect software (Cf. page 18). This software
is available to download for free on the BODET website www.bodet-time.com.
Note: the BODET clock must be connected to a PoE network socket via a PoE switch or a PoE
injector. (802.3af, class 3: multicast, class 0: unicast).
Bodet recommends the following devices:
• PoE injectors: Zyxel, Tp link, D-Link, HP, Cisco, Axis, ITE Power Supply, PhiHong,
Abus, Globtek
• PoE switches: D-Link, HP, Planet, Zyxel, Cisco, NetGear, PhiHong
Select a location to install the clock, preferably away from sources of electrical interference, such as
transformers.
EN

6
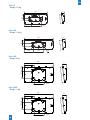
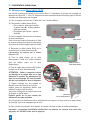
II – Installation
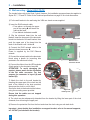
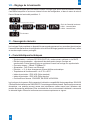
2.1 Wall mounting – Style 5-5S-7-7D-7E
The visuals below refer to the Style 5 clock. However, the installation process shown also applies to
Styles 5S, 7, 7D and 7E. Refer to the Technical specifications on page 26 for clock dimensions.
1) Fix the wall bracket to the wall using the 3 Ø4 mm dowel screws supplied.
EN
2) Insert the RJ45 network cable:
• From above: cut through the upper
part of the casing u and insert the
cable at the back. .
• From behind: dedicated area v.
3) Clip the electronic board into the wall
bracket. Insert the lower part of the electronic
board into the back of the wall bracket, then
push the upper part of the board into the
back of the bracket until it clicks w.
4) Connect the RJ45 network cable to the
electronic board connector x.
Power is supplied by the PoE Ethernet
network.
5) Connect the network cable to the electronic
board using a plastic tie (mounting hole
provided in the electronic board).
6) Connect the ribbon from the LED modules
(clock casing) to the electronic board y.
ATTENTION: To avoid damaging the
product, please, watch for the orientation
of the flat cable connector. For that
purpose the connector is keyed (A) and
marked (B).
7) Attach the clock to the wall bracket by
inserting the upper part of the clock into the
back of the bracket in the slots provided,
then press the clock in until it clicks.
Secure the clock to the bracket at the bottom,
using the mounting screw provided.
Ensure that the cables are not trapped
during this operation.
8) The clock may be subsequently detached from the bracket by lifting the lower part of the clock
outwards, then removing the upper part.
9) Remove the protective film from the front and clean the clock using an anti-static cloth.
Important : about double face installation on support bracket, refer to the manual supports,
ref.: 607847 (included with the bracket).
u
Back view
Wall bracket +
electronic board
w
w
x
y
Right side
cutaway view
v
A
A
B
B

7
EN
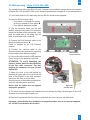
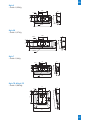
2.2 Wall mounting – Style 10-10S-10D-10SD
The visuals below refer to the Style 10 clock. However, the installation process shown also applies
to Styles 10S, 10D and10SD. Refer to the Technical specifications on page 26 for clock dimensions.
1) Fix the wall bracket to the wall using the four Ø4 mm dowel screws supplied.
v
u
Back view
w
w
x
y
Wall bracket +
electronic board
Right side
cutaway view
2) Insert the RJ45 network cable:
• From above: cut through the casing
at the top, between the two labels u.
• From behind: dedicated area v.
3) Clip the electronic board into the wall
bracket. Insert the lower part of the electronic
board into the back of the wall bracket , then
push the upper part of the board into the
back of the bracket until it clicks w.
4) Connect the RJ45 network cable to the
electronic board connector x.
Power is supplied by the PoE Ethernet
network.
5) Connect the network cable to the
electronic board using a plastic tie (mounting
hole provided in the electronic board).
6) Connect the ribbon from the LED modules
(clock casing) to the electronic board y.
ATTENTION: To avoid damaging the
product, please, watch for the orientation
of the flat cable connector. For that
purpose the connector is keyed (A) and
marked (B).
7) Attach the clock to the wall bracket by
inserting the upper part of the clock into the
back of the bracket in the slots provided,
then press the clock in until it clicks.
Secure the clock to the bracket at the bottom,
using the mounting screw provided.
Ensure that the cables are not trapped
during this operation.
8) The clock may be subsequently detached from the bracket by lifting the lower part of the clock
outwards, then removing the upper part.
9) Remove the protective film from the front and clean the clock using an anti-static cloth.
Important : about double face installation on support bracket, refer to the manual supports,
ref.: 607847 (included with the bracket).
A
A
B
B

8
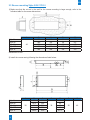
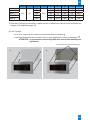
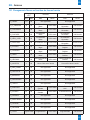
2.3 Recess mounting Style 5-5S-7-7D-10
1) Make sure that the cut-out in the wall for the recess mounting is large enough, refer to the
following table for the proper dimensions:
A B C D E
Style 5
46
275 241 68 107
Style 5S 400 365 68 107
Style 7 325 291 85 117
Style 7 Date 365 331 200 308
Style 10 424 406 100 165
Dimensions in mm
2) Install the recess casing following the dimensions listed below:
A B C D E F G
Style 5
38
135 241
30
18
30 46
Style 5S 197.5 365 52
Style 7 160 291 43
Style 7 Date - 331 63
Style 10 229.5 429 97.5
EN

9
H I J K L M N O P
Style 5
0.8 46
107
23.3
68 18.5 275 285 34
Style 5S 107 68 18.5 400 410 34
Style 7 153 85 15 325 335 42.5
Style 7 Date 308 200 53 365 375 100
Style 10 165 100 31.5 464 474 50
3) Connect the clock (refer to the next chapter) and set the time (see chapter VI-Configuration, page 13).
4) Attach the clock:
- to the wall by tightening the 4 screws into the inserted Ø4 mm dowels
a
- to its recess mounting by tightening the 4 metric screws of the recess mounting
b
.
CAUTION: do not fit a DHF clock in a metal partition or equivalent.
Recess mounting attachment screwsa
a b
EN

10
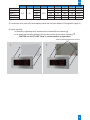
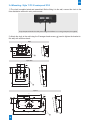
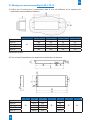
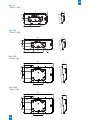
2.4 Mounting - Style 7-7D-10 waterproof IP55
1) The clock is supplied wired and assembled. Before fitting it to the wall, connect the clock to the
time distribution network in a dry environment.
2) Attach the clock to the wall using the 2 hexagon-head screws
1
(used to tighten the bracket to
the wall) with a Ø4mm dowel:
EN
Style 7
Style 10
Style 7 Date
137
61
80
140
7°
320
R3.5
68.5
375
84
517
R3.5
91.5
209
7°
187.5
137
320
320
68.5
R3.5
93
114
7°
1
1
1
Crimp the RJ45 socket after the cable passes through the bulkhead or in a casing waterproof (not supplied)

11
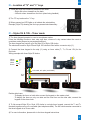
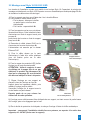
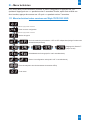
III – Location of "S" and "+" keys
1) These two keys are located on the back of the clock:
– Right side: when viewed from the back
– Left side: when viewed from the front (when being handled)
2) The "S" key is above the "+" key.
3) When pressed, an LED lights up to indicate the selected key.
Example (Style 7D) showing the two keys pressed simultaneously:
EN
0VGreen
Yellow
White
Brown
8/10 cable, twin pairs (unshielded)
20 m
max.
15V
T+
T-
IV – Styles 5S & 10S – Timer mode
1) The timer keypad operates in count or countdown modes.
It has the following functions: start, stop, split time, closure of a dry contact when the count or
countdown ends (stops at a pre-programmed time).
The timer keypad can control up to ten Style 5S or Style 10S clocks.
The electronic board for Style 5S and Style 10S clocks is fitted with a connector strip (j).
2) Connect the timer keypad to the strip (j) using a 4-core cable (T-, T+, 0V and 15V) for the
first clock.
Wiring example with three Style 5S clocks:
Double sided case:
- To display the timer on both sides connect the keypad on the master clock.
- To display the timer on only one side and the local time on the other side, connect the
keypad on the slave clock.
3) To link several Style 5S or Style 10S clocks to a single timer keypad, connect the T- and T+
terminals together using a 2-core cable (twin telephone cable). The first clock remains connected to
the timer keypad via a 4-core cable.
4) For more information, please refer to the timer keypad instructions.

12
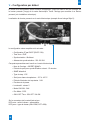
V – Default configuration
To restore factory settings, press the red button on the electronic board until the clock turns black.
Open the clock to access this button (see Installation).
Location of button on the electronic board (e.g. a Style 5 clock):
The full factory configuration is as follows:
• IP configuration by DHCP (DHCP: ON)
• Time zone: EUR
• Synchronisation: Multicast
• Synchronisation address: 239.192.54.1
These four parameters are displayed on the electronic board.
• Clock name: BODET-@MAC
• Pool period for unicast synchronisation: 15 mins.
• SNMP disabled
• Trap type: V2C
• Temperature alarm threshold: -5°C to +55°C
• Trap status issue period: 24 hrs
• No password
• Luminosity: level 2
• 12 hr/24 hr mode: 24hr
• Eco mode: ECO
• ON & OFF time: 23 hrs OFF / 6 hrs ON
On the electronic board connector:
Green LED: network activity + power
Yellow LED: network type (ON = 100 m, OFF = 10 m)
EN

13
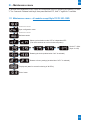
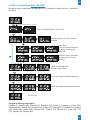
VI – Basic configuration
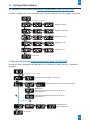
6.1 Setting time/date/year – all models except Style 7D-10D-10SD
To set time, date and year, press and hold "S" for 3 seconds.
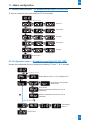
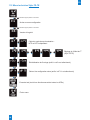
6.2 Configuration menu – all models except Style 7D-10D-10SD
Access the configuration menu by pressing and holding "S" then "+" for 3 seconds.
EN
+
+
+
+
+
+
+
+
+
+
Set hour
Set minute
Set year
Set month
Set day
End of menu
S
S
Hold down for 3 seconds
S
S
S
S
+
+
+
+ + +
+
S
S
S
S
S
S
S
Select display mode: 12 or 24 hr (default 24 hr)
Hold down for 3 seconds
End of menu
+
View display
options
Select energy-saving mode
(default Eco)
EcoP mode:
Select looped switch-off time from 0 to 23
(default 23)
Select looped switch-on time from 0 to 23
(default 6)

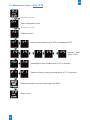
14
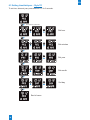
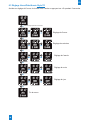
6.3 Setting time/date/year – Style 7D
To set time, date and year, press and hold "S" for 3 seconds.
EN
+
+
+
+
+
+
+
+
+
+
S
S
S
S
S
S
Hold down for 3 seconds
Set hour
Set minutes
Set year
Set month
Set day
End of menu

15
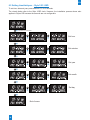
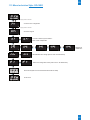
6.4 Configuration menu – Style 7D
Access the configuration menu by pressing and holding "S" then "+" for 3 seconds.
EN
+
S
S
S
S
S
S
S
S
S
Hold down for 3 seconds
+
+
+ +
+
+
+
+
+
+
+ +
+
+
+
+
S
Select display mode: 12 or 24 hr (default 24 hr)
Select energy-saving mode
(default Eco)
EcoP mode:
Select looped switch-off time
from 0 to 23 (default 23)
Select looped switch-on time
from 0 to 23 (default 6)
Select main display language
Select secondary display language
Select the information to be
displayed on the middle line
Set the middle line display to alternate with the day
(only day, week and T °)
End of menu
Available display languages:
French (F), English (GB), German (D), Spanish (SP), Italian (I), Portuguese (P), Greek (GR), Dutch
(NL), Denmark (DK), Norway (N), Swedish (S), Finland (FI), Poland (PL), Hungarian (HG), Russian
(RU), Croatian (HR), Romanian (RO), Czech (CZ), Slovenian (CL), Arabic (AR), Turkish (TR) Catalan
(CA), Basque (BA).

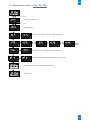
16
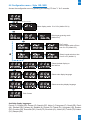
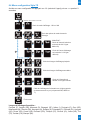
6.5 Setting time/date/year – Style 10D-10SD
To set time, date and year, press and hold "S" for 3 seconds.
The visuals below refer to the Style 10SD clock. However, the installation process shown also
applies to Styles 10D because the seconds are not configurable.
+ +
Set hour
Set minutes
Set year
Set month
Set day
End of menu
S
S
S
Hold down for 3 seconds
S
S
S
+
+
+
+ +
+
+
+
EN

17
6.6 Configuration menu – Style 10D-10SD
Access the configuration menu by pressing and holding "S" then "+" for 3 seconds.
+
S
S
S
S
S
S
S
Hold down for 3 seconds
+
+
+
+
S
Select display mode: 12 or 24 hr (defaut: 24 hr)
Select energy-saving mode
(defaut Eco)
+
EcoP mode:
Select looped switch-off time
from 0 to 23 (default: 23)
Select looped switch-on time
from 0 to 23 (default: 6)
Select main display language
Select secondary display language
Select the date display on
the 2nd line
End of menu
+
+
+
+ +
+
+
+ +
Available display languages:
French (F), English (GB), German (D), Spanish (SP), Italian (I), Portuguese (P), Greek (GR), Dutch
(NL), Denmark (DK), Norway (N), Swedish (S), Finland (FI), Poland (PL), Hungarian (HG), Russian
(RU), Croatian (HR), Romanian (RO), Czech (CZ), Slovenian (CL), Arabic (AR), Turkish (TR) Catalan
(CA), Basque (BA).
EN

18
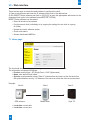
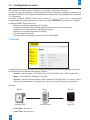
VII – Web interface
There are two ways to access the web interface to configure the clock:
1) Open a web browser and enter the IP address of the clock in the address bar.
2) Run BODET Detect software and click on to open the appropriate web server for the
networked clock (refer to the software instructions, ref.: 607548)
BODET Detect software can be used to:
• Detect all clocks on the network
• Congureeachclock(individuallyorbycopyingthesettingsforoneclocktoagroup
of clocks)
• Update the clock’s software version
• Check clock status
• Access downloaded MIB files
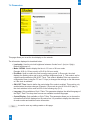
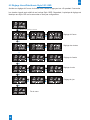
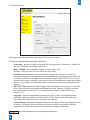
7.1 Home page
The clock web server home page contains general information about the clock.
The information is displayed as follows:
• Product: product type + SF (Single Face) + SUP (Supervised)
• Name: user-defined clock name
• Synchro: synchronisation status ("Strat 2" indicates that the clock is at the 2nd level from
the synchronisation source) + IP address of the server on which the clock is synchronised.
Example:
Strat 0 Strat 1 Strat 2
GPS antenna Master clock Style 7E
• Local date: current date
• Local time: current time
EN

19
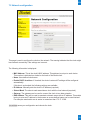
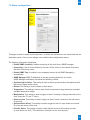
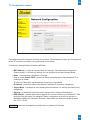
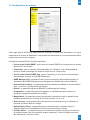
7.2 Network configuration
This page is used to configure the clock on the network. The warning indicates that the clock might
lose network connectivity if the settings are incorrect.
The following information is displayed:
• MAC Address: This is the clock's MAC address. This address is unique to each device.
This number is indicated on a label on the back of the Bodet clock.
• Name: User-defined clock name.
• Enable DHCP checkbox: If checked, the device's network IP settings will be configured
automatically.
If this box is unchecked, the following settings are available:
• IP Address: Manually sets the device's IP address (required).
• Subnet Mask: The subnet mask associates a clock with the local network (required).
• Gateway: The gateway can be used to connect the clock to two data networks.
• DNS Address: This can be used to associate a domain name with an IP address. This avoids
having to enter an IP address in the browser as a user-defined name can be used instead.
For example: www.bodet.com is easier to remember than 172.17.10.88.
saves your configuration and reboots the clock.
EN

20
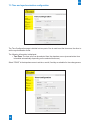
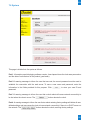
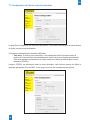
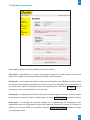
7.3 Time and synchronisation configuration
EN
The Time Configuration page is divided into two parts. One is used to set the time zone, the other to
set the synchronisation mode.
The following information is displayed:
• Time Zone: The time zone can be selected from the dropdown menu (summer/winter time
is handled automatically depending on the selected time zone).
Select “PROG” in the dropdown menu to set time, month, fixed day or schedule for time changeovers:
La page charge ...
La page charge ...
La page charge ...
La page charge ...
La page charge ...
La page charge ...
La page charge ...
La page charge ...
La page charge ...
La page charge ...
La page charge ...
La page charge ...
La page charge ...
La page charge ...
La page charge ...
La page charge ...
La page charge ...
La page charge ...
La page charge ...
La page charge ...
La page charge ...
La page charge ...
La page charge ...
La page charge ...
La page charge ...
La page charge ...
La page charge ...
La page charge ...
La page charge ...
La page charge ...
La page charge ...
La page charge ...
La page charge ...
La page charge ...
La page charge ...
La page charge ...
La page charge ...
La page charge ...
La page charge ...
La page charge ...
La page charge ...
La page charge ...
La page charge ...
-
 1
1
-
 2
2
-
 3
3
-
 4
4
-
 5
5
-
 6
6
-
 7
7
-
 8
8
-
 9
9
-
 10
10
-
 11
11
-
 12
12
-
 13
13
-
 14
14
-
 15
15
-
 16
16
-
 17
17
-
 18
18
-
 19
19
-
 20
20
-
 21
21
-
 22
22
-
 23
23
-
 24
24
-
 25
25
-
 26
26
-
 27
27
-
 28
28
-
 29
29
-
 30
30
-
 31
31
-
 32
32
-
 33
33
-
 34
34
-
 35
35
-
 36
36
-
 37
37
-
 38
38
-
 39
39
-
 40
40
-
 41
41
-
 42
42
-
 43
43
-
 44
44
-
 45
45
-
 46
46
-
 47
47
-
 48
48
-
 49
49
-
 50
50
-
 51
51
-
 52
52
-
 53
53
-
 54
54
-
 55
55
-
 56
56
-
 57
57
-
 58
58
-
 59
59
-
 60
60
-
 61
61
-
 62
62
-
 63
63


Bodet Seconde Date Mode d'emploi
- Catégorie
- Horloges murales
- Taper
- Mode d'emploi
- Ce manuel convient également à
dans d''autres langues
Documents connexes
-
Bodet Style II Manuel utilisateur
-
Bodet 10 Date Mode d'emploi
-
Bodet Style 5 Seconde Mode d'emploi
-
-
-
-
-
-
-