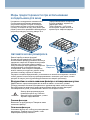
Haier WS136GDBI Manuel utilisateur
- Catégorie
- Cave à vin
- Taper
- Manuel utilisateur

WS136GDBI
Wine Cellar
User Guide
EN
IT
ES
DE
FR
NL
CZ
PL
RU
WS50GDBI
WS92GDBI
WS136GDBI
WS151GDBI

2
Heading 1
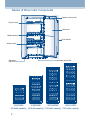
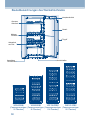
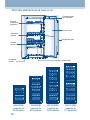
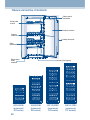
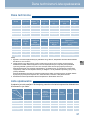
Names of Wine Cellar Components
Top wine shelf
Wooden shelf
Middle partition
Glass door
Door handle
Activated carbon lter
Adjustable
foot screw
Master control panel
WS50GDBI
(50 bottle capacity)
WS92GDBI
(92 bottle capacity)
WS136GDBI
(136 bottle capacity)
WS151GDBI
(151 bottle capacity)

3
Heading 1
EN
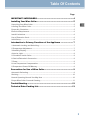
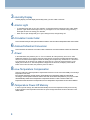
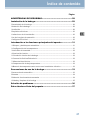
IMPORTANT SAFEGUARDS ............................................................. 4
Installing Your Wine Cellar .............................................................. 5
Unpacking Your Wine Cellar ............................................................................................. 5
Leveling Your Wine Cellar ................................................................................................. 5
Proper Air Circulation ........................................................................................................ 5
Electrical Requirement ...................................................................................................... 6
Install Limitations ............................................................................................................... 6
Use of Extension Cord ....................................................................................................... 6
Initial Setup ......................................................................................................................... 6
Introduction to Primary Functions of the Appliance ..................... 7
1.Automatic Locking and Unlocking................................................................................ 7
2.Temperature Adjustment ................................................................................................ 7
3.Humidity Display ............................................................................................................. 8
4.Interior Light .................................................................................................................... 8
5.Circulation Inside Cellar ................................................................................................. 8
6.Celsius/Fahrenheit Conversion ..................................................................................... 8
7.Power ................................................................................................................................ 8
8.Low-Temperature Compensation .................................................................................. 8
9.Temperature Power-Off Memory ................................................................................... 8
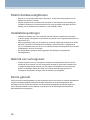
Precautions for Use of Wine Cellar ................................................. 9
Automatic Defrosting ......................................................................................................... 9
Shelving ............................................................................................................................. 10
Normal Operating Sounds You May Hear ..................................................................... 10
Proper Wine Cellar Care and Cleaning .......................................................................... 11
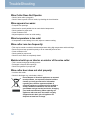
TroubleShooting ............................................................................ 12
Technical Data•Packing List ......................................................... 13
Table Of Contents
Page

4
Heading 1
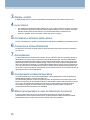
This appliance is intended to be used exclusively for the storage of wine.
When using this appliance, always exercise basic safety precautions,
including the following:
1. Read all of the instructions before using this appliance.
2. Use this appliance only for its intended purpose as described in this use
and care guide.
3. This wine cellar must be properly installed in accordance with the
installation instructions before it is used. See grounding instructions in the
installation section.
4. It is intended strictly for household use. If using it for industrial or
commercial purpose, be sure to observe the relevant norms and
regulations. This appliance can be used by children aged from 8 years and
above and persons with reduced physical, sensory or mental capabilities or
lack of experience and knowledge if they have been given supervision or
instruction concerning use of the appliance in a safe way and understand
the hazards involved. Children shall not play with the appliance. Cleaning
and user maintenance shall not be made by children without supervision.
5. The appliance must be positioned so that the plug is accessible.
6. If the supply cord is damaged, it must be replaced by the manufacturer, its
service agent or similarly qualied persons in order to avoid a hazard.
7. Keep ventilation openings, in the appliance enclosure or in the built-in
structure, clear of obstruction.
8. Do not use mechanical devices or other means to accelerate the defrosting
process, other than those recommended by the manufacturer.
9. Do not damage the refrigerant circuit.
10. Do not use electrical appliances inside the food storage compartments
of the appliance, unless they are of the type recommended by the
manufacturer.
11. If the light is damaged, it must be replaced by the manufacturer, its service
agent or similarly qualied persons in order to avoid a hazard.
12. This appliance is intended to be used exclusively for the storage of wine.
13. Risk of child entrapment. Before you throw away your old wine cellar, take
off the doors. Leave the shelves in place so that children may not easily
climb inside.
14. Do not store explosive substances such as aerosol cans with a ammable
propellant in this appliance.
IMPORTANT SAFEGUARDS

5
Heading 1
EN
Installing Your Wine Cellar
Unpacking Your Wine Cellar
1. Remove all packaging material. This includes the foam base and all adhesive tape holding
the wine cellar accessories inside and outside.
2. Inspect and remove any remains of packing, tape or printed materials before powering on the
wine cellar.
Leveling Your Wine Cellar
• Your wine cellar has four leveling legs which are located in the front and rear corners of your
wine cellar. After properly placing your wine cellar in its nal position, you can level your
wine cellar.
• Leveling legs can be adjusted by turning them clockwise to raise your wine cellar or by turning
them counterclockwise to lower your wine cellar. The wine cellar door will close easier when
the leveling legs are extended.
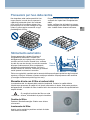
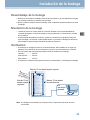
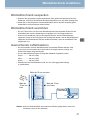
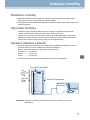
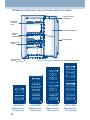
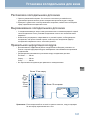
Proper Air Circulation
• To assure your wine cellar works at the maximum efciency it was designed for, you should
install it in a location where there is proper air circulation, plumbing and electrical connections.
• The following are recommended clearances around the wine cellar:
Sides ................ 4" (100mm)
Top ................... 4" (100mm)
Back ................. 4" (100mm)
• Do not over ll your wine cellar for proper wine cooling.
Note: If your wine cellar has been tilted for any reason, wait 24 hours before plugging it in.
More than
10 cm
from the top
More than
10 cm
from the right
High Low
Adjustable
foot screw
More
than
10 cm
from the rear
More than
10 cm
from
the left

6
Heading 1
Electrical Requirement
• Make sure there is a suitable power Outlet (220-240V, 15 amps outlet) with proper grounding
to power the wine cellar.
• Avoid the use of three plug adapters or cutting off the third grounding in order to
accommodate a two plug outlet. This is a dangerous practice since it provides no effective
grounding for the wine cellar and may result in shock hazard.
Install Limitations
• Do not install your wine cellar in any location not properly insulated or heated e.g. garage etc.
Your wine cellar was not laid to operate if the ambient temperature is below 10°C.
• Select a suitable location for the wine cellar on a hard even surface away from direct
sunlight or heat source e.g. radiators, baseboard heaters, cooking appliances etc. Any oor
unevenness should be corrected with the leveling legs located on the front and rear bottom
corners of the wine cellar.
• Your wine cellar is designed for free-standing installation only. It is not designed for built-in
application.
Use of Extension Cord
• Avoid the use of an extension cord because of potential safety hazards under certain
conditions. If it is necessary to use an extension cord, use only a 3-wire extension cord that
has a 3-blade grounding plug and a 3-slot outlet that will accept the plug. The marked rating
of the extension cord must be equal to or greater than the electrical rating of the appliance.
Initial Setup
Once you have plugged the unit into an electrical outlet, let the unit run for at least 30 minutes
to acclimatize itself before making any adjustments. During this time, depending on the internal
temperature, the red or white wine light will stay on for the upper compartment and red or white wine
light will stay on for the lower compartment. The LED display will show the current internal temperature.

7
Heading 1
EN
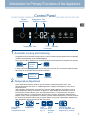
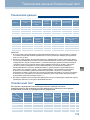
Introduction to Primary Functions of the Appliance
1.
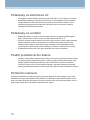
Automatic Locking and Unlocking
The appliance has an automatic locking function in order to prevent improper operation of the set operating
conditions and temperature due to accidental triggering.
The "Lock" icon will be displayed and control panel will be locked if operation is stopped for 30 seconds.
In order to unlock the panel, press the key and hold it for 3 seconds. The control panel will be unlocked.
Other keys can be operated when the panel is unlocked.
2.
Temperature Adjustment
Press "TEMP Zone Selection" briey in order to select the required temperature zone. If the
selected temperature zone turns on, "TEMP Display Zone" displays the temperature of the current
temperature zone.
After completion of temperature zone selection, press the "TEMP Up/Down" keys briey in order to
enable temperature settings. At this time, the gures on "TEMP Display Zone" ash and can be set
by pressing the "TEMP Up/Down" keys. The temperature rises by 1°C each time when the Up key
is pressed and falls by 1°C each time when the Down key is pressed. Temperature settings range is
between 5~20°C. After the temperature is selected, operation will be suspended for 3 seconds, and then
the currently set parameter will become the system default. The process of temperature adjustments in
other temperature zones is the same as that given above.
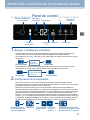
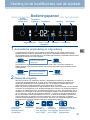
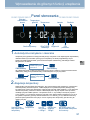
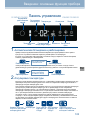
Control Panel
Press briey
to select
a temperature zone
Temperature
Press
once, rise
by 1
°C
Press
once,
decrease
by 1
°C
This will not ash
after the operation has
stopped for 3 seconds
Humidity
Temperature Zone
°F/°C
Conversion
Screen
Lock/Unlock
Temperature
Up/Down
Tem-
perature
Press the
Lock key and
hold for 3s
Unlocked Locked
3s
3s
Stop key
operation
for 30s
Unlocked Locked
3s
3s

8
Heading 1
3.
Humidity Display
Humidity display zone will display the humidity inside your wine cellar in real time.
4.
5.
Circulation Inside Cellar
Press "Circulate" briey to start up the fan inside the cellar in order to make the temperature inside more uniform.
6.
Celsius/Fahrenheit Conversion
Press "Circulate" and hold it for 3 seconds in order to activate the conversion between Celsius and Fahrenheit.
7.
Power
In the initial status, the power key is in on. If it is not locked, all of the power key icons are on. After
holding the power key for 3 seconds, the main power will turn off (power for all electrical devices inside
will be cut off and the whole appliance will be in standby) and the power key will be half-on. If the device
is off, the power can be turned on by holding the power key for 3 seconds, and then all icons on the
display screen will turn on. After the operation is stopped for 30 seconds, the display screen will be
locked. If the screen is locked, the power key icons are half-on.
8.
Low-Temperature Compensation
This wine cellar has a low-temperature compensation function so as to ensure the stability of the storage
temperature of the wine.
If the ambient temperature is lower than the set temperature, the temperature inside the cellar will fall
accordingly. If the temperature inside the cellar is lower than the shutdown temperature by 2°C(4°F), the cellar
will automatically enable the low-temperature compensation function in order to heat the cellar. If the
temperature inside reaches the set temperature, the low-temperature compensation function will be disabled.
9.
Temperature Power-Off Memory
In case of a power outage, the cellar will automatically save the set temperature. After power recovery,
it will run based on the temperature set before the power outage while other functions will return to the
default status.
Interior Light
• To complement the look of your wine collection, a soft light has been built into the wine cellar. Simply
push the "Light" button and the light comes on, push again for off. For maximum energy efciency,
leave light off when not viewing your collection.
• When door is open the light will go on. Upon closing the door, the light will go off.

9
Heading 1
EN
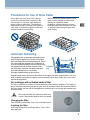
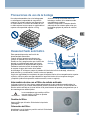
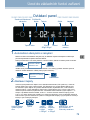
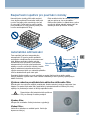
Do not place too much wine in the cellar so
as not to exceed the bearing capacity of the
wine shelves. Do not place more than three
layers of wine on each shelf. The number of
wine bottles should not exceed three layers on
each shelf, or the bearing capacity of the wine
shelves should not exceed 35kg.
Before placing the bottles inside the wine
cellar, conrm whether or not the wine
shelves are completely stable.
In addition, conrm whether or not any
bottle protrudes from the shelves in order
to prevent bottles hitting the glass door
upon closing.
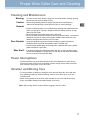
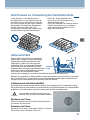
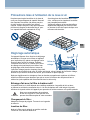
Precautions for Use of Wine Cellar
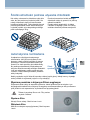
Automatic Defrosting
This appliance has an automatic defrosting function.
When using the appliance for the rst time, please
place a through-hole pin at the drainage hole. During
use, ensure that the drainage hole is unblocked so
as to force defrosting water to ow smoothly through
the drainage hole into the water receiver inside
the cellar cabin. If blocked, take the through-hole
pin inside drainage hole out, clear away
blockages inside and then put the pin back.
Regularly clean water receivers at the bottom of the upper and lower compartments; use a dry
cloth to absorb water inside the water receivers and wipe down them (clean them every three
months as suggested).
Air exchange with activated carbon lter
The way in which wines continue to mature depends on the ambient conditions. The quality of
the air is therefore decisive for preserving the wine. An activated carbon lter has been tted in
the lower area of the rear wall of the appliance to ensure that the air through put remains at an
optimum quality.
CAUTION
We recommend that you replace the lter once
a year. Filters can be obtained from your dealer.
Changing the lter:
Take the lter by the handle. Turn it to the left and remove.
Inserting the lter:
Insert with the handle in a vertical position. Turn it to the
right and insert.
Through-hole pin
Drainage
hole

10
Heading 1
Shelving
• The shelves are designed for appearance and easy cleaning. Larger bottles or Magnums can
be more easily accommodated at the cross shelves at the bottom of the cellar.
• There are some shelves for easy storage and removal of your wine.
Normal Operating Sounds You May Hear
• Boiling water, gurgling sounds or slight vibrations that are the result of the refrigerant
circulating through the cooling coils.
• The thermostat control will click when it cycles on and off.

11
Heading 1
EN
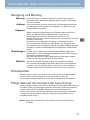
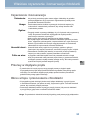
Cleaning and Maintenance
Warning:
To avoid electric shock always unplug your wine cellar before cleaning. Ignoring
this warning may result in death or injury.
Caution:
Before using cleaning products, always read and follow manufacturer's
instructions and warnings to avoid personal injury or product damage.
General:
• Prepare a cleaning solution of 3-4 tablespoons of baking soda mixed with warm
water. Use sponge or soft cloth, dampened with the cleaning solution, to wipe
down your wine cellar.
• Rinse with clean warm water and dry with a soft cloth.
• Do not use harsh chemicals, abrasives, ammonia, chlorine bleach, concentrated
detergents, solvents or metal scouring pads. SOME of these chemicals may
dissolve, damage and/or discolor your wine cellar.
Door Gaskets:
• Clean door gaskets every three months according to general instructions.
Gaskets must be kept clean and pliable to assure a proper seal.
• Petroleum jelly applied lightly on the hinge side of gaskets will keep the gasket
pliable and assure a good seal.
Wine Shelf:
If the wine shelf was accidentally sprinkled with wine or water droplets, please
use 300-400 sandpaper to polish, then use soft cloth to wipe down the sawdust.
Do not use towel or soft cloth with water.
Power Interruptions
• Occasionally there may be power interruptions due to thunderstorms or other causes.
Remove the power cord from AC outlet when a power outage occurs. When power has
been restored, replug power cord to AC outlet.
Vacation and Moving Care
• For long vacations or absences, unplug the wine cellar and clean the wine cellar and
door gaskets according to "General cleaning" section. Leave doors open, so air can
circulate inside.
• When moving always move the wine cellar vertically. Do not move with the unit lying
down, as possible damage to the sealed system could occur.
Note: After moving, wait for 24 hours before plugging in the wine cellar.
Proper Wine Cellar Care and Cleaning

12
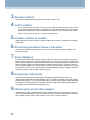
Heading 1
Wine Cellar Does Not Operate:
• Check if wine cellar is plugged in.
• Check if there is power in the AC outlet, by checking the circuit breaker.
Wine appears too warm:
• Frequent door openings.
• Allow time for recently added wine to reach desired temperature.
• Check gaskets for proper seal.
• Clean condenser coils.
• Adjust temperature control to colder setting.
Wine temperature is too cold:
• If temperature control setting is too cold, adjust to a warmer setting.
Wine cellar runs too frequently:
• This may be normal to maintain constant temperature during high temperature and humid days.
• Doors may have been opened frequently or for an extended period of time.
• Clean condenser coils.
• Check gasket for proper seal.
• Check to see if doors are completely closed.
Moisture build up on interior or exterior of the wine cellar:
• This is normal during high humidity periods.
• Prolonged or frequent door openings.
• Check door gaskets for proper seal.
Wine cellar door does not shut properly:
• Level the wine cellar.
• Check for blockages e.g. wine bottles, shelves.
Do not dispose of electrical appliances as unsorted
municipal waste, use separate collection facilities.
Contact you local government for information
regarding the collection systems available. If
electrical appliances are disposed of in landlls or
dumps, hazardous substances can leak into the
groundwater and get into the food chain, damaging
your health and well-being. When replacing old
appliances with new ones, the retailer is legally
obligated to take back your old appliance for
disposals at least free of charge.
TroubleShooting

13
Heading 1
EN
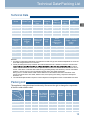
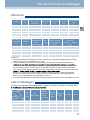
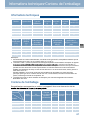
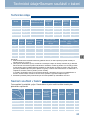
Technical Data•Packing List
Technical Data
Packing List
This appliance is being developed continuously. We reserve the right to change the components
of the wine cellar without notice.
User
Guide
Informa-
tion Kit
Top Oblique
Wine Shelf
(Optional)
Small
Wooden
Shelf
Wooden
Shelf
Through-
hole Pin
Key
WS50GDBI 1 1 0 1 1 1 2
WS92GDBI 1 1 1 1 3 1 2
WS136GDBI 1 1 1 1 5 1 2
WS151GDBI 1 1 1 0 6 1 2
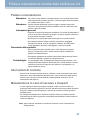
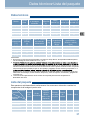
Model Climate Type
Electric Shock
Resistance
Type
Available
Capacity
(l)
Rated
Voltage (V)
Rated
Frequency
(Hz)
Input Power
(W)
WS50GDBI SN~ST I 106 220~240 50 80
WS92GDBI SN~ST I 206 220~240 50 85
WS136GDBI SN~ST I 306 220~240 50 75
WS151GDBI SN~ST I 356 220~240 50 85
Temperature
Range
(°C)
Refrigerant
(R600a)
(g)
Supply Cord
Connection
Mode
Weight
(kg)
Noise
(Acoustic
Power Level)
dB (A)
Overall Dimension
(Depth × Width ×
Height)
(mm)
5~20 22 Y 55 39 695×595×820
5~20 32 Y 76 39 695×595×1,265
5~20 50 Y 86 39 695×595×1,655
5~20 55 Y 92 39 695×595×1,850
Remarks:
1. According to international standards, if the climate is an SN~ST type, the ambient temperature for use of the
wine cellar ranges between 10°C and 38°C.
2. "Noise (acoustic power level)" marked in the technical data refers to a situation in which the semi-anechoic
, a resilient
rubber cushion as thick as 5 mm to 6 mm is placed inside. It can run for at least 30 minutes after the door is
closed. A test will be conducted after stable running (excluding startup and shutdown). Ground noise will be
tested at 1 m from the front, rear, left and right surfaces of the wine cellar respectively.
During use, it is normal that the actual noise is different from the marked noise due to the effects of the
type of wine stored in the wine cellar, ambient noise, door opening and closing, compressor startup and
shutdown, etc.
3. The standard implementation sequence of the enterprise for this appliance series is: Q/0212BGC 007-2012
Name
Quantity
Product Model

14
Intestazione 1
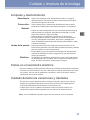
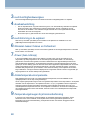
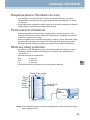
Nomi dei componenti della cantina
Ripiano
superiore
per i vini
Ripiano
in legno
Scomparto
intermedio
Sportello in vetro
Maniglia dello sportello
Filtro ai carboni attivi
Vite del piede
regolabile
Pannello di controllo
principale
WS50GDBI
(capacità:
50 bottiglie)
WS92GDBI
(capacità:
92 bottiglie)
WS136GDBI
(capacità:
136 bottiglie)
WS151GDBI
(capacità:
151 bottiglie)

15
Intestazione 1
IT
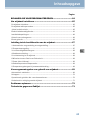
MISURE DI SICUREZZA IMPORTANTI ........................................... 16
Installazione della cantina ............................................................ 17
Disimballaggio della cantina per vini ............................................................................ 17
Messa in piano della cantina per vini ............................................................................ 17
Circolazione adeguata dell'aria ...................................................................................... 17
Requisiti elettrici .............................................................................................................. 18
Limitazioni per l'installazione ......................................................................................... 18
Utilizzo di cavi di prolunga .............................................................................................. 18
Congurazione iniziale .................................................................................................... 18
Introduzione alle funzioni fondamentali dell'apparecchio ........... 19
1.Blocco e sblocco automatico ...................................................................................... 19
2.Regolazione della temperatura ................................................................................... 19
3.Display umidità .............................................................................................................. 20
4.Luce interna ................................................................................................................... 20
5.Circolazione all'interno della cantina ......................................................................... 20
6.Conversione Celsius/Fahrenheit ................................................................................. 20
7.Alimentazione ................................................................................................................ 20
8.Compensazione bassa temperatura ........................................................................... 20
9.Memoria temperatura in caso di interruzioni di corrente ........................................ 20
Precauzioni per l'uso della cantina ............................................... 21
Sbrinamento automatico ................................................................................................. 21
Ripiani ................................................................................................................................ 22
Rumori durante il funzionamento .................................................................................. 22
Pulizia e manutenzione corrette della cantina per vini ............................................... 23
Risoluzione dei problemi ............................................................... 24
Dati tecnici•Lista di imballaggio .................................................. 25
Sommario
Pagina

16
Intestazione 1
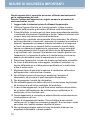
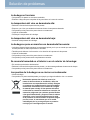
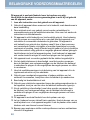
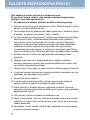
Questo apparecchio è concepito per essere utilizzato esclusivamente
per la conservazione del vino.
Durante l'utilizzo dell'apparecchio, seguire sempre le precauzioni di
sicurezza basilari, tra cui:
1. Leggere tutte le istruzioni prima di utilizzare l'apparecchio.
2. Utilizzare l'apparecchio solo per lo scopo previsto, in base a quanto
descritto nella presente guida relativa all'utilizzo e alla manutenzione.
3. Prima dell'utilizzo, la cantina per vini deve essere accuratamente installata
in conformità alle istruzioni di installazione fornite. Vedere le istruzioni sulla
messa a terra nella sezione relativa all'installazione.
4. L'apparecchio è destinato esclusivamente all'uso domestico. Se utilizzato
per scopi industriali o commerciali, assicurarsi di osservare le normative in
materia. L'apparecchio può essere utilizzato da bambini di età superiore
a 8 anni e da persone con capacità siche, sensoriali o mentali ridotte,
oppure con mancanza di esperienza e conoscenza, solo se sorvegliati
o se adeguatamente istruiti in merito all'utilizzo sicuro dell'apparecchio
e agli eventuali rischi connessi. Non lasciare che i bambini giochino con
l'apparecchio. Le operazioni di pulizia e di manutenzione non dovranno
essere volte da bambini senza la supervisione di un adulto.
5. Posizionare l'apparecchio in modo che la spina sia facilmente accessibile.
6. Se il cavo di alimentazione è danneggiato, contattare il produttore, un
tecnico dell'assistenza o un'altra persona qualicata per la sostituzione,
al ne di evitare rischi.
7. Mantenere libere da ostruzioni le aperture di ventilazione nell'involucro
dell'apparecchio o nella struttura a incasso.
8. Non utilizzare nessuno strumento per accelerare il processo di
sbrinamento, ad eccezione di quelli consigliati dal produttore.
9. Non danneggiare il circuito del refrigeratore.
10. Non utilizzare apparecchi elettrici nei vani di conservazione degli alimenti,
ad eccezione di quelli di tipo consigliato dal produttore.
11. In caso di danneggiamento, la spia deve essere sostituita dal produttore,
da un tecnico dell'assistenza o da un'altra persona qualicata per la
sostituzione, al ne di evitare rischi.
12. Questo apparecchio è concepito per essere utilizzato esclusivamente per
la conservazione del vino.
13. Rischio di intrappolamento bambini. Prima di disfarsi di una vecchia
cantina per vini, è opportuno rimuovere gli sportelli. Non rimuovere i ripiani
per evitare che i bambini possano introdursi all'interno.
14. Non conservare sostanze esplosive come bombolette di aerosol con
propellente inammabile in questo prodotto.
MISURE DI SICUREZZA IMPORTANTI

17
Intestazione 1
IT
Installazione della cantina
Disimballaggio della cantina per vini
1. Rimuovere tutto il materiale di imballaggio, inclusa la base in schiuma e il nastro adesivo che
ssa gli accessori all'interno e all'esterno.
2. Ispezionare e rimuovere eventuali rimanenze dell'imballaggio o di nastro e qualsiasi materiale
stampato prima dell'accensione della cantina.
Messa in piano della cantina per vini
• La cantina è dotata di quattro piedini per la messa in piano, posizionati agli angoli anteriori
e posteriori. Una volta stabilita la posizione denitiva, effettuare la messa in piano.
• I piedini possono essere regolati, ruotandoli in senso orario per alzare la cantina e in senso
antiorario per abbassarla. L'estensione completa dei piedini agevola la chiusura e l'apertura
dello sportello.
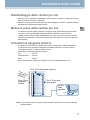
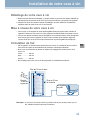
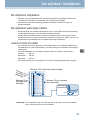
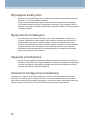
Circolazione adeguata dell'aria
• Per garantire il funzionamento ottimale della cantina, è necessario installare l'apparecchio
in una posizione che consenta un'adeguata circolazione dell'aria e in cui siano presenti
i collegamenti elettrici e l'impianto idraulico corretti.
• Spazio libero consigliato attorno alla cantina:
Lati ........................... 100 mm
Piano superiore ........ 100 mm
Retro ........................ 100 mm
• Non sovraccaricare la cantina per consentire un corretto raffreddamento del vino.
Nota: se, per qualche motivo, la cantina è stata inclinata, attendere 24 ore prima di collegarla
all'alimentazione.
Più di
10 cm
dalla parte superiore
Più di
10 cm
dalla
parte destra
Stringere Allentare
Vite del
piede
regolabile
Più di
10 cm
dalla parte
posteriore
Più di
10 cm
dalla parte
sinistra

18
Intestazione 1
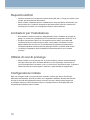
Introduzione alle funzioni fondamentali dell'apparecchio
Requisiti elettrici
• Vericare la presenza di una presa di corrente idonea (220-240 V, 15 amp) con messa a terra
corretta, per l'alimentazione della cantina.
• Evitare l'utilizzo di adattatori tripolari o l'adattamento a una presa bipolare eliminando il polo
della messa a terra. Si tratta di un'operazione pericolosa poiché elimina la messa a terra
necessaria per la cantina, con conseguente pericolo di scosse elettriche.
Limitazioni per l'installazione
• Non installare la cantina in luoghi non adeguatamente isolati o riscaldati, ad esempio nei
garage. La cantina non è predisposta per il funzionamento a temperature inferiori ai 10°C.
• Scegliere una posizione idonea, con una supercie solida e piana, non esposta alla
luce diretta del sole e lontana da fonti di calore, come radiatori, riscaldatori a zoccolo,
apparecchiature per la cucina ecc. Eventuali dislivelli del pavimento possono essere
compensati regolando i piedini posizionati agli angoli anteriori e posteriori della cantina.
• La cantina è progettata per essere installata solo autonomamente e non in strutture
a incasso.
Utilizzo di cavi di prolunga
• Evitare l'utilizzo di cavi di prolunga che, in alcune condizioni, possono causare potenziali
rischi per la sicurezza. Se è necessario utilizzare un cavo di prolunga, utilizzare solo un
cavo di prolunga trifase con spina a 3 poli e un'uscita a tre 3 che accetti la presa. La tensione
elettrica del cavo deve essere uguale o superiore a quella indicata per l'apparecchio.
Configurazione iniziale
Dopo aver collegato l'unità a una presa elettrica, lasciarla in funzione per almeno 30 minuti per
stabilizzare la temperatura, prima di procedere con le regolazioni desiderate. Durante tale intervallo
di tempo, a seconda della temperatura interna, la luce dei vini rossi o bianchi resterà accesa per
lo scomparto superiore e l'altra resterà accesa per lo scomparto inferiore. Sul display LED verrà
visualizzata la temperatura interna corrente.

19
Intestazione 1
IT
Introduzione alle funzioni fondamentali dell'apparecchio
1.
Blocco e sblocco automatico
L'apparecchio è dotato di una funzione di blocco automatico per impedire eventuali malfunzionamenti
relativi a condizioni e temperatura di esercizio, dovuti a un'attivazione indesiderata.
Se il funzionamento viene interrotto per un periodo di 30 secondi, verrà visualizzata l'icona "Blocco" e il
pannello di controllo si bloccherà.
Per sbloccare il pannello, tenere premuto il tasto per 3 secondi. In tal modo, il pannello si controllo verrà
sbloccato e sarà possibile utilizzare anche gli altri tasti.
2.
Regolazione della temperatura
Premere "Selezione zona di temperatura" per selezionare la zona di temperatura desiderata. Attivando
la zona di temperatura selezionata, sul "Display zona di temperatura" verrà visualizzata la temperatura
della zona attuale.
Dopo aver completato la selezione della zona di temperatura, premere i tasti "Aumenta/riduci
temperatura" per attivare le impostazioni relative alla temperatura. A questo punto, le immagini
visualizzate sul "Display zona di temperatura" iniziano a lampeggiare in modo che possano essere
selezionate premendo i tasti "Aumenta/riduci temperatura". La temperatura aumenta di 1°C ogni volta
che si preme il tasto Aumenta, mentre diminuisce di 1°C ogni volta che si seleziona il tasto Riduci.
L'intervallo delle impostazioni relative alla temperatura è compreso tra i 5~20°C. Dopo aver selezionato
la temperatura, il funzionamento dell'apparecchio viene sospeso per 3 secondi, quindi il parametro
attualmente impostato diventa il valore predenito del sistema. La procedura di regolazione della
temperatura per le altre zone è uguale a quella descritta in precedenza.
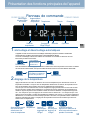
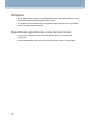
Pannello di controllo
Premere
brevemente per
selezionare una
zona di temperatura
Temperatura
Premere una volta
per aumentare
la temperatura di
1
SDgrC
Premere una
volta per ridurre
la temperatura
di 1
SDgrC
Questa indicazione
non lampeggia dopo
un'interruzione di 3 secondi
dell'operazione
Umidità Zona di temperatura Conversione da
SDgrF a SDgrC
Blocco/sblocco
dello schermo
Aumenta/riduci
temperatura
Temperatura
Tenere premuto il
tasto Blocco per
3 secondi
Sbloccato Bloccato
3s
3s
Tasto interruzione
dell'operazione
per 30 secondi
Sbloccato Bloccato
3s
3s
Ciclo dell’ari
Alimentazione
Spia

20
Intestazione 1
3.
Display umidità
Il display umidità di zona consente di visualizzare l'umidità presente nella cantina in tempo reale.
4.
Luce interna
• Per migliorare la presentazione della collezione di vini, la cantina è dotata di una tenue luce interna.
Per accenderla o spegnerla è sufciente premere l'apposito pulsante. Per un risparmio energetico
ottimale, lasciare la luce spenta quando non è necessario illuminare la collezione di vini.
• Aprendo lo sportello, la luce si accende. Chiudendolo, la luce si spegne.
5.
Circolazione all'interno della cantina
Premere "Circolazione" per avviare la ventola presente nella cantina e stabilizzare la temperatura interna.
6.
Conversione Celsius/Fahrenheit
Per attivare la conversione tra gradi Celsius e gradi Fahrenheit, tenere premuto il tasto "Circolazione"
per 3 secondi.
7.
Alimentazione
Lo stato iniziale del tasto di alimentazione è attivo. Se non è bloccato, tutte le icone relative al tasto di
alimentazione sono attive. Dopo aver premuto il tasto di alimentazione per 3 secondi, l'alimentazione
principale verrà disattivata (l'alimentazione di tutti i dispositivi elettrici deve essere scollegata e l'intera
apparecchiatura deve trovarsi in modalità standby), mentre il tasto di alimentazione sarà parzialmente
attivo. Se il dispositivo è disattivato, è possibile attivare l'alimentazione tenendo premuto il pulsante per
3 secondi, quindi tutte le icone dello schermo saranno attivate. Dopo l'interruzione dell'operazione per
30 secondi, lo schermo del display verrà bloccato. Se lo schermo è bloccato, le icone relative al tasto di
alimentazione saranno attive parzialmente.
8.
Compensazione bassa temperatura
La cantina è dotata di una funzione di compensazione di bassa temperatura in modo da garantire la
stabilità della temperatura di conservazione del vino.
Se la temperatura ambiente è inferiore a quella impostata, la temperatura interna della cantina verrà
ridotta di conseguenza. Se la temperatura all'interno della cantina è inferiore alla temperatura di arresto
di 2°C (4°F), verrà abilitata automaticamente la funzione di compensazione di bassa temperatura
per riscaldare la cantina. Se la temperatura interna raggiunge quella impostata, la funzione di
compensazione bassa temperatura verrà disabilitata.
9.
Memoria temperatura in caso di interruzioni di corrente
In caso di un'interruzione di corrente, la temperatura impostata per la cantina verrà salvata
automaticamente. Dopo il ripristino della corrente, la cantina funzionerà alla temperatura impostata
prima dell'interruzione, mentre le altre funzioni torneranno allo stato predenito.
La page charge ...
La page charge ...
La page charge ...
La page charge ...
La page charge ...
La page charge ...
La page charge ...
La page charge ...
La page charge ...
La page charge ...
La page charge ...
La page charge ...
La page charge ...
La page charge ...
La page charge ...
La page charge ...
La page charge ...
La page charge ...
La page charge ...
La page charge ...
La page charge ...
La page charge ...
La page charge ...
La page charge ...
La page charge ...
La page charge ...
La page charge ...
La page charge ...
La page charge ...
La page charge ...
La page charge ...
La page charge ...
La page charge ...
La page charge ...
La page charge ...
La page charge ...
La page charge ...
La page charge ...
La page charge ...
La page charge ...
La page charge ...
La page charge ...
La page charge ...
La page charge ...
La page charge ...
La page charge ...
La page charge ...
La page charge ...
La page charge ...
La page charge ...
La page charge ...
La page charge ...
La page charge ...
La page charge ...
La page charge ...
La page charge ...
La page charge ...
La page charge ...
La page charge ...
La page charge ...
La page charge ...
La page charge ...
La page charge ...
La page charge ...
La page charge ...
La page charge ...
La page charge ...
La page charge ...
La page charge ...
La page charge ...
La page charge ...
La page charge ...
La page charge ...
La page charge ...
La page charge ...
La page charge ...
La page charge ...
La page charge ...
La page charge ...
La page charge ...
La page charge ...
La page charge ...
La page charge ...
La page charge ...
La page charge ...
La page charge ...
La page charge ...
La page charge ...
La page charge ...
La page charge ...
-
 1
1
-
 2
2
-
 3
3
-
 4
4
-
 5
5
-
 6
6
-
 7
7
-
 8
8
-
 9
9
-
 10
10
-
 11
11
-
 12
12
-
 13
13
-
 14
14
-
 15
15
-
 16
16
-
 17
17
-
 18
18
-
 19
19
-
 20
20
-
 21
21
-
 22
22
-
 23
23
-
 24
24
-
 25
25
-
 26
26
-
 27
27
-
 28
28
-
 29
29
-
 30
30
-
 31
31
-
 32
32
-
 33
33
-
 34
34
-
 35
35
-
 36
36
-
 37
37
-
 38
38
-
 39
39
-
 40
40
-
 41
41
-
 42
42
-
 43
43
-
 44
44
-
 45
45
-
 46
46
-
 47
47
-
 48
48
-
 49
49
-
 50
50
-
 51
51
-
 52
52
-
 53
53
-
 54
54
-
 55
55
-
 56
56
-
 57
57
-
 58
58
-
 59
59
-
 60
60
-
 61
61
-
 62
62
-
 63
63
-
 64
64
-
 65
65
-
 66
66
-
 67
67
-
 68
68
-
 69
69
-
 70
70
-
 71
71
-
 72
72
-
 73
73
-
 74
74
-
 75
75
-
 76
76
-
 77
77
-
 78
78
-
 79
79
-
 80
80
-
 81
81
-
 82
82
-
 83
83
-
 84
84
-
 85
85
-
 86
86
-
 87
87
-
 88
88
-
 89
89
-
 90
90
-
 91
91
-
 92
92
-
 93
93
-
 94
94
-
 95
95
-
 96
96
-
 97
97
-
 98
98
-
 99
99
-
 100
100
-
 101
101
-
 102
102
-
 103
103
-
 104
104
-
 105
105
-
 106
106
-
 107
107
-
 108
108
-
 109
109
-
 110
110


Haier WS136GDBI Manuel utilisateur
- Catégorie
- Cave à vin
- Taper
- Manuel utilisateur
dans d''autres langues
- italiano: Haier WS136GDBI Manuale utente
- English: Haier WS136GDBI User manual
- español: Haier WS136GDBI Manual de usuario
- Deutsch: Haier WS136GDBI Benutzerhandbuch
- русский: Haier WS136GDBI Руководство пользователя
- Nederlands: Haier WS136GDBI Handleiding
- polski: Haier WS136GDBI Instrukcja obsługi
- čeština: Haier WS136GDBI Uživatelský manuál