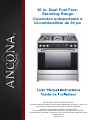
Ancona AN-2202 Manuel utilisateur
- Catégorie
- Cuisinières
- Taper
- Manuel utilisateur

®
30 in. Dual Fuel Free-
Standing Range
Cuisinière autoportante à
bi-combustible de 30 po
IMPORTANT SAFETY INSTRUCTIONS
Carefully read the important information regarding installation, safety and
maintenance. Keep these instructions for future reference.
INSTRUCTIONS IMPORTANTES DE SÉCURITÉ
Lire attentivement l’importante information concernant la sécurité,
l’installation et l’entretien. Conserver ces instructions pour référence future.
MAAN2202-03
2019-01-18


1
RANGE SAFETY ....................................................................................................... 2
The Anti-tip Bracket .................................................................................................. 4
PARTS AND FEATURES .......................................................................................... 8
CONTROL PANEL.................................................................................................... 10
Display ......................................................................................................................10
Start ..........................................................................................................................10
Cancel ......................................................................................................................10
Cook Time ..............................................................................................................10
Start Time ................................................................................................................11
Oven Lights ..............................................................................................................11
Timer ........................................................................................................................12
Settings ....................................................................................................................12
Control Lock .............................................................................................................15
COOKTOP USE ....................................................................................................... 15
Power Failure ...........................................................................................................16
Cookware ................................................................................................................16
OVEN USE .............................................................................................................. 18
Oven Temperature Control .....................................................................................18
Oven Modes ............................................................................................................18
Convection ..............................................................................................................22
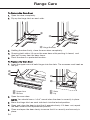
RANGE CARE ........................................................................................................
General Cleaning.....................................................................................................29
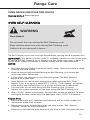
Oven Self-Cleaning ................................................................................................31
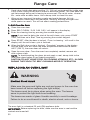
Replacing an Oven Light ........................................................................................32
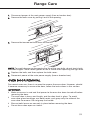
Oven Door Removal ...............................................................................................33
TROUBLESHOOTING ........................................................................................... 35
Solving Baking and Roasting Problems .................................................................35
Cooktop .................................................................................................................36
Oven .......................................................................................................................37
CIRCUIT DIAGRAM .............................................................................................. 38
Table of Contents

2
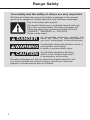
Your safety and the safety of others are very important.
We have provided many important safety messages in this manual
and on your appliance. Always read and obey all safety messages.
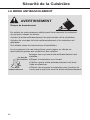
DANGER
WARNING
CAUTION
This is the safety alert symbol.
This symbol alerts you to potential hazards that can
kill or hurt you and others. All safety messages will
follow the safety alert symbol and either the word
“DANGER,” “WARNING” or “CAUTION.”
These words mean:
An imminently hazardous situation. You
could be killed or seriously injured if
you don’t immediately follow instructions.
A potentially hazardous situation which, if
not avoided, could result
in death or serious bodily injury.
A potentially hazardous situation
which, if not avoided, may result
in moderate or minor injury.
All safety messages will tell you what the potential hazard is, tell
you how to reduce the chance of injury, and tell you what can
happen if the instructions are not followed.
Range Safety

3
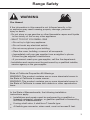
If the information in this manual is not followed exactly, a fire
or explosion may result causing property damage, personal
injury or death.
- Do not store or use gasoline or other flammable vapors and liquids
in the vicinity of this or any other appliance.
- WHAT TO DO IF YOU SMELL GAS
•
Do not try to light any appliance.
•
Do not touch any electrical switch.
• Do not use any phone in your building.
•
Clear the room, building, or area of all occupants.
•
Immediately call your gas supplier from a neighbor’s phone.
Follow the gas supplier’s instructions.
•
If you cannot reach your gas supplier, call the fire department.
- Installation and service must be performed by a qualified installer,
service agency or the gas supplier.
State of California Proposition 65 Warnings:
WARNING: This product contains one or more chemicals known to
the State of California to cause cancer.
WARNING: This product contains one or more chemicals known to
the State of California to cause birth defects or other reproductive
harm.
In the State of Massachusetts, the following installation
instructions apply:
•
Installations and repairs must be performed by a qualified or
licensed contractor, plumber, or gasfitter qualified or licensed by
the State of Massachusetts.
•
If using a ball valve, it shall be a T-handle type.
•
A flexible gas connector, when used, must not exceed 3 feet.
Range Safety
WARNING
Fire Hazard

4
Range Safety
THE ANTI-TIP BRACKET
A child or adult can tip the range and be killed.
Connect anti-tip bracket to rear range foot.
Reconnect the anti-tip bracket, if the range is moved.
See the installation instructions for details.
Failure to follow these instructions can result in death or serious
burns to children and adults.
Making sure the anti-tip bracket is installed:
•
Slide range forward.
•
Look for the anti-tip bracket securely
attached to floor.
•
Slide range back so rear range foot is under
anti-tip bracket.
Anti-Tip
Bracket
Range
Foot
WARNING
Tip Over Hazard

5
IMPORTANT SAFETY
INSTRUCTIONS
WARNING: To reduce the risk of fire, electrical shock, injury
to persons, or damage when using the range, follow basic
precautions, including the following:
•
WARNING: TO REDUCE THE
RISK OF TIPPING OF THE
RANGE, THE RANGE MUST
BE SECURED BY PROPERLY
INSTALLED ANTI-TIP
DEVICES. TO CHECK IF THE
DEVICES ARE INSTALLED
PROPERLY, SLIDE RANGE
COMPLETELY FORWARD,
LOOK FOR ANTI-TIP
BRACKET SECURELY
ATTACHED TO THE FLOOR
BEHIND THE RANGE AND
SLIDE RANGE COMPLETELY
BACK UNTIL THE REAR
RANGE FOOT IS UNDER
ANTI-TIP BRACKET.
•
WARNING: NEVER use this
appliance as a space heater
to heat or warm the room.
Doing so may result in
carbon monoxide poisoning
and overheating of the oven.
•
WARNING: NEVER cover
any slots, holes or passages
in the oven bottom or cover
an entire rack with materials
such as aluminum foil. Doing
so blocks airflow through the
oven and may cause carbon
monoxide poisoning.
Aluminum foil linings may also
trap heat, causing a fire
hazard.
•
CAUTION: Do not store
items of interest to children in
cabinets above a range or on
the back guard of a range
– children climbing on the
range to reach items could
be seriously injured.
•
Do Not Leave Children Alone
– Children should not be left
alone or unattended in area
where the range is in use.
They should never be
allowed to sit or stand on
any part of the range.
•
Wear Proper Apparel – Loose-
fitting or hanging garments
should never be worn while
using the range.
•
User Servicing – Do not
repair or replace any part of
the range unless
specifically recommended
in the manual. All other
servicing should be referred
to a qualified technician.
•
Storage in or on the Range –
Flammable materials
should not be stored in an
oven or near surface units.
•
Do Not Use Water on Grease
Fires – Smother fire or
flame or use dry chemical
or foam-type extinguisher.
•
Use Only Dry Potholders –
Moist or damp potholders
on hot surfaces may result
in burns from steam. Do
not let potholder touch hot
heating elements. Do not
use a towel or other bulky
cloth.
Range Safety

6
IMPORTANT SAFETY
INSTRUCTIONS
•
DO NOT TOUCH SURFACE
UNITS OR AREAS NEAR
UNITS – Surface units may
be hot even though they
are dark in color. Areas near
surface units may become
hot enough to cause burns.
During and after use, do not
touch, or let clothing or
other flammable materials
contact surface units or
areas near units until they
have had sufficient time to
cool. Among those areas are
the cooktop and surfaces
facing the cooktop.
•
Never Leave Surface Units
Unattended at High Heat
Settings – Boil over causes
smoking and greasy
spillovers that may ignite.
•
Glazed Cooking Utensils –
Only certain types of glass,
glass/ceramic, ceramic,
earthenware, or other glazed
utensils are suitable for
range-top service without
breaking due to the sudden
change in temperature.
•
Utensil Handles Should Be
Turned Inward and Not
Extend Over Adjacent
Surface
Units – To reduce the risk of
burns, ignition of flammable
materials, and spillage due
to unintentional contact with
the utensil, the handle of a
utensil should be positioned
so that it is turned inward,
and does not extend over
adjacent surface units.
•
Clean Cooktop With Caution –
If a wet sponge or cloth is used
to wipe spills on a hot cooking
area, be careful to avoid steam
burn. Some cleaners can
produce noxious fumes if
applied to a hot surface.
•
Use Care When Opening Door
– Let hot air or steam escape
before removing or
replacing food.
•
Do Not Heat Unopened
Food Containers – Build-up
of pressure may cause
container to burst and result
in injury.
•
Keep Oven Vent
Ducts Unobstructed.
•
Placement of Oven Racks –
Always place oven racks in
desired location while oven
is cool. If rack must be
moved while oven is hot, do
not let potholder contact hot
heating element in oven.
•
DO NOT TOUCH HEATING
ELEMENTS OR INTERIOR
SURFACES OF OVEN –
Heating elements may be hot
even though they are dark in
color. Interior surfaces of an
oven become hot enough to
cause burns. During and after
use, do not touch, or let
clothing or other flammable
materials contact heating
elements or interior surfaces
of oven until they have had
sufficient time to cool. Other
surfaces of the appliance may
become hot enough to cause
burns – among these surfaces
are oven vent openings and
surfaces near these openings,
oven doors, and windows of
oven doors.
Range Safety

7
IMPORTANT SAFETY
INSTRUCTIONS
•
Proper Installation – The
range, when installed, must
be electrically grounded in
accordance with local codes
or, in the absence of local
codes, with the National
Electrical Code, ANSI/NFPA
70. In Canada, the range must
be electrically grounded in
accordance with Canadian
Electrical Code. Be sure the
range is properly installed
and grounded by a qualified
technician.
•
Disconnect the electrical
supply before servicing
the appliance.
•
Injuries may result from the
misuse of appliance doors
or drawers such as
stepping, leaning, or sitting
on the doors or drawers.
•
Maintenance – Keep range
area clear and free from
combustible materials,
gasoline, and other
flammable vapors and
liquids.
•
Top burner flame size
should be adjusted so it
does not extend beyond the
edge of the cooking utensil.
For self-cleaning ranges –
•
Do Not Clean Door Gasket –
The door gasket is essential
for a good seal. Care should
be taken not to rub, damage,
or move the gasket.
•
Do Not Use Oven Cleaners –
No commercial oven cleaner
or oven liner protective
coating of any kind should
be used in or around any
part of the oven.
•
Clean Only Parts Listed in
Manual.
For units with ventilating hood –
•
Clean Ventilating Hoods
Frequently – Grease should
not be allowed to accumulate
on hood or filter.
•
When flambé cooking
under the vent hood, turn
the fan on.
READ AND SAVE THESE
INSTRUCTIONS
Range Safety
•
CAUTION: DO NOT LEAVE
FOOD OR COOKING
UTENSILS, ETC., IN OVEN
DURING THE PYROLYTIC
SELF-CLEANING MODE OF
OPERATION

8
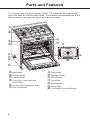
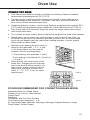
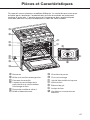
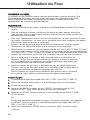
This manual covers several different models. The range you have purchased
may have some or all of the items listed. The locations and appearances of the
features shown here may not match those of your model.
a
b
c
d
i
j
e
f
g
h
l
l
k
m
a Backsplash
b Burner Grates
c Control Panel
d Oven Door Lock Latch and
Light Switch
e Model and Serial Number Plate
f Anti-tip Bracket
g Door Hinge
h Storage Drawer
i Door Gasket
j Oven Rack
k Broil Element
l Oven Light
m Convection Fan and Element
Parts and Features

9
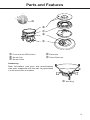
MAX
MIN
a
b
c
d
e
OFF
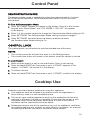
a Control Knob O Position
b Burner Cap
c Burner Head
d Electrode
e Flame Detector
Accessory
Both flat-bottom wok pans and round-bottom
wok pans supported with the wok ring (provided)
can be used with all models.
a
a Wok Ring
Parts and Features

10
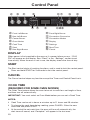
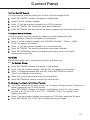
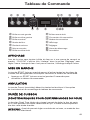
Convection Conversion
Start
Cancel
1 2 3
4 5 6
7 8
0
9
Timer Light
Convection
Bake Broil Roast
Bake Broil
Warm/
Proof
Self
Clean
Baked
Goods
Meats
Other
Foods
Cook
Time
Start
Time
Settings
MAX
OFF
MIN
MAX
OFF
MIN
MAX
OFF
MIN
MAX
OFF
MIN
MAX
OFF
MIN
MIN
MAX
Power
Simmer
a b
c
e
f
d
g h
i j
k
l n
m
a Front Left Burner
b Rear Left Burner
c Center Burner
d Oven Modes
e Cook Time
f Start
g Rear Right Burner
h Front Right Burner
i Convection Conversion
j Convection Modes
k Display
l Settings
m Start Time
n Cancel
DISPLAY
When power is first supplied to the oven or if a power failure occurs, “12:00
PM” will appear on the display. See “Clock” in the “Settings” section to set
time-of-day. When the oven is not in use, the display shows the time-of-day.
START
The Start control starts all cooking functions, and is used to lock the control panel.
•
Press and hold START for 3 seconds to lock the control panel.
CANCEL
The Cancel control stops any function except the Timer and Control Panel Lock.
COOK TIME
(REQUIRED FOR SOME OVEN MODES)
The Cook Time feature allows the oven to be set to cook for a set length of time,
and then turn off automatically.
IMPORTANT: You must select an Oven Mode before you can set a Cook Time.
Control Panel
NOTES:
•
Cook Time can be set in hours or minutes up to 11 hours and 59 minutes.
•
To change the cook time during cooking, press CANCEL. Enter the new
cook time and press START.
•
At the end of the set cook time, the oven will turn off automatically, the
alert tone will sound, and “Complete” will appear in the text area.

11
To Set Cook Time:
1. Select cooking mode.
2. Select temperature.
3. Press COOK TIME. Enter the desired cook time by pressing the number keypad.
4. Press START. The oven will begin to preheat.
START TIME
This feature allows you to set the oven to turn on at a later time.
IMPORTANT: The clock must be set to the correct time-of-day.
To Set Start Time:
1. Select an Oven Mode.
2. Set Temperature.
3. Set Cook Time.
4. Press START TIME.
5. Press the number keypad to enter the desired start time. “Press START”
will appear the display. If Cook Time was not set, the control will prompt
you to “Set Cook Time Before Start Time.”
6. Place the food in the oven and close the door.
7. Press START. Start Time will begin counting down until it reaches the set
time-of-day.
NOTE: At the end of Cook Time, the oven will turn off automatically, an
alert tone will sound and “Complete” will appear in the display.
OVEN LIGHTS
The oven lights turn On automatically when the oven door is opened, and turn
Off automatically when the oven door is closed.
•
Press the Light button to turn On/Off the oven lights when the oven
door is closed.
NOTE: The oven lights will not come on during the Self-Clean cycle.
Control Panel
WARNING
Food Poisoning Hazard
Do not let food sit in oven more than one hour before or after
cooking. Doing so can result in food poisoning or sickness.

12
TIMER
The Timer can be set in hours or minutes up to 11 hours and 59 minutes, and
counts down the set time.
NOTES:
•
The Timer does not start or stop the oven.
•
The Timer must be set before setting cook or start time.
To Set the Timer :
1. Press TIMER. “Set TIMER” will appear in the display, and the clock will
display “--:--.”
2. Use the number keypad to enter the desired time. The set time “--:-- ”
will appear in the display.
3. Press TIMER to start the timer. The time begins counting down.
“TIMER Started” will appear upper right corner of the display.
4. The last minute of the timer countdown will be displayed in seconds.
5. At the end of the set time, unit will beep for one minute, and “TIMER
End” will be displayed.
6. Press TIMER to clear the display.
To Cancel the Timer:
1. Press TIMER once to cancel the timer.
SETTINGS
FAHRENHEIT AND CELSIUS
1. The temperature is factory preset to Fahrenheit, but can be changed to Celsius.
2. Press SETTINGS. Options will appear the display.
3. Press 2 in the number keypad “TEMP UNIT” and “FAHRENHEIT ”.
PRESS1: DEGREE F/C” will appear the text display area.
4. Press the “1” number keypad to change the temperature unit setting.
5. Press SETTING. The temperature units have been changed.
6. Press SETTING then follow the display prompts to return to Fahrenheit.
TONES
Tones are audible signals, indicating the following basic functions:
Number of Tones
Indicates
1
Valid Press Function has
been entered
Oven is Preheated
2
Invalid Touch
Pad Press
4
End of Cycle End of Timer
Control Panel
•
A reminder beep will sound until the Timer is canceled.

13
To Turn On/Off Sound:
The oven sound is factory preset for On but can be changed to Off.
1. Press SETTINGS. Options will appear in the display.
2. Press 3 on the number keypad.
3. Press “1” on the number keypad to turn OFF the sound.
4. Press SETTINGS. The sound has now been turned off.
5. Press SETTINGS, and then follow the display prompts to return the sound to On.
To Adjust Sound Volume:
The oven sound is factory preset for High but can be changed to Low.
1. Press Settings. Options will appear in the display.
2. Press 4 on the number keypad, and “SOUND VOLUME” “Press 1: HIGH/
LOW” will appear the display.
3. Press “1” on the number keypad to turn the sound Low.
4. Press SETTINGS. The sound volume has now been changed.
5. Press SETTINGS then follow the display prompts to return the sound
volume setting to High.
CLOCK
Before setting the clock, make sure the oven and Timer are
off.
To Set the Clock:
1. Press SETTINGS. Options will appear in the display.
2. Press 1 on the number keypad. “AM or PM” will appear in the display.
3. Press 1 to toggle between AM and PM, Press SETTINGS to confirm.
“Clock” will appear in the display.
4. Press the number keypad to enter the time-of-day.
5. Press SETTINGS to confirm and set the time-of-day.
To Change the Clock to 24-Hour Format:
1. The clock can be set to display time in a 12-hour or 24-hour format. The clock is
factory preset for the 12-hour format.
2. Press SETTINGS. Options will appear in the display. Press 5 in the number
keypad, and “12/24 HOUR” and “12”. “PRESS1: 12/24” will appear in the
display text area.
3. Press 1 on the number keypad to change the 12/24-hour setting to 24-hour.
4. Press SETTINGS. The 12/24-hour setting has been changed.
Control Panel

14
SABBATH MODE
The Sabbath function is designed for those whose religious observances
require that certain features and modes are disabled. The range is factory
preset with Sabbath Mode Off.
To Turn On/Off Sabbath mode:
1.
Make sure the oven is turned Off, and the meat probe is not plugged in.
NOTE: Sabbath mode cannot be set when the oven is On. The oven will
not recognize the meat probe while in Sabbath mode.
2. Press SETTINGS > Press START > Press 7, and then press 1 to (toggle
between ON / OFF).
3. Press SETTINGS again to enable Sabbath mode. The only cooking function
that works while the oven is set to Sabbath mode is Bake.
To Bake While the Oven is in Sabbath Mode:
1. Press BAKE.
2. Enter the desired oven temperature by pressing the numbered keypad.
3. After selecting Bake and a Temperature, you have the option to set a Cook Time
and Start Time before pressing START. See “Cook Time” and “Start Time.”
4. Press START. Pressing Start activates Sabbath mode.
Only the Cancel control is functional.
•
Press CANCEL to exit Sabbath mode. Press SETTINGS again to turn off Sabbath
mode and resume normal oven operation. The display will return to the
time-of-day.
NOTE: If there is a power failure while the oven is in Sabbath mode, the
oven will resume in Sabbath mode when power is restored.
OVEN AUTO-OFF FEATURE
•
The oven can be programmed to turn off automatically either 12 or 24 hours
after the oven turns on.
•
The oven control is factory preset to automatically turn off the oven 12
hours after the oven turns on.
To change the Auto-off feature from 12 hours to 24 hours:
1. Press SETTINGS.
2.
Press “5” on the number keypad. “12/24 hour” and “12” will appear in the display.
3. Press “1” on the number keypad to turn the 12 to 24hour.
4. Press SETTINGS to confirm. The Auto-off feature has been changed to 24 hours.
NOTE: If you want to change the Auto-off feature back to 12 hours,
press SETTINGS, and then follow the display prompts.
Control Panel

15
DEMONSTRATION MODE
The demonstration mode is intended for sales floor demonstrations. It should
be Off for normal operation. While demonstration mode is active, the oven
will not heat.
To Turn Off Demonstration Mode:
1. Press SETTINGS. Options will appear in the display. Press 9 in the number
keypad, and “Demo Mode” and “ON. PRESS 1 :ON/ OFF” will appear
in the display.
2. Press 1 in the number keypad to change the Demonstration Mode setting to Off.
3. Press SETTINGS. The Demonstration Mode setting has been changed.
4. Press SETTINGS, and then follow the display prompts to return
the Demonstration Mode setting to On.
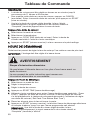
CONTROL LOCK
The control panel can be locked to avoid unintended use of the oven.
NOTES:
•
The control cannot be locked if the oven is in the Settings menu.
•
The current time of day will remain in the display when the control is locked.
To Lock Control:
1. Make sure the oven(s) is not in use and Kitchen Timer is not running.
2. Press and hold START for 3 seconds or until “LOCKED” appears in the
display. “LOCKED” will remain lit in the display.
3. To Unlock Control:
4. Press and hold START for 3 seconds or until “LOCKED” scrolls in the display.
Read the instructions before installing or using this appliance.
1. This appliance shall be installed in accordance with the regulations in
force and only used in a well-ventilated space.
2. The use of a gas-cooking appliance results in the production of heat and
moisture in the room in which it is installed. Ensure that the kitchen is well
ventilated: keep natural ventilation holes open or install a mechanical
ventilation device (mechanical extractor hood).
3. Prolonged intensive use of the appliance may call for additional ventilation,
for example opening of a window, or more effective ventilation, for example
increasing the level of mechanical ventilation where present.
Control Panel
Cooktop Use

16
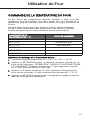
IGNITION AND OPERATION OF THE BURNERS
In order to ignite a burner, push down on the knob while rotating it
counterclockwise, until the knob indicator is aligned with the ignite icon .
For models with a safety valve - Once the flame is lit, hold the knob depressed
for about 3-4 seconds until the device keeps the burner automatically lit. If the
burner fails to ignite, wait one minute for the gas to dissipate before attempting
to reignite. Adjust the flame intensity by rotating the knob counterclockwise
from MAX (maximum) to MIN (minimum).
To turn off the burner, rotate the knob clockwise until the indicator on the
knob is aligned with OFF.
POWER FAILURE
In case of prolonged power failure, the surface burners can be lit manually. Hold
a lit match near a burner and turn knob counterclockwise until the indicator is
aligned with MAX. After the burner is lit, turn knob to desired setting.
In the case of unintentional flame extinguishing, the safety valve intervenes
by shutting off the gas to the burners.
The electric igniter must not be actuated for longer than 15 seconds. Should
the burner not light, or should the burner be unintentionally turned off,
immediately close the burner, and wait at least 1 minute before repeating.
Once ignited, adjust the flame as desired.
For lower gas consumption and a better result, use saucepans with a diameter
matching the diameter of the burner, to avoid the flame coming up around the
sides of the saucepan. See the Container Table. Use only flat-bottomed pans.
As soon as liquid starts to boil, turn the flame down to a level sufficient to
maintain boiling.
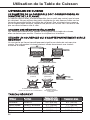
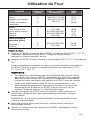
COOKWARE
MATCH PAN DIAMETER TO FLAME SIZE
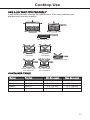
The flame should be the same size as the bottom of the pan or smaller. Do not use
small pans with high flame settings as the flames can lick up the sides of the pan.
Oversize pans that span two burners are placed front to rear, not side to side.
USE BALANCED PANS
Pans must sit level on the cooktop grate without rocking. Center the pan over
the burner.
Cooktop Use

17
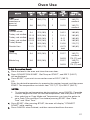
USE A LID THAT FITS PROPERLY
A well-fitting lid helps shorten the cooking time. Flat, heavy bottom pans
provide even heat and stability.
BALANCED PAN
UNBALANCED PAN
CONVEX
(ROUNDED)
CONCA. E
(HOLLOW)
FLAME TOO LARGE USE LIDS THAT
FIT PROPERLY
FOR PAN SIZE
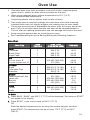
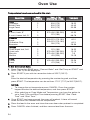
CONTAINER TABLE
Burner Position Min Saucepan Max Saucepan
Auxiliary Rear R 3.5" (9.0 cm) 6.3" (16 cm)
Semi-rapid Rear L and Center 5.1" (13 cm) 7.1" (18 cm)
Rapid Front R 5.9" (15 cm) 10.2" (26 cm)
Triple ring Front L 8.3" (21 cm) 10.2" (26 cm)
Cooktop Use

18
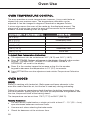
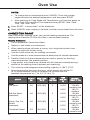
OVEN TEMPERATURE CONTROL
The oven provides accurate temperatures; however, it may cook faster or
slower than your previous oven. The temperature calibration can be
adjusted. It can be changed in degrees Fahrenheit or degrees Celsius.
A minus sign means the oven will be cooler by the displayed amount. The
absence of a minus sign means the oven will be warmer by the displayed
amount. Use the following chart as a guide.
ADJUSTMENT °F (ADJUSTMENT °C) COOKS FOOD
10°F (6°C) a little more
20°F (12°C) moderately more
30°F (17°C) much more
-10°F (-6°C) a little less
-20°F (-12°C) moderately less
-30°F (-17°C) much less
To Adjust Oven Temperature Calibration:
1. The adjustment can be set between 30°F (18°C) and -30°F (-18°C).
2. Press SETTINGS. Options will appear in the display. Press 8 in the number
keypad. “CALIBRATION”. PRESS 3 TO INCREASE/ PRESS 6 TO
DECREASE” will scroll in the display.
3. Press 3 in the number keypad to increase or the 6 in the number
keypad to decrease the temperature in 5°F (3°C) increments.
4.
Press SETTINGS to save the adjustment and exit the Temperature Calibration
menu.
OVEN MODES
BAKE
Baking is cooking with heated air. Both upper and lower elements in the
oven are used to heat the air, but the fan is used only during preheating.
Follow the recipe or convenience food directions for baking temperature, time
and rack position. Baking time will vary with the temperature of ingredients and
the size, shape and finish of the baking utensil.
The temperature can be set from 170°F (77°C) to 500°F (260°C).
General Guidelines
•
For best results, bake food on a single rack with at least 1" - 1½" (2,5 - 4 cm)
space between bakeware and oven walls.
•
Use one rack when selecting the bake mode.
•
Check for doneness at the minimum time.
Oven Use
La page est en cours de chargement...
La page est en cours de chargement...
La page est en cours de chargement...
La page est en cours de chargement...
La page est en cours de chargement...
La page est en cours de chargement...
La page est en cours de chargement...
La page est en cours de chargement...
La page est en cours de chargement...
La page est en cours de chargement...
La page est en cours de chargement...
La page est en cours de chargement...
La page est en cours de chargement...
La page est en cours de chargement...
La page est en cours de chargement...
La page est en cours de chargement...
La page est en cours de chargement...
La page est en cours de chargement...
La page est en cours de chargement...
La page est en cours de chargement...
La page est en cours de chargement...
La page est en cours de chargement...
La page est en cours de chargement...
La page est en cours de chargement...
La page est en cours de chargement...
La page est en cours de chargement...
La page est en cours de chargement...
La page est en cours de chargement...
La page est en cours de chargement...
La page est en cours de chargement...
La page est en cours de chargement...
La page est en cours de chargement...
La page est en cours de chargement...
La page est en cours de chargement...
La page est en cours de chargement...
La page est en cours de chargement...
La page est en cours de chargement...
La page est en cours de chargement...
La page est en cours de chargement...
La page est en cours de chargement...
La page est en cours de chargement...
La page est en cours de chargement...
La page est en cours de chargement...
La page est en cours de chargement...
La page est en cours de chargement...
La page est en cours de chargement...
La page est en cours de chargement...
La page est en cours de chargement...
La page est en cours de chargement...
La page est en cours de chargement...
La page est en cours de chargement...
La page est en cours de chargement...
La page est en cours de chargement...
La page est en cours de chargement...
La page est en cours de chargement...
La page est en cours de chargement...
La page est en cours de chargement...
La page est en cours de chargement...
La page est en cours de chargement...
La page est en cours de chargement...
La page est en cours de chargement...
La page est en cours de chargement...
La page est en cours de chargement...
La page est en cours de chargement...
La page est en cours de chargement...
-
 1
1
-
 2
2
-
 3
3
-
 4
4
-
 5
5
-
 6
6
-
 7
7
-
 8
8
-
 9
9
-
 10
10
-
 11
11
-
 12
12
-
 13
13
-
 14
14
-
 15
15
-
 16
16
-
 17
17
-
 18
18
-
 19
19
-
 20
20
-
 21
21
-
 22
22
-
 23
23
-
 24
24
-
 25
25
-
 26
26
-
 27
27
-
 28
28
-
 29
29
-
 30
30
-
 31
31
-
 32
32
-
 33
33
-
 34
34
-
 35
35
-
 36
36
-
 37
37
-
 38
38
-
 39
39
-
 40
40
-
 41
41
-
 42
42
-
 43
43
-
 44
44
-
 45
45
-
 46
46
-
 47
47
-
 48
48
-
 49
49
-
 50
50
-
 51
51
-
 52
52
-
 53
53
-
 54
54
-
 55
55
-
 56
56
-
 57
57
-
 58
58
-
 59
59
-
 60
60
-
 61
61
-
 62
62
-
 63
63
-
 64
64
-
 65
65
-
 66
66
-
 67
67
-
 68
68
-
 69
69
-
 70
70
-
 71
71
-
 72
72
-
 73
73
-
 74
74
-
 75
75
-
 76
76
-
 77
77
-
 78
78
-
 79
79
-
 80
80
-
 81
81
-
 82
82
-
 83
83
-
 84
84
-
 85
85


Ancona AN-2202 Manuel utilisateur
- Catégorie
- Cuisinières
- Taper
- Manuel utilisateur
dans d''autres langues
- English: Ancona AN-2202 User manual
Documents connexes
Autres documents
-
Cosmo 305DFSC Manuel utilisateur
-
Cosmo COS-965AGC Mode d'emploi
-
Haier HCW3285AES Manuel utilisateur
-
Cosmo COS-305AERC Manuel utilisateur
-
Whirlpool WGG755S0BH Le manuel du propriétaire
-
-
IKEA IGS900DS01 Le manuel du propriétaire
-
-
Maytag MGR8880AS0 Le manuel du propriétaire
-