Thermador PAKNOBLUWG Guide d'installation
- Taper
- Guide d'installation

Page. 1
PRO GRAND Knob Kit
Knob Replacement
This accessory knob kit contains knobs to be used with
many different configurations of Professional Series Pro
Grand
®
ranges.
To exchange knobs, make sure that the OFF marking on
the knob is facing up, while gently pushing the knob on or
pulling the knob off the control’s shaft. Each knob should
install easily. If a replacement knob is not fitting properly,
it is likely that an incorrect position has been chosen. After
installation, verify that each knob turns freely, and that the
markings on each knob correspond to the graphics or
indicators on the control panel.
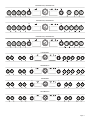
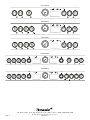
Knob Identification
The following illustrations identify each knob type
contained within this kit. Locate the position of each knob
type by its corresponding number on the diagram that
matches the control panel on your appliance. Some knobs
will be used in more than one location and other knobs
may not be used at all; this depends upon your range
model.
State of California Proposition 65 Warning:
: WARNING
This product can expose you to chemicals including
vinyl chloride, which is known to the State of California
to cause cancer and birth defects or other
reproductive harm. For more information go to
www.P65Warnings.ca.gov.
9 CAUTION
DO NOT force knobs onto control shafts. Failure to
install and operate knobs properly may result in
personal injury and damage to the appliance.
Remplacement de boutons
Ce jeu de boutons optionnels contient des boutons à
utiliser avec plusieurs configurations différentes de
Professional Series Pro Grand
®
ranges.
Au moment de remplacer les boutons, assurez-vous que la
marque OFF du bouton est orienté vers le haut et retirez-
le ou poussez-le doucement sur la tige du bouton de
commande. Chaque bouton devrait être facile à installer.
Si le bouton de remplacement ne s'installe pas facilement,
vous essayez probablement de l'insérer dans la mauvaise
position. Après l'installation, assurez-vous que chaque
bouton tourne librement et que les marques de chaque
bouton correspondent aux graphiques ou indicateurs du
tableau de commande.
Identification des boutons
Les illustrations suivantes illustrent tous les types de
boutons contenus dans le jeu. Repérez la position de
chaque type de bouton par le numéro du diagramme qui
correspond au tableau de commande de votre appareil.
Selon le modèle de cuisinière, certains boutons peuvent
être utilisés à plus d'un endroit, alors que d'autres
peuvent ne pas servir du tout.
Avertissement de la Proposition 65 de l'État de la
Californie :
: AVERTISSEMENT
Ce produit vous exposez à des produits chimiques,
comme du chlorure de vinyle, reconnus par l'État de la
Californie comme causant le cancer, des
malformations congénitales ou d'autres effets nocifs
sur la reproduction. Pour de plus amples
renseignements, consulter
www.P65Warnings.ca.gov.
9 ATTENTION
NE forcez PAS pour insérer les boutons de commande
à leur place. Le fait de ne pas installer et utiliser les
boutons adéquatement peut entraîner des blessures
personnelles et endommager l'appareil.
La page est en cours de chargement...
La page est en cours de chargement...

Page. 4
PRD364WLGU | PRD364WLGC
PRD366WGU | PRD366WGC
PRD484WCGU | PRD484WCGC
PRD486WDGU | PRD486WDGC
PRD486WIGU | PRD486WIGC
PRD486WLGU | PRD486WLGC
PRD48WCSGU | PRD48WCSGC
300
250
200
100
BROIL
CLEAN
400
450
500
350
1 11
5
58
11
3
300
250
200
100
BROIL
CLEAN
400
450
500
350
1 11
2
27
14
3
300
250
200
100
BROIL
CLEAN
400
450
500
350
1
5
5
4
2
2
8
11
3
8
12
300
250
200
100
BROIL
CLEAN
400
450
500
350
1
1
4
1
2
2
8
11
3
8
12
300
250
200
100
BROIL
CLEAN
400
450
500
350
1 611 7228
11
3 8
12
300
250
200
100
BROIL
CLEAN
400
450
500
350
1
1
5
5
1
2
2
8
11
3
8
12
300
250
200
100
BROIL
CLEAN
400
450
500
350
1
5
5
4
2
2
8
11
3
13
14

Page. 5
PRD48WDSGU | PRD48WDSGC
PRD48WISGU | PRD48WISGC
PRD48WLSGU | PRD48WLSGC
PRD606WCG
PRD606WCSG
PRD606WEG
PRD606WESG
300
250
200
100
BROIL
CLEAN
400
450
500
350
1
1
4
1
2
2
8
11
3
13
14
300
250
200
100
BROIL
CLEAN
400
450
500
350
1 611 7228
11
3
13
14
300
250
200
100
BROIL
CLEAN
400
450
500
350
1
1551
2
2
8
11
3
13
14
300
250
200
100
BROIL
CLEAN
400
450
500
350
1
1
4
5
5
1
2
2
8
11
3
8
12
300
250
200
100
BROIL
CLEAN
400
450
500
350
1
1
4
5
5
1
2
2
8
11
3
13
14
300
250
200
100
BROIL
CLEAN
400
450
500
350
1
1
4
4
1
2
2
8
11
3
8
12
300
250
200
100
BROIL
CLEAN
400
450
500
350
1
1
4
4
1
2
2
8
11
3
13
14

Page. 6
PRG364WDG
PRG364WLG
PRG366WG
PRG486WDG
PRG486WLG
300
250
200
100
BROIL
CLEAN
400
450
500
350
13 4 8
9
11
300
250
200
100
BROIL
CLEAN
400
450
500
350
1 11558
9
3
300
250
200
100
BROIL
CLEAN
400
450
500
350
1 11
2
28
9
3
300
250
200
100
BROIL
CLEAN
400
450
500
350
1
1
4
1
2
2
8
9
3
8
10
300
250
200
100
BROIL
CLEAN
400
450
500
350
1
155 1
2
2
8
9
3
8
10
1901 MAIN STREET, SUITE 600, IRVINE, CA 92614 // 800-735-4328 // WWW.THERMADOR.COM
© 2018 BSH Home Appliances Corporation
9001227791
-
 1
1
-
 2
2
-
 3
3
-
 4
4
-
 5
5
-
 6
6


Thermador PAKNOBLUWG Guide d'installation
- Taper
- Guide d'installation
dans d''autres langues
Documents connexes
-
Thermador PARKB36GY Guide d'installation
-
Thermador PARKB36HY Guide d'installation
-
-
Thermador PAKNOBLUWR Guide d'installation
-
Thermador PD366BS/08 Le manuel du propriétaire
-
-
-
-
Thermador PRD48NCSGU Le manuel du propriétaire
-