Little Tikes 625954M Manuel utilisateur
- Catégorie
- Jouets
- Taper
- Manuel utilisateur
Ce manuel convient également à
La page est en cours de chargement...

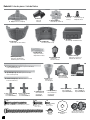
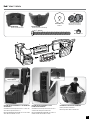
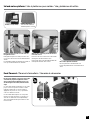
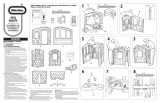
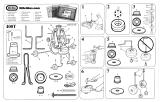
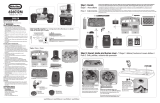
Parts List / Liste des pieces / Lista de Partesv
F. Footboard (1)
Pied de lit (1) / Pie de la cama (1)
G. Headboard (1)
Tête de lit (1) / Cabecera (1)
H. Side Rail (2)
Rail Latéral (2) / Baranda lateral (2)
I. Mattress platform (2)
Plate-forme de matelas (2)
Plataforma para el colchón (2)
A. Lid (1) / Couvercle (1) / Tapa (1)
M. Top horizontal post (1) / Montant supérieur horizontal (1)
Poste horizontal superior (1)
O. Bottom vertical post (1) / Montant inférieur vertical (1)
Poste vertical inferior (1)
N. Top vertical post (1) / Montant supérieur vertical (1)
Poste vertical superior (1)
S. Cross section FRONT (1)
Croix AVANT (1)
Cruceta DELANTERA (1)
T. Cross section back (1)
Croix arrière (1)
Cruceta POSTERIOR (1)
U. Coupling front (1)
Raccord avant (1)
Acoplamiento
DELANTERO (1)
V. Coupling back (1)
Raccord arrière (1)
Acoplamiento
POSTERIOR (1)
W. End cap FRONT ( 2)
Embout AVANT (2)
Tapón DELANTERO (2)
X. End cap BACK ( 2)
Embout ARRIÈRE (2)
Tapón POSTERIOR (2)
R. Sail (1) / Voile (1) / Vela (1)
P. Crows nest (1 )
Nid de pie (1)
Torre de vigía (1)
Q. Mast support (1 )
Support de mât (1)
Soporte del mástil (1)
B. Cannon (1)
Canon (1)
Cañón (1)
C. Steering wheel (1)
Gouvernail (1) / Volante (1)
D. Hub-bolt (1)
Boulon (1)
Perno (1)
E. Hub-pin (1)
Goujon de moyeu (1)
Clavija de cubo (1)
J. Reading lamp (1)
Lampe de lecture (1)
Lámpara de lectura (1)
K. Reading lantern (2)
Lanterne (2)
Farol de lectura (2)
L. Cannon covers (6)
Capuchons pour canon (6)
Cubiertas de cañones (6)
Bolt - 3
1
/2" (8.89 cm) / Vis - 8,89 cm / Perno - 8,89 cm
Screw - 2" (5.08 cm) / Vis - 5,08 cm / Perno - 5,08 cm
Washer / Roundelle
Arandela
Nut / Écrou
Tuerca
Screw
3
/4" (1.9 cm)
Vis - 1,9 cm
Perno - 1,9 cm
Screw
1
/2" (1.27 cm)
Vis - 1,27 cm
Perno - 1,27 cm
Brown bolt cover ( 2)
Capuchon de boulon brun (2)
Cubierta de perno marrón (2)
(x4)
(x4)
(x4)
(x4)
(x4)
(x4)
(x23)
2

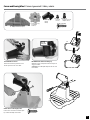
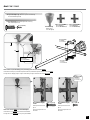
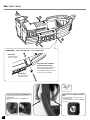
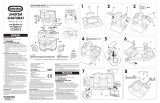
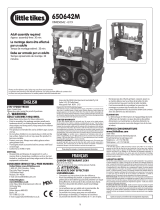
Cannon and Steering Wheel / Canon et gouvernail / Cañón y volante
BE SURE flat side of hub bolt is facing up.
ASEGÚRESE que el lado plano del perno de cubo esté
hacia arriba.
Attach cannon to lid using (4) screws.
Fije el cañón a la tapa con 4 tornillos.
Insert hub bolt into cannon.
Inserte el perno de cubo en el cañón.
(4)
3
/4" (1,9 cm)
(4)
3
/4" (1,9 cm)
D. Bolt (1)
Boulon (1)
Perno (1)
E. Hub pin (1)
Goujon de moyeu (1)
Clavija de cubo (1)
C. Steering wheel (1)
Gouvernail (1)
Volante (1)
B. Cannon (1)
Canon (1)
Cañón (1)
A. Lid (1) / Couvercle (1) / Tapa (1)
B
D
Flat side
Côte plat
Lado plano
1
2
3
4
A
B
3

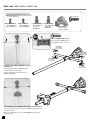
Cannon and Steering Wheel / Canon et gouvernail / Cañón y volante
Place steering wheel onto hub bolt.
Coloque el volante en el perno de cubo.
Insert hub pin and hit into place.
Inserte la clavija de cubo y golpéela para
asentarla en su sitio.
E
C
D
Secure using a
washer as shown.
Asegúrelo con una
arandela tal y como
se muestra.
C
E
4

S. Cross section FRONT
Cruceta DELANTERA
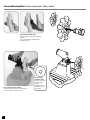
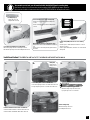
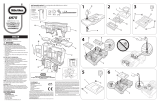
Mast / Mât / Mástil
1
2
5
4
3
1
2
3
4
(5)
3
/4" (1,9 cm)
(5)
3
/4" (1,9 cm)
(4)
1
/2" (1,27 cm)
Secure BACK using (5)
screws.
Fije la cruceta posterior con
5 tornillos.
(4)
1
/2" (1,27 cm)
Secure BACK using (4)
screws.
Fije la cruceta posterior con
4 tornillos.
Place crows nest, horizontal top post, vertical top post onto cross section FRONT.
Coloque la torre de vigía, el poste superior horizontal y el superior vertical en la cruceta DELANTERA.
M. Top horizontal post (1) /
Poste horizontal superior (1)
N. Top vertical post (1) /
Poste vertical superior (1)
S. Cross section FRONT (1)
Cruceta DELANTERA (1)
T. Cross section BACK (1)
Cruceta POSTERIOR (1)
P. Crows nest (1)
Torre de vigía (1)
M
P
N
N
M
P
T
S
T
a. b.
Place cross section BACK onto assembled posts.
Coloque la cruceta POSTERIOR en los postes ya montados.
5
#1 screwdriver
Cross section BACK
Cruceta POSTERIOR
Cross section FRONT
Cruceta DELANTERA

2x
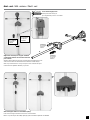
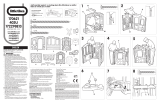
Mast - cont. / Mât - contenu / Mástil - cont.
1
(2)
3
/4" (1,9 cm)
(4)
3
/4" (1,9 cm)
Secure each BACK using (1) screw.
Fije cada tapón posterior con 1 tornillo.
W
Q
Sandwich end cap FRONT and BACK around end of
horizontal post.
Inserte los extremos del poste horizontal entre los
TAPONES y POSTERIORES.
O. Bottom vertical post (1) /
Poste vertical inferior (1)
U. Coupling FRONT (1)
Acoplamiento
DELANTERO (1)
V. Coupling BACK (1)
Acoplamiento
POSTERIOR (1)
W. End cap FRONT (2)
Tapón DELANTERO (2)
X. End cap BACK (2)
Tapón POSTERIOR (2)
Q. Mast support (1)
Soporte del mástil (1)
Slide mast support onto post. BACK of mast support should be facing up.
Deslice el soporte del mástil en el poste. El lado POSTERIOR del soporte debe
quedar hacia arriba.
X
W
X
6
end cap FRONT
Tapón DELANTERO
end cap FRONT
Tapón DELANTERO
end cap BACK
Tapón POSTERIOR
end cap BACK
Tapón POSTERIOR
X
X

Mast - cont. / Mât - contenu / Mástil - cont.
1
(2)
3
/4" (1,9 cm)
Secure back using (2) screws.
Fije el acoplamiento posterior con 2 tornillos.
V
Align bottom vertical post to top post. Sandwich
coupling front and back around end of horizontal
post as shown.
Alinee el poste vertical inferior con el poste superior. Inserte el extremo del poste
vertical entre el acoplamiento delantero y el posterior.
Slide mast support down over assembled coupling.
Deslice el soporte del poste hacia abajo para que quede encima del acoplamiento ensamblado.
U
2
7
Coupling front
Acoplamiento
DELANTERO
Coupling back
Acoplamiento
POSTERIOR
V. Coupling BACK
Acoplamiento
POSTERIOR
O
O
U. Coupling FRONT
Acoplamiento
DELANTERO

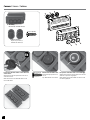
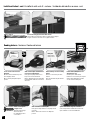
Line up the notch in the cannon cover to the notch
on the cannon.
Alinee la muesca en la cubierta del cañón con la
muesca del cañón.
Cannons / Canons
/
Cañónes
L. Cannon covers (6)
Cubiertas de cañones (6)
H. Side Rail (2)
Rail Latéral (2) / Baranda lateral (2)
(6)
3
/4" (1,9 cm)
(6)
3
/4" (1,9 cm)
Attach each cover with a screw.
Fije cada cubierta con un tornillo.
Line up notch on decal to notch on cover and apply.
Alinee la muesca en la calcomanía con la muesca de
la cubierta y aplíquela.
H
H
L
L
L
L
L
L
6x
8

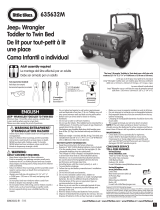
Bed / Volant
/
Volante
“L” Left
Gauche / Izquierdo
F. Footboard (1)
Pied de lit (1) / Pie de la cama (1)
G. Headboard (1)
Tête de lit (1) / Cabecera (1)
Nut / Écrou / Tuerca
Washer / Roundelle
Arandela
Brown bolt cover ( 2)
Capuchon de boulon brun (2)
Cubierta de perno marrón (2)
(x4)
(x4)
(x4)
(4)
3
1
/2
" (8,89 cm)
“R” Right
Droit / Derecho
Assemble the side rail marked "L" to the headboard
side marked "L".
Monte la baranda lateral marcada con la “L” en el lado
de la cabecera marcado con la “L”.
Assemble the side rail marked "R" to the
headboard side marked "R".
Monte la baranda lateral marcada con la “R” en el
lado de la cabecera marcado con la “R”.
G
F
H
H
9
Assemble the footboard to the headboard.
Monte el pie de la cama en la cabecera.

Bed / Volant
/
Volante
1
2
3
4
10
Cap covers are installed on the OUTSIDE of bed.
Les petits capuchons se positionnent sur le côté
EXTÉRIEUR du lit.
Las cubiertas se instalan en el EXTERIOR de la
cama.
Washer and nut are installed on the INSIDE
of bed.
L’écrou et la rondelle se positionnent sur le
côté INTÉRIEUR du lit.
La tuerca y arandela se instalan en el INTERIOR
de la cama.
Pliers or wrench
Pince ou clé
Pinzas o llave
outside of bed
exterior de la cama
inside of bed
interior de la cama
Overview • Vue d’ensemble • Vista detallada
Secure side rails to headboard
and footboard in 4 locations.
Fije las barandas laterales a la cabecera
y el pie de la cama en 4 lugares.

J. Reading lamp (1)
Lampe de lecture (1)
Lámpara de lectura (1)
Unscrew the back plate from reading lamp.
Dévissez la plaque arrière de la lampe de lecture.
Desatornille la placa posterior de la lámpara de lectura.
Back plate. Needed for securing mast to bed.
Plaque arrière. Nécessaire à la fixation du mât sur
le lit.
Placa posterior. Necesaria para asegurar el mástil
a la cama.
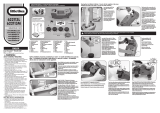
Install 3 "AA" (LR03) batteries. Re-secure battery
cover.
Installez 3 piles « AAA » (LR03). Remettez le couvercle
des piles en place.
Instale 3 pilas “AAA” (LR03). Vuelva a colocar la cubierta
de las pilas.
Attach back plate using (2) screws.
Attachez chaque capuchon avec (2) vis.
Fije la placa posterior con 2 tornillos.
Remove battery cover from reading lamp.
Retirez le couvercle des piles de la lampe de
lecture.
Retire la cubierta de las pilas de la lámpara de
lectura.
Install assembled mast into back of headboard.
Installez le mât assemblé sur l'arrière de la tête de lit.
Instale el mástil ensamblado detrás de la cabecera.
Position back plate on front of headboard.
Positionnez la plaque arrière sur l’avant de la tête de lit.
Coloque la placa posterior en el frente de la cabecera.
Back plate
Plaque arrière
Placa posterior
Attach reading lamp.
Attachez la lampe de lecture.
Fije la lámpara de lectura.
a. c.b.
d.
Install mast to bed / Installez le mât sur le lit
/
Instalación del mástil en la cama
11
#1 screwdriver
(2)
2" (5,08 cm)
To assemble mast to bed, you will need the BACK, BLACK PLATE from the reading lamp.
Pour fixer le mât sur le lit, vous aurez besoin de la plaque NOIRE ARRIÈRE de la lampe de lecture.
Para montar el mástil en la cama necesita la placa POSTERIOR NEGRA de la lámpara de lectura.

Install mast to bed - cont. / Installez le mât sur le lit - contenu.
/
Instalación del mástil en a cama - cont.
(2)
2" (5,08 cm)
Reading lanterns / Lanterne
/
Faroles de lectura
Secure mast using (2) screws in locations shown.
Fixez le mât au moyen de (2) vis dans les emplacements indiqués.
Asegure el mástil con 2 tornillos en los lugares indicados.
1
2
Slide each back plate downward and
remove from reading lantern.
Faites glisser la plaque arrière vers le
bas pour la retirer de la lanterne.
Deslice cada placa posterior hacia abajo
para quitarla de cada uno de los faroles
de lectura.
Install 3 "AAA" (LR03) batteries. Re-
attach battery cover.
Installez 3 piles « AAA » (LR03).
Remettez le couvercle des piles en place.
Instale 3 pilas “AAA” (LR03). Vuelva a
colocar la cubierta de las pilas.
Remove battery cover from reading
lantern.
Retirez le couvercle des piles de la
lanterne.
Retire la cubierta de las pilas del farol
de lectura.
Back plate
Plaque arrière
Placa posterior
Attach each back plate
using (2) screws.
Attachez chaque plaque
arrière avec (2) vis.
Fije cada placa posterior
con 2 tornillos.
(4)
3
/4" (1,9 cm)
1
2
Tighten each lantern using a #1 screwdriver.
Serrez chaque lanterne à l’aide d'un tournevis N°1.
Ajuste cada farol con un destornillador Nº 1.
Slide each lantern onto back plate.
Faites glisser chaque lanterne sur sa plaque arrière
respective.
Deslice cada uno de los faroles en cada placa
posterior.
12
Loosen screw in order to remove
back plate.
Desserrez la vis de manière à pouvoir
retirer la plaque arrière.
Afloje el tornillo para quitar la placa
posterior.
2x
#1 screwdriver
Tournevis N°1
DEstornillador N° 1

Sail and matress platforms / Voile et plateformes
pour matelas /
Vela y plataformas del colchón
I. Mattress platform (2)
Plate-forme de matelas (2)
Plataforma para el colchón (2)
R. Sail (1) / Voile (1) / Vela (1)
Decal Placement / Placement d’autocollants
/
Colocación de calcomanías
3
Decals must be applied to a clean, dry surface. Wipe
clean with a dry rag before application. Remove
air from under decals by applying pressure to the
decals starting from the center, and work towards
edges.
Les autocollants doivent être appliqués sur une surface
propre et sèche. Essuyez avec un chiffon sec avant
l’application. Retirez l’air sous les autocollants en
appliquant une pression sur ceux-ci, en partant du
centre et en allant vers les bords.
Las calcomanías deben aplicarse en una superficie
limpia y seca. Limpie la superficie con un trapo seco
antes de colocarlas. Quite el aire atrapado debajo
de las calcomanías haciendo presión desde el centro
hacia los bordes.
Flag facing forward, loop the non-velcro side over
the right side of mast.
En dirigeant l’inscription vers l’avant, enroulez le côté
non recouvert de velcro autour du montant latéral droit
du mât.
Con la bandera mirando hacia delante pase el lado sin
velcro por encima del lado derecho del mástil.
Wrap the velcro side of flag around the left side of
mast. Velcro closed.
Enroulez le côté velcro de la voile autour du montant
latéral gauche du mât. Refermez le velcro.
Enrolle el lado de velcro de la bandera alrededor del
lado izquierdo del mástil. Cierre el velcro.
Place matress platforms inside bed.
Placez les plateformes de matelas dans le lit.
Coloque las plataformas del colchón adentro de la
cama.
4
1
2
2x
13

LIMITED WARRANTY
The Little Tikes Company makes fun, high quality toys. We warrant to the original purchaser
that this product is free of defects in materials or workmanship for one year * from the date of
purchase (dated sales receipt is required for proof of purchase). At the sole election of The Little
Tikes Company, the only remedies available under this warranty will be either replacement of the
defective part of the product or refund the purchase price of the product. This warranty is valid only if
the product has been assembled and maintained per the instructions. This warranty does not cover
abuse, accident, cosmetic issues such as fading or scratches from normal wear, or any other cause
not arising from defects in material and workmanship.
U.S.A and Canada: For warranty service or replacement part information, please visit our website
at www.littletikes.com, call 1-800-321-0183 or write to: Consumer Service, The Little Tikes Company,
2180 Barlow Road, Hudson OH 44236, U.S.A. Some replacement parts may be available for purchase
after warranty expires—contact us for details.
Outside U.S.A and Canada: Contact place of purchase for warranty service. This warranty gives
you specic legal rights, and you may also have other rights, which vary from country/state to
country/state. Some countries/states do not allow the exclusion or limitation of incidental or
consequential damages, so the above limitation or exclusion may not apply to you. *The warranty
period is three (3) months for daycare or commercial purchasers.
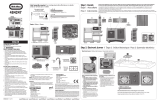
FRANÇAIS
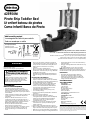
LIT ENFANT BATEAU DE PIRATES
AVERTISSEMENT
DANGER DE COINCEMENT/
D’ÉTRANGLEMENT
AVERTISSEMENT:
LE MONTAGE DOIT ÊTRE EFFECTUÉ PAR UN
ADULTE.
/8
/4
/4
INFORMATIONS SUR LA SÉCURITÉ DES PILES :
9 piles alcalines « AAA » (LR03) (non incluses)
requises : 3 pour les lampes de lecture, 3 autres
pour les lanternes (2). (Les piles peuvent être
remplacées par des piles rechargeables.)
REMARQUE:
ENTRETIEN :
SERvICE CONSOMMATEURS
www.littletikes.fr
MINIMUM SIZE allowed is .2” high
Updated 12.2.11 per Paul Madan (new spacing)
Imprimé aux Etats-Unis.
© The Little Tikes Company, et MGA Entertainment company. LITTLE TIKES® est une marque de
commerce de Little Tikes aux États-Unis et dans d’autres pays. Tous les logos, noms, caractères,
similitudes, images, slogans et apparence d’emballage sont la propriété de Little Tikes. Merci de
conserver cette adresse et cet emballage car ils contiennent des informations importantes. Le
contenu, y compris les spécications et les couleurs, peut varier par rapport aux illustrations de
l’emballage. Instructions incluses. Merci d’enlever l’emballage, y compris les étiquettes, liens et ls
cousus, avant de donner ce jouet à un enfant.
GARANTIE
The Little Tikes Company fabrique des jouets amusants de qualité exceptionnelle. Nous garantissons
à l’acheteur d’origine que ce produit est exempt de vices de matériau ou de fabrication pendant une
année* à compter de sa date d’achat (le reçu d’achat daté est exigé comme preuve d’achat). Au
titre de la présente garantie, la seule responsabilité de The Little Tikes Company et le seul recours se
limitent au remplacement des pièces défectueuses du produit ou au remboursement du prix d’achat
du produit. La présente garantie est valable uniquement si le produit a été assemblé et entretenu
conformément aux instructions fournies. La présente garantie ne couvre ni les dommages résultant
d’une utilisation abusive ou d’un accident, ni l’apparence esthétique telle les décolorations ou les
rayures dues à l’usure normale ou à toute autre cause ne relevant pas de vices de matériau ou de
fabrication.
États-Unis et Canada : Pour obtenir des informations sur le service de garantie ou de remplacement
des pièces veuillez visiter notre site Web : www.littletikes.com, appeler le 1-800-321-0183 ou écrire à
: Consumer Service, The Little Tikes Company, 2180 Barlow Road, Hudson OH 44236, U.S.A. Certaines
pièces de rechange peuvent être achetées après l’expiration de la garantie – veuillez nous contacter
pour obtenir de plus amples informations.
À l’extérieur des États-Unis et du Canada : Veuillez contacter le magasin où le produit a été
acheté pour vous informer sur le service de garantie. La présente garantie vous ore des droits
spéciques reconnus par la loi, mais il se peut que vous ayez d’autres droits qui varient de pays /
province à pays / province. Certains pays ou certaines provinces n’autorisent pas l’exclusion ou la
limitation pour les dommages consécutifs ou fortuits, par conséquent la limitation ou l’exclusion qui
précède peut ne pas s’appliquer à votre cas. *La période de garantie est de trois (3) mois pour les
services de garderie et les acheteurs commerciaux.
ESPAÑOL
CAMA INFANTIL BARCO DE PIRATA
¡ADVERTENCIA SOBRE
PELIGRO DE ATRAPAMIENTO/
ESTRANGULACIÓN
¡ADVERTENCIA:
DEBE SER ARMADO POR UN ADULTO.
14
Visit our website at
www.littletikes.com
to register your product online!
Lamp and lantern operation / Fonctionnement de la lampe et de la lanterne / Funcionamiento de la lámpara y los faroles
Press button once to TURN ON. Press
button twice to TURN OFF. The light
automatically shuts off after 10 minutes.
Appuyez sur le bouton une fois pour ALLUMER.
Appuyez sur le bouton deux fois pour ÉTEINDRE.
La lumière s’éteint automatiquement après
10 minutes.
Apriete el botón una vez PARA ENCENDERLA.
Apriete el botón dos veces PARA APAGARLA.
Después de 10 minutos la luz se
apagará automáticamente.
Press button once to TURN
ON, press again to TURN OFF.
The light automatically shuts
off after 2 minutes.
Appuyez sur le bouton une fois
pour ALLUMER, appuyez une
nouvelle fois pour ÉTEINDRE.
La lumière s’éteint
automatiquement après 2 minutes
Apriete el botón una vez PARA
ENCENDERLO. Vuelva a apretarlo
PARA APAGARLO.
Después de 2 minutos la luz se
apagará automáticamente.
La page est en cours de chargement...
La page est en cours de chargement...
-
 1
1
-
 2
2
-
 3
3
-
 4
4
-
 5
5
-
 6
6
-
 7
7
-
 8
8
-
 9
9
-
 10
10
-
 11
11
-
 12
12
-
 13
13
-
 14
14
-
 15
15
-
 16
16


Little Tikes 625954M Manuel utilisateur
- Catégorie
- Jouets
- Taper
- Manuel utilisateur
- Ce manuel convient également à
dans d''autres langues
- English: Little Tikes 625954M User manual
- español: Little Tikes 625954M Manual de usuario
- Deutsch: Little Tikes 625954M Benutzerhandbuch
- Nederlands: Little Tikes 625954M Handleiding
- polski: Little Tikes 625954M Instrukcja obsługi
Documents connexes
-
 Little Tikes Magic Doorbell™ Playhouse Manuel utilisateur
-
 Little Tikes Bake 'n Grow™ Kitchen Manuel utilisateur
-
 Little Tikes Gourmet Prep 'n Serve™ Kitchen Manuel utilisateur
-
 Little Tikes Picnic on the Patio™ Playhouse Le manuel du propriétaire
-
Little Tikes Anchors Away Pirate Ship Manuel utilisateur
-
 Little Tikes Ride & Rescue Cozy Coupe Manuel utilisateur
-
 Little Tikes Play 'n Scoot™ Pirate Ship Manuel utilisateur
-
 Little Tikes 635632M Instructions Manual
-
 Little Tikes Ultimate Cook Kitchen Manuel utilisateur
-
 Little Tikes Cook 'n Grow™ Kitchen Manuel utilisateur


Autres documents
-
BERG Flashing light orange on pole Le manuel du propriétaire
-
 MGA Entertainment little tikes 650642M Manuel utilisateur
-
Bell'O B565QDC Mode d'emploi
-
-
Bell'O B544 Manuel utilisateur
-
-
RIDGID R8694220B-AC93044SBN Manuel utilisateur
-
Sauthon LIT B Le manuel du propriétaire
-
-
Rescue tALes 657719C Guide d'installation
