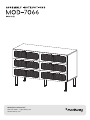
MODWAY MOD-7066-BLK Assembly Instructions
- Taper
- Assembly Instructions

Questions? Contact us!
609.256.9000 • cs@modway.com
www.modway.com

PAGE 2 OF 10
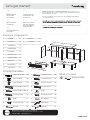
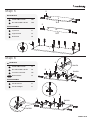
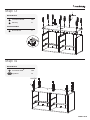
Provided hardware:
Furniture components:
E
F
x12
x10
Ax38Cam Bolt Ø6 x 35 mm
Bx14Cam Lock Ø15 mm
Dx32Wood Dowel Ø8 x 30 mm
Cx24Cam Lock Ø12 mm
Wood Dowel Ø6 x 30 mm
Screw M 7 x 50 mm
Gx6Handle
Missing parts or hardware? Need assistance?
Contact us before returning your item. We're here to help!
609.256.9000 • cs@modway.com
Hx36Screw M 3.5 x 13 mm
Ix2Allen Key
J
K
x24
x20
Screw M 8 x 39 mm
Screw M 4 x 20 mm
Screw M 6 x 10.5 mm
Lx36
Mx6
Screw M 4 x 22 mm
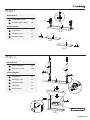
Only use hand tools to assemble this item. Do not use power tools.
Do not tighten bolts or screws completely until all hardware is lined up
and inserted into the holes.
Do not over-tighten screws and bolts to avoid stripping the hardware
or cracking the item.
you’re assembling the product.
Keep all components and packaging out of reach of children or animals
Approx. 60 minutes
assembly time
2 people recommended
for assembly
Care instructions are
listed in the last step
of this manual
Read through all of
the instructions
before starting
Make sure you have all
parts and components
before discarding any
packing materials
Let’s get started!
Wedge
N
Ox24
x24
Screw M 3.5 x 15.5 mm
What you need:
Phillips Head Screwdriver
Phillips
x6
x6
x6
1 x1
2 x1Bottom Board
Top Board
3 x1Side Board Left
11 x4
12 x1Center Board
Back Board
5
7
8
x14 Side Board Right
Front Drawer
x66 Side Drawer Left
Side Drawer Right
Back Drawer
x6Bottom Drawer9
x2Support Board10
RM35A x6Drawer Runner
LM20A1 x5Leg Metal
Px12Silicon Bumper
x 6
5
6
7
8
9
1
2
3
4
12
10 11 11 11 11
10

A
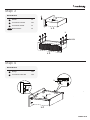
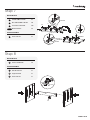
Step 2
Step 1
x24
Cam Bolt Ø6 x 35 mm
A
x12
Wood Dowel Ø6 x 30 mm
E
HARDWARE
COMPONENTS
x6
Front Drawer
5
x6
Side Drawer Left
6
x6
Side Drawer Right
7
x24
Cam Lock Ø12 mm
C
x24
Screw M 8 x 39 mm
J
HARDWARE
COMPONENTS
x6
Front Drawer
5
x6
Side Drawer Left
6
x6
Side Drawer Right
7
x6
Back Drawer
8
x6
Bottom Drawer
9
PAGE 3 OF 10
A
E
E
5
6
7
x 6
x 6
x 6
C
5
6
7
x 6
J
9
8
x 6
C
J
WARNING
Children have died from furniture tipover.
To reduce the risk of furniture tipover:
ALWAYS install tipover restraint provided.
NEVER put a TV on this product.
NEVER allow children to stand, climb or
hang on drawers, door or shelves.
NEVER open more than one drawer at a
time.
Place heaviest items in the lowest drawer.
This is a permanent label.
Do not remove!
ATTENTION
Les enfants sont morts de basculement
dans les meubles. Réduire les risques de
renversement de meubles:
TOUJOURS installer la retenue de
renversement fournie.
NE JAMAIS installer de téléviseur sur ce
produit.
Ne JAMAIS LAISSER les enfants se tenir
debout, grimper ou s'accrocher aux tiroirs,
aux portes ou aux étagères.
NE JAMAIS ouvrir plus d’un tiroir à la fois
Placez les articles les plus lourds dans le
tiroir le plus bas.
Ceci est une étiquette permanente.
Ne pas enlever!
Los niños han muertopor vuelco de
muebles. Para reducir el riesgo de
vuelco de muebles:
SIEMPRE instale la restricción del vuelco
provista.
NUNCA cologue un televisor en este
producto.
NUNCA permita que los niños se paren,
trepen o cuelguen en cajones, puertas o
estantes.
NUNCA abra más de un cajón a la vez.
Coloque los artículos más pesados en los
cajón más bajo.
¡No Quitar!
ADVERTENCIA
WARNING LABEL

PAGE 4 OF 10
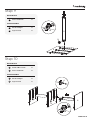
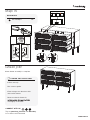
Step 4
Step 3
x6
Handle
G
x36
Screw M 3.5 x 13 mm
H
x6
Screw M 4 x 22 mm
M
x6
Drawer Runner
HARDWARE
x24
Wedge
N
x24
Screw M 3.5 x 15.5 mm
O
HARDWARE
RM35A
O
N
30 mm
50 - 60 mm
O
N
G
M
RM35A
H
N
O
x 6
x 6
x 6

PAGE 5 OF 10
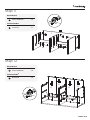
Step 6
Step 5
x2
Cam Bolt Ø6 x 35 mm
A
x8
Wood Dowel Ø8 x 30 mm
D
x18
Screw M 6 x 10.5 mm
L
x3
Drawer Runner
HARDWARE
COMPONENTS
x1
Side Board Left
3
x1
Side Board Right
4
x10
Cam Bolt Ø6 x 35 mm
A
x20
Wood Dowel Ø8 x 30 mm
D
HARDWARE
COMPONENTS
x1
Top Board
1
x2
Support Board
10
x4
Back Board
11
A
A
RM35A
RM35A
L
RM35A
L
D
D
A
1
11
10
x 4
x 2
D
D
A
A
L
L
RM35A
RM35A
3
4

PAGE 6 OF 10
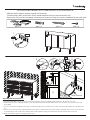
Step 7
Step 8
B
x2
Cam Lock Ø15 mm
B
HARDWARE
COMPONENTS
x1
Side Board Left
3
x1
Support Board
10
x1
Center Board
12
x1
Cam Bolt Ø6 x 35 mm
A
x4
Wood Dowel Ø8 x 30 mm
D
x18
Screw M 6 x 10.5 mm
L
x3
Drawer Runner
HARDWARE
COMPONENTS
x1
Center Board
12
RM35A
A
RM35A
L
12
12
RM35A
L
L
DRM35A
RM35A
L
A
B12
3
10

PAGE 7 OF 10
Step 10
Step 9
B
B
4
10
B
x1
Cam Lock Ø15 mm
B
HARDWARE
COMPONENTS
x1
Side Board Right
4
x1
Support Board
10
x1
Cam Bolt Ø6 x 35 mm
A
x1
Cam Lock Ø15 mm
B
HARDWARE
COMPONENTS
x1
Side Board Right
4
A
B4
10
3
12
A
x1
Support Board
10

PAGE 8 OF 10
B
B
Step 11
x6
Cam Lock Ø15 mm
B
HARDWARE
COMPONENTS
x1
Top Board
1
Step 12
x4
Cam Lock Ø15 mm
B
HARDWARE
COMPONENTS
x4
Back Board
11
1
B
11
11
11 11
B

PAGE 9 OF 10
Step 13
x10
Screw M 7 x 50 mm
F
x1
Allen Key
I
HARDWARE
COMPONENTS
x1
Bottom Board
2
F
I
Step 14
x20
Screw M 4 x 20 mm
K
x5
Leg Metal
HARDWARE
LM20A1
2
F
2
I
LM20A1
K

PAGE 10 OF 10
Step 15
x12
Silicon Bumper
P
HARDWARE
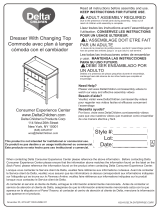
Chest drawer assembly is complete.
CARING FOR YO U R I T E M
Indoor use only.
Not contract grade.
Clean using a non-abrasive cloth
and a mild cleaner.
Never use harsh chemicals,
or integrity of the item.
CONNECT WITH US!
Tag us @modway_furniture and #modway
for a chance to be featured.
Great job!
Drawer with warning labels on top
WARNING
Children have died from furniture tipover.
To reduce the risk of furniture tipover:
ALWAYS install tipover restraint provided.
NEVER put a TV on this product.
NEVER allow children to stand, climb or
hang on drawers, door or shelves.
NEVER open more than one drawer at a
time.
Place heaviest items in the lowest drawer.
This is a permanent label.
Do not remove!
ATTENTION
Les enfants sont morts de basculement
dans les meubles. Réduire les risques de
renversement de meubles:
TOUJOURS installer la retenue de
renversement fournie.
NE JAMAIS installer de téléviseur sur ce
produit.
Ne JAMAIS LAISSER les enfants se tenir
debout, grimper ou s'accrocher aux tiroirs,
aux portes ou aux étagères.
NE JAMAIS ouvrir plus d’un tiroir à la fois
Placez les articles les plus lourds dans le
tiroir le plus bas.
Ceci est une étiquette permanente.
Ne pas enlever!
Los niños han muertopor vuelco de
muebles. Para reducir el riesgo de
vuelco de muebles:
SIEMPRE instale la restricción del vuelco
provista.
NUNCA cologue un televisor en este
producto.
NUNCA permita que los niños se paren,
trepen o cuelguen en cajones, puertas o
estantes.
NUNCA abra más de un cajón a la vez.
Coloque los artículos más pesados en los
cajón más bajo.
¡No Quitar!
ADVERTENCIA
PP

1AA1
AA4
TIPPING RESTRAINTS KIT INSTALLATION GUIDANCE
AA1 x 2 AA2 x 4 AA3 x 4 AA4 x 4
Different wall materials require unique wall fasteners.
The wall plugs (AA2) and screws (AA3) are designed for fixing to concrete walls only.
Please consult your local hardware store to ensure you are using the correct hardware for you wall type.
4
5
Grids Surface
2 3 4
AA2
AA1
AA1
AA3
Installation Instructions :
1. Attach bracket (AA1) securely to the back top of the furniture using screw (AA4) provided. Allow 8 - 10 cm from each side.
2. Please make a hole for wall plugs position on the wall and minimum 15 mm below bracket secured to the back of unit attach the wall
plugs (AA2).
3. Locate the other bracket (AA1) on the wall over wall plugs (AA2). Place furniture into position so both brackets (AA1) are vertically in the
line.
4. Lace the end of the restrains strap through the larger hole in each bracket. Ensure the restrains strap with grids surface facing the inner
loops. Bring both ends together and slide the flat end through the locking end and draw it through until all slack is removed.
5. Make sure that the strap is securely laced & locked.
Customer Service 609.256.9000 | www.modway.com
8-10 cm
8-10 cm
-
 1
1
-
 2
2
-
 3
3
-
 4
4
-
 5
5
-
 6
6
-
 7
7
-
 8
8
-
 9
9
-
 10
10
-
 11
11


MODWAY MOD-7066-BLK Assembly Instructions
- Taper
- Assembly Instructions
dans d''autres langues
- English: MODWAY MOD-7066-BLK
Documents connexes


Autres documents
-
 Delta Children Farmhouse 3 Drawer Dresser Assembly Instructions
-
 Delta Children Mason Convertible Baby Crib N Changer Assembly Instructions
-
 Delta Children Mason Convertible Baby Crib N Changer Assembly Instructions
-
Ameriwood Home 5319341EBL Assembly Manual
-
Ameriwood HD20116 Mode d'emploi
-
 Dorel Home Vaughn 5555155COM Guide d'installation
-
 Dorel Home HD48012 Guide d'installation
-
 Dorel Home HD80037 Guide d'installation


