Sennheiser ActiveGuard CC 510 Manuel utilisateur
- Catégorie
- Microphones
- Taper
- Manuel utilisateur
Ce manuel convient également à

1
English
Deutsch
Français
Italiano
Español
Nederlands
CC_510.book Seite 1 Donnerstag, 10. April 2003 3:02 15

2
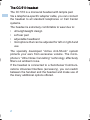
The CC 510 headset
The CC 510 is a monaural headset with temple pad.
Via a telephone-specific adapter cable, you can connect
the headset to all standard telephones or Call Center
systems.
The headset is extremely comfortable to wear due to:
• ultra-lightweight design
• soft ear pad
• adjustable headband
• microphone that can be adjusted for left or right-hand
use
The specially developed “Active Anti-Shock” system
protects your ears from excessive volume. The micro-
phone’s “Ultra Noise Cancelling” technology effectively
filters out ambient noise.
If the headset is connected to a Sennheiser Communi-
cations Universal Interface (accessory), you can switch
between the handset and the headset and make use of
the many additional options offered.
CC_510.book Seite 2 Donnerstag, 10. April 2003 3:02 15

3
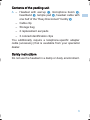
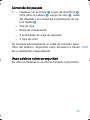
Contents of the packing unit
A — Headset with earcup , microphone boom ,
headband , temple pad , headset cable with
one half of the “Easy Disconnect” facility
— Cable clip
— Storage bag
— 2 replacement ear pads
— 3 colored identification clips
You additionally require a telephone-specific adapter
cable (accessory) that is available from your specialist
dealer.
Safety instructions
Do not use the headset in a damp or dusty environment.
CC_510.book Seite 3 Donnerstag, 10. April 2003 3:02 15

4
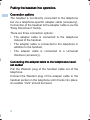
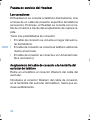
Putting the headset into operation
Connection options
The headset is not directly connected to the telephone
but via a telephone-specific adapter cable (accessory).
Connection of the headset to the adapter cable is via the
“Easy Disconnect” facility.
There are three connection options:
• The adapter cable is connected to the telephone
instead of the handset.
• The adapter cable is connected to the telephone in
addition to the handset.
• The adapter cable is connected to a Universal
Interface (accessory).
Connecting the adapter cable to the telephone’s hand-
set socket
Pull the Western plug of the handset cable out of the
telephone.
Connect the Western plug of the adapter cable to the
handset socket on the telephone until it locks into place.
An audible “click” should be heard.
CC_510.book Seite 4 Donnerstag, 10. April 2003 3:02 15

5
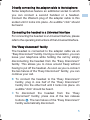
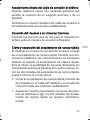
Directly connecting the adapter cable to the telephone
Some telephones feature an additional socket to which
you can connect a second handset or a headset.
Connect the Western plug of the adapter cable to this
socket until it locks into place. An audible “click” should
be heard.
Connecting the headset to a Universal Interface
For connecting the headset to a Universal Interface, please
refer to the operating instructions of the Universal Interface.
The “Easy disconnect” facility
The headset is connected to the adapter cable via an
“Easy Disconnect” facility. During a converation, you can
leave your telephone while holding the call by simply
disconnecting the headset from the “Easy Disconnect”
facility. This allows you to move around freely without
having to put off the headset. As soon as you re-connect
the two halves of the “Easy Disconnect” facility, you can
continue your call.
B To connect the headset to the “Easy Disconnect”
facility, plug in one half of the “Easy Disconnect”
facility into the other half until it locks into place. An
audible “click” should be heard.
C To disconnect the headset from the “Easy
Disconnect” facility, press one of the two release
buttons . The two halves of the “Easy Disconnect”
facility automatically disconnect.
CC_510.book Seite 5 Donnerstag, 10. April 2003 3:02 15

6
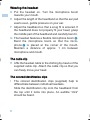
Wearing the headset
D Put the headset on. Turn the microphone boom
towards your mouth.
E Adjust the length of the headband so that the ear pad
exerts even, gentle pressure on your ear.
F
Adjust the headband so that a snug fit is ensured. If
the headband does not properly fit your head, grasp
the middle part of the headband and carefully bend it.
G The headset features a flexible microphone boom .
Bend the microphone boom so that the micro-
phone is placed at the corner of the mouth.
Maintain a distance of approx. 1 cm between
microphone and mouth.
The cable clip
H Affix the headset cable to the clothing by means of the
supplied cable clip. Attach the cable clip so that you
can freely move your head.
The colored identification clips
I The colored identification clips (supplied) help to
differentiate between individual headsets.
Slide the identification clip onto the headband from
the top until it locks into place. An audible “click”
should be heard.
CC_510.book Seite 6 Donnerstag, 10. April 2003 3:02 15

7
When is the headset ready for operation?
The headset is ready for operation as soon as it is
connected – via an adapter cable – to your telephone or a
Universal Interface. If you disconnect the headset from
the telephone or Universal Interface, it is out of
operation.
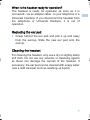
Replacing the ear pad
J Grasp behind the ear pad and pull it up and away
from the earcup. Slide the new ear pad onto the
earcup.
Cleaning the headset
For cleaning the headset, only use a dry or slightly damp
soft cloth. Do not use any solvents or cleansing agents
as these can damage the varnish of the headset. If
necessary, the ear pad can be cleaned with soapy water
(use a mild cleanser such as washing-up liquid).
CC_510.book Seite 7 Donnerstag, 10. April 2003 3:02 15

8
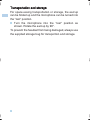
Transportation and storage
For space-saving transportation or storage, the earcup
can be folded up and the microphone can be turned into
the “rest” position.
K Turn the microphone into the “rest” position as
shown. Rotate the earcup by 90°.
To prevent the headset from being damaged, always use
the supplied storage bag for transportion and storage.
CC_510.book Seite 8 Donnerstag, 10. April 2003 3:02 15

9
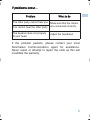
If problems occur...
If the problem persists, please contact your local
Sennheiser Communications agent for assistance.
Never repair or attempt to repair the units as this will
invalidate the warranty.
Problem What to do
The other party cannot hear you
Make sure that the cables
are connected correctly.
You cannot hear the other party
The headset does not properly
fit your head.
Adjust the headband.
CC_510.book Seite 9 Donnerstag, 10. April 2003 3:02 15

10
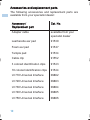
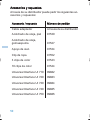
Accessories and replacement parts
The following accessories and replacement parts are
available from your specialist dealer:
Accessory /
Replacement part
Cat. No.
Adapter cable available from your
specialist dealer
Leatherette ear pad 91530
Foam ear pad 91527
Temple pad 91534
Cable clip 91552
3 colored identification clips 91543
10 colored identification clips 91544
UI 710 Universal Interface 09882
UI 720 Universal Interface 09883
UI 730 Universal Interface 09884
UI 740 Universal Interface 09885
UI 750 Universal Interface 09886
CC_510.book Seite 10 Donnerstag, 10. April 2003 3:02 15

11
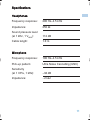
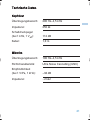
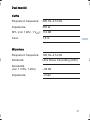
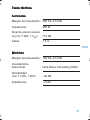
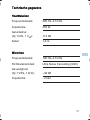
Specifications
Headphones
Frequency response: 200 Hz—4.5 kHz
Impedance: 250
Ω
Sound pressure level
(at 1 kHz, 1 V
rms
): 112 dB
Cable length: 1.0 m
Microphone
Frequency response: 100 Hz—4.5 kHz
Pick-up pattern: Ultra Noise Cancelling (UNC)
Sensitivity
(at 1 V/Pa, 1 kHz): —38 dB
Impedance:
∼2kΩ
CC_510.book Seite 11 Donnerstag, 10. April 2003 3:02 15

12
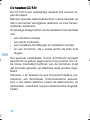
Das Headset CC 510
Das CC 510 ist ein einseitiges Headset mit Schläfenstütze.
Sie können das Headset über ein telefonspezifisches
Adapterkabel an alle handelsüblichen Telefone und Call
Center-Systeme anschließen.
Der hohe Tragekomfort des Headsets beruht auf:
• dem ultraleichten Design
• dem bequemen Ohrpolster
• dem einstellbaren Kopfband
• und dem Mikrofon, das Sie rechts oder links tragen
können
Das speziell entwickelte „Active Anti-Shock“-System
schützt Ihr Gehör vor zu hohen Lautstärken. Die „Ultra
Noise Cancelling“-Technik des Mikrofons blendet Stör-
schall wirkungsvoll aus.
Wenn Sie das Headset an ein Sennheiser Communica-
tions Universal Interface (Zubehör) anschließen, können
Sie nicht nur zwischen dem Telefonhörer und dem
Headset umschalten, sondern viele zusätzliche Möglich-
keiten nutzen.
CC_510.book Seite 12 Donnerstag, 10. April 2003 3:02 15

13
Inhalt der Packung
A
— Headset mit
Hörermuschel
,
Mikrofonarm ,
Kopfband
,
Schläfenstütze
,
Headsetkabel
mit
einer Hälfte der Schnelltrennkupplung
— Kleiderclip
— Aufbewahrungsbeutel
— 2 Ersatzohrpolster
— 3 Farbclips
Sie benötigen zusätzlich ein telefonspezifisches Adap-
terkabel, das Sie als Zubehör bei Ihrem Fachhändler er-
halten.
Einige Worte zu Ihrer Sicherheit
Benutzen Sie das Headset nicht in feuchter oder staubi-
ger Umgebung.
CC_510.book Seite 13 Donnerstag, 10. April 2003 3:02 15

14
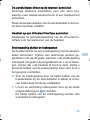
Headset in Betrieb nehmen
Die Anschlüsse
Das Headset wird nicht direkt, sondern über ein telefon-
spezifisches Adapterkabel (Zubehör) an das Telefon an-
geschlossen. Das Headset wird dann über die Schnell-
trennkupplung mit dem Adapterkabel verbunden.
Sie haben drei Anschlussmöglichkeiten:
• Das Adapterkabel wird anstelle des Telefonhörers
angeschlossen.
• Das Adapterkabel wird zusätzlich zum Telefon-
hörer an das Telefon angeschlossen.
• Das Adapterkabel wird an ein Universal Interface
(Zubehör) angeschlossen.
Adapterkabel an die Telefonhörerbuchse anschließen
Ziehen Sie am Telefon den Westernstecker des Telefon-
hörerkabels ab.
Stecken Sie den Westernstecker des Adapterkabels in
die Telefonhörerbuchse des Telefons, bis er hörbar ein-
rastet.
CC_510.book Seite 14 Donnerstag, 10. April 2003 3:02 15

15
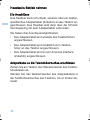
Adapterkabel direkt an das Telefon anschließen
Manche Telefone haben eine zusätzliche Buchse, an die
Sie einen zweiten Telefonhörer oder ein Headset an-
schließen können.
Stecken Sie den Westernstecker des Adapterkabels in
die Buchse, bis er hörbar einrastet.
Headset an ein Universal Interface anschließen
Bitte entnehmen Sie der Bedienungsanleitung für das
Universal Interface, wie das Headset angeschlossen wird.
Schnelltrennkupplung schließen oder trennen
Das Headset wird über eine Schnelltrennkupplung mit
dem Adapterkabel verbunden. Während eines Telefo-
nats werden Gespräche auch dann gehalten, wenn Sie
die Schnelltrennkupplung trennen. Das gibt Ihnen die
Möglichkeit, sich frei zu bewegen, ohne das Headset ab-
zusetzen. Sobald Sie die beiden Hälften der Schnell-
trennkupplung wieder schließen, können Sie das
Gespräch weiterführen.
B
Schließen Sie die Schnelltrennkupplung, indem Sie die
beiden Hälften am Headsetkabel und am Adapterkabel
ineinanderschieben, bis sie hörbar einrasten.
C Trennen Sie die Verbindung, indem Sie auf einen der
beiden Entriegelungsknöpfe drücken. Die beiden
Hälften der Schnelltrennkupplung trennen sich auto-
matisch.
CC_510.book Seite 15 Donnerstag, 10. April 2003 3:02 15

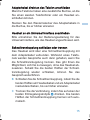
16
Headset anpassen
D Setzen Sie das Headset auf den Kopf.
E Drehen Sie den Mikrofonarm zum Mund.
F Stellen Sie die Länge des Kopfbands entsprechend
Ihrer Kopfform ein. Das Ohrpolster sollte mit leichtem
Druck auf dem Ohr liegen.
G
Das Kopfband sollte am Kopf anliegen. Sitzt das Kopf-
band zu fest oder zu locker, können Sie es mittig fas-
sen und vorsichtig biegen.
H Das Headset hat einen flexiblen Mikrofonarm . Bie-
gen Sie ihn so, dass das Mikrofon am Mundwinkel,
etwa 1 cm vom Mund entfernt, sitzt.
Der Kleiderclip
I Befestigen Sie das Headsetkabel mit dem Kleiderclip
so, dass Sie den Kopf ungehindert bewegen können.
Die Farbclips
J Sie können Ihr Headset mit den Farbclips individuell
kennzeichnen.
Drücken Sie den Farbclip von oben auf das Kopf-
band, bis er hörbar einrastet.
CC_510.book Seite 16 Donnerstag, 10. April 2003 3:02 15

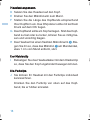
17
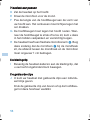
Das Headset ist betriebsbereit
Das Headset ist betriebsbereit, sobald Sie es über ein
Adapterkabel an das Telefon oder ein Universal Inter-
face angeschlossen haben. Wenn Sie die Verbindung
zum Telefon oder zum Universal Interface lösen, ist das
Headset außer Funktion.
Ohrpolster wechseln
K Fassen Sie hinter das Ohrpolster und ziehen Sie es
von der Hörermuschel ab. Krempeln Sie das neue
Ohrpolster auf die Hörermuschel.
Pflegen
Reinigen Sie das Headset ausschließlich mit einem wei-
chen Tuch, das leicht angefeuchtet werden kann. Ver-
wenden Sie bitte keine Löse- oder Reinigungsmittel, da
diese die Lackierung des Headsets beschädigen kön-
nen. Das Ohrpolster können Sie mit einer milden Seifen-
lösung waschen.
CC_510.book Seite 17 Donnerstag, 10. April 2003 3:02 15

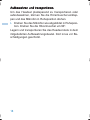
18
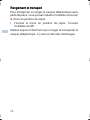
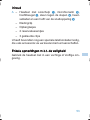
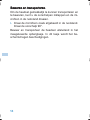
Aufbewahren und transportieren
Um das Headset platzsparend zu transportieren oder
aufzubewahren, können Sie die Hörermuschel einklap-
pen und das Mikrofon in Ruheposition drehen.
L Drehen Sie das Mikrofon wie abgebildet in Ruheposi-
tion. Drehen Sie die Hörermuschel um 90°.
Lagern und transportieren Sie das Headset stets in dem
mitgelieferten Aufbewahrungsbeutel. Dort ist es vor Be-
schädigungen geschützt.
CC_510.book Seite 18 Donnerstag, 10. April 2003 3:02 15

19
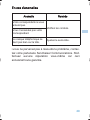
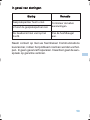
Wenn Störungen auftreten
Rufen Sie Ihren Sennheiser Communications-Partner
an, wenn sich das Problem nicht beheben lässt. Führen
Sie auf keinen Fall Reparaturen selbst durch. Garantie-
ansprüche erlöschen dadurch.
Störung Abhilfe
Der Gesprächspartner hört
Sie nicht.
Überprüfen Sie die Kabelver-
bindungen.
Sie hören den Gesprächs-
partner nicht.
Headset sitzt nicht fest am
Kopf.
Passen Sie das Kopfband an.
CC_510.book Seite 19 Donnerstag, 10. April 2003 3:02 15

20
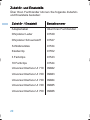
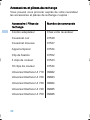
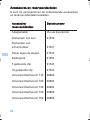
Zubehör- und Ersatzteile
Über Ihren Fachhändler können Sie folgende Zubehör-
und Ersatzteile bestellen:
Zubehör- / Ersatzteil Bestellnummer
Adapterkabel Über Ihren Fachhändler
Ohrpolster Leder 91530
Ohrpolster Schaumstoff 91527
Schläfenstütze 91534
Kleiderclip 91552
3 Farbclips 91543
10 Farbclips 91544
Universal Interface UI 710 09882
Universal Interface UI 720 09883
Universal Interface UI 730 09884
Universal Interface UI 740 09885
Universal Interface UI 750 09886
CC_510.book Seite 20 Donnerstag, 10. April 2003 3:02 15
La page est en cours de chargement...
La page est en cours de chargement...
La page est en cours de chargement...
La page est en cours de chargement...
La page est en cours de chargement...
La page est en cours de chargement...
La page est en cours de chargement...
La page est en cours de chargement...
La page est en cours de chargement...
La page est en cours de chargement...
La page est en cours de chargement...
La page est en cours de chargement...
La page est en cours de chargement...
La page est en cours de chargement...
La page est en cours de chargement...
La page est en cours de chargement...
La page est en cours de chargement...
La page est en cours de chargement...
La page est en cours de chargement...
La page est en cours de chargement...
La page est en cours de chargement...
La page est en cours de chargement...
La page est en cours de chargement...
La page est en cours de chargement...
La page est en cours de chargement...
La page est en cours de chargement...
La page est en cours de chargement...
La page est en cours de chargement...
La page est en cours de chargement...
La page est en cours de chargement...
La page est en cours de chargement...
La page est en cours de chargement...
La page est en cours de chargement...
La page est en cours de chargement...
La page est en cours de chargement...
La page est en cours de chargement...
La page est en cours de chargement...
La page est en cours de chargement...
La page est en cours de chargement...
La page est en cours de chargement...
La page est en cours de chargement...
-
 1
1
-
 2
2
-
 3
3
-
 4
4
-
 5
5
-
 6
6
-
 7
7
-
 8
8
-
 9
9
-
 10
10
-
 11
11
-
 12
12
-
 13
13
-
 14
14
-
 15
15
-
 16
16
-
 17
17
-
 18
18
-
 19
19
-
 20
20
-
 21
21
-
 22
22
-
 23
23
-
 24
24
-
 25
25
-
 26
26
-
 27
27
-
 28
28
-
 29
29
-
 30
30
-
 31
31
-
 32
32
-
 33
33
-
 34
34
-
 35
35
-
 36
36
-
 37
37
-
 38
38
-
 39
39
-
 40
40
-
 41
41
-
 42
42
-
 43
43
-
 44
44
-
 45
45
-
 46
46
-
 47
47
-
 48
48
-
 49
49
-
 50
50
-
 51
51
-
 52
52
-
 53
53
-
 54
54
-
 55
55
-
 56
56
-
 57
57
-
 58
58
-
 59
59
-
 60
60
-
 61
61


Sennheiser ActiveGuard CC 510 Manuel utilisateur
- Catégorie
- Microphones
- Taper
- Manuel utilisateur
- Ce manuel convient également à
dans d''autres langues
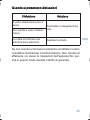
Documents connexes
-
Sennheiser CC 510 Le manuel du propriétaire
-
-
Sennheiser CC 550 Le manuel du propriétaire
-
-
Sennheiser HMD 280 PRO Le manuel du propriétaire
-
Sennheiser HMEC 300 Le manuel du propriétaire
-
-
-
Sennheiser UI 770 Manuel utilisateur