Muskoka MFB25WSTBL-1 Manuel utilisateur
- Catégorie
- Cheminées
- Taper
- Manuel utilisateur
Ce manuel convient également à

11
YEAR
AN
AÑO
I
N
H
O
M
E
W
A
R
R
A
N
T
Y
G
A
R
A
N
T
I
E
À
L
A
M
A
I
S
O
N
G
A
R
A
N
T
Í
A
E
N
S
U
P
R
O
P
I
A
C
A
S
A
USE & CARE GUIDE
GUIDE D’UTILISATION ET D’ENTRETIEN
MANUAL D USO Y CUIDADO
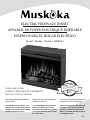
ELECTRIC FIREPLACE INSERT
APPAREIL DE FOYER ÉLECTRIQUE INSÉRABLE
INSERTO PARA EL HOGAR ELÉCTRICO
Model / Modèle / Modelo: MFB28-2
Please read this manual before installing and
using your firebox
IF THE INFORMATION IN THIS MANUAL IS NOT
FOLLOWED EXACTLY, AN ELECTRICAL SHOCK OR
FIRE MAY RESULT CAUSING PROPERTY DAMAGE,
PERSONAL INJURY OR LOSS OF LIFE
Veuillez lire ce manuel avant l’installation et
l’utilisation de votre foyer
SI LES RENSEIGNEMENTS DE CE MANUEL NE
SONT PAS EXACTEMENT SUIVIS, UN CHOC
ÉLECTRIQUE OU UN INCENDIE PEUT SURVENIR,
ET CAUSER DES DOMMAGES, DES BLESSURES
OU LA PERTE DE VIE
Por favor lea las instrucciones de instalación y de
operación antes de usar este caja de fuego
SI NO SIGUE EXACTAMENTE LA INFORMACIÓN EN
ESTE MANUAL, PODRÍA RESULTAR EN CHOQUES
ELÉCTRICOS O INCENDIO QUE PUEDEN CAUSAR
DAÑOS A LA PROPIEDAD, LESIONES PERSONALES
O LA PÉRDIDA DE LA VIDA.
REV03

Thank you for purchasing a Muskoka
®
Electric Fireplace Insert.
Important: Read all instructions and warnings carefully before starting installation. Failure
to follow these instructions may result in a possible electric shock, fire hazard and will void
the warranty.
IMPORTANT INSTRUCTIONS
When using electrical appliances, basic precautions should always be followed to reduce the risk of fire, electrical shock,
and injury to persons, including the following:
1. Read all instructions before using this heater.
2. This heater is hot when in use. To avoid burns, do not let bare skin touch hot surfaces. If provided, use handles
when moving this heater. Keep combustible materials, such as furniture, pillows, bedding, papers, clothes, and
curtains at least 3 feet (0.9 meters) from the front of the heater and keep them away from the sides and rear.
3. Extreme caution is necessary when any heater is used by or near children or invalids and whenever the heater is left
operating and unattended.
4. Always unplug heater when not in use.
5. Do not operate any heater with a damaged cord or plug or after the heater malfunctions, has been dropped or
damaged in any manner. Return heater to authorized service facility for examination, electrical or mechanical
adjustment, or repair.
6. Do not use outdoors.
7. This heater is not intended for use in bathrooms, laundry areas and similar indoor locations. Never locate
heater where it may fall into a bathtub or other water container.
8. Do not run power cord under carpeting. Do not cover power cord with throw rugs, runners, or the like.
Arrange power cord away from traffic area and where it will not be tripped over.
9. To disconnect heater, turn controls to off, then remove plug from outlet.
10. Connect to properly grounded outlets only.
11. Do not insert or allow foreign objects to enter any ventilation or exhaust openings as this may cause an electric
shock or fire, or damage the heater.
12. To prevent a possible fire, do not block firebox air intakes or exhaust in any manner. Do not operate firebox on soft
surfaces, like a bed, where openings may become blocked.
13. A heater has hot and arching or sparking parts inside. Do not use in areas where gasoline, paint, or flammable
liquids are used or stored.
14. Use this heater only as described in this manual. Any other use not recommended by the manufacturer may cause
fire, electrical shock, or injury to persons.
15. Avoid the use of an extension cord because the extension cord may overheat and cause a risk of fire. However, if
you have to use an extension cord, the cord shall be No.14ga minimum size and rated not less than 2025 watts.
16. “SAVE THESE INSTRUCTIONS”
1

USER INSTRUCTIONS
1. Any repairs to this appliance should be carried out by qualified/authorized service personnel only.
2. Under no circumstances should this appliance be modified. Parts having to be removed for servicing must be
replaced with original “OEM” (original equipment manufacturers) parts only.
3. This firebox is to be cleaned with a damp cloth (water) only. IMPORTANT: Always unplug the power cord before
cleaning the unit. Do not use any abrasive cleaners on the unit.
4. Please unplug this firebox when not in use.
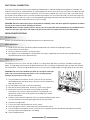
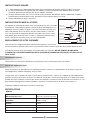
GROUNDING INSTRUCTIONS
This heater is for use on 120 volts. The cord has a plug as shown in figure A in the
diagram. An adapter as shown in figure C is available for connecting three-blade
grounding-type plugs to two-slot receptacles. The green grounding lug extending
from the adapter must be connected to a permanent ground such as a properly
grounded outlet box. The adapter should not be used if a three-slot grounded
receptacle is available.
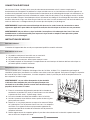
LOCATING YOUR FIREPLACE
When choosing a location for your new fireplace, ensure the general instructions
are followed. Also, for best effect install the fireplace out of direct sunlight.
It is safe to set the fireplace insert close to non-combustibles. DO NOT STORE OR USE GASOLINE OR OTHER
FLAMMABLE VAPORS OR LIQUIDS IN THE VICINITY OF THIS OR ANY OTHER APPLIANCE.
Mantel Installation
Please refer to the detailed instructions that come with the mantel that you purchased.
Attaching the firebox trims
Take your electric firebox out of its packaging and position it between the 2 legs of the mantel. Once you are close to the
wall, plug the firebox into the nearest outlet.
The firebox comes with 3 metal brackets and 16 black screws (15 required plus 1 spare). These metal brackets must be
attached to all 3 sides of the firebox and 2 sides of the mantel to ensure that your firebox does not move around as you
use it. All 3 trims attach to the firebox by inserting and tightening 3 screws. Both the left and right side trim attach to the
mantel front by inserting and tightening 3 screws
The top trim does not attach to the mantel, just the firebox.
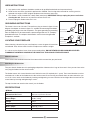
SPECIFICATIONS
MFB28-2
Fireplace Insert
Dimensions W x D x H
27.2” x 9.7” x 23.1”
69.1 cm x 24.5 cm x 58.8 cm
Net Weight
Gross Weight
37.4 lbs / 17 kg
44 lbs / 20 kg
Voltage
120 V
Frequency
60 Hz
Watts / Amps.
1400 W / 11.6 A
Heater Rating
4770 BTUs
2
Grounding Pin
Cover of Grounded Outlet Box
Adapter
Grounding Lug
Metal Screw
Cover of Grounded Outlet Box
A
B
C

ELECTRICAL CONNECTION
A 15 Amp, 120 Volt, 60 Hz circuit with a properly grounded outlet is required to operate this appliance. Preferably, the
fireplace insert will be on a dedicated circuit as other appliances on the same circuit may cause the circuit breaker to trip
or the fuse to blow when the heater is in operation. The unit comes standard with a 6 ft (1.8 m) long 3 wire cord, exiting
out the back of the fireplace insert. Plan the installation to avoid the use of an extension cord. If an extension cord must
be used, it must be a minimum 14 ga, 3 wire with grounding type plug and connector and rated not less than 2025 watts.
The extension cord shall not be more than 20 ft (6 m) in length.
WARNING: Electrical outlet wiring must comply with local building codes and other applicable regulations to reduce
the risk of fire, electrical shock and injury to persons.
WARNING: Do not use this fireplace insert if any part of it has been under water. Immediately call a qualified service
technician to inspect the firebox and replace any part of the electrical system which has been under water.
SERVICE INSTRUCTIONS
For Your Safety
Service must be performed by qualified/authorized service personnel only.
Glass Information
1. Under no circumstances should this product be operated with a broken or chipped glass panel.
2. Do not strike or slam the glass.
3. Do not use abrasive cleansers to clean the glass.
4. This product uses tempered glass. Replacement of the glass supplied by the manufacturer should be done by
qualified/authorized service personnel only.
Replacing the Light Bulbs
This fireplace insert uses 2 clear 120 Volt, 40 Watt, E-12 socket base light bulbs (small base, chandelier candle type
bulbs). The light bulbs are located at the bottom of the unit. You can change the light bulbs from the front of the firebox.
For convenience, if one of the light bulbs burns out, it may be easier to replace both of the light bulbs at the same time.
WARNING: Do not exceed 40 Watts per bulb. Use of higher rated light
bulbs may cause overheating and result in a fire, causing property
damage, personal injury or loss of life.
1. Turn the firebox master power “on/off” switch to the “off” position,
(located behind the front lower access panel) the switch red indicator
pilot light will turn off.
2. Let the firebox insert cool if it has been operating.
3. With the lower front panel open, locate the 2 small access panels.
4. Remove the screws in each panel using a Philips or flathead
screwdriver. Pull the access panel toward you. The light bulbs are
attached to a slide, which will bring them to the edge of the firebox
for your convenience.
5. Carefully remove the burnt light bulb. This may require holding the light socket
with one hand while unscrewing the light bulb with the other hand.
6. Install the new light bulbs.
7. Push in the slides and reposition the access panels.
8. Insert and tighten screws in each panel that were removed in step 4.
9. Turn the firebox master power “on/off” switch to the “on” position and the red indicator pilot light will illuminate.
Check the replacement light bulbs are working.
10. Close the bottom panel.
3

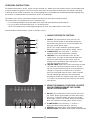
OPERATING INSTRUCTIONS
The firebox master power “on/off” switch must be switched “on” before any of the control functions, (on the firebox and/
or remote control) will operate. NOTE: The master switch does not have to be turned off when the firebox is not being
used for brief time periods. If however, you are not planning to use your firebox for extended time periods or going away
on vacation, we recommend the master power “on/off” be switched off.
This firebox insert features conveniently separate controls for the flame effect and heat control.
This feature allows you to operate the unit in 2 different ways;
• Asafullfeaturedreplaceinsertwithbothameeffectandheateroperatingsimultaneously.
• Asavisualeffectwithameeffectonly.(i.e.noheatingcycle)
NOTE: This firebox insert is not designed to operate in “heat” only mode without a flame effect.
All of the firebox control functions can be accessed in 2 ways:
4
1. USING THE REMOTE CONTROL:
1. ON/OFF: (The master power switch must be “on”)
Press the “on/off” button on the remote control, the
flame effect (only) will turn on. To turn the firebox “off”
press the “on/off” button again.
(NOTE: The “on/off” button on the remote control
does “not” control the master power “on/off” switch)
2. FLAME EFFECT: Press the flame “+” or flame “–“
button to achieve the desired effect. (no heat)
3. HEATING: Press the heat button “once” for “low”
and/or “twice” for “high” to achieve the desired level.
(NOTE: the flame effect is always active when the
heating cycle is operational) Press the button a “third”
time turns the heating cycle off.
4. HEATER TIMER: Allows you to leave your heater on while
you sleep with a delayed automatic timer for shut off.
You can set your heater to be on for ½ hour increments
starting at ½ hour up to a maximum of 7-1/2 hours –
press the timer button once for each ½ hour increment.
The red indicator light above the time selected will
illuminate to confirm the selection made. After you reach
7-1/2 hours, the next press of the button will shut off the
timer feature.
4
2
1
3
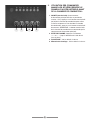
2. USING THE MANUAL CONTROLS LOCATED
ON THE FIREBOX BEHIND THE LOWER
FRONT ACCESS PANEL.
1. ON/OFF: (The master power switch must be “on”) Press
the “on/off” button on the firebox, the flame effect (only)
will turn on. To turn the firebox “off” press the “on/off”
button again. (NOTE: The “on/off” button on the firebox
does “not” control the master power “on/off” switch)
2. FLAME EFFECT: Press the flame “+” or flame “–“
button to achieve the desired effect. (no heat)
3. HEATING: (See details above under Remote Control)
4. HEATER TIMER: (See details above under Remote Control)
1 4 3
2

Greenway Home Products is pleased to offer in home warranty repairs.
DO NOT RETURN THIS PRODUCT TO THE STORE:
Please contact Customer Service at: 1-866-253-0447
web: www.greenwayhp.com | email: [email protected]
Canada: 400 Southgate Dr., Guelph, Ontario, Canada, N1G 4P5
USA: 1270 Flagship Dr., Perrysburg, Ohio, USA, 43551
Limited Warranty Definitions
Greenway Home Products
(Greenway): Manufacturer.
Fireplace Insert: Fireplace insert manufactured by Greenway Home Products.
Purchaser: Purchaser of the fireplace insert.
Distributor: Facility authorized to sell Greenway Home Products.
Warranty Card: Greenway Home Products Limited Warranty Registration
Card identifying the Purchaser and product model.
Greenway Limited Warranty:
Greenway warrants to the Purchaser that the fireplace insert is free from defects in material and workmanship, under normal use and
service, for one (1) year (1 year limited parts) from the date of purchase.
All warranty repairs must be pre-authorized by Greenway Home Products. Greenway will, at its option, replace or repair free of charge any
defective part, which the Purchaser shall notify their Distributor or Greenway Home Products within the warranty period. The obligation of
Greenway Home Products under this warranty, is expressly limited to such replacement or repairs.
The provisions of this limited warranty shall not apply to the following:
1. Accidents.
2. Unauthorized repairs or alterations.
3. Normal maintenance.
4. Changes made to other units manufactured after this fireplace insert was manufactured.
5. Incidental damages caused by failure of the fireplace insert such as inconvenience or loss of use.
6. Improper installation.
The provisions of this limited warranty shall not apply to deterioration due to wear and exposure beyond the following limitations:
1. For one (1) year from the date of purchase on electrical component and circuit boards (lightbulbs excluded).
Greenway Limited Warranty is void unless the following conditions are adhered to:
1. Warranty registration must be completed and returned to Greenway Home Products.
2. All warranty repairs must be preauthorized by Greenway repair facility.
3. Greenway reserves the right to inspect defective parts that have been replaced under warranty. Distributor is expected to hold
defective parts for 60 days.
4. Only parts and accessories and other material, available through Greenway Home Products are to be used in the performance of
warranty service.
5. Purchasers are responsible for presenting/notifying their Distributor as soon as a problem exists. The warranty repairs should be
completed in a reasonable amount of time from the date of authorization. Not to exceed 30 days past notification.
This limited warranty is expressly in lieu of any other expressed or implied warranty, including any implied warranty or merchantability or
fitness for a particular purpose and of any obligations or liabilities on Greenway Home Products which neither assumes nor authorizes any
other person to assume for it any other liability in connection with the fireplace insert manufactured by it.
The warranty is null and void if used in commercial or industrial applications.
Retailer: Model Number:
Serial Number: Date Code:
Purchase Date:
Warranty

11
YEAR
AN
AÑO
I
N
H
O
M
E
W
A
R
R
A
N
T
Y
G
A
R
A
N
T
I
E
À
L
A
M
A
I
S
O
N
G
A
R
A
N
T
Í
A
E
N
S
U
P
R
O
P
I
A
C
A
S
A
USE & CARE GUIDE
GUIDE D’UTILISATION ET D’ENTRETIEN
MANUAL D USO Y CUIDADO
ELECTRIC FIREPLACE INSERT
APPAREIL DE FOYER ÉLECTRIQUE INSÉRABLE
INSERTO PARA EL HOGAR ELÉCTRICO
Model / Modèle / Modelo: MFB28-2
Please read this manual before installing and
using your firebox
IF THE INFORMATION IN THIS MANUAL IS NOT
FOLLOWED EXACTLY, AN ELECTRICAL SHOCK OR
FIRE MAY RESULT CAUSING PROPERTY DAMAGE,
PERSONAL INJURY OR LOSS OF LIFE
Veuillez lire ce manuel avant l’installation et
l’utilisation de votre foyer
SI LES RENSEIGNEMENTS DE CE MANUEL NE
SONT PAS EXACTEMENT SUIVIS, UN CHOC
ÉLECTRIQUE OU UN INCENDIE PEUT SURVENIR,
ET CAUSER DES DOMMAGES, DES BLESSURES
OU LA PERTE DE VIE
Por favor lea las instrucciones de instalación y de
operación antes de usar este caja de fuego
SI NO SIGUE EXACTAMENTE LA INFORMACIÓN EN
ESTE MANUAL, PODRÍA RESULTAR EN CHOQUES
ELÉCTRICOS O INCENDIO QUE PUEDEN CAUSAR
DAÑOS A LA PROPIEDAD, LESIONES PERSONALES
O LA PÉRDIDA DE LA VIDA.
REV03

Merci d’avoir acheté un appareil de foyer fermé électrique Muskoka
®
.
Important : Lisez attentivement toutes les instructions et les avertissements avant de commencer l’installation. À
défaut de suivre ces instructions, un choc électrique peut survenir de même qu’un risque d’incendie et l’annulation
de la garantie.
INSTRUCTIONS IMPORTANTES
Lors de l'utilisation d'appareils électriques, des précautions de base doivent toujours être observées pour réduire les
risques d'incendie, de décharge électrique et de blessures, notamment :
1. Lire toutes les instructions avant d'utiliser cet appareil de chauffage.
2. Cet appareil de chauffage est chaud lorsqu'il est utilisé. Pour éviter les brûlures, ne pas toucher aux surfaces
chaudes de l'appareil à mains nues. Utiliser les poignées pour déplacer l'appareil. Garder les matières combustibles
comme les meubles, les oreillers, la literie, le papier, les vêtements et les rideaux à au moins 3 pi (0.9 m) du
pourtour de l'appareil (avant, côtés, arrière).
3. Il faut user d'une extrême prudence lorsque l'appareil est utilisé par des enfants ou des personnes handicapées, ou
lorsque ces derniers sont à proximité et que l'appareil est laissé sans surveillance.
4. Débrancher toujours l'appareil lorsqu'il n'est pas utilisé.
5. Ne pas utiliser un appareil de chauffage pourvu d'un cordon d'alimentation ou d'une fiche endommagés, ni après
une défaillance de l'appareil, ni si l'appareil est tombé au sol ou s'il a été endommagé de quelque façon. Retourner
l'appareil de chauffage à un atelier de service autorisé pour faire effectuer une vérification, un ajustement des
systèmes électriques et mécaniques ou pour toute réparation.
6. No usar al aire libre.
7. Cet appareil de chauffage n'est pas conçu pour être utilisé dans une salle de bains, buanderie et autres endroits
intérieurs similaires. Jamais localiser le chauffage où il peut être tombe dans une baignoire ou d'autres contenant d'eau.
8. Ne pas acheminer le cordon sous un tapis. Ne pas couvrir le cordon d'une moquette ou d'un tapis, ou de tout autre
matériau similaire. Disposer le cordon à bonne distance des zones de passage, à un endroit où il ne risque pas d'être
un obstacle.
9. Pour débrancher l'appareil, tourner la commande en position d'arrêt, puis débrancher la fiche de la prise murale.
10. Brancher à des prises mises à la terre seulement.
11. Ne laisser aucun objet étranger pénétrer dans les ouvertures de ventilation ou d'échappement pour éviter une
décharge électrique, un incendie et les dommages à l'appareil.
12. Pour éviter les risques d'incendie, ne pas obstruer les prises d'admission d'échappement de l'air. Ne pas utiliser sur
des surfaces souples comme un lit pour éviter d'obstruer les ouvertures.
13. Un appareil de chauffage est pourvu de pièces internes produisant des arcs électriques ou des étincelles. Ne
pas utiliser l'appareil dans une pièce ou de l'essence, de la peinture ou des liquides inflammables sont utilisés
ou entreposés.
14. Utiliser cet appareil de chauffage en suivant les instructions du manuel. Toute autre utilisation du produit non
recommandée par le fabricant pourrait être à l'origine d'un incendie, d'une décharge électrique ou de blessures.
15. Éviter d'utiliser une rallonge avec l'appareil; la rallonge pourrait surchauffer et provoquer un incendie. Toutefois, si
l'on doit utiliser une rallonge, cette dernière doit être de calibre No. 14ga et pouvoir supporter une puissance
d'au moins 2025 watts.
16. "CONSERVER CES INSTRUCTIONS"
1

INSTRUCTIONS D'USAGER
1. 1. Toute réparation de l’appareil doit être effectuée par un personnel d'entretien qualifié et autorisé seulement.
2. En aucune circonstance cet appareil doit être modifié. Les pièces qui doivent être déposées pour un service
d'entretien doivent être remplacées des pièces d'origine seulement.
3. Ce foyer doit être nettoyé avec un tissu humide (l'eau) seulement. IMPORTANT: Toujours débrancher le cordon
d'alimentation avant de nettoyer l'unité. N'employer aucun nettoyant abrasif sur l'unité.
4. Veuillez débrancher ce foyer si non utilisé.
INSTRUCTIONS DE MISE À LA TERRE
Cet appareil de chauffage fonctionne sous une tension de 120 volts. Le cordon
d'alimentation a été branchée comme le montre la figure A du diagramme. Un
adaptateur, comme le montre la figure C, peut être utilisé pour raccorder une
fiche à trois broches (mise à la terre) à une prise à deux fentes. La fiche de
mise à la terre verte de l'adaptateur doit être raccordée à une mise à la terre
permanente (prise de courant mise à la terre). L'adaptateur ne doit pas être
utilisé si une prise à trois fentes mise à la terre est disponible.
EMPLACEMENT DE VOTRE CHEMINÉE
Lors du choix d’un emplacement pour votre nouvelle cheminée, assurez-vous
que les instructions générales sont suivies. Pour un meilleur effet, installez le foyer hors de la lumière directe du soleil.
L’installation du foyer fermé près d’objets non-combustibles est sécuritaire. NE PAS REMISER NI EMPLOYER
D’ESSENCE OU D’AUTRES ÉMANATIONS OU DE LIQUIDES INFLAMMABLES PRÈS DE CET APPAREIL OU DE
TOUT AUTRE.
Installation du manteau
Veuillez référer aux instructions détaillées qui sont fournies avec le manteau que vous avez acheté.
Attache les support pour foyer
Sortez votre boîte à feu électrique de son emballage et placez-la entre les 2 compartiments de remisage. Le foyer est
accompagné de 3 supports métalliques et 20 vis noires.
Le foyer vient avec 3 supports en métal et 16 vis noires (15 requies plus 1 surplus). Ces supports en métal doivent être
attachées à chacun des 3 côtés du foyer et à 2 côtés du mantel pour s’assurer que votre foyer ne se déplace pas autour
pendant que vous l’employez. Chacune des attache de 3 équilibres s’attache au foyer en insérant et en serrant 3 vis. Les
deux attache latérale gauche et droite d’équilibre s’attache à l’avant de mantel en insérant et en serrant 3 vis
L’équilibre supérieur n’attache pas au mantel, juste le foyer.
SPÉCIFICATIONS
MFB28-2
Foyer Insérable
Dimensions W x D x H
27.2” x 9.7” x 23.1”
69.1 cm x 24.5 cm x 58.8 cm
Poids Net
Poids Brut
37.4 lbs / 17 kg
44 lbs / 20 kg
Tension
120 V
Fréquence
60 Hz
Watts / Amps
1400 W / 11.6 A
Classement d'appareil de chauffage
4770 BTUs
2
Broche de
mise à la terre
Couvercle d'une boîte
de prises mises à la terre
Adaptateur
Éléments de mise
à la terres
Vis à métal
Couvercle d'une boîte
de prises mises à la terre
A
B
C

CONNECTION ÉLECTRIQUE
Un circuit de 15 Amp, 120 Volts, 60 Hz avec prise de courant correctement mise à la terre est requis pour le
fonctionnement de cet appareil. De préférence, le foyer insérable sera sur un circuit distinct car d’autres appareils sur
le même circuit pourraient causer au disjoncteur de mal fonctionner ou le fusible de griller lorsque la chaufferette est en
fonctionnement. L’appareil est fournit standard avec cordon à trois fils de 6 pieds (1.8 m) de longueur sortant à l’arrière
du foyer insérable. Prévoyez l’installation pour éviter l’utilisation d’une rallonge. Si une rallonge doit être utilisée, elle doit
être d’un minimum de 14 ga, avec fiche de type à trois fils avec mise à la terre et connecteur, et d’une évaluation à pas
moins de 2025 watts. La rallonge ne devra pas mesurer plus de 20 pieds (6 m) de longueur.
AVERTISSEMENT: La prise de courant électrique doit observer les codes locaux de construction et autres
règlements applicables pour réduire le risque d’incendie, de choc électrique et de blessures aux personnes.
AVERTISSEMENT: Ne pas utiliser ce foyer insérable si toute pièce a été submergée dans l’eau. Faire venir
immédiatement un technicien qualifié pour inspecter le foyer fermé et remplacer toute pièce du système
électrique qui a été submergée.
INSTRUCTIONS DE SERVICE
Pour votre sécurité
L'entretien de l'appareil doit être assuré par un personnel qualifié et autorisé seulement.
Informations sur le verre
1. Ce produit ne doit jamais être utilisé avec un verre brisé.
2. Ne pas frapper ou toucher brusquement le verre.
3. Ne pas utiliser de nettoyants abrasifs pour nettoyer le verre.
4. Ce produit emploie un verre trempé. Le remplacement du verre fourni par le fabricant doit être exécuté par un
personnel qualifié et autorisé seulement.
Remplacement des ampoules d’éclairage
Ce foyer insérable utilise 2 ampoules d'éclairage claires de 120 Volts, 40 Watt, E-12 (ampoule de type bougie de
chandelier à petite base) avec douille. Les lumières sont situées au bas de l’appareil. Vous pouvez changer les ampoules
de l'avant du foyer. Pour la convenance, si une des ampoules s’éteint, il peut être plus facile de remplacer toutes les
deux ampoules en même temps.
AVERTISSEMENT : ne pas utiliser d'ampoules de plus de 40 W.
L'utilisation d'une ampoule plus puissante peut provoquer une
surchauffe et un incendie, pouvant causant ainsi des dommages à la
propriété, des blessures et la mort.
1. Placez le commutateur d'alimentation principal de la chambre de
combustion en position OFF (arrêt); le commutateur est situé derrière
le panneau d'accès avant) - le pilote rouge s'éteint.
2. Laissez la chambre de combustion refroidir si elle a été utilisée.
3. Une fois le panneau avant inférieur ouvert, repérez les deux (2) plus
petits panneaux d'accès.
4. Retirez les vis sur chaque panneau au moyen d'un tournevis Phillips
ou à pointe plate. Tirez le panneau d'accès vers vous. Les ampoules
sont fixées à un support coulissant qui permet de rapprocher les
ampoules du bord de la chambre de combustion afin de pouvoir les
remplacer facilement.
5. Retirez soigneusement les ampoules grillées. Il peut être nécessaire de tenir le culot de l'ampoule d'une main
tout en dévissant l'ampoule de l'autre.
3

6. Insérez les nouvelles ampoules.
7. Poussez le support coulissant et remettez les panneaux d'accès en place.
8. Insérez les vis et serrez-les dans chaque panneau retiré au cours de l'étape 4.
9. Placez le commutateur d'alimentation principal de la chambre de combustion en position ON (marche) - le pilote
rouge s'allume. Assurez-vous que les nouvelles ampoules fonctionnement correctement.
10. Fermez le panneau inférieur.
INSTRUCTIONS DE FONCTIONNEMENT
Le commutateur d'alimentation principal de la chambre de combustion doit être en position ON (marche) pour que les
commandes (sur la chambre de combustion ou la télécommande) puissent fonctionner.
REMARQUE : Le commutateur d'alimentation principal n'a pas à être en position d'arrêt (OFF) lorsque la chambre de
combustion n'est pas utilisée pendant une courte période. Si toutefois vous prévoyez ne pas utiliser votre chambre de
combustion pendant une longue période, ou si vous partez pour les vacances, nous vous recommandons de placer le
commutateur d'alimentation en position d'arrêt (OFF).
Cette chambre de combustion est pourvue de commandes distinctes pour le réglage de la flamme et de la température.
Cette caractéristique vous permet d'utiliser l'appareil de deux façons;
• D'abordcommefoyercompletavecammeetchauffage.
• Puiscommeeffetvisuelavecammeseulement.(c'est-à-dire,aucunchauffage)
REMARQUE : Cette chambre de combustion n'a pas été conçue pour fonctionner en mode de chauffage
uniquement, sans l'effet flamme.
On peut utiliser les commandes de la chambre de combustion de deux façons :
4
1. EN UTILISANT LA TÉLÉCOMMANDE :
1. ON/OFF (marche/arrêt) : (le commutateur d'alimentation
principal doit être en position de marche « ON ») Appuyez sur
le bouton marche/arrêt (on/off) de la télécommande pour
utiliser la flamme uniquement. Pouréteindre la chambre de
combustion, appuyez sur le bouton marche/arrêt de nouveau.
(REMARQUE : le bouton marche/arrêt de la télécommande ne
commande pas le commutateur d'alimentation principal).
2. EFFET DE FLAMME : Appuyez sur le bouton « + » ou « – »
jusqu'à l'obtention de l'effet désiré (sans chaleur).
3. CHAUFFAGE : Appuyez une fois sur le bouton pour un
chauffage réduit (LOW) ou deux fois pour un chauffage élevé
(HIGH). (REMARQUE : l'effet de flamme est toujours en
fonction lorsque le cycle de chauffage est activé). Appuyez
une troisième fois sur le bouton pour arrêter le cycle de
chauffage.
4. Minuterie de chauffage : Vous permet de laisser le cycle de
chauffage fonctionné pendant la nuit grâce à une minuterie de
mise hors tension automatique. Vous pouvez régler le
fonctionnement du cycle de chauffage par tranches de 30
minutes, soit de 30 minutes à 7,5 heures – appuyez une fois
sur le bouton pour chaque tranche de 30 minutes. Le témoin
rouge situé au-dessus de la durée sélectionnée s'allume pour
confirmer votre choix. Lorsque vous avez atteint la durée
limite de 7,5 heures, le fait d'appuyer une fois de plus sur le
bouton désactive la minuterie.
4
2
1
3

2. UTILISATION DES COMMANDES
MANUELLES SITUÉES DERRIÈRE LE
PANNEAU D'ACCÈS INFÉRIEUR AVANT
DE LA CHAMBRE DE COMBUSTION :
1. ON/OFF (marche/arrêt) (le commutateur
d'alimentation principal doit être en position de
marche « ON ») Appuyez sur le bouton marche/arrêt
(on/off) de la chambre de combustion pour utiliser
la flamme uniquement. Pour éteindre la chambre
de combustion, appuyez sur le bouton marche/arrêt
de nouveau. (REMARQUE : le bouton marche/arrêt
de la chambre de combustion ne commande pas le
commutateur d'alimentation principal).
2. EFFET DE FLAMME : Appuyez sur le bouton
« + » ou « – » jusqu'à l'obtention de l'effet désiré
(sans chaleur).
3. CHAUFFAGE : Voir les détails ci-dessus
4. Minuterie de chauffage : Voir les détails ci-dessus
5
1 4 3
2

Greenway Home Products est heureuse d’offrir les réparations sous garantie à la maison.
NE RAPPORTEZ PAS LE PRODUIT AU MAGASIN :
Communiquez avec le service à la clientèle aux numéros suivants: 1-866-253-0447
Site web: www.greenwayhp.com
courriel: [email protected]
Au Canada: 400 Southgate Dr., Guelph, Ontario, Canada, N1G 4P5
États-Unis: 1270 Flagship Dr., Perrysburg, Ohio, USA, 43551
Définitions s’appliquant à la garantie limitée
Greenway Home Products:
(Greenway) Fabricant.
Foyer insérable: Foyer insérable fabriquée par Greenway Home Products.
Acheteur: Acheteur du foyer insérable.
Distributeur: Établissement autorisé à vendre les produits de Greenway Home Products.
Fiche de garantie: Fiche de garantie limitée de Greenway Home Products.
identifiant l’acheteur et le modèle du produit.
Garantie limitée de Greenway:
Greenway garantit à l’acheteur que le foyer insérable est exempt de tout défaut tant au niveau des matériaux que de fabrication, à condition
que le système soit utilisé normalement; la garantie vaut pendant un (1) an (garantie limitée d’un an sur les pièces) à partir de la date d’achat.
Toutes les réparations faites sous garantie doivent être autorisées par Greenway Home Products. Greenway pourra, à son choix, remplacer
ou réparer gratuitement la pièce défectueuse, à condition que l’acheteur avise son distributeur ou Greenway Home Products au cours de la
période de garantie. L’obligation de Greenway Home Products en vertu de la garantie est expressément limitée à ce remplacement ou à ces
réparations.
Les dispositions de cette garantie limitée ne s’appliquent pas à ce qui suit:
1. Accidents.
2. Réparations ou modifications non autorisées.
3. Entretien normal.
4. Changements apportés aux autres unités fabriquées après la fabrication de cette foyer insérable.
5. Les dommages secondaires causés par une panne de la foyer insérable, comme les inconvénients ou la perte d’usage.
6. Mauvaise installation.
Les dispositions de cette garantie limitée ne s’appliquent pas à la détérioration causée par l’usure ou par une exposition au-delà des
limites suivantes :
1. À partir de la date d’achat, pendant une (1) année sur les composants électriques et les circuits électriques (les ampoules sont exclu).
La garantie limitée de Greenway est sans valeur si les conditions suivantes ne sont pas observées :
1. La fiche de garantie doit être remplie et envoyée à Greenway Home Products.
2. Toutes les réparations sous garantie doivent être autorisées d’avance par les installations de réparation de la société Greenway.
3. Greenway se réserve le droit d’inspecter les composants défectueux remplacés sous garantie. le distributeur doit conserver les
pièces défectueuses pendant 60 jours.
4. Seulement les pièces et les accessoires et tout autre matériel disponible par l’entremise de Greenway Home Products doivent être
utilisés pour exécuter le service sous garantie.
5. Il incombe aux acheteurs de se présenter/aviser leur distributeur dès que le problème est découvert. Les réparations sous garantie
doivent être faites dans un temps raisonnable à partir de la date d’autorisation. La réparation ne doit pas dépasser 30 jours après la
réception de l’avis.
Cette garantie limitée remplace toute autre garantie expresse ou tacite, y compris toute garantie tacite ou de caractère marchand ou de
convenance en fonction d’une application particulière et de toute obligation ou responsabilité relativement aux produits de Greenway
Home Products qui n’assume/n’autorise aucune autre personne à assumer pour Greenway une responsabilité relativement à la fabrication
du foyer insérable.
Cette garantie est nulle si l’appareil est utilisé dans des applications commerciales ou industrielles.
Revendeur : Numéro de modèle :
Numéro de série : Code date de fabrication :
Date d’achat :
Garantie
-
 1
1
-
 2
2
-
 3
3
-
 4
4
-
 5
5
-
 6
6
-
 7
7
-
 8
8
-
 9
9
-
 10
10
-
 11
11
-
 12
12
-
 13
13


Muskoka MFB25WSTBL-1 Manuel utilisateur
- Catégorie
- Cheminées
- Taper
- Manuel utilisateur
- Ce manuel convient également à
dans d''autres langues
- English: Muskoka MFB25WSTBL-1 User manual
Documents connexes
-
Muskoka Gold MFB33WSC Mode d'emploi
-
-
-
-
-
-
-
-

