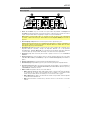
iON Projector Max HD Mode d'emploi
- Catégorie
- Projecteurs de données
- Taper
- Mode d'emploi

Projector Max™ HD
User Guide English ( 3 – 17 )
Guía del usuario Español ( 18 – 32 )
Guide d’utilisation Français ( 33 – 47 )
Appendix English ( 48 )
SUPPORT / SOPORTE / ASSISTANCE
ionaudio.com/support
Tap or click for technical support.
Toque o haga clic para obtener soporte
técnico.
Appuyez ou cliquez pour obtenir une
assistance technique.

2

3
User Guide (English)
Introduction
Thank you for purchasing the Projector Max™ HD. At ION, your entertainment is as important to us as
it is to you. That’s why we design our products with one thing in mind—to make your life more fun
and more convenient.
Box Contents
Projector Max™ HD
Microphone with Cable (10 ft. / 300 cm)
15V 4.8A Power Adapter (3 ft. / 100 cm)
Power Cord (3 ft. / 100 cm)
Remote Control
2 AAA Batteries
FAQ Insert
Quickstart Guide
Rechargeable Batteries
Note: Before you first use the product, please fully charge the battery. Your unit was purposely
shipped with a reduced battery charge to ensure safe transit. Use the included power adapter to
connect the unit to a power outlet and let it charge. This helps ensure the longest life for your
battery.
Here are some recommendations for getting the longest life from the internal battery.
General Usage Fully charge the battery before using it.
Charge the battery completely after each use.
Storage For best product longevity, do not store at exceedingly hot (greater than
90°F/32°C) or exceedingly cold (less than 32°F/0°C) temperatures.
It is acceptable to leave your sound system plugged in. This will not overcharge
the battery.
If you leave the battery level low and do not charge it for 3 months, it may
permanently lose capacity.
Repair If the battery fails to charge, check your fuse near the power cable input. If your fuse
is intact and it still will not charge, contact ION Audio at ionaudio.com.
Disposal Bring the unit to a recycling center or dispose of in accordance with local
ordinances.

4
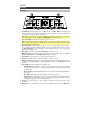
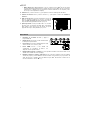
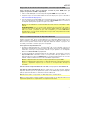
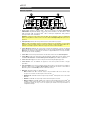
Features
Top Panel
1. Power Button: After powering on Projector Max™ HD (via the Power Switch on the side panel),
press this button in order to enter or exit standby mode. In standby mode, Projector Max HD will
not be fully turned off but it will save battery life.
Note: When Projector Max™ HD is out of standby mode and fully powered on, the speaker will
work, but you will need to use the Projector On/Off button to turn on the projector.
2. Projector On/Off: Press this button to turn the projector on or off.
Tip: This feature can be useful for saving battery life. If you are only using Projector Max™ HD to
listen to music from a Bluetooth or auxiliary device, use this button to turn the projector off and
save Projector Max™ HD’s battery.
3. Bluetooth Button: Press and hold this button to make Projector Max™ HD unpair from a
connected Bluetooth device and automatically search for another Bluetooth device to pair with.
The Bluetooth button is only for unpairing connected Bluetooth devices, since Projector Max
HD is always in pairing mode.
4. Echo Button: Use this button to turn the Mic Inputs echo effect on or off.
5. Menu Button: Press this button to access the projector’s picture settings. Then use the Arrow
buttons and OK button on the Navigation Pad to adjust the settings.
6. Home Button: Press this button to go to the projector’s main menu.
7. Return: When using the projector, press this button to go back one page.
8. Navigation Pad: Use the buttons here to navigate pages and select/adjust settings for your
projector. Use the Arrow buttons to highlight/edit different options and the OK button to make
a selection.
9. Status LEDs: From left to right, these four LEDs are the:
• Standby LED: This LED will be off when Projector Max™ HD is powered off, lit red when
Projector Max™ HD is powered on, and lit green when Projector Max™ HD is powered on but
in standby mode.
• Bluetooth LED: This LED will be lit blue when Projector Max™ HD is paired with a Bluetooth
audio source.
• Echo LED: This LED will be lit red when the mic echo effect is turned on.
• Battery LED: This LED will blink red when Projector Max™ HD has a low battery. It will be lit
solid when Projector Max™ HD is connected to power and charging (solid red when the unit
is still charging; green when the unit is fully charged).
10. Volume: Press and release the + and - buttons to adjust the overall output volume of the
loudspeaker.
11. Mic Volume: Press and release the + and - buttons to adjust the input volume of the Mic Inputs.
3
1
2
4
57
8
9
9
10
11

5
12. Focus Ring: Rotate this wheel left and right in order to
get a clear picture from the projector. How you should set
the Focus Ring will depend on the distance between
Projector Max™ HD and the projection screen.
13. Keystone Adjustment: If Projector Max™ HD is not sitting
on a level surface, use this lever in order to tilt the
projector lens so that it is perpendicular to the projection
screen.
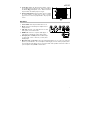
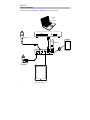
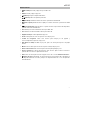
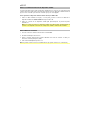
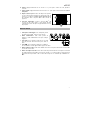
Side Panel
1. Power Switch: Turns Projector Max™ HD on or off.
2. DC In: Insert the included power adapter here to
charge the unit.
3. USB Port: Connect your USB drive here to load
video, photo, music, and text files.
4. HDMI Port: Connect a computer, DVD player, or
other device to this input in order to project video.
5. Aux Input (1/8" / 3.5 mm): Connect an MP3 Player
or other audio source to this 1/8” (3.5 mm) stereo
auxiliary input.
6. Mic Inputs (1/4" / 6.35 mm): Connect the included microphone to one of the 1/4” (6.35 mm)
inputs, if you would like to use a microphone while listening to music and/or projecting video.
The microphone audio will be sent out of Projector Max™ HD’s speaker. Control the volume of
your microphone using the Mic + and - buttons.
12
13
1
2 3456

6
Remote Control
• Power ( ): Powers Projector Max™ HD on and off.
• PROJ: Turns the projector on and off.
• Previous ( ): Skips to the previous USB file.
• Next ( ): Skips to the next USB file.
• Rewind ( ): Rewinds the USB music or movie file.
• Fast-forward ( ): Fast-forwards the USB music or movie file.
• Play/Pause ( ): Plays/pauses the USB slideshow, movie file, or music file.
• Vol-: Decreases the volume of Projector Max™ HD’s speaker.
• Vol+: Increases the volume of Projector Max™ HD’s speaker.
• Flip: Flips the projector screen around.
• Zoom: Toggles through the projector’s zoom options.
• Navigation Pad: Use the buttons here to navigate pages and select/adjust settings on your
projector.
• Exit button: When using the projector, press this button to go back one page.
• Menu: Press this button to access the projector’s picture settings.
• Home: Press this button to access the projector’s main menu.
• Number buttons: If entering a “Go Time” for a USB music or movie file, use these buttons to
enter the time.
• Echo: Use this button to turn the Mic Inputs echo effect on or off.
• Bluetooth ( ): Press and hold this button to make Projector Max™ HD unpair from a connected
Bluetooth device and automatically search for another Bluetooth device to pair with.

7
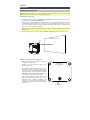
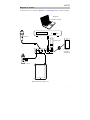
Setup
Getting the Projector Ready
To set up the projector:
1. Power up the projector by flipping Projector Max™ HD’s Power Switch to the on position
and then pressing the Projector button.
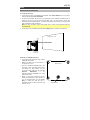
2. Position Projector Max™ HD in front of your projection screen, making sure that the lens is
facing the screen. The closer that Projector Max™ HD is to the projection screen, the
smaller the projected video will be. You’ll get a clear picture when the size of the projected
video is between 4 feet and 16 feet.
Note: The lens should be at the same height as the center of the projected video (as
pictured below).
3. Focus the lens as needed by turning the Focus Ring until you achieve a clear picture.
Some tips on using the projector:
• The projector will work best when used in
a dimly lit environment.
• White is the ideal color for the surface of
the projection screen.
• The lens should be perpendicular to the
projection screen. If Projector Max™ HD is
not sitting on a level surface, you can
correct the angle of the lens by using the
Keystone Adjustment or by
raising/lowering the adjustable foot on the
bottom of the unit.
• When you are done using the projector,
fasten the included lens cap to the lens. If
you are having trouble, use the Focus
Ring to make sure that the lens is
extended enough in order for the lens cap
to latch onto it.
Projector
Max™HD
Lens
Projection Screen
Projector Max™ HD
Bottom Panel
Adjustable Foot


9
Operation
Selecting the Projector Source
Note: Make sure the projector is fully charged (up to 10 hours) each time before using the
projector for an extended period, such as watching a movie.
With the Projector Max™ HD, you can project video from a device connected to the HDMI Port
or project an image, music, video, or text file from a USB drive plugged into the USB Port.
Note: To see what file formats Projector Max™ HD can read on a USB drive, see the
Appendix.
To turn the projector on and off, press the Projector button while Projector Max™ HD is fully
powered on (not in standby mode).
To select the video source for the projector:
1. Press the Source button while the projector is turned on, and then a menu will appear on
the right side of the projector screen.
2. Press the Source button again to toggle between HDMI and USB Media Player.
Alternatively, use the Arrow buttons on the Navigation Pad to highlight the desired
option.
3. When the desired source is highlighted on the screen, press the OK button to confirm
your selection.
If USB Media Player is selected as the projector source, the top left of the screen will
indicate whether a USB drive is plugged in, and four icons will appear on the projection
screen: Photo, Music, Movie, and Text. This is the home screen when USB Media Player
is selected as the projector source. When viewing files on a USB drive, you can always
return to the home screen by pressing the Home button.
If HDMI is selected as the audio source, the projector will act as a live feed for the device
plugged into the HDMI Port.
See the following sections of this manual for more details on using Projector Max™ HD with a
USB drive or with a device connected to the HDMI Port.
To adjust the projector’s picture settings or other settings, press the Menu button at any
time while the projector is turned on. Use the Arrow buttons on the Navigation Pad to scroll
through settings and press the OK button to select settings.
Note: Using the power adapter will provide a slightly brighter picture and louder audio.

10
Projecting Image Files from a USB Drive
To project images from a USB drive:
1. Plug your USB drive into the USB Port on Projector Max™ HD. Select USB Media Player as the
projector source and then access the home screen (as described in Selecting the Projector
Source).
2. Use the Arrow buttons to highlight the Photo icon. Then press the OK button.
3. The projector will display the list of directories on the USB drive. Use the Arrow buttons to
highlight the directory that contains the desired image files. Then press the OK button while the
directory name is highlighted.
4. The projector will display the list of folders/image files within that directory. Use the Arrow
buttons to highlight the folder that contains the desired image files. Then press the OK button
to select that folder. If there are no folders within the directory or if the desired image files are not
in any folder, skip to Step 5.
5. The projector will display a list of image files. Use the Arrow buttons to scroll between the
images. When the image you want to display is selected, press the OK button to select that
image.
6. The projector will display the image and begin a slideshow that starts with that image and
proceeds alphabetically through the rest of the images in the currently selected folder or
directory.
Note: Using the power adapter will provide a slightly brighter picture and louder audio.
In order to adjust the playback of the images in the slideshow, you can use the menu at the bottom
of the projector screen. If the menu does not appear automatically, press the OK button while an
image is being displayed.
While the menu is shown, you can use the Arrow buttons, OK button, and Return button to
navigate the following options:
• Play/Pause: Plays or pauses the slideshow.
• Prev.: Skips to the previous image in the slideshow.
• Next: Skips to the next image in the slideshow.
• Stop: Stops the slideshow and returns to the list of image files in the currently selected folder or
directory.
• Repeat: Toggles between the repeat options. If Repeat… is selected, the slideshow will stop
playing after all the images in the folder or directory have been displayed. If Repeat 1 is
selected, the slideshow will play the currently selected image continuously. If Repeat All is
selected, the slideshow will cycle through all the images in the folder or directory continuously.
• PList: Select this option to pull up a list of the image files in the currently selected folder or
directory in order to change the photo/view the slideshow playlist without having to exit the
slideshow.
• Info: Press this button to see the specifications for the currently projected image.
• Rotate: Select this option to rotate the image 90 degrees.
• ZoomI: Select this option to zoom in.
• ZoomO: Select this option to zoom out.
• Move: If a photo is zoomed in to more than 100% of its size, use this feature to adjust the
portion of the photo that is visible on the projection screen.
• Slide: Select this option to toggle through the slideshow transition modes.
To hide the menu from the slideshow, press the Down Arrow button.
To exit the slideshow, press the Return button at any time.

11
Playing Music Files from a USB Drive
To play music from a USB drive:
1. Plug your USB drive into the USB Port on Projector Max™ HD. Select USB Media Player as the
projector source and then access the home screen (as described in Selecting the Projector
Source).
2. Use the Arrow buttons to highlight the Music icon. Then press the OK button.
3. The projector will display the list of directories on the USB drive. Use the Arrow buttons to
highlight the directory that contains the desired music files. Then press the OK button while the
directory name is highlighted.
4. The projector will display the list of folders/music files within that directory. Use the Arrow
buttons to highlight the folder that contains the desired music files. Then press the OK button to
select that folder. If there are no folders within the directory or if the desired music files are not in
any folder, skip to Step 5.
5. The projector will display a list of music files. Use the Arrow buttons to scroll between the music
files. As each file is highlighted, Projector Max HD will begin playing a preview of the song. When
the music file you want to hear is selected, press the OK button to select it.
6. Projector Max™ HD will begin playing the selected music file. The song artwork and a visualizer
will be displayed on the projection screen.
Note: Using the power adapter will provide a slightly brighter picture and louder audio.
When the selected song finishes, Projector Max™ HD will proceed to play the rest of the songs in the
folder or directory in alphabetical order.
In order to adjust playback of the music files, you can use the menu at the bottom of the screen. If
the menu does not appear automatically, press the OK button while a song is playing.
While the menu is shown, you can use the Arrow buttons, OK button, and Return button to
navigate the following options:
• Play/Pause: Plays or pauses the music file.
• FB: Rewinds the music file.
• FF: Fast-forwards the music file.
• Prev.: Skips to the previous song in the folder or directory.
• Next: Skips to the next song in the folder or directory.
• Stop: Stops the playlist and returns to the list of music files in the currently selected folder or
directory.
• Set A / Set B / None: Use this option to loop a segment of a playing music file. In order to set
the start point for the loop, press the OK button on the Set A option. Then set the end point of
the loop by pressing the Set B option. After you do this, the loop will repeat. To deactivate the
loop, press the OK button while None is highlighted.
• Mute: Silences the music file.
• PList: Select this option to pull up a list of the music files in the currently selected folder or
directory in order to change the song/view the list without having to stop the music.
• Info: Press this button to see the specifications for the current music file.
• GoTime: Select this option to enter a track time for Projector Max™ HD to skip to. You can use
the Arrow buttons or Number buttons on the remote to enter the time.
To hide the menu, press the Down Arrow button.
To return to the list of files in the folder or directory, press the Return button at any time.

12
Projecting Movie Files from a USB Drive
To play videos from a USB drive:
1. Plug your USB drive into the USB Port on Projector Max™ HD. Select USB Media Player as the
projector source and then access the home screen (as described in Selecting the Projector
Source).
2. Use the Arrow buttons to highlight the Movie icon. Then press the OK button.
3. The projector will display the list of directories on the USB drive. Use the Arrow buttons to
highlight the directory that contains the desired movie files. Then press the OK button while the
directory name is highlighted.
4. The projector will display the list of folders/movie files within that directory. Use the Arrow
buttons to highlight the folder that contains the desired movie files. Then press the OK button
to select that folder. If there are no folders within the directory or if the desired movie files are not
in any folder, skip to Step 5.
5. The projector will display a list of movie files. Use the Arrow buttons to scroll between the movie
files. As each file is highlighted, Projector Max™ HD may begin playing a preview of the
highlighted video from the beginning. When the movie file you want to watch is selected, press
the OK button to select it.
6. A pop-up will appear asking if you would like to resume the video. Select Yes or No. If you
select Yes, the video will continue playing from the point at which the video preview left off. If
you select No, the video will restart from the beginning. If you did not highlight the movie file
long enough for a preview to start, the movie will automatically play from the beginning after you
select it.
Note: Using the power adapter will provide a slightly brighter picture and louder audio.
When the selected video finishes, Projector Max™ HD will proceed to play the rest of the videos in
the folder or directory in alphabetical order.
In order to adjust playback of the movie files, press the OK button to bring up the menu at the
bottom of the screen. Then use the Arrow buttons, OK button, and Return button to navigate the
following options:
• Play/Pause: Plays or pauses the video.
• FB: Rewinds the video.
• FF: Fast-forwards the video.
• Prev.: Skips to the previous video in the folder or directory.
• Next: Skips to the next video in the folder or directory.
• Stop: Stops playing the video and returns to the list of video files in the currently selected folder
or directory.
• Repeat: Toggles between the repeat options. If Repeat… is selected, Projector Max™ HD will
stop playing videos after all the movie files in the folder have been played. If Repeat 1 is
selected, Projector Max™ HD will play the current video continuously. If Repeat All is selected,
Projector Max™ HD will cycle through all the movie files in the folder or directory continuously.
• Set A / Set B / None: Use this option to loop a segment of the video. In order to set the start
point for the loop, press the OK button on the Set A option. Then set the end point of the loop
by pressing the Set B option. After you do this, the loop will repeat. To deactivate the loop,
press the OK button while None is highlighted.
• PList: Select this option to pull up a list of the video files in the currently selected folder or
directory in order to change the video/view the list without having to stop playback.
• Info: Displays the specifications for the current video.
• SlowF: Toggles through the slow-motion playback options.
• StepF: Freezes the current video and then fast-forwards the video in small increments each time
you select.

13
• GoTime: Select this option to enter a video time for Projector Max™ HD to jump to. Use the
Arrow buttons or the Number buttons on the remote control to enter the time.
• ZoomI: Zooms in on the video.
• ZoomO: Zooms out on the video.
• Aspect: Toggles through the aspect ratio settings.
• Move: If a video is zoomed in to more than 100% of its size, use this feature to adjust the portion
of the video that is visible on the projection screen.
To hide the menu, press the Down Arrow button.
To return to the list of files in the folder or directory, press the Return button at any time.
Projecting Text Files from a USB Drive
To view a text document from a USB drive:
1. Plug your USB drive into the USB Port on Projector Max™ HD. Select USB Media Player as the
projector source and then access the home screen (as described in Selecting the Projector
Source).
2. Use the Arrow buttons to highlight the Text icon. Then press the OK button.
3. The projector will display the list of directories on the USB drive. Use the Arrow buttons to
highlight the directory that contains the desired text files. Then press the OK button while the
directory name is highlighted.
4. The projector will display the list of folders/text files within that directory. Use the Arrow buttons
to highlight the folder that contains the desired text files. Then press the OK button to select
that folder. If there are no folders within the directory or if the desired text files are not in any
folder, skip to Step 5.
5. The projector will display a list of text files. Use the Arrow buttons to scroll between the text
files. While a text file is highlighted, the projector will show a preview of the file. When the text file
you want to view is selected, press the OK button to select it.
6. The projector will then show the text file.
In order to adjust the projection of the text files in the folder or directory, press the OK button to
bring up the menu at the bottom of the screen. Then use the Arrow buttons, OK button, and
Return button to navigate the following options:
• Prev…: Goes to the previous page in the text file.
• Nex…: Goes to the next page in the text file.
• Prev.: Skips to the previous text file in the folder or directory.
• Next: Skips to the next text file in the folder or directory.
• Stop: Exits the text file and returns to the list of files in the folder or directory.
• PList: Select this option to pull up a list of the text files in the currently selected folder or
directory in order to change the document/view the list without having to exit the document.
• Info: Displays the specifications for the text file.
To hide the menu, press the Down Arrow button.
To return to the list of files in the folder, press the Return button at any time during the
slideshow.

14
Projecting Video from a Device Connected to the HDMI Port
To play video from a device connected to the HDMI Port (such as a DVD player or
computer):
1. Use an HDMI cable to connect your device to the HDMI Port on Projector Max™ HD.
2. Make sure that HDMI is selected as the projector source (as described in Selecting the
Projector Source).
3. Once you select HDMI as the projector source, the projector will display whatever is
playing on the device connected to the HDMI Port. Use the controls on your device in
order to adjust playback as needed.
Note: Using the power adapter will provide a slightly brighter picture and louder audio.
IMPORTANT NOTE: If no sound is heard from Projector Max™ HD's speaker when playing
video from a device connected to the HDMI Port, check the source's audio settings and
make sure they are set to PCM Stereo mode. Alternatively, connect the device's audio to
Projector Max™ HD via Bluetooth while playing video via HDMI.
Listening to Music from a Bluetooth Device
When Projector Max™ HD is paired with a Bluetooth device (such as a smartphone), it can play
music from the device through its speaker. You can play music from the Bluetooth device
while the projector is on and operating or while the projector is off.
To pair with a Bluetooth device:
1. Turn on your Bluetooth device and power on Projector Max™ HD, which will automatically
begin the pairing process (Projector Max™ HD is always in pairing mode). You will know
that Projector Max™ HD is not yet paired to a Bluetooth device if the Bluetooth LED is
blinking.
2. Navigate to the Bluetooth device’s setup screen. Then find and select Projector Max HD.
You will know that Projector Max™ HD is paired with your Bluetooth device when the
Bluetooth LED is lit solid blue. Also, the speaker will play a brief tone once pairing is
complete.
Note: If your Bluetooth device prompts for a pairing code, enter “0000”.
Note: If you have previously paired to the Bluetooth device, you may be able to skip Step
2 and simply wait for it to connect with Projector Max™ HD after powering on.
To disconnect the paired Bluetooth device, press and hold the Bluetooth button.
To pair with a different Bluetooth device, repeat step 2 after disconnecting from the first
device. During the pairing process, it may help to move the first device out of range or to
disable its Bluetooth capacity.
Note: Maximum range will be achieved when using devices with Bluetooth 5.0.
Note: Users should consider updating their Bluetooth device’s operating system if
experiencing trouble with pairing or playing music.

15
Listening to Music from an Auxiliary Device
You can play music from an auxiliary device (such as an iPod or other MP3 player) through
Projector Max™ HD. You can play music from the auxiliary device while the projector is on and
operating or while the projector is off.
To play an auxiliary device through Projector Max™ HD:
1. Use a standard 1/8” / 3.5 mm cable to connect the output jack on your aux device to the
Aux Input on Projector Max HD.
2. Use the controls on your auxiliary device to play/pause a track, skip tracks, etc.
Note: If the sound from your auxiliary device is distorted, try lowering the volume on the
device. The volume on your auxiliary device should not be at full level.
Using a Microphone
1. Connect the included microphone to one of the two MIC inputs.
2. Turn the microphone switch to ON.
3. Adjust the volume from the top panel using the +/- MIC volume buttons and the +/- main
Volume (VOL) buttons.
4. Press the ECHO button to enhance your voice.
Note: Two microphones can be used simultaneously (second microphone not included).

16
Troubleshooting
If the unit is not charging: Make sure the power cable is properly connected to the power
input and the power outlet.
If the sound is distorted: Try lowering the volume control of your sound source, musical
instrument, or microphone. Also, try to reduce the overall volume of Projector Max™ HD using
the Volume controls.
If there is too much bass: Try adjusting the tone or EQ control on your sound source to lower
the bass level. This will allow you to play the music louder before clipping (distortion) occurs.
If there is a high-pitched whistling noise when using microphones: This is probably
feedback. Point the microphone away from the speaker.
If you can’t hear the microphone over the music volume: Turn down the music volume
from your source.
If you cannot connect your audio device to Projector Max™ HD via Bluetooth:
• Have your audio device (e.g., smartphone or tablet) and Projector Max™ HD as close
together as possible while trying to connect. Make sure both the audio device and
Projector Max™ HD are unobstructed by walls, furniture, etc.
• Reset the Bluetooth connection on Projector Max™ HD to disconnect Projector Max™ HD
from any other audio device and restart the search process. If this does not work right
away, power off Projector Max™ HD and then power it back on.
• Reset the Bluetooth connection on your audio device by turning Bluetooth off and back
on. You can find this under the Bluetooth menu in the Settings for your phone or other
audio device.
If this does not work, and you have connected to Projector Max™ HD before, find Projector
Max™ HD in the list of available or previously connected devices in your audio device's
Bluetooth menu, tap the "gear" or “i” icon located next to it and then select Unpair or
Forget. Turn Projector Max™ HD off and back on and try pairing again once it reappears in
your available devices list.
Note: If Projector Max™ HD has been paired to another audio device recently that is still
within range, you may need to repeat this process with that audio device to fully
disconnect.
How do I use the USB input for file playback? (1) Connect the USB flash drive to the USB
port on the projector. (2) Use the projector's control panel or remote control to choose the file
type (Movies, Music, Photo, or Text) on the home menu. (3) Navigate to your file and press OK
to playback the file.
Can I connect my HDMI Streaming Device (eg Chromecast, Roku, etc.)? Yes. Use your
streaming device's power source to ensure enough power is provided. (1) Connect your
streaming device to the projector's HDMI port. (2) Power on the streaming device. (3) Select
HDMI on the projector's home screen menu to project the streaming device's content. (4) Use
the streaming device's suggested controls to navigate content (e.g. remote control).

17
Can I connect a phone/tablet via HDMI? Yes. An adapter cable connector (sold separately)
is needed. Consult your device's manual for the recommended cables.
I see video but cannot hear audio:
• Check the volume setting on your streaming device, software, and projector.
• Some streaming services/apps have default audio settings that need to be adjusted to
'PCM'.
• For some streaming services, try downloading the video content within the streaming
provider and playing from the downloaded file.
• Connect your device's headphone output to the 1/8" (3.5 mm) aux input on the projector,
or if your device supports Bluetooth, connect your device to the projector via Bluetooth.
How do I resolve the HDCP error message? Be sure to use at least an HDMI 2.0 cable. (1)
Disconnect the HDMI cable from both devices (2) Disconnect the power cables (3) Reconnect
the HDMI cables (4) Reconnect the power cables and power on devices. On some devices,
you will have the ability to change the display setting from 4k to 720p which may also help
resolve this issue.

18
Guía del usuario (Español)
Introducción
Gracias por comprar el Projector Max™ HD. En ION, su entretenimiento es tan importante para nosotros
como para usted. Por eso es que diseñamos nuestros productos con una sola cosa en mente—hacer
que su vida sea más divertida y cómoda.
Contenido de la caja
Projector Max™ HD
Micrófono y cable (300 cm / 10 pies)
15V 4.8A Adaptador de alimentación (100 cm / 3 pies)
Cable de alimentación (100 cm / 3 pies)
Control remoto
2 pilas AAA
Inserto de preguntas frecuentes
Guía de inicio rápido
Baterías recargables
Nota: Antes de utilizar por primera vez el producto, cargue completamente la batería. Su unidad se
despachó intencionalmente con una carga reducida de la batería por razones de seguridad en el
tránsito. Utilice el adaptador de alimentación incluido para conectar la unidad a una toma de
corriente y permita que la unidad se cargue. Esto contribuye a asegurar la vida útil más larga de su
batería.
He aquí algunas recomendaciones para prolongar la vida útil de la batería interna.
Uso general Cargue completamente la batería antes de usarla.
Cargue la batería completamente después de cada uso.
A
lmacenamiento Para lograr la mayor longevidad del producto, no lo almacene a temperaturas muy
altas (superiores 32°C/90°F) o muy frías (inferiores a 0°C/32°F).
Es aceptable dejar su sistema de sonido enchufado. No sobrecargará la
batería.
Si deja que el nivel de la batería baje y no la carga durante 3 meses, puede
perder permanentemente su capacidad.
Reparación Si la batería no se carga, compruebe su fusible cerca de la entrada del cable
de alimentación. Si el fusible está intacto y la batería sigue sin cargarse,
póngase en contacto con ION Audio en ionaudio.com.
Disposición final Lleve la unidad a un centro de reciclaje o deséchela de acuerdo a las
ordenanzas locales.

19
Características
Panel superior
1. Botón de encendido: Luego de encender el Projector Max™ HD (mediante el interruptor de
encendido del panel lateral), pulse este botón para entrar o salir del modo de espera. En modo de
espera, el Projector Max™ HD no se apagará por completo, sino que ahorrará batería.
Nota: Cuando el Projector Max™ HD no se encuentre en modo de espera y esté completamente
encendido, el altavoz funcionará, pero deberá utilizar el botón Projector On/Off para encender el
proyector.
2. Encender/Apagar el Projector: Pulse este botón para encender o apagar el proyector.
Consejo: Esta característica puede ser de utilidad para ahorrar batería. Si solamente está utilizando el
Projector Max™ HD para escuchar música desde un dispositivo Bluetooth o auxiliar, utilice este botón
para apagar el proyector y ahorrar su batería.
3. Botón Bluetooth: Mantenga pulsado este botón para que el Projector Max™ HD se desaparee de un
dispositivo Bluetooth conectado y busque otro dispositivo Bluetooth con el cual aparearse
automáticamente. El botón Bluetooth sirve únicamente para desaparear dispositivos Bluetooth
conectados, dado que el Projector Max™ HD siempre se encuentra en modo de apareamiento.
4. Botón Echo (eco): Utilice este botón para encender o apagar el efecto de eco de la entrada de
micrófono.
5. Botón del menú: Pulse este botón para acceder a los ajustes de imagen del proyector. Luego utilice
los botones direccionales y el botón OK que componen el teclado de navegación para modificar los
ajustes.
6. Botón de menú inicial: Pulse este botón para ir al menú principal del proyector.
7. Botón Return (regreso): Al utilizar el proyector, pulse este botón para regresar a la página anterior.
8. Teclado de navegación: Utilice estos botones para navegar por las páginas y seleccionar/ajustar los
ajustes de su proyector. Utilice los botones direccionales para resaltar/editar las diferentes opciones y
el botón OK para confirmar su selección.
9. LED de estado: De izquierda a derecha, estos cuatro LED son:
• LED de modo de espera: Este LED estará apagado cuando el Projector Max™ HD esté apagado,
se encenderá de rojo cuando el Projector Max™ HD esté encendido y se encenderá de verde
cuando el Projector Max™ HD esté encendido, pero se encuentre en modo de espera.
• LED de Bluetooth: Este LED se encenderá de azul cuando el Projector Max™ HD esté apareado
con una fuente de audio Bluetooth.
• LED de eco: Este LED se encenderá de rojo cuando el efecto de eco de micrófono se encuentre
activado.
3
1
2
4
57
8
9
9
10
11

20
• LED de batería: Este LED parpadeará de color rojo cuando el Projector Max™ HD esté por agotar
su batería. Quedará permanentemente encendido cuando el Projector Max™ HD esté conectado a
la alimentación y cargándose (de rojo permanente cuando la unidad aún se esté cargando y verde
una vez que esté completamente cargada).
10. Volumen: Pulse y suelte los botones + y - para ajustar el volumen de salida general del altavoz.
11. Volumen de micrófono: Pulse y suelte los botones + y - para ajustar el volumen las entradas de
micrófono.
12. Anillo de enfoque: Gire este anillo a la izquierda y a la derecha
para que la imagen emitida por el proyector sea nítida. El
ajuste del anillo de enfoque dependerá de la distancia entre el
Projector Max™ HD y la pantalla en donde se proyecte.
13. Ajuste trapezoidal: Si el Projector Max™ HD no se encuentra
apoyado sobre una superficie nivelada, utilice esta palanca
para inclinar la lente del proyector de manera que quede
perpendicular respecto de la pantalla de proyección.
Panel lateral
1. Interruptor de encendido: Enciende y apaga el
Projector Max HD.
2. Entrada de CC: Inserte aquí el cable de alimentación
incluido para cargar la unidad.
3. Puerto USB: Conecte aquí su unidad USB para cargar
archivos de video, fotos, música, y texto.
4. Puerto HDMI: Conecte a esta entrada una
computadora, un reproductor de DVD u otro
dispositivo a fin de reproducir videos.
5. Entrada auxiliar (1/8 pulg. / 3,5 mm): Conecte un reproductor de MP3 u otra fuente de audio a esta
entrada estéreo auxiliar de 3,5 mm (1/8 pulg.).
6. Entradas de micrófono (1/4 pulg. / 6,35 mm): Conecte el micrófono incluido a una de las entradas
de 6,35 mm (1/4 pulg.), si desea utilizar un micrófono mientras escucha música y/o proyecta video. El
audio del micrófono se emitirá a través del altavoz Projector Max™ HD. Controle el volumen de su
micrófono utilizando los botones Mic + y -.
12
13
1
2 3456
La page est en cours de chargement...
La page est en cours de chargement...
La page est en cours de chargement...
La page est en cours de chargement...
La page est en cours de chargement...
La page est en cours de chargement...
La page est en cours de chargement...
La page est en cours de chargement...
La page est en cours de chargement...
La page est en cours de chargement...
La page est en cours de chargement...
La page est en cours de chargement...
La page est en cours de chargement...
La page est en cours de chargement...
La page est en cours de chargement...
La page est en cours de chargement...
La page est en cours de chargement...
La page est en cours de chargement...
La page est en cours de chargement...
La page est en cours de chargement...
La page est en cours de chargement...
La page est en cours de chargement...
La page est en cours de chargement...
La page est en cours de chargement...
La page est en cours de chargement...
La page est en cours de chargement...
La page est en cours de chargement...
La page est en cours de chargement...
La page est en cours de chargement...
-
 1
1
-
 2
2
-
 3
3
-
 4
4
-
 5
5
-
 6
6
-
 7
7
-
 8
8
-
 9
9
-
 10
10
-
 11
11
-
 12
12
-
 13
13
-
 14
14
-
 15
15
-
 16
16
-
 17
17
-
 18
18
-
 19
19
-
 20
20
-
 21
21
-
 22
22
-
 23
23
-
 24
24
-
 25
25
-
 26
26
-
 27
27
-
 28
28
-
 29
29
-
 30
30
-
 31
31
-
 32
32
-
 33
33
-
 34
34
-
 35
35
-
 36
36
-
 37
37
-
 38
38
-
 39
39
-
 40
40
-
 41
41
-
 42
42
-
 43
43
-
 44
44
-
 45
45
-
 46
46
-
 47
47
-
 48
48
-
 49
49


iON Projector Max HD Mode d'emploi
- Catégorie
- Projecteurs de données
- Taper
- Mode d'emploi
dans d''autres langues
- English: iON Projector Max HD User guide
- español: iON Projector Max HD Guía del usuario
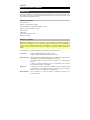
Documents connexes
Autres documents
-
Philips PPX520 Mode d'emploi
-
AIPTEK PocketCinema V150W Manuel utilisateur
-
 NOMVDIC L500 Manuel utilisateur
-
Panasonic PTL780U Manuel utilisateur
-
NEC GT1150 Series Manuel utilisateur
-
LG HW300G Le manuel du propriétaire
-
AIPTEK PocketCinema V60 Manuel utilisateur
-
-
Sony HDR-PJ710 Mode d'emploi
