Saris SuperClamp HD 2-Bike Le manuel du propriétaire
- Catégorie
- Accessoires de vélo
- Taper
- Le manuel du propriétaire
Ce manuel convient également à

SuperClamp EX - 2 Bike
Assembly Instructions | Instrucciones de montaje | Instructions d’assemblage
4025F, 4025HD

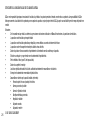
TELL US WHAT YOU THINK
SARIS.COM/FEEDBACK
REGISTER YOUR PRODUCT FOR UPDATES
SARIS.COM/REGISTRATION

3
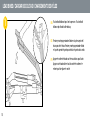
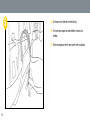
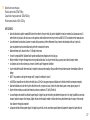
LONG FOR THE RIDE
Just as no garage is complete without a bicycle, at Saris, we believe no car is
complete withouta bike rack.
Since setting off on this journey nearly 30 years ago, Saris racks have freed
millions of bike-lovers to explore new territory and terrain, take part in group
rides, bike pool to races, and commute to and from work.
And we continue to do so in style.
As the all-time #1 best-selling bike rack, Saris Bones® continues to set the
standard for excellence in design. Today all Saris bicycle racks are intuitive to
load and secure, and guaranteed for life.
Built by cyclists for cyclists in Madison, Wisconsin, we strive to create the
world’s best bike racks.
Because cycling is what we live for.

4
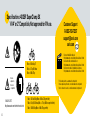
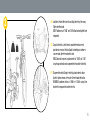
Specifications: 4025F SuperClamp EX
1-1/4” or 2” Compatible, Not approved for RV use.
Max = 60 lbs/kg 27
Máx.= 27 kg/60 libras
Max = 60lb/27kg
* Guía de
adaptación
* Guide de
compatibilité
Fit
Guide
1.800.783.7257
http://www.saris.com/en/vehicle-racks.html
Max = 120 lbs/54kg (Max = 60 lbs/27kg per bike)
Máx.= 54 kg/120 libras (Máx. = 27 kg /60 libras por bicicleta)
Max = 120lb/54kg (Max = 60lb/27kg par vélo)
For relevant patents, see www.saris.com/patents
Para las patentes pertinentes, consulte www.saris.com/patents
Pour les brevets concernés, consultez www.saris.com/patents
View our installation video at
http://www.saris.com/en/instructional-videos-1.html
Vea nuestro vídeo de instalación en
http://www.saris.com/en/instructional-videos-1.html
Visionnez notre vidéo d’installation à l’adresse
http://www.saris.com/en/instructional-videos-1.html
Customer Support
1-800-783-7257
saris.com Live
Chat

5
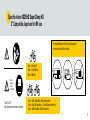
Specifications: 4025HD SuperClamp HD
2” Compatible, Approved for RV use.
RV compatibility (Class A, B and C) and (not approved
for use on tow-behind RVs or Trailers)
* Guía de
adaptación
* Guide de
compatibilité
Fit
Guide
1.800.783.7257
http://www.saris.com/en/vehicle-racks.html
Max = 60 lbs/kg 27
Máx.= 27 kg/60 libras
Max = 60lb/27kg
Max = 120 lbs/54kg (Max = 60 lbs/27kg per bike)
Máx.= 54 kg/120 libras (Máx. = 27 kg /60 libras por bicicleta)
Max = 120lb/54kg (Max = 60lb/27kg par vélo)

6
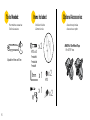
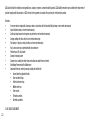
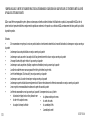
Tools Needed: Items Included:
x 1
8mm
x 2
M10 x 60
x 2
M10
Accesorios opcionales
Accessoires en option
Herramientas necesarias:
Outils nécessaires:
Artículos incluidos
éléments inclus
For 4.5”-5” tires
Adjustable or 19mm and 17mm
#4419 Fat Tire Wheel Trays
x 2
Optional Accessories:
Pre installed
Pre instalado
Pre installé
x 1

Copy here...
EN
ES
FR
2
7
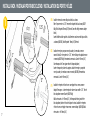
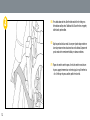
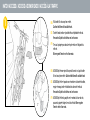
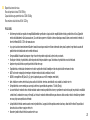
Install receiver and secure with pin and lock, as shown.
Note: If your receiver is 1.25” remove the adapter block as shown (4025F
Only).Tools Required: 19mm(3/4’’) Wrench, 5mm Hex Key(to remove adapter
block).
Insert hitchtite and line up holes. Install receiver and secure with pin and lock,
as shown (4025HD). Tools Required: 19mm(3/4’’) Wrench.
Instalar el receptor y asegurar con el pasador y la cerradura, como se
muestra. Nota: Si el receptor es de 1,25”, retire el bloque de adaptador como
se muestra(4025F Only). Herramientas necesarias: Llave de 19mm (3/4”),
llave hexagonal de 5mm (para retirar el bloque adaptador)
Inserte el enganche y alinee los agujeros. Instale el receptor y asegúrelo
con el pasador y la cerradura, como se muestra (4025HD).Herramientas
necesarias: Llave de 19mm (3/4”).
Installez le récepteur et fixez-le avec une épingle et un verrou, comme
indiqué. Remarque: si votre récepteur de barre est un modèle 1,25”, ôtez le
bloc adaptateur comme illustré (4025F Only)
Outils nécessaires: clé 19mm (3/4’’), clé hexagonale 5mm (pour ôter le
bloc adaptateur) Insérez le tirant et alignez les trous. Installez le récepteur
et fixez-le avec une épingle et un verrou, comme indiqué. (4025HD) Outils
nécessaires: clé 19mm (3/4’’).
1
INSTALL RACK / INSTALAR PORTABICICLETAS / INSTALLATION DU PORTEVÉLOS
EN
ES
FR
7
2”
1.25”
2”

1
COPY HERE
8
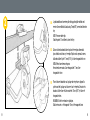
Lay horizontal bar on to receiver plate, lining up front plate with bar and
receiver. Secure with bolts & nuts, using 17mm(9/16”) wrench and 8mm hex
key.
NOTE : Remove rubber tips
Tools Required: 17mm Wrench, 8mm Hex Key
Colocar la barra horizontal sobre la placa del receptor, alineando la
placa frontal con la barra y el receptor. Fijarla con los pernos & nueces,
utilizando la llave fija de 17 mm (9/16”) y la llave hexagonal de 8 mm
NOTA: Retirar los extremos de goma
Herramientas necesarias: Llave hexagonal de 17mm, llave
hexagonal de 8mm
Placez la barre horizontale sur la plaque du récepteur, en alignant la
partie avant de la plaque sur la barre et sur le récepteur. Sécurisez les
boulons à l’aide d’une clé & des noisettes 17mm (9/16”) et d’une clé
hexagonale 8mm.
REMARQUE: ôtez les embouts en plastique.
Outils nécessaires: clé hexagonale 17mm, clé hexagonale 8mm.
EN
ES
FR
2
8

Copy here...
1
COPY HERE
EN
ES
FR
9
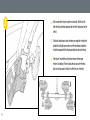
Slide on outer wheel trays to complete rack assembly. (Wheel tray with
white reflectors installed on passenger side of vehicle facing away from the
vehicle.)
Deslizar las bandejas para ruedas exteriores para completar el montaje del
portabicicletas. (Bandeja para ruedas con reflectores blancos instalada en
el lado del acompañante del vehículo apuntando hacia afuera del mismo).
Faites glisser l’ensemble dans les plateaux de roue extérieurs pour
terminer l’assemblage. (Placez le plateau de roue pourvu de réflecteurs
blancs du côté passager du véhicule, les réflecteurs vers l’extérieur).
EN
ES
FR
3
9
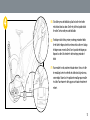
A
A
B
B
BB
A
A

10
Push and hold button on top of arm to open arm. Push and hold
button on top of hook to slide hook up.
Presione y mantenga presionado el botón en la parte superior del
brazo para abrir el brazo. Presione y mantenga presionado el botón
en la parte superior del gancho para deslizar el gancho hacia arriba.
Appuyer et maintenir le bouton sur le dessus du bras pour l’ouvrir.
Appuyez sur le bouton situé en haut du crochet et maintenez-le
enfoncé pour faire glisser le crochet.
1
LOAD BIKES / CARGAR BICICLETAS / CHARGEMENT DES VÉLOS
EN
ES
FR

11
Load bikes. Heaviest bike closest to car. Adjust wheel tray if necessary.
Tighten wheeltray knob.
NOTE: Position arms at ‘‘10:00’’ and ‘‘2:00’’ without contacting bike frame
components.
Cargar las bicicletas. La bicicleta más pesada debe colocarse en la
posición más cercana al vehículo. Ajustar las bandejas para ruedas en
caso necesario. Apriete el mando de la rueda
NOTA: Colocar los brazos en las posiciones de las “10:00” y las “2:00”
sin que hagan contacto con los componentes del cuadro de la bicicleta.
Chargement des vélos Chargez le vélo le plus lourd contre la voiture.
Ajustez le plateau de roue si nécessaire. Serrez le bouton de traction.
REMARQUE: positionnez les bras à «10h00» et «14h00», sans qu’ils ne
touchent les composants des cadres des vélos.
EN
ES
FR
2
LOAD BIKES / CARGAR BICICLETAS / CHARGEMENT DES VÉLOS

12
Press hooks down onto tires. Once the hook contacts the tire, firmly press
the hook down until you hear 1 additional click. Ensure the tires are properly
inflated and in good condition.
Bajar los ganchos hacia las ruedas. Una vez que el gancho haga contacto con
la rueda, presionar con fuerza hasta escuchar un clic adicional. Asegurarse de
que las ruedas estén correctamente infladas y en buenas condiciones.
Plaquez les crochets contre les pneus. Une fois les crochets en contact avec
les pneus, appuyez fermement sur ces derniers jusqu’à ce qu’ils émettent un
«clic». Vérifiez que les pneus sont bien gonflés et en bon état.
3EN
ES
FR

13
To lock bikes press and hold button, pull out lock cable. Insert cables
ends into lock shank as shown. Turn the key to the lock position to lock
the cables. To return cable press and hold button.
Para bloquear las bicicletas, presione y mantenga presionado el botón,
tire del cable de bloqueo. Inserte los extremos de los cables en el vástago
de bloqueo como se muestra. Gire la llave a la posición de bloqueo para
bloquear los cables. Para devolver el cable, mantenga presionado el
botón.
Pour verrouiller les vélos, maintenez le bouton enfoncé, tirez sur le câble
de verrouillage. Insérez les extrémités des câbles dans la tige du verrou,
comme indiqué. Tournez la clé en position de verrouillage pour verrouiller
les câbles. Pour retourner le câble, appuyez sur le bouton et maintenez-le
enfoncé.
EN
ES
FR
4

14
Use straps to secure front and rear wheels to trays.
Use correas para asegurar las ruedas delanteras y traseras a las
bandejas.
Utilisez des sangles pour fixer les roues avant et arrière aux plateaux.
5EN
ES
FR

Copy here...
EN
ES
FR
2
15
Pull handle, tilt rack away from vehicle.
Caution: hold bikes with available hand.
Tirar del tirador, inclinar el portabicicletas alejándolo del vehículo.
Precaución: Sujetar las bicicletas con la otra mano.
Tirez sur la poignée pour basculer le porte-vélos en l’éloignant du
véhicule.
Mise en garde: Tenez les vélos d’une main.
1
HATCH ACCESS / ACCESO A SOMBREADO / ACCÈS À LA TRAPPE
EN
ES
FR
4025HD Only: Remove pin with lanyard at base of rack, push handle,
tilt rack away from vehicle. Caution: hold bikes with available hand.
4025HD Only: Retire el pasador con el cordón en la base del bastidor,
empuje el mango, incline el bastidor hacia afuera del vehículo.
Precaución: Sujetar las bicicletas con la otra mano.
4025HD Only: Retirez la goupille avec le cordon à la base du rack,
poussez la poignée, éloignez le rack du véhicule.Mise en garde:
Tenez les vélos d’une main.
EN
ES
FR
2”

1
COPY HERE
EN
ES
FR
16
Access Hatch.
Acceder al maletero
Accès au coffre
2

Copy here...
1
COPY HERE
EN
ES
FR
17
Push rack into place, you will hear audible “click” when in place.
Empujar el portabicicletas a su posición,
oirá “clic” audible cuando esté en su lugar.
Replacez le porte-vélos en poussant dessus, vous entendrez un «clic»
audible en place.
EN
ES
FR
3

18
Pull hande, Fold up rack toward vehicle
Tirar hande, Plegar el bastidor en dirección al vehículo.
Tirer Hande, Poussez le porte-vélos vers le véhicule pour le plier.
1
RACK STORAGE / ALMACENAMIENTO DEL PORTABICICLETAS / RANGEMENT DU PORTEVÉLOS
EN
ES
FR

19
Technical Specifications
Bike carrier weight: 35lb/ 15.8kg
Permitted load capacity: 120lb/ 54.4kg
Max bike weight: 60 lb/27.2 kg
CAUTIONS:
• All requirements for compatability/fit as stated in the current Saris vehicle/carrier compatability guide must be followed. (Available at any Saris dealer or www.saris.com). If
your vehicle is not listed or you have any questions, please call our customer service at 800-783-7257 or visit www.saris.com.
• Read and follow instructions carefully. Save owner’s manual for future reference or parts information. Ensure that any other users of the bicycle carrier are familiar with their
content.
• Drive slowly over speed bumps, 5 to 10 mph max speed.
• It’s the end users responsibility to ensure that use of this product meets all local and state laws.
• When cleaning vehicle and rack, use only water soluble cleaners. Do not take rack through car wash.
• Make sure bike tires are not directly behind exhaust pipe.
• Rack must be installed directly into vehicle hitch receiver. Do not modify the hitch receiver or use hitch extenders.
• 4025F - Do not mount to any type of trailer or RV including Class B vehicles
• 4025HD is RV compatibible (Class A, B and C) and (not approved for use on tow-behind RVs or Trailers)
• Prior to usage on the road, remove all loose parts from bicycle, including (but not limited to) child seat, basket, lock, light, pump, etc.
• This carrier is not recommended for off-road use or for use at speed exceeding 70 mph (113 km/h).
• The handling characteristics of a vehicle will change when a rear bicycles carrier is fitted and especially when it is loaded (in particular crosswind sensitivity, handling on
bends and braking). Driving techniques should be altered to allow for these changes, reduce speed, especially on bends and allowing for longer braking distances.
• The vehicle’s total length increases when the bike carrier is attached. The bikes themselves may increase the vehicle’s total width and height. Take care when reversing
and/or entering garages or ferries, etc.
• Remove carrier from vehicle when not in use.
• This carrier is constructed to carry standard-bike-frames. It is not intended for use with tandem or recumbent bicycles.
EN
RACK STORAGE / ALMACENAMIENTO DEL PORTABICICLETAS / RANGEMENT DU PORTEVÉLOS

20
• Replace any mounting strap at the first sign of wear. Replacement parts are available through your local Saris dealer or call 1-800-783-7257.
• Tighten straps regularly during the journey.
• Vehicle should be in good condition in the area at which the hitch is located.
• Do not exceed maximum load capacity of carrier (120 lbs max or 60 lbs max per bike!) Secure properly and adjust for even load distribution, loading the heaviest/biggest
bike first and closest to the vehicle.
• Saris absolves itself of responsibility for any personal injuries or consequential damage to property or wealth caused by incorrect fitting or use.
Recommended Rack Maintenance & Care Instructions
Each use:
• Wipe down trunk rack feet
• Avoid ground contact with trunk rack feet
• Check straps for signs of wear
• Check bike cradles and wheel scoops
• Check for loose bolts
Every 90 days actions:
• Clean with water and mild soap
• Lubricate locks if applicable (use wet, oil-based lubricant; NO WD-40)
• Grease hitch bolt threads
• Check for scratches in paint.
Official Warranty Terms: Saris Racks
Saris Cycling Group, Inc (SCG), parent company of Saris Racks, warrants our products to the original consumer to be free from defects in materials and workmanship. Your purchase
includes the following warranty which is in lieu of all other express warranties. This warranty is extended only to the initial consumer purchaser. This warranty gives you specific legal
rights. You may have other legal rights which vary from state to state. Please retain your sales slip for your records, as proof of purchase will be required.
La page est en cours de chargement...
La page est en cours de chargement...
La page est en cours de chargement...
La page est en cours de chargement...
La page est en cours de chargement...
La page est en cours de chargement...
La page est en cours de chargement...
La page est en cours de chargement...
La page est en cours de chargement...
La page est en cours de chargement...
La page est en cours de chargement...
-
 1
1
-
 2
2
-
 3
3
-
 4
4
-
 5
5
-
 6
6
-
 7
7
-
 8
8
-
 9
9
-
 10
10
-
 11
11
-
 12
12
-
 13
13
-
 14
14
-
 15
15
-
 16
16
-
 17
17
-
 18
18
-
 19
19
-
 20
20
-
 21
21
-
 22
22
-
 23
23
-
 24
24
-
 25
25
-
 26
26
-
 27
27
-
 28
28
-
 29
29
-
 30
30
-
 31
31


Saris SuperClamp HD 2-Bike Le manuel du propriétaire
- Catégorie
- Accessoires de vélo
- Taper
- Le manuel du propriétaire
- Ce manuel convient également à
dans d''autres langues
Documents connexes
-
Saris 4031 MTR 1-Bike Hitch Rack Le manuel du propriétaire
-
-
-
-
Saris MTR 1-Bike Add-On Le manuel du propriétaire
-
-
-
-
-


