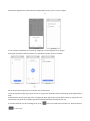
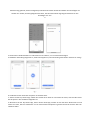
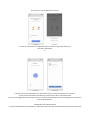
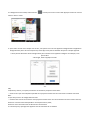
FlinQ Smart Starry Sky Projector Manuel utilisateur
- Catégorie
- Projecteurs
- Taper
- Manuel utilisateur

FlinQ Smart Starry Sky Projector
User manual
Made in China
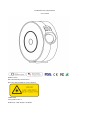
Don’t look directly into the laser!
Not a toy. Not intended for use by children!
LASER LIGHT
Laser product class 1
Diode laser - Max. Output < 0,39mW

English
NOTICE
● Please keep the product away from open flames.
● Please keep away from water to avoid damage.
● Please keep out of reach of children. Children may only use it under adult supervision.
● Please cut off power supply if a hazard occurs.
● Please use the product in line with instructions.
● Do not look directly at the laser to avoid damaging your eyes.
● Do not point the light into sky within 10 nautical miles (18.5km) of an airport.
● Do not disassemble and assemble it by yourself.
● For indoor use only. (Works better in a dark environment!)
INTRODUCTION
The Smart Star Projector is an entertaining electronic device and able to project the starry sky on your ceiling with
floating clouds that have a lot of changeable colors. It creates thousands of stars filling the ceiling, it will give you
the best visual experience of milky way and Nebula without having to step one foot outside of your room.
Create a romantic and dreamy atmosphere easily. Sleep under the stars and enjoy the starry sky. We hope you have
a great experience with this incredible product.
SPECIFICATIONS
Power Input
5V 1A
Power Output
<1 mW per beamlet
Classification of lasers
Class 1
Work Temperature
14℉~95℉(-10~40℃)
Wireless Type
WiFi 2.4G 1T1R
Laser color
Green,515-520nm/Blue,450nm
Nebula color
Colorful,450nm
Shell Material
Flame Retarding V0 Class ABS
Application
Indoor(Home/Cafe/Bar/motor homes)
Certificate
FDA,FCC,CE,ROHS,RCM
Control by
Amazon Alexa, Google Home, APP
Timing
Flexible timing
Dimensions(cm)
16.2L*6.8W*16.2H
Net Weight
0.5KG
Power Cord Length
1,8m
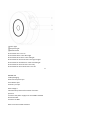
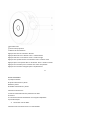
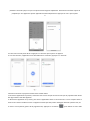
PARTS LIST

①Laser light
②Projector light
③Switch button
Press button once: Turn on
Press button twice: Laser+blue light
Press button three times: Laser+red light
Press button for the fourth time: Laser+green light
Press button for the fifth time: Laser+colorful light
Press button for the sixth time: Laser only
Press button for the seventh time: Turn off
-3-
BEFORE USE
Inside packaging:
Smart Star Projector 1pcs
User Manual 1pcs
Accessory set 1pcs
How to begin?
1.Remove the protective film sticker from laser
aperture.
2.Connect the power supply into an available standard
electrical outlet.
3.Connect to WIFI.
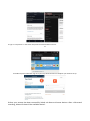
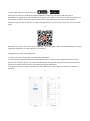
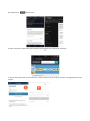
How to connect to WIFI-network?

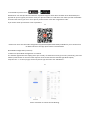
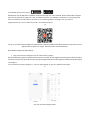
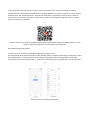
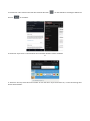
1. Download Tuya Smart from or .
Download or scan the QR code and install the Tuya Smart App for either iOS or Android. Once downloaded, the
app will ask you to register your device. Enter your phone number or email which one makes you feel comfortable
and select the country you live in. If use phone you will receive a text with a registration code.
If you choose email you will then create a password.
-4-
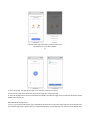
Please note: there are two mode configurations (Quick Mode/Bluetooth Mode) available for you to choose from
to add the device to the app. Quick mode is recommended.
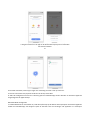
Quick Mode Configuration (Common)
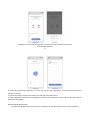
1. Make sure Quick Mode Configuration is initiated:
The indicator light blinks blue rapidly (twice per second). If it blinks blue slowly (once every 3seconds), press and
hold the power button on the Smart Star Projector for 6 seconds until the indicator light blinks rapidly.
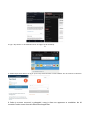
2.Tap the icon "+" on the top right, choose any device type and enter into "Add Device".
-5-
Please remember to choose the fast blinking.

3. Follow the In-app instructions to connect the Smart
Star Projector to your WIFI-network.
-6-
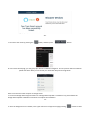
4. Once connected , the App will prompt you to connect. Please press ”Done”.
5. Now you can control the Smart Star Projector through your Tuya Smart App.
6. Once the configuration has been completed successfully, the indicator light will turn solid and the device will be
added to the Device List.
Bluetooth Mode Configuration
1. Turn on your phone’s Bluetooth, press and hold the power button on the Smart Star Projector for 6 seconds until
the indicator light blinks rapidly. Enter the add device interface. It automatically says ”Devices to be added” then

press ”Go” to add.
-7-
2.Enter your Wi-Fi Password and press “Next” to add device.
3.Once connected, the app will prompt, to connect press “Done”
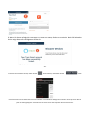
How to connect Smart Star Projector to Amazon Alexa.
1.Launch Tuya Smart App, sign into your account and make sure Mini Smart star projector is on the device list.
2.Minimize Tuya Smart App, then launch the Alexa App and sign in your Alexa account and make sure you have at
least one Alexa smart speaker-controlled device installed like Echo dot, etc.
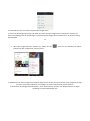
3. In the upper left corner of Home page, press the button to show APP Menu. Then select in the
menu.

4. Type in "Tuya Smart" in the search and press the search button next to it.
-9-
5. Enable Tuya Smart Skill then sign in to your Tuya Smart account to complete your account set up.
6.Once your account has been successfully linked, ask Alexa to discover devices. After a 20-second
searching, Alexa will show all the available devices.

-10-
7. Go back to the menu by pressing the button, and then press button.
8. In the Smart Home page, you can group your devices in different categories. Your Tuya Smart APP has now been
paired with Alexa. Now you can control your Smart Star Projector through Alexa.
How to connect Smart Star Projector to Google Home
1. Launch the Google Home App and make sure a Google Home Speaker is installed. If not, please follow the
Google Home Speaker installation instruction to complete the installation.
-11-
2. Once the Google Home is installed, in the upper left corner of App Home page pressing button to show

App menu. Then press “Home Control”in the menu.
3. After successfully linking your account, in the Google Home App you can see all your smart devices from your
Tuya Smart App-account. You can assign rooms tor each device.
4. Now you can use Google Home to control your smart device, you can say like:
´Ok Google, turn off wall light´
-12-
FAQ
1.What should I do if I can’t turn off or turn on the Smart Star Projector?
---Make sure your cellphone and the Smart Star Projector are connected to the same WiFi connection.
2.What should I do when the configuration fails?
---Make sure to connect your Smart Star Projector within a short distance of your internet router; Check whether
the available internet network has a frequency of 2.4GHz;
Check your internet connection is working properly
3.How can I share devices with my family members?
---Open the Tuya Smart APP, select “profile” >“Devices Sharing”>“Sent” select “Add Sharing”, now you can
share with your family members.
4.Can this APP be used on any type of mobile phone? Can I control the device from a distance?

---Yes, the APP can work with both android & IOS systems. Once connected to the Internet, there is no distance
limitation.
-13-
5.Can I control the devices with a 2G/3G/4G connection?
--- The Smart Star Projector devices must be registered first on a WiFi network, after you have successfully connected
it, then the Smart Star Projector can be controlled by your Smart Phone with 2G/3G/4G networks.
6.Will it cause a fire or other safety hazards if kept on all night ?
--- No, it will be safe to use all night.
7.Can I adjust the brightness on this?
--- Yes, you can adjust the brightness on the APP.
8.Is the indirect laser light damaging to eyesight?
--- Yes,please do not look directly into the laser.
9.If projected on a ceiling, what is greatest width and height of the projected image?
--- That depends on the height of the object you place it on.
-14-
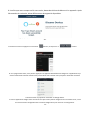
FlinQ Slimme Sterrenprojector

Handleiding
Gefabriceerd in China
Kijk niet rechtstreeks in de laser!
Geen speelgoed. Niet bedoeld voor gebruik door kinderen!
LASER LIGHT
Laser product klasse 1
Diode laser - Max. Output < 0,39mW
Nederlands

LET OP:
● Houd het product uit de buurt van open vuur.
● Blijf uit de buurt van water om schade te voorkomen.
● Buiten bereik van kinderen houden. Kinderen mogen het onder toezicht van een volwassene gebruiken.
● Schakel de stroomtoevoer uit als er zich een gevaar voordoet.
● Gebruik het product in overeenstemming met de instructies.
● Kijk niet rechtstreeks in de laser om oogletsel te voorkomen.
● Richt het licht niet op de lucht binnen een straal van 10 zeemijl (18,5 km) van een luchthaven.
● Demonteer en monteer het apparaat niet zelf.
● Alleen voor gebruik binnenshuis. (Werkt beter in een donkere omgeving!)
INTRODUCTIE
De slimme sterrenprojector is een vermakelijk elektronisch apparaat en in staat om de sterrenhemel op je plafond
te projecteren met zwevende wolken in veel veranderlijke kleuren. En met duizenden sterren die het plafond vullen.
Het geeft je de beste visuele ervaring van de melkweg en Nebula zonder een voet buiten je kamer te hoeven stappen.
Creëer gemakkelijk een romantische en dromerige sfeer. slaap onder de sterren en geniet van de sterrenhemel die
nu van jou is. We hopen dat je een geweldige ervaring hebt met dit geweldige product!
SPECIFICATIES
Stroomaansluiting
5V 1A
Vermogen
<1 mW per bundeltje
Classificatie van lasers
Class 1
Werktemperatuur
14℉~95℉(-10~40℃)
Draadloos type
WiFi 2.4G 1T1R
Laser kleur
Groen,515-520nm/Blauw,450nm
Nebula kleur
Kleurrijk 450nm
Materiaal behuizing
Flame Retarding V0 Class ABS
Toepassing
Binnen(Thuis/Cafe/Bar)
Certificaat
FDA,FCC,CE,ROHS,RCM
Controle via
Amazon Alexa, Google Home, APP
Timing
Flexibele timing
Afmetingen (cm)
16.2L*6.8W*16.2H
Netto gewicht
0.5KG
Netsnoer lengte
1,8m
ONDERDELENLIJST

①Laser light
②Projector light
③Switch-knop
Druk eenmaal op de knop: inschakelen
Druk tweemaal op de knop: laser + blauw licht
Druk driemaal op de knop: laser + rood licht
Druk voor de vierde keer op de knop: laser + groen licht
Druk voor de vijfde keer op de knop: laser + kleurrijk licht
Voor de zesde keer op de knop drukken: alleen laser
Druk voor de zevende keer op de knop: uitschakelen
-3-
VOOR GEBRUIK:
Het pakket bevat:
Slimme Sterrenprojector 1pcs
Handleiding 1pcs
Accessoiresset 1pcs
Hoe te beginnen?
1.Verwijder de beschermende filmsticker van de laser
opening.
2.Sluit de voeding aan op een beschikbare standaard
stopcontact.
3.Maak verbinding met WIFI.
Hoe maak je verbinding met een wifi-netwerk?

1. Download de Tuya Smart app in of .
Download of scan de QR-code en installeer de Tuya Smart App voor iOS of Android. Na het downloaden vraagt de
app u om uw apparaat te registreren. Voer uw telefoonnummer of e-mailadres in waardoor u zich op uw gemak
voelt en selecteer het land waarin u woont. Als u een telefoon gebruikt, ontvangt u een sms met een
registratiecode. Als u voor e-mail kiest, maakt u een wachtwoord aan.
-4-
Let op: er zijn twee modusconfiguraties (Quick Mode / Bluetooth Mode) beschikbaar waaruit u kunt kiezen om het
apparaat aan de app toe te voegen. De snelle modus wordt aanbevolen.
Quick Mode Configuratie (Gebruikelijk)
1. Zorg ervoor dat de configuratie van de snelle modus is gestart:
Het indicatielampje knippert snel blauw (tweemaal per seconde). Als het langzaam blauw knippert (elke 3 seconden),
houdt u de aan/uit-knop op de Slimme Sterrenprojector gedurende 6 seconden ingedrukt totdat het indicatielampje
snel knippert.
2. Tik rechtsboven op het pictogram "+", kies een apparaattype en ga naar "Apparaat toevoegen".
-5-
Kies voor de snelle knippermodus.

3. Volg de instructies in de app om de Slimme Sterrenprojector te verbinden
met uw wifi-netwerk.
-6-
4. Eenmaal verbonden, zal de app u vragen om verbinding te maken. Druk op "Gereed".
5. Nu kunt u de Smart Star-projector bedienen via de Tuya Smart APP.
6. Zodra de configuratie met succes is voltooid, gaat het indicatielampje continu branden en wordt het apparaat
toegevoegd aan de apparatenlijst.
Bluetooth Mode Configuratie
1. Schakel Bluetooth van uw telefoon in, houd de aan/uit-knop op de Slimme Sterrenprojector 6 seconden ingedrukt
totdat het indicatielampje snel knippert. Open de interface voor het toevoegen van apparaten. Er verschijnen

automatisch apparaten die moeten worden toegevoegd en druk op ‚Go‘ om toe te voegen
-7-
2. Voer uw Wi-Fi-wachtwoord in en druk op "Volgende" om een apparaat toe te voegen.
3. Eenmaal verbonden, zal de app vragen om verbinding te maken, druk op "Gereed"
Hoe de Slimme Sterrenprojector te verbinden met Amazon Alexa.
1. Start de Tuya Smart-app, log in op uw account en zorg ervoor dat de Mini Smart-sterprojector op de apparatenlijst
staat.
2. Minimaliseer de Tuya Smart-app, start vervolgens de Alexa-app en log in op uw Alexa-account en zorg ervoor dat
u opminstens één Alexa smart speaker-gestuurd apparaat geïnstalleerd zoals Echo dot, etc.
3. In hoek linksboven van de homepage, druk op de knop om het APP menu te laten zien. Selecteer daarna
. in het menu.

4. Type "Tuya Smart" in de zoekbalk en druk vervolgens op de zoekknop.
-9-
5. Schakel Tuya Smart Skill in en log in op uw Tuya Smart-account om het instellen van uw account te voltooien.
6. Zodra je account succesvol is gekoppeld, vraag je Alexa om apparaten te ontdekken. Na 20
seconden zoeken toont Alexa alle beschikbare apparaten.

-10-
7. Ga terug naar het menu door op de knop te drukken, en klik op de knop.
8. Op de Smart Home-pagina kunt u uw apparaten in verschillende categorieën groeperen. De Tuya Smart APP is
nu gekoppeld met Alexa. Nu kunt u uw Slimme Sterrenprojector bedienen via Alexa.
Hoe de Slimme Sterrenprojector te gebruiken via Google Home:
1. Start de Google Home-app en zorg ervoor dat de Google Home-luidspreker is geïnstalleerd. Als dit niet het geval
is, volg dan de installatie-instructies van de Google Home-luidspreker om de installatie te voltooien.
-11-
2. Als de Google Home is geïnstalleerd, kies in de linkerbovenhoek van de homepage voor de knop om het

APP-menu te openen. Druk vervolgens op “Home Control” in het menu.
3. Nadat u uw account succesvol heeft gekoppeld, kunt u in de Google Home-app al uw slimme apparaten zien
vanaf uw Tuya Smart App-account. U kunt aan elk apparaat kamers toewijzen.
4. Nu kunt u Google Home gebruiken om uw smart-apparaat te bedienen. U kunt bijvoorbeeld zeggen:
´Ok Google, doe de wandlamp uit´
-12-
FAQ
1.Wat moet ik doen als ik de Smart Star Projector niet kan in- of uitschakelen?
--- Zorg ervoor dat uw gsm en de Smart Star Projector zijn verbonden met dezelfde wifi-verbinding.
2. Wat moet ik doen als de configuratie mislukt?
--- Zorg ervoor dat u uw Smart Star Projector op korte afstand van uw internetrouter aansluit; Controleer of het
beschikbare internetnetwerk een frequentie heeft van 2,4 GHz;
Controleer of uw internetverbinding correct werkt
3.Hoe kan ik apparaten delen met mijn gezinsleden?
--- Open de Tuya Smart APP, selecteer "profiel"> "Apparaten delen"> "Verzonden" selecteer "Delen toevoegen",
nu kunt u
deel met uw gezinsleden.
4.Kan deze app op elk type mobiele telefoon worden gebruikt? Kan ik het apparaat op afstand bedienen?

--- Ja, de APP kan werken met zowel Android- als IOS-systemen. Eenmaal verbonden met internet, is er geen
afstandsbeperking.
-13-
5.Kan ik de apparaten met een 2G / 3G / 4G-verbinding bedienen?
--- De Smart Star Projector-apparaten moeten eerst op een WiFi-netwerk worden geregistreerd, nadat u deze met
succes hebt verbonden, kan de Smart Star-projector worden bestuurd door uw smartphone met 2G / 3G / 4G-
netwerken.
6. Zal het brand of andere veiligheidsrisico's veroorzaken als het de hele nacht aan blijft?
--- Nee, het is veilig om de hele nacht te gebruiken.
7.Kan ik de helderheid hierop aanpassen?
--- Ja, u kunt de helderheid op de APP aanpassen.
8. Is het indirecte laserlicht schadelijk voor het gezichtsvermogen?
--- Ja, kijk niet rechtstreeks in de laser.
9.Wat is de grootste breedte en hoogte van het geprojecteerde beeld als het op een plafond wordt geprojecteerd?
--- Dat hangt af van de hoogte van het object waarop u het plaatst.
-14-
La page est en cours de chargement...
La page est en cours de chargement...
La page est en cours de chargement...
La page est en cours de chargement...
La page est en cours de chargement...
La page est en cours de chargement...
La page est en cours de chargement...
La page est en cours de chargement...
La page est en cours de chargement...
La page est en cours de chargement...
La page est en cours de chargement...
La page est en cours de chargement...
La page est en cours de chargement...
La page est en cours de chargement...
La page est en cours de chargement...
La page est en cours de chargement...
La page est en cours de chargement...
La page est en cours de chargement...
La page est en cours de chargement...
La page est en cours de chargement...
-
 1
1
-
 2
2
-
 3
3
-
 4
4
-
 5
5
-
 6
6
-
 7
7
-
 8
8
-
 9
9
-
 10
10
-
 11
11
-
 12
12
-
 13
13
-
 14
14
-
 15
15
-
 16
16
-
 17
17
-
 18
18
-
 19
19
-
 20
20
-
 21
21
-
 22
22
-
 23
23
-
 24
24
-
 25
25
-
 26
26
-
 27
27
-
 28
28
-
 29
29
-
 30
30
-
 31
31
-
 32
32
-
 33
33
-
 34
34
-
 35
35
-
 36
36
-
 37
37
-
 38
38
-
 39
39
-
 40
40


FlinQ Smart Starry Sky Projector Manuel utilisateur
- Catégorie
- Projecteurs
- Taper
- Manuel utilisateur
dans d''autres langues
Documents connexes
Autres documents
-
 iqonic SP21 Manuel utilisateur
-
PNI PT202L Manuel utilisateur
-
ProBreeze PB-20 Manuel utilisateur
-
Telefunken TF29 Manuel utilisateur
-
Logicom STRIPPY 4 + 4USB Le manuel du propriétaire
-
Ultenic K10 Mode d'emploi
-
Overmax OV-CAMSPOT 4.0 PTZ WHITE Le manuel du propriétaire
-
EXPERT4HOUSE MS-104B Manuel utilisateur
-
MOES MS-104 Manuel utilisateur
-
Olympia OC 1000 Outdoor Camera Le manuel du propriétaire
