
Amazfit GTR 42mm
Product Manual

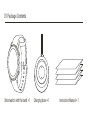
Charging base × 1 Instruction Manual × 1Smartwatch with the band × 1
01 Package Contents

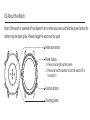
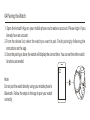
02 About the Watch
Note: If the watch is powered off and doesn’t turn on when you press and hold the power button, the
battery may be running low. Please charge the watch and try again.
1. Press once to light up the screen
2. Press and hold the button to turn the watch off or
to restart it
Power button:
Heart rate sensor
Charging plates
Function button

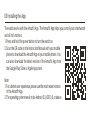
03 Installing the App
The watch works with the Amazfit App. The Amazfit App helps you control your smartwatch
and all its functions.
1.
2.
Press and hold the power button to turn the watch on.
Scan the QR code on the Instruction Manual with your mobile
phone to download the Amazfit App to your mobile phone. You
can also download the latest version of the Amazfit App from
the Google Play Store or Apple App store.
Note:
1.
2.
For a better user experience, please use the most recent version
of the Amazfit App.
The operating system needs to be Android 5.0, iOS10.0, or above.

1. Open the Amazfit App on your mobile phone and create an account. Please login if you
already have an account.
2. From the device list, select the watch you want to pair. Finish pairing by following the
instructions on the app.
3. Once the pairing is done, the watch will display the correct time. You can set the other watch
functions as needed.
Note:
Do not pair the watch directly using your mobile phone’s
Bluetooth. Follow the steps in the app to pair your watch
correctly.
04 Pairing the Watch

Only use the original charger to charge your watch. The charging plates on the back of the
watch should be aligned with those of the charger. Once the watch begins to charge, the
charging indicator will appear on the screen.
05 Charging the Watch
Note:
Only use the original charging base provided in the product
package to charge your watch. Also make sure that the
charging base is always kept dry.

Note:
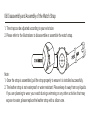
1. Once the strap is assembled, pull the strap properly to ensure it is installed successfully.
2. The leather strap is not waterproof or water resistant. Please keep it away from any liquids.
If you are planning to wear your watch during swimming or any other activities that may
expose to water, please replace the leather strap with a silicon one.
1. The strap can be adjusted according to your wrist size.
2. Please refer to the illustrations to disassemble or assemble the watch strap.
06 Disassembly and Assembly of the Watch Strap

This device complies with part 15 of the FCC Rules. Operation is subject to the following two
conditions:
1. This device may not cause harmful interference, and
2. This device must accept any interference received, including the interference that may cause
undesired operation.
FCC ID:2AC8UA1910
Any changes or modifications that are not expressly approved by the party responsible for the
compliance may void the user’s authority to operate the device.
07 Regulatory Notice

Note: This device has been tested and found to comply with the limits for a Class B digital
device, pursuant to Part 15 of the FCC Rules. These limits are designed to provide reasonable
protection against harmful interferences in a residential installation. This device generates,
uses, and may radiate radio frequency energy and, if not installed and used in accordance with
the instructions, may cause harmful interference to radio communications. However, there is no
guarantee that interference will not occur in a particular installation. If this product does cause
harmful interference to radio or television reception, which can be determined by turning the
device off and on, the user is encouraged to try to correct the interference by one or more of the
following measures:

- Reorient or relocate the receiving antenna.
- Increase the separation between the device and receiver.
- Connect the device into an outlet on a circuit dierent from that to which the receiver is connected.
- Consult the dealer or an experienced radio/TV technician for help.
The device has been evaluated to meet general RF exposure
requirement. The device can be used in portable exposure
condition without restriction.

This device complies with Industry Canada license-exempt RSS standard(s). Operation is
subject to the following two conditions:
(1) This device may not cause interference, and
(2) This device must accept any interference, including interference that may cause undesired
operation if the device.
IC:21806-A1910 CAN
ICES-3(B)/NMB-3(B)
Le présent appareil est conforme aux CNR d'Industrie Canada applicables aux appareils
radioexempts de licence. L'exploitation est autorisée aux deux conditions suivantes :
(1) l'appareil ne doit pas produire de brouillage, et
(2) l'utilisateur de l'appareil doit accepter tout brouillage radioélectrique subi, même si le

Under Industry Canada regulations, this radio transmitter may only operate using an antenna of
a type and the maximum (or lesser) gain approved for the transmitter by Industry Canada. To
reduce the potential of radio interference to other users, the antenna type and its gain should be
so chosen that the equivalent isotopically radiated power (e.i.r.p.) is not more than that
necessary for successful communication.
Conformément à la réglementation d'Industrie Canada, le présent émetteur radio peut fonctionner
avec une antenne d'un type et d'un gain maximal (ou inférieur) approuvé pour l'émetteur par
Industrie Canada. Dans le but de réduire les risques de brouillage radioélectrique à l'intention
des autres utilisateurs, il faut choisir le type d'antenne et son gain de sorte que la puissance
isotrope rayonnée équivalente (p.i.r.e.) ne dépasse pas l'intensité nécessaire à l'établissement
d'une communication satisfaisante.

The following symbol signifies that this device has to be disposed separately from
ordinary household wastes at the end of its life. Please kindly be aware that this is
your responsibility to dispose the electronic device at recycling centers so as to
help conserve the natural resources.
08 Disposal and Recycling Information

Hereby, Anhui Huami Information Technology Co., Ltd. declares that the radio device type
A1910 is in compliance with Directive 2014/53/EU. The full text of the EU declaration of
conformity is available at the following internet address:
http://en.amazfit.com/support.html
For more regulatory information and product certification/compliance logos related
to Amazfit GTR, please go to Regulatory on your Amazfit GTR.
09 Certifications and Safety Approvals

1. The device is water resistant with a certified rating of 5ATM. This means that the device is
resistant to rain and can be worn while showering. It may also be used in shallow-water
activities, such as swimming in a pool.
2. However, the watch should not be used when scuba diving, bathing, taking a sauna, or in
other activities involving a high-velocity of water or the submersion below shallow depth.
4. Please do not operate the watch underwater. After submerging, dry it with a dry cloth before
operating or charging.
3. The watch is not protected against chemical reagents, acidic or alkaline solutions, etc.
Defects caused by liquid damages are not covered under the warranty.
10 Safety Notice

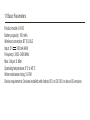
11 Basic Parameters
Product model: A1910
Battery capacity: 195 mAh
Wireless connection: BT 5.0, BLE
Input: 5 V 300 mA MAX
Frequency: 2402–2480 MHz
Max. Output: 0 dBm
Operating temperature: 0°C to 45°C
Water resistance rating: 5 ATM
Device requirements: Devices installed with Android 5.0 or iOS 10.0 or above OS versions

The Amazfit Limited Warranty covers Amazfit products against manufacturing defects beginning on
the original purchase date. The warranty period is 12 months or other period as the applicable
consumer laws in the consumer’s country of purchase require. Our warranty is in addition to
rights provided by applicable consumer laws.
Official website: en.amazfit.com
Support: support.amazfit.com
Email: support@amazfit.com
Importer:
Beryko s.r.o.
Na Roudné 1162/76, 301 00 Plzeň
www.beryko.cz
12 Warranty and Return Policy
-
 1
1
-
 2
2
-
 3
3
-
 4
4
-
 5
5
-
 6
6
-
 7
7
-
 8
8
-
 9
9
-
 10
10
-
 11
11
-
 12
12
-
 13
13
-
 14
14
-
 15
15
-
 16
16
-
 17
17


dans d''autres langues
- English: Amazfit A1910 User manual
Documents connexes
Autres documents
-
Suzhou 360 Robotic Technology 360 S8 Series Robot Vacuum Cleaner Manuel utilisateur
-
Boat SmartWatch Mode d'emploi
-
Timex Ironman R300 GPS Watch Manuel utilisateur
-
Mi A2005 Amazfit band Manuel utilisateur
-
 SKG S9246HC R8 Smart Watch Mode d'emploi
-
LG LGW110.AATTBK Manuel utilisateur
-
Timex iConnect By Round Manuel utilisateur
-
 Mode d'Emploi pdf LG W150 Mode d'emploi
-
-

