Honeywell CL60PM Manuel utilisateur
- Catégorie
- Humidificateurs
- Taper
- Manuel utilisateur

Portable Evaporative Air Cooler
User Manual
Read and save these instructions before use
EN
Refroidisseur d'air par évaporation portatif
Mode d'emploi
Lire ces instructions avant l'utilisation et les conserver
FR
Enfriador de Aire Evaporativo Portátil
Manual de Instrucciones
Lea y guarde estas instrucciones antes de usar la unidad
ES
Model / Modèle / Modelo:
CO70PE
Customer Support:
Assistance Au Client:
Servicio de atencion a clientes:
Web: www.jmatek.com
USA: 1-800-474-2147 | [email protected]
CANADA^: [email protected]
^ Canada Customer Support service available for models sold in Canada only.
^ Le Service Client Canadien est disponible uniquement pour les modèles vendus sur le territoire Canadien.
^ Servicio de Atención A Clientes en Canadá disponible solo para modelos vendidos en Canadá.

1
THANK YOU
SAFETY RULES
Congratulations on your purchase of this Honeywell Evaporative Air Cooler.
The Safety & Maintenance Guide and the separate User Manual are intended to provide you with
important information needed to set up, operate, maintain and troubleshoot this product.
EN
The Air Cooler Guide and User Manual are intended to provide important information needed to
set up, operate, maintain and troubleshoot your Air Cooler. Failure to follow these instructions may
damage and/or impair its operation, create hazards, and void the warranty. In case there is any
inconsistency or conflict between the English version and any other language version of the content
of this material, the English version shall prevail.
WARNING—READ AND SAVE THE AIR COOLER GUIDE AND USER MANUAL
READ AND SAVE THESE INSTRUCTIONS:
When using electrical appliances, basic safety precautions should always be followed:
This appliance can be used by children aged from 8 years and above and persons with reduced
physical, sensory or mental capabilities or lack of experience and knowledge if they have been
given supervision or instruction concerning use of the appliance in a safe way and understand
the hazards involved. Children shall not play with the appliance. Cleaning and user maintenance
shall not be made by children without supervision.
DO NOT operate with a damaged cord or plug. If the supply cord is damaged, it must be replaced
with a supply cord which is as per manufacturers specifications, by the authorized service centre
or its service agent or a similarly qualified person in order to avoid a hazard.
Before operating the product, remove the packaging and check that product is in good condition.
DO NOT allow children to play with this appliance, packaging or plastic bags.
Check the household voltage to ensure it matches the appliance’s rating specifications.
DO NOT use an extension cord with this unit.
DO NOT run power cord under carpeting, or cover it with rugs or runners. Keep the cord away from
areas where it may be tripped over.
Always ensure the water tank is filled with water above the "min." level mark, when operating the
air cooler in evaporative COOLING mode.
Always unplug the Air Cooler before refilling the water tank, cleaning, servicing or relocating the
unit.
•
•
•
•
•
•
•
•
•

2
SAFETY RULES (CONTINUED)
EN
Never pull the cord. Remove it from the electrical outlet/ socket by grasping and pulling on the
plug-end of the cord.
This appliance has been manufactured for use in domestic environments and must not be used
for other purposes.
DO NOT use in areas where gasoline, paint or other flammable goods and objects are stored.
DO NOT operate the unit on COOL setting with an empty tank as this may result in damage to the
water pump.
DO NOT attempt to repair or adjust any electrical or mechanical functions of the Air Cooler, as
this may void the warranty.
DO NOT cover the cooler’s air inlet or outlet, as this may damage the motor.
DO NOT insert or allow objects to enter any ventilation or exhaust opening, as this may damage
the unit and may cause electrical shock or fire.
DO NOT operate with the Honeycomb Cooling Media removed, as this will overload and damage
the motor.
DO NOT leave the operating appliance unattended for an extended period of time.
DO NOT operate this unit if it is damaged or malfunctions. Refer to the Troubleshooting section.
If problem still exists contact the Customer Support Center.
Always place the unit on a dry level floor.
DO NOT use in bathrooms or near water. DO NOT keep the product where it may fall into water or
a water container.
Store in a dry area when not in use.
Always grip the side handles to move the Air Cooler.
WARNING: To reduce the risk of fire or electric shock, do not use this appliance with any solid
state speed control device.
•
•
•
•
•
•
•
•
•
•
•
•
•
•
•

3
USER TIPS
EN
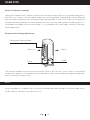
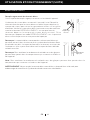
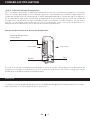
Honeywell Evaporative Air Coolers are built to maximize energy efficiency and keep energy costs
low. Warm air is drawn into the cooler and enters the Honeycomb Cooling Media. Water pumped
from the water tank pours over the Honeycomb Cooling Media. As the warm air passes through the
Honeycomb Cooling Media, the water absorbs the heat, naturally cooling and humidifying the air. A
fan propels the cooled air out into the room. This no-compressor system cools naturally, efficiently
and inexpensively.
The recommended maximum relative humidity level is 60% or less, which allows a noticeable
temperature decrease. The temperature will be lower in drier climates because higher evaporation
occurs when the humidity is low.
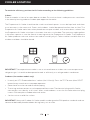
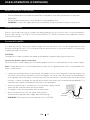
What is Evaporative Cooling?
Evaporative Air Cooling Mechanism
Honeycomb Cooling Media
Warm Air Cool Air
Pump Water
NOTE
When the product is used for the first time the Honeycomb Cooling Media will have an odor which
will dissipate in a few hours or so of initial use.

4
COOLER LOCATION
EN
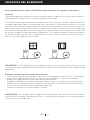
Indoors
Place the cooler in front of an open door or window. Ensure that there is adequate cross-ventilation
in the room by leaving a door or window open opposite the cooler.
The Evaporative Air Cooler should not be used in enclosed spaces. It must be kept level and there
must be water in the water tank. Doors and windows should be opened to allow free air flow. The
Evaporative Air Cooler works best when placed near an open window, so that outside air is drawn into
the Evaporative Air Cooler, circulates in the room, then exits via the door. The maximum cooling effect
is felt when a person is near the flow of air coming out of the Evaporative Air Cooler. The Evaporative
Air Cooler produces moisture and can be used to humidify dry air. To be used for humidification the
windows and doors should be closed.
To maximize efficiency, position the Air Cooler according to the following guidelines:
IMPORTANT: The evaporative air cooler is not an air conditioner as it does not use a compressor or
refrigerant gas. It should not be expected to cool as efficiently as a refrigerated air conditioner.
IMPORTANT: Honeywell Outdoor Air Cooler models are designed to IPX4 product standards and not
recommended to be placed outdoors during heavy rain or snow.
Outdoors (for outdoor models only)
Use only on GFCI Protected outlets/ sockets (for USA only). Press the TEST button (then RESET
button) every month to ensure proper operation.
Power cords must be secured to avoid tripping.
The wiring and connections must be protected from water. The electrical plug and Air Cooler
connections must be dry at all times. When used outdoors, insert the air cooler electrical plug
into an IP44 compliant outdoor electrical outlet.
Set the unit on a solid flat surface.
•
•
•
•

5
STORAGE AND MAINTENANCE GUIDELINES
EN
Read the detailed CLEANING & DRAINING THE WATER TANK instructions for your Air Cooler, located
in the separate User Manual. Below is a general guideline for maintenance and storage of your Air
Cooler.
WARNING: Always switch OFF the Air Cooler and unplug it from the electrical source before
cleaning or maintenance.
Cleaning
At least once a week, drain the water tank completely and refill with fresh water. Doing this will greatly
reduce mineral deposits and help to extend the life of the Honeycomb Cooling Media.
End of Season Storage
If the Air Cooler will not be used for a long time:
Make sure all parts are dry by running the Fan Only mode for about 1 to 2 hours before storing
(time depends on ambient humidity conditions).
Switch OFF the Air Cooler and unplug from the power supply.
Empty/drain all the water from the tank. Note: If the unit is connected to a continuous water
supply, you must switch off the water supply and remove the drain tube before draining the
water tank. This function is only available on some Honeywell Air Cooler models. Check the User
Manual to see if your unit has the Continuous Water Supply Function.
Clean the water tank with a damp cloth to wipe away any dust or mineral deposits.
Remove the Honeycomb Cooling Media and Carbon Dust Filter* from the Air Cooler and rinse
under fresh water to remove dust and dirt.
Replace the Honeycomb Cooling Media and Carbon Dust Filter* after they are clean and dry.
To protect the unit from dust, moisture and scratches, cover with a clean cloth, tarp or plastic bag
before storing.
Coil the power cord and store it away from the floor to protect it.
Store this unit at room temperature in a dry location, away from direct sunlight and/or very hot,
cold or damp environments.
•
•
•
•
•
•
•
•
•
Carbon Dust Filter is available in specific models of Honeywell Air Coolers only.
Check the Parts Description in the User Manual for your model to see if it includes a Carbon
Dust Filter.
*

6
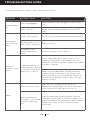
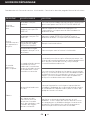
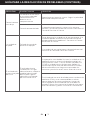
TROUBLESHOOTING GUIDE
EN
Customer Service Center Contact: See last page of User Manual.
PROBLEM POSSIBLE CAUSE SOLUTION
No discharge of
air.
Cord is not plugged in. Make sure power cord is plugged in and the switch is
ON.
Power is not ON.
Turn the unit ON by pressing the power button on the
control panel / remote control or turn the SPEED
knob.
Not Cooling /
Unit is making
noise.
Pump is not turned ON. Turn on COOL function from remote or control panel.
Low or no water in tank,
when COOL is selected. Refill water tank.
Damaged Pump or
Calcium deposits on
blower.
Contact Customer Service Center.
Excessive
humidity in the
room.
In cooling mode, the Air
Cooler produces moisture
as a result of evaporative
cooling. This is normal.
The Air Cooler cools best in dry climates. If the
ambient humidity level is high (approx. 60% or
above), refrain from using the Air Cooler until ambient
humidity is reduced.
Make sure the window/doors are open and there
is adequate cross-ventilation in the room so that
the moisturized air can circulate better. Do not use
the evaporative cooling function on days with high
ambient humidity.
Odors.
When the Cooler is new.
When the unit is used for the first time, the
Honeycomb Cooling Media will have an odor, which
will dissipate within a few hours of initial use.
Algae or mold due to
moist parts. In very damp
conditions, algae may
form.
Check the Honeycomb Cooling Media. If you see
mold spots on the media or suspect an algae issue,
remove and replace the Honeycomb Cooling Media.
Contact the Customer Service Center for more
information.

7
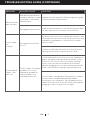
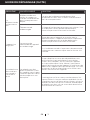
TROUBLESHOOTING GUIDE (CONTINUED)
EN
PROBLEM POSSIBLE CAUSE SOLUTION
Remote control
does not work.
Remote control batteries
are old & used or inserted
incorrectly in the battery
compartment.
Replace with new batteries. Follow the polarity guide
inside the battery compartment.
Damaged remote control. If replacing new batteries in the correct position does
not work, contact the Customer Service Center.
The unit does
not
respond.
Damaged Control Panel
on unit.
Try to activate the unit with the Remote Control. If the
unit responds, then the Control Panel on the unit may
be experiencing problems - contact the Customer
Service Center.
If neither the Remote Control or the Control Panel is
working, contact the Customer Service Center.
The outdoor Air
Cooler is wet
from rain.
The Air Cooler was placed
outdoors (this is only
allowed for outdoor Air
Cooler models) and
soaked by heavy rain.
A small amount of rain on the unit is not a problem as
long as the electrical plug and outlet are dry. If they
are wet, DO NOT touch the unit or electrical plug/
outlet. Switch off the master power for the outlet
before unplugging the unit from the electrical outlet.
Make sure all outlets and plugs are dry before use.
The Air Cooler is designed to IPX4 product standards
and not recommended to be placed outdoors
during heavy rain conditions. Do not operate the Air
Cooler when wet. Wait for the Air Cooler to dry before
plugging in and turning on the unit again.

EN
The batteries contain materials, which are hazardous to the environment; they must be removed
from the appliance before it is scraped and that they are disposed of safely.
Correct Disposal of this product.
This marking indicates that this product should not be disposed with other
household wastes throughout the EU. To prevent possible harm to the
environment or human health from uncontrolled waste disposal. recycle it
responsibly to promote the sustainable reuse of material resources. To return
your used device, please use the return and collection systems or contact
the retailer where the product was purchased. They can take this product for
environmental safe recycling.

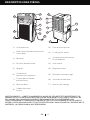
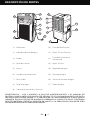
1
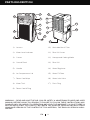
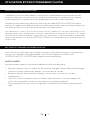
1) Louvers 10) Washable Mesh Filter
2) Water Level Indicator 11) Rear Grill Screw
3) Casters 12) Honeycomb Cooling Media
4) Control Panel 13) Rear Grill
5) Handle 14) Water Regulator
6) Ice Compartment Lid 15) Water Fill Door
7) Power Cord Wrap 16) Water Inlet Valve
8) Water Tank 17) Drain Plug
9) Power Cord & Plug
PARTS DESCRIPTION
EN
4
5
6
7
8
9
3
2
1
15
16
17
10
11
12
13
14
WARNING -- READ AND SAVE THE AIR COOLER SAFETY & MAINTENANCE GUIDE AND USER
MANUAL BEFORE USING THIS PRODUCT. FAILURE TO FOLLOW THESE INSTRUCTIONS MAY
DAMAGE AND/ OR IMPAIR ITS OPERATION AND VOID THE WARRANTY. IN CASE THERE IS
ANY INCONSISTENCY OR CONFLICT BETWEEN THE ENGLISH VERSION AND ANY OTHER
LANGUAGE VERSION OF THE CONTENT OF THIS MATERIAL, THE ENGLISH VERSION SHALL
PREVAIL.

2
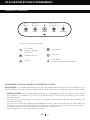
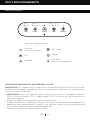
HML0.5 124SC
MODE SPEED POWER TIMER SWING(H)
SWING(V)
USE & OPERATION
EN
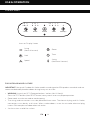
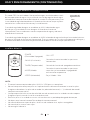
Icons on Display Screen
CONTROL PANEL
Swing
(Vertical Louvers)
Cool
Speed
Power
Timer
Swing
(Horizontal Louvers)
IMPORTANT: Honeywell Outdoor Air Cooler models are designed to IPX4 product standards and not
recommended to be placed outdoors during heavy rain or snow.
FOR OUTDOOR MODEL CO70PE:
WARNING: Use only on GFCI Protected outlets/ sockets (for USA only).
Press the TEST button (then RESET button) every month to ensure proper operation.
Power cords must be secured to avoid tripping.
The wiring and connections must be protected from water. The electrical plug and Air Cooler
connections must be dry at all times. When used outdoors, insert the air cooler electrical plug
into an IP44 compliant outdoor electrical outlet.
Set the unit on a solid flat surface.
•
•
•
•

3
USE & OPERATION (CONTINUED)
EN
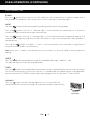
POWER
Press the button to turn the unit on. The cooler will start automatically at medium speed. After a
few seconds the speed will switch to low. To turn the unit off, press the button again.
MODE
Press the button to activate evaporative cooling and/or louver swing modes.
Press the button until the “S” indicator light is illuminated on the control panel. The Vertical
Louvers will begin to move left to right automatically.
Press the button until the “C” indicator light is illuminated to activate evaporative cooling. The
water pump will operate and you will feel the cooler air after the Honeycomb Cooling Media is
completely wet.
Pressing the button until both “S” and “C” are illuminated will activate both Swing (Vertical
Louvers) and Cool modes simultaneously.
Note: When the “C” mode is not selected, the unit functions in a fan only mode, without evaporative
cooling.
FUNCTION BUTTONS
SPEED
Press the button repeatedly to change the speed between High - Medium - Low.
The indicator light will show the selected speed.
TIMER
Press the button until the desired time duration setting is selected. When the set time has passed,
the unit will automatically turn off (unit remains in Standby mode until power cord is unplugged from
electrical socket). The TIMER function allows you to program the unit for up to 7.5 hours of use.
SWING(H)
Press the button until the indicator light turns on. This activates the
Horizontal Louvers and they will begin to move up and down automatically.
LOUVER
MOVEMENT

4
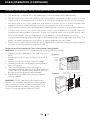
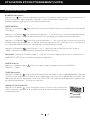
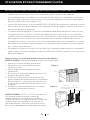
In cooling mode, Honeywell Air Coolers provide cool, moist air through the
evaporation of water. There is a manual Water Regulator knob located behind
the ice compartment of the unit. This allows you to adjust the amount of water
pumped over the Honeycomb Cooling Media, thus helping to control cooling
and humidification levels.
When the Water Regulator is set to MIN, the water pump distributes a minimal
amount of water to the Honeycomb Cooling Media. This results in less water
evaporation and reduces the cooling effect.
When the Water Regulator is set to MAX, the water pump distributes the maximum amount of water
to the Honeycomb Cooling Media. This results in maximum water evaporation and greater cooling
performance.
USE & OPERATION (CONTINUED)
EN
ROOM COOLING AND HUMIDIFYING
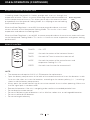
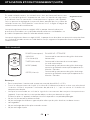
REMOTE CONTROL
NOTE:
•
•
•
•
•
•
•
•
The remote control requires AAA (2 x 1.5V) batteries for replacement.
Open the battery compartment at the back of the remote control and insert the batteries inside.
Care must be taken to insert the batteries according to the correct polarity (+ / –) markings
shown inside the battery compartment.
Always point the remote control signal transmitter towards the unit when operating. Make sure
that the signal path is not obstructed.
Remove the batteries if the unit is not going to be used for an extended period of time.
Do not drop the remote control.
Do not mix different types of batteries such as alkaline, carbon-zinc, or rechargeable batteries.
Do not mix old and new batteries.
Do not recharge the battery.
SWING (H)
SPEED
TIMER MODE
ON/OFF POWER :
:
:
:
:
ON / OFF
Controls the motion of the horizontal louvers
Controls the Timer function for automatic off
Controls the motion of the vertical louvers and
evaporative Cooling On / Off
Controls timer function for automatic off
SWING
TIMER
SPEED
MODE
Water Regulator
MAX
MIN

5
It is ideal to use the Continuous Water Supply Connection to run the unit for long periods of time
without refilling the tank. This also helps prevent pump failure in case the cooler is running with
inadequate water in the tank.
CAUTION:
Unplug the unit from the electrical power outlet before filling or emptying the water tank.
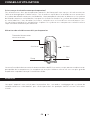
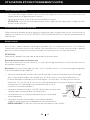
Continuous Water Supply Connection:
For a continuous water supply, you will need a garden hose that is connected to a main water supply.
Note: The garden hose is not included. Please make use of a garden hose which is compatible with
the unit connection.
FILLING WITH WATER
Locate the male connector at one end of the garden hose. Insert the garden hose connector into
the water inlet valve of the cooler. Screw and tighten the water inlet valve onto the threaded part
of the garden hose connector, making sure the hose connector is secured to ensure there will be
no leaks. If there is leakage, the hose and the water inlet valve may not be connected properly. Try
to disconnect, replace and tighten the water inlet valve again.
When the connection is secured, turn ON the water supply and the
water will flow into the water tank of the cooler.
The cooler is now set so the water refills automatically.
When the water tank is full, the water inlet valve will
automatically stop the water supply from overflowing.
WARNING: The maximum water inlet pressure is 0.5 MPa.
•
•
•
•
USE & OPERATION (CONTINUED)
EN
REMOTE CONTROL (CONTINUED)
COOLER LOCATION
•
•
Exhausted batteries are to be removed from the product and safely disposed of as per local
regulations.
Do not dispose of batteries in fire. Batteries may explode or leak.
WARNING: Caution for ingestion of the small battery. Keep away from children and animals.
Make sure to position the air cooler correctly before you set up and start using the product.
Please refer to the COOLER LOCATION (IMPORTANT TO READ) section of the separate Safety &
Maintenance Guide.
Garden Hose
Water
Inlet Value

6
USE & OPERATION (CONTINUED)
EN
FILLING WITH WATER (CONTINUED)
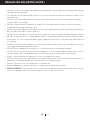
LOW WATER ALARM
The unit is equipped with a low water sensor. In Cooling Mode, when water in the tank is below the
minimum level, you will hear a beeping sound and the indicator light will flash continuously. The unit
will automatically pause evaporative cooling.
Refill the water tank to deactivate the alarm in cooling mode. First switch OFF the unit and unplug
from the power outlet. Fill the water tank with water above the minimum water level mark. Plug in and
switch ON again.
To deactivate the alarm and continue using the unit as a fan (without evaporative cooling), switch the
unit OFF and then ON again. The Low Water Alarm will not activate in Fan only mode. The Low Water
Alarm will sound again if the COOL function is activated while the water tank is still empty.
Water
Fill Door
Manual Water Tank Refill:
Open the Water Fill Door located on the side of the unit.
The Water Level Indicator is located at the front of the unit. Refill the
water tank when water level is low. Do not fill water above the "Max."
water level mark to avoid water droplets collecting on the louvers.
Check the water level in the tank before running the COOL function.
Make sure that the water in the tank is above the minimum water level
mark. Running the unit in COOL mode with inadequate water may
cause pump failure.
WARNING: Always ensure the water in the water tank is above the minimum (Min.) water level mark
for both Continuous & Manual Water Refill. Running the unit in Cool mode with inadequate water
may cause pump failure.
Note: The water capacity refers to the total volume of water that can
be contained within the air cooler water tank and water distribution
system. The water capacity in the tank at the “Max.” indicator level may
be lower than the actual water capacity of the air cooler.
Note: If ice is available, you may add ice in the ice tray to enhance the
cooling performance.
WARNING: Do not fill water tank with dirty water or salt water. This can damage the unit and Honeycomb
media.
Ice Tray

7
CLEANING & DRAINING THE WATER TANK
Move the unit to a location where the water can be drained. Remove the cap from the Drain plug
located at the bottom of the unit. Allow the tank to empty.
Refill the water tank with clean water, up to the maximum level and drain it completely.
Use a damp cloth to remove the dirt and dust from the surface of the unit. Never use corrosive
elements or chemicals to clean this product.
When the product is not in use, store the unit in a dry place out of direct sunlight.
If the cooler will not be used for a long period of time, please refer to the STORAGE & MAINTENANCE
GUIDELINES located in the separate Safety & Maintenance Guide.
WARNING:
Before cleaning the unit, switch the unit OFF and disconnect from the electrical socket.
•
•
•
•
USE & OPERATION (CONTINUED)
EN

8
USE & OPERATION (CONTINUED)
EN
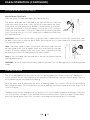
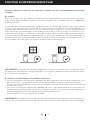
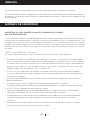
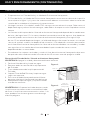
CLEANING THE WASHABLE MESH FILTER AND HONEYCOMB COOLING MEDIA
The appliance is supplied with a Washable Mesh Filter and Honeycomb Cooling Media.
The Washable Mesh Filter and Honeycomb Cooling Media are located inside the Rear Grill (See
Figure 1 and 2) and see below for instructions on how to remove them from the unit for cleaning.
Do not run the unit in COOL mode with stale water in the tank. You must empty the water tank
and refill with fresh water, especially if the tank has not been cleaned in a long time.
The cleaning frequency for the Honeycomb media depends on local air and water conditions.
In areas where the mineral content of water is high, mineral deposits may build up on the
Honeycomb Cooling Media and restrict air flow. Draining the water tank and refilling with fresh
water at least once a week will help reduce mineral deposits. If mineral deposits remain on
the Honeycomb Cooling Media, the media should be removed and washed under fresh water. The
media should be cleaned every two months or sooner, depending on your needs.
For best results allow the Honeycomb Cooling Media to dry after each use by turning off the cool
function 15 minutes before turning the unit off.
•
•
•
•
•
Slide out the Washable Mesh Filter and clean with
water.
Remove all the screws from the Rear Grill of the Air
Cooler.
Carefully pull out the rear grill from the cooler.
Carefully pull out the Honeycomb Cooling Media
from the rear grill.
There are two Horizontal Bars holding the
Honeycomb Cooling Media in place. Remove all the
screws from the Horizontal Bars and then pull the
bars off of the Honeycomb Cooling Media.
Replace or clean media with water and a damp
cloth as needed.
1.
2.
3.
4.
5.
6.
Removing the Washable Mesh Filter/ Honeycomb Cooling Media:
WARNING: Switch the unit OFF and disconnect from the electrical socket.
WARNING: DO NOT operate the Air Cooler when
the Rear Grill or Honeycomb Media is removed from
the Air Cooler, or if there is a loose-fitting Rear Grill
or Honeycomb Cooling Media. Doing so can cause
serious injury or dangerous electrical shock.
Honeycomb
Cooling Media
Horizontal Bar
Screws
Screws
Rear Grill
Washable
Mesh
Filter
Figure 1:
Figure 2:

1
MERCI
RÈGLES DE SÉCURITÉ
Nous vous félicitons d’avoir acheté ce refroidisseur d’air par évaporation de Honeywell.
Le Guide de sécurité et d’entretien et le Manuel de l’utilisateur ont tous deux pour but de vous
communiquer des renseignements importants pour l’installation, l’utilisation, l’entretien et le
dépannage de cet appareil.
FR
Le Guide et le Manuel de l’utilisateur du refroidisseur d’air sont destinés à fournir des renseignements
importants pour l’installation, l’utilisation, l’entretien et le dépannage de votre refroidisseur d’air.
Ne pas suivre ces consignes pourrait endommager l’appareil et/ou perturber son fonctionnement,
provoquer des risques et annuler la garantie. En cas d'incoherence ou de conflit entre la version
anglaise et tout autre version linguistique du contenu de ce materiel, la version anglaise prévaudra.
AVERTISSEMENT - LIRE ET CONSERVER LE GUIDE ET LE MANUEL DE L’UTILISATEUR DU
REFROIDISSEUR D’AIR
LIRE ET CONSERVER CES CONSIGNES:
En utilisant des appareils électriques, les mesures de sécurité élémentaires suivantes doivent toujours
être prises:
Cet appareil peut être utilisé par des enfants âgés de 8 ans et plus, ainsi que des personnes ayants
des capacités réduites au niveau physique, sensoriel ou mental, ou un manque d’expérience et de
connaissances si ils ont été supervisés ou instruits à propos de l’utilisation de l’appareil de manière sûre
et s’ils ont compris les risques encourus. Les enfants de devront pas jouer avec l’appareil. Le nettoyage
ou la maintenance ne devra pas être effectuée par des enfants, sauf si ces derniers sont âgés de plus de
8 ans et s’ils sont supervisés.
NE PAS utiliser avec une prise ou un cordon endommagés. Si le cordon d'alimentation est endommagé,
il doit être remplacé par un cordon d'alimentation conforme aux spécifications du fabricant, par le centre
de service agréé, son intermédiaire de service ou une personne qualifiée afin d'éviter tout danger.
Avant d’utiliser l’appareil, il convient de le déballer et de s’assurer qu’il est en bon état.
NE PAS permettre aux enfants de jouer avec cet appareil, son emballage ou les sacs en plastique.
Vérifiez la tension résidentielle afin de s’assurer qu’elle convient aux spécifications de l’appareil.
NE PAS utiliser une rallonge électrique avec cet appareil.
NE PAS faire passer le cordon électrique sous la moquette ou le recouvrir avec un tapis ou un chemin de
couloir. Garder le cordon à l’écart des endroits où ils risquent de causer une chute.
S’assurer à tout moment que l’eau dans le réservoir dépasse la marque du niveau "min.", lorsque le
refroidisseur d’air fonctionne en mode REFROIDISSEMENT par évaporation.
Toujours débrancher le refroidisseur d’air avant d’en remplir le réservoir d’eau, de le nettoyer, d’en faire
l’entretien ou de le déplacer.
•
•
•
•
•
•
•
•
•

2
RÈGLES DE SÉCURITÉ (SUITE)
FR
Ne jamais tirer sur le cordon. Pour débrancher l’appareil, il convient de saisir la fiche et de la retirer
hors de la prise électrique.
Cet appareil a été fabriqué pour être utilisé en milieu domestique et ne doit pas être utilisé
à d’autres fins.
NE PAS utiliser dans des endroits où de l’essence, de la peinture ou d’autres produits ou objets
inflammables sont rangés.
NE PAS faire fonctionner l’appareil en mode COOL (refroidissement) avec un réservoir vide au
risque d’endommager la pompe à eau.
NE PAS tenter de réparer ou de régler les fonctions électriques ou mécaniques du refroidisseur
d’air, car cela risque d’annuler la garantie.
NE PAS couvrir l’entrée ou la sortie d’air du refroidisseur, car cela risque d’endommager le moteur.
NE PAS insérer ou laisser un objet pénétrer dans une quelconque ouverture de ventilation ou d’
évacuation, car cela risque d’endommager l’appareil et de causer une décharge électrique ou
un incendie.
NE PAS faire fonctionner l’appareil sans le système de refroidissement en nid d’abeilles, car cela
surchargera et endommagera le moteur.
NE PAS laisser l’appareil en marche sans surveillance durant une longue période.
NE PAS continuer de faire fonctionner l’appareil s’il est endommagé ou défectueux. Voir la
section Dépannage. Si le problème persiste, contacter le centre de soutien à la clientèle.
Placer systématiquement l’appareil sur une surface plane et sèche.
NE PAS utiliser dans les salles de bains ou à proximité de l’eau. NE PAS placer l’appareil dans un
endroit où il risque de tomber dans l’eau ou dans un contenant d’eau.
Lorsqu’il n’est pas utilisé, le ranger dans un endroit sec.
Toujours déplacer le refroidisseur d’air au moyen de ses poignées latérales.
AVERTISSEMENT: Afin de réduire les risques d’incendie ou de décharges électriques, ne pas
utiliser cet appareil avec toute commande de vitesse à semi-conducteur.
•
•
•
•
•
•
•
•
•
•
•
•
•
•
•

3
CONSEILS D’UTILISATION
FR
Les refroidisseurs d’air par évaporation portatifs de Honeywell sont conçus afin de maximiser
l’efficacité énergétique à faibles coûts. L’air chaud est aspiré dans le refroidisseur et entre dans
le système de refroidissement en nid d’abeilles. L’eau pompée du réservoir se déverse sur le système
de refroidissement en nid d’abeilles. Lorsque l’air chaud circule dans le système de refroidissement
en nid d’abeilles, l’eau absorbe la chaleur, refroidissant et humidifiant naturellement l’air.
Un ventilateur projette l’air refroidi dans la pièce. Ce système sans compresseur rafraîchit d’une
façon naturelle, efficace et peu coûteuse.
Le taux d’humidité relative maximal recommandé est de 60% ou moins, ce qui permet une diminution
perceptible de la température. La température sera plus faible en climat sec, car une plus grande
évaporation se produit lorsque l’humidité est faible.
Qu’est-ce que le refroidissement par évaporation?
Mécanisme de refroidissement d’air par évaporation
REMARQUE
Lorsque l’appareil sera utilisé pour la première fois, une odeur se dégagera du système de
refroidissement en nid d’abeilles, puis se dissipera dans les quelques heures suivant l’utilisation
initiale.
Raccord d’alimentation
continue en eau
Air chaud Air froid
Pump Eau
La page est en cours de chargement...
La page est en cours de chargement...
La page est en cours de chargement...
La page est en cours de chargement...
La page est en cours de chargement...
La page est en cours de chargement...
La page est en cours de chargement...
La page est en cours de chargement...
La page est en cours de chargement...
La page est en cours de chargement...
La page est en cours de chargement...
La page est en cours de chargement...
La page est en cours de chargement...
La page est en cours de chargement...
La page est en cours de chargement...
La page est en cours de chargement...
La page est en cours de chargement...
La page est en cours de chargement...
La page est en cours de chargement...
La page est en cours de chargement...
La page est en cours de chargement...
La page est en cours de chargement...
La page est en cours de chargement...
La page est en cours de chargement...
La page est en cours de chargement...
La page est en cours de chargement...
La page est en cours de chargement...
La page est en cours de chargement...
La page est en cours de chargement...
La page est en cours de chargement...
-
 1
1
-
 2
2
-
 3
3
-
 4
4
-
 5
5
-
 6
6
-
 7
7
-
 8
8
-
 9
9
-
 10
10
-
 11
11
-
 12
12
-
 13
13
-
 14
14
-
 15
15
-
 16
16
-
 17
17
-
 18
18
-
 19
19
-
 20
20
-
 21
21
-
 22
22
-
 23
23
-
 24
24
-
 25
25
-
 26
26
-
 27
27
-
 28
28
-
 29
29
-
 30
30
-
 31
31
-
 32
32
-
 33
33
-
 34
34
-
 35
35
-
 36
36
-
 37
37
-
 38
38
-
 39
39
-
 40
40
-
 41
41
-
 42
42
-
 43
43
-
 44
44
-
 45
45
-
 46
46
-
 47
47
-
 48
48
-
 49
49
-
 50
50


Honeywell CL60PM Manuel utilisateur
- Catégorie
- Humidificateurs
- Taper
- Manuel utilisateur
dans d''autres langues
- English: Honeywell CL60PM User manual
- español: Honeywell CL60PM Manual de usuario
Documents connexes
-
Honeywell CS10XE Manuel utilisateur
-
Honeywell CO25AE Manuel utilisateur
-
-
Honeywell CL30XC Series Manuel utilisateur
-
Honeywell CL30XC Manuel utilisateur
-
Honeywell TC30PEU Manuel utilisateur
-
Honeywell CS071AE Manuel utilisateur
-
-
Honeywell CL30XC Portable Evaporative Air Cooler Manuel utilisateur
-
