Bosch BSG81885/01 Manuel utilisateur
- Catégorie
- Aspirateurs
- Taper
- Manuel utilisateur

GA 9000 059 820 A
a
Internet:
http://www.
bosch-hausgeraete.de
de Gebrauchsanweisung
en Instructions for use
fr Mode d´emploi
it Instruzioni per l´uso
nl Gebruiksaanwijzing
da Brugsanvisning
no Bruksanvisning
sv Bruksanvisning
fi Käyttöohje
es
Instrucciones para el uso
BSG8....
dual filtration
technology
de
en
fr
it
nl
da
no
sv
fi
es
䡲
Gedruckt auf Recyclingpapier
䡲
Printed on recycled paper
䡲
Imprimé sur papier recyclé
䡲
Stampato su carta riciclata
䡲
Gedrukt op recyclingpapier
䡲
Trykt på genbrugspapir
䡲
Trykket på resirkulert papir
䡲
Tryckt på återvunnet papper
䡲
Painettu uusiopaperille
䡲
Impreso sobre papel reciclable

a) b)
6
7
8
3*
CLICK!
CLICK!
a) b)
1
a) b)
2*
a) b)
4*
5*

9*
CLICK!
CLICK!
a
b
c
10
17
11
13 14*
16
min
max
12*
15
18
2221
19
23
20

29
30
32*
31
34
33
*
28
26
24
25
CLICK!
CLICK!
CLICK!
CLICK!
27

Gerätebeschreibung . . . . . . . . . . . . . . . . . . . . . . . . . . . . . . . . . . . . . . . . . . . . . . . . . . . .4
Bestimmungsgemäße Verwendung . . . . . . . . . . . . . . . . . . . . . . . . . . . . . . . . . . . . . . . .5
Sicherheitshinweise . . . . . . . . . . . . . . . . . . . . . . . . . . . . . . . . . . . . . . . . . . . . . . . . . . . .5
Hinweise zur Entsorgung . . . . . . . . . . . . . . . . . . . . . . . . . . . . . . . . . . . . . . . . . . . . . . . .6
Inbetriebnahme . . . . . . . . . . . . . . . . . . . . . . . . . . . . . . . . . . . . . . . . . . . . . . . . . . . . .7
Saugen . . . . . . . . . . . . . . . . . . . . . . . . . . . . . . . . . . . . . . . . . . . . . . . . . . . . . . . . . . .7
Nach der Arbeit . . . . . . . . . . . . . . . . . . . . . . . . . . . . . . . . . . . . . . . . . . . . . . . . . . . . .8
Arbeiten mit dem Staubbehälter . . . . . . . . . . . . . . . . . . . . . . . . . . . . . . . . . . . . . . . . . . .9
Dauer- und Microfilter des Staubbehälters reinigen . . . . . . . . . . . . . . . . . . . . . . . . . . . .9
Störbetrieb Staubbehälter . . . . . . . . . . . . . . . . . . . . . . . . . . . . . . . . . . . . . . . . . . . . . .10
Arbeiten mit Filterbeutel
MEGAfilt
®
plus . . . . . . . . . . . . . . . . . . . . . . . . . . . . . . . . . . . . . . .10
Austausch von Motorschutz-/Ausblasfilter . . . . . . . . . . . . . . . . . . . . . . . . . . . . . . . . .12
Pflege . . . . . . . . . . . . . . . . . . . . . . . . . . . . . . . . . . . . . . . . . . . . . . . . . . . . . . . . . . .13
Sonderzubehör / Ersatzteile . . . . . . . . . . . . . . . . . . . . . . . . . . . . . . . . . . . . . . . .14/15
de
Your vacuum cleaner . . . . . . . . . . . . . . . . . . . . . . . . . . . . . . . . . . . . . . . . . . . . . . . . . .16
Intended use . . . . . . . . . . . . . . . . . . . . . . . . . . . . . . . . . . . . . . . . . . . . . . . . . . . . . . . .17
Safety information . . . . . . . . . . . . . . . . . . . . . . . . . . . . . . . . . . . . . . . . . . . . . . . . . . . .17
Disposal information . . . . . . . . . . . . . . . . . . . . . . . . . . . . . . . . . . . . . . . . . . . . . . . . . .18
Using your vacuum cleaner . . . . . . . . . . . . . . . . . . . . . . . . . . . . . . . . . . . . . . . . . . .19
Vacuuming . . . . . . . . . . . . . . . . . . . . . . . . . . . . . . . . . . . . . . . . . . . . . . . . . . . . . . .19
When the work is done . . . . . . . . . . . . . . . . . . . . . . . . . . . . . . . . . . . . . . . . . . . . . .20
Using the dust collector . . . . . . . . . . . . . . . . . . . . . . . . . . . . . . . . . . . . . . . . . . . . . . . .21
Cleaning the permanent filters and microfilters in the dust collector . . . . . . . . . . . . . .21
Blockages in the dust filter . . . . . . . . . . . . . . . . . . . . . . . . . . . . . . . . . . . . . . . . . . . . . .22
Using MEGAfilt
®
plus dust bags . . . . . . . . . . . . . . . . . . . . . . . . . . . . . . . . . . . . . . . . . .22
Replacing the motor protection filter/exhaust filter . . . . . . . . . . . . . . . . . . . . . . . . . . .24
Looking after your vacuum cleaner . . . . . . . . . . . . . . . . . . . . . . . . . . . . . . . . . . . . .25
Optional accessories / replacement parts . . . . . . . . . . . . . . . . . . . . . . . . . . . . . .26/27
en
Description de l’appareil . . . . . . . . . . . . . . . . . . . . . . . . . . . . . . . . . . . . . . . . . . . . . . . .28
Utilisation conforme aux prescriptions et à l’emploi prévu . . . . . . . . . . . . . . . . . . . . .29
Consignes de sécurité . . . . . . . . . . . . . . . . . . . . . . . . . . . . . . . . . . . . . . . . . . . . . . . . .29
Indication pour la mise au rebut . . . . . . . . . . . . . . . . . . . . . . . . . . . . . . . . . . . . . . . . . .30
Mise en service . . . . . . . . . . . . . . . . . . . . . . . . . . . . . . . . . . . . . . . . . . . . . . . . . . . .31
Aspiration . . . . . . . . . . . . . . . . . . . . . . . . . . . . . . . . . . . . . . . . . . . . . . . . . . . . . . . .31
Après le travail . . . . . . . . . . . . . . . . . . . . . . . . . . . . . . . . . . . . . . . . . . . . . . . . . . . .32
Travaux avec le collecteur de poussières . . . . . . . . . . . . . . . . . . . . . . . . . . . . . . . . . . .33
Nettoyage du filtre permanent et du microfiltre du collecteur de poussières . . . . . . .33
Dérangement collecteur de poussières . . . . . . . . . . . . . . . . . . . . . . . . . . . . . . . . . . . .34
Travaux avec le sac aspirateurMEGAfilt
®
plus . . . . . . . . . . . . . . . . . . . . . . . . . . . . . . . .34
Echange du filtre moteur/filtre de sortie d’air . . . . . . . . . . . . . . . . . . . . . . . . . . . . . . . .36
Entretien . . . . . . . . . . . . . . . . . . . . . . . . . . . . . . . . . . . . . . . . . . . . . . . . . . . . . . . . .37
Accessoires spéciaux / Pièces de rechange . . . . . . . . . . . . . . . . . . . . . . . . . . . .38/39
fr
Descrizione dell’apparecchio . . . . . . . . . . . . . . . . . . . . . . . . . . . . . . . . . . . . . . . . . . . .40
Utilizzo conforme . . . . . . . . . . . . . . . . . . . . . . . . . . . . . . . . . . . . . . . . . . . . . . . . . . . . . .41
Norme di sicurezza . . . . . . . . . . . . . . . . . . . . . . . . . . . . . . . . . . . . . . . . . . . . . . . . . . . .41
Avvertenze per lo smaltimento . . . . . . . . . . . . . . . . . . . . . . . . . . . . . . . . . . . . . . . . . . .42
Messa in funzione . . . . . . . . . . . . . . . . . . . . . . . . . . . . . . . . . . . . . . . . . . . . . . . . . .43
Aspirazione . . . . . . . . . . . . . . . . . . . . . . . . . . . . . . . . . . . . . . . . . . . . . . . . . . . . . . .43
Dopo aver terminato la pulizia . . . . . . . . . . . . . . . . . . . . . . . . . . . . . . . . . . . . . . . . . .44
Uso del contenitore raccoglisporco . . . . . . . . . . . . . . . . . . . . . . . . . . . . . . . . . . . . . . .45
Pulizia del filtro permanente e del microfiltro del contenitore raccoglisporco . . . . . . .45
Malfunzionamento del contenitore raccoglisporco . . . . . . . . . . . . . . . . . . . . . . . . . . .46
Uso del sacchetto filtrante MEGAfilt
®
plus . . . . . . . . . . . . . . . . . . . . . . . . . . . . . . . . . .46
Sostituzione del filtro di protezione del motore e del filtro di soffiaggio . . . . . . . . . . . .48
Manutenzione . . . . . . . . . . . . . . . . . . . . . . . . . . . . . . . . . . . . . . . . . . . . . . . . . . . . .49
Accessori speciali / Parti di ricambio . . . . . . . . . . . . . . . . . . . . . . . . . . . . . . . . .50/51
it

2 3
Beschrijving van het apparaat . . . . . . . . . . . . . . . . . . . . . . . . . . . . . . . . . . . . . . . . . . .52
Gebruik volgens de voorschriften . . . . . . . . . . . . . . . . . . . . . . . . . . . . . . . . . . . . . . . . .53
Veiligheidsinstructies . . . . . . . . . . . . . . . . . . . . . . . . . . . . . . . . . . . . . . . . . . . . . . . . . .53
Instructies voor recycling . . . . . . . . . . . . . . . . . . . . . . . . . . . . . . . . . . . . . . . . . . . . . . .54
De stofzuiger in gebruik nemen . . . . . . . . . . . . . . . . . . . . . . . . . . . . . . . . . . . . . . . .55
Zuigen . . . . . . . . . . . . . . . . . . . . . . . . . . . . . . . . . . . . . . . . . . . . . . . . . . . . . . . . . . .55
Na het werk . . . . . . . . . . . . . . . . . . . . . . . . . . . . . . . . . . . . . . . . . . . . . . . . . . . . . . .56
Werken met de Cyclon-stoftank . . . . . . . . . . . . . . . . . . . . . . . . . . . . . . . . . . . . . . . . . .57
Duurzaam filter en microfilter van de Cyclon-stoftank schoonmaken . . . . . . . . . . . . .57
Storing Cyclon-stoftank . . . . . . . . . . . . . . . . . . . . . . . . . . . . . . . . . . . . . . . . . . . . . . . .58
Werken met filterzak MEGAfilt
®
plus . . . . . . . . . . . . . . . . . . . . . . . . . . . . . . . . . . . . . . .58
Vervanging van motorbeveiligings-/uitblaasfilter . . . . . . . . . . . . . . . . . . . . . . . . . . . . .60
Verzorging . . . . . . . . . . . . . . . . . . . . . . . . . . . . . . . . . . . . . . . . . . . . . . . . . . . . . . . .61
Extra toebehoren / onderdelen . . . . . . . . . . . . . . . . . . . . . . . . . . . . . . . . . . . . . .62/63
nl
Beskrivelse . . . . . . . . . . . . . . . . . . . . . . . . . . . . . . . . . . . . . . . . . . . . . . . . . . . . . . . . . .64
Formålsmæssig anvendelse . . . . . . . . . . . . . . . . . . . . . . . . . . . . . . . . . . . . . . . . . . . . .65
Sikkerhedsanvisninger . . . . . . . . . . . . . . . . . . . . . . . . . . . . . . . . . . . . . . . . . . . . . . . . .65
Anvisninger om bortskaffelse . . . . . . . . . . . . . . . . . . . . . . . . . . . . . . . . . . . . . . . . . . . .66
Ibrugtagning . . . . . . . . . . . . . . . . . . . . . . . . . . . . . . . . . . . . . . . . . . . . . . . . . . . . . .67
Støvsugning . . . . . . . . . . . . . . . . . . . . . . . . . . . . . . . . . . . . . . . . . . . . . . . . . . . . . .67
Efter arbejdets afslutning . . . . . . . . . . . . . . . . . . . . . . . . . . . . . . . . . . . . . . . . . . . . .68
Arbejde med Cyclon-støvbeholder . . . . . . . . . . . . . . . . . . . . . . . . . . . . . . . . . . . . . . . .69
Rense fast filter og Micro-filteret i Cyclon-støvbeholderen . . . . . . . . . . . . . . . . . . . . .69
Funktionsfejl i Cyclon-støvbeholderen . . . . . . . . . . . . . . . . . . . . . . . . . . . . . . . . . . . . .70
Arbejde med filterpose MEGAfilt
®
plus . . . . . . . . . . . . . . . . . . . . . . . . . . . . . . . . . . . . .70
Udskiftning af motorbeskyttelses-/udbblæsningsfilter . . . . . . . . . . . . . . . . . . . . . . . . .72
Pleje . . . . . . . . . . . . . . . . . . . . . . . . . . . . . . . . . . . . . . . . . . . . . . . . . . . . . . . . . . . .73
Specialtilbehør/ reservedele . . . . . . . . . . . . . . . . . . . . . . . . . . . . . . . . . . . . . . . .74/75
da
Beskrivelse av apparatet . . . . . . . . . . . . . . . . . . . . . . . . . . . . . . . . . . . . . . . . . . . . . . .76
Tiltenkt bruk . . . . . . . . . . . . . . . . . . . . . . . . . . . . . . . . . . . . . . . . . . . . . . . . . . . . . . . . .77
Sikkerhetsanvisninger . . . . . . . . . . . . . . . . . . . . . . . . . . . . . . . . . . . . . . . . . . . . . . . . . .77
Informasjon om kassering . . . . . . . . . . . . . . . . . . . . . . . . . . . . . . . . . . . . . . . . . . . . . .78
Komme i gang . . . . . . . . . . . . . . . . . . . . . . . . . . . . . . . . . . . . . . . . . . . . . . . . . . . . .79
Støvsuging . . . . . . . . . . . . . . . . . . . . . . . . . . . . . . . . . . . . . . . . . . . . . . . . . . . . . . .79
Når jobben er gjort . . . . . . . . . . . . . . . . . . . . . . . . . . . . . . . . . . . . . . . . . . . . . . . . .80
Arbeide med støvbeholderen . . . . . . . . . . . . . . . . . . . . . . . . . . . . . . . . . . . . . . . . . . . .81
Rengjøring av langtids- og mikrofilteret for støvbeholderen . . . . . . . . . . . . . . . . . . . .81
Feil på støvbeholderen . . . . . . . . . . . . . . . . . . . . . . . . . . . . . . . . . . . . . . . . . . . . . . . . .82
Arbeide med filterposen MEGAfilt
®
plus . . . . . . . . . . . . . . . . . . . . . . . . . . . . . . . . . . . .82
Bytte motor-/utblåsningsfilteret . . . . . . . . . . . . . . . . . . . . . . . . . . . . . . . . . . . . . . . . . .84
Vedlikehold . . . . . . . . . . . . . . . . . . . . . . . . . . . . . . . . . . . . . . . . . . . . . . . . . . . . . . .85
Ekstra tilbehør / reservedeler . . . . . . . . . . . . . . . . . . . . . . . . . . . . . . . . . . . . . . .86/87
no
Beskrivning av produkten . . . . . . . . . . . . . . . . . . . . . . . . . . . . . . . . . . . . . . . . . . . . . . .88
Föreskriven användning . . . . . . . . . . . . . . . . . . . . . . . . . . . . . . . . . . . . . . . . . . . . . . . .89
Säkerhetsanvisningar . . . . . . . . . . . . . . . . . . . . . . . . . . . . . . . . . . . . . . . . . . . . . . . . . .89
Råd beträffande avfallshanteringen . . . . . . . . . . . . . . . . . . . . . . . . . . . . . . . . . . . . . . .90
Start av dammsugaren . . . . . . . . . . . . . . . . . . . . . . . . . . . . . . . . . . . . . . . . . . . . . .91
Dammsugning . . . . . . . . . . . . . . . . . . . . . . . . . . . . . . . . . . . . . . . . . . . . . . . . . . . . .91
Efter dammsugningen . . . . . . . . . . . . . . . . . . . . . . . . . . . . . . . . . . . . . . . . . . . . . . .92
Dammsugning med dammbehållare . . . . . . . . . . . . . . . . . . . . . . . . . . . . . . . . . . . . . .93
Rengöra dammbehållarens permanent- och mikrofilter . . . . . . . . . . . . . . . . . . . . . . . .93
Störningar dammbehållare . . . . . . . . . . . . . . . . . . . . . . . . . . . . . . . . . . . . . . . . . . . . . .94
Dammsugning med filterpåsen MEGAfilt
®
Plus . . . . . . . . . . . . . . . . . . . . . . . . . . . . . . .94
Byte av motorskydds-/utblåsfilter . . . . . . . . . . . . . . . . . . . . . . . . . . . . . . . . . . . . . . . .96
Skötsel och vård . . . . . . . . . . . . . . . . . . . . . . . . . . . . . . . . . . . . . . . . . . . . . . . . . . .97
Extra tillbehör / Reservdelar . . . . . . . . . . . . . . . . . . . . . . . . . . . . . . . . . . . . . . . .98/99
sv
Laitteen kuvaus . . . . . . . . . . . . . . . . . . . . . . . . . . . . . . . . . . . . . . . . . . . . . . . . . . . . .100
Määräystenmukainen käyttö . . . . . . . . . . . . . . . . . . . . . . . . . . . . . . . . . . . . . . . . . . .101
Turvaohjeet . . . . . . . . . . . . . . . . . . . . . . . . . . . . . . . . . . . . . . . . . . . . . . . . . . . . . . . . .101
Ohjeita jätehuollosta . . . . . . . . . . . . . . . . . . . . . . . . . . . . . . . . . . . . . . . . . . . . . . . . . .102
Käyttöönotto . . . . . . . . . . . . . . . . . . . . . . . . . . . . . . . . . . . . . . . . . . . . . . . . . . . . .103
Imurointi . . . . . . . . . . . . . . . . . . . . . . . . . . . . . . . . . . . . . . . . . . . . . . . . . . . . . . . .103
Työn jälkeen . . . . . . . . . . . . . . . . . . . . . . . . . . . . . . . . . . . . . . . . . . . . . . . . . . . . .104
Työskentely pölysäiliön kanssa . . . . . . . . . . . . . . . . . . . . . . . . . . . . . . . . . . . . . . . . . .105
Pölysäiliön kesto- ja mikrosuodattimen puhdistus . . . . . . . . . . . . . . . . . . . . . . . . . . .105
Pölysäiliön häiriökäyttö . . . . . . . . . . . . . . . . . . . . . . . . . . . . . . . . . . . . . . . . . . . . . . . .106
Työskentely pölypussilla MEGAfilt
®
plus . . . . . . . . . . . . . . . . . . . . . . . . . . . . . . . . . . .106
Moottorinsuoja-/poistoilman suodattimen vaihto . . . . . . . . . . . . . . . . . . . . . . . . . . . .108
Hoito . . . . . . . . . . . . . . . . . . . . . . . . . . . . . . . . . . . . . . . . . . . . . . . . . . . . . . . . . . .109
Erikoisvarusteet / varaosat . . . . . . . . . . . . . . . . . . . . . . . . . . . . . . . . . . . . . . .110/111
fi
Descripción del aparato . . . . . . . . . . . . . . . . . . . . . . . . . . . . . . . . . . . . . . . . . . . . . . .112
Descripción del aparato . . . . . . . . . . . . . . . . . . . . . . . . . . . . . . . . . . . . . . . . . . . . . . .113
Indicaciones de seguridad . . . . . . . . . . . . . . . . . . . . . . . . . . . . . . . . . . . . . . . . . . . . .113
Indicaciones para eliminar el material de embalaje . . . . . . . . . . . . . . . . . . . . . . . . . .114
Puesta en marcha . . . . . . . . . . . . . . . . . . . . . . . . . . . . . . . . . . . . . . . . . . . . . . . . .115
Aspirar . . . . . . . . . . . . . . . . . . . . . . . . . . . . . . . . . . . . . . . . . . . . . . . . . . . . . . . . . .115
Tras el trabajo . . . . . . . . . . . . . . . . . . . . . . . . . . . . . . . . . . . . . . . . . . . . . . . . . . . .116
Trabajar con el contenedor de polvo . . . . . . . . . . . . . . . . . . . . . . . . . . . . . . . . . . . . .117
Limpiar el filtro permanente y el microfiltro del contenedor de polvo . . . . . . . . . . . .117
Fallo en el funcionamiento del contenedor de polvo . . . . . . . . . . . . . . . . . . . . . . . . .118
Trabajar con la bolsa filtrante MEGAfilt
®
plus . . . . . . . . . . . . . . . . . . . . . . . . . . . . . . .118
Cambio del filtro protector del motor/filtro de salida . . . . . . . . . . . . . . . . . . . . . . . . .120
Cuidados . . . . . . . . . . . . . . . . . . . . . . . . . . . . . . . . . . . . . . . . . . . . . . . . . . . . . . . .121
Accesorios opcionales / piezas de repuesto . . . . . . . . . . . . . . . . . . . . . . . . . .122/123
es

5
de
4
de de
Die Gebrauchsanweisung bitte
aufbewahren.
Bei Weitergabe des Staubsaugers an
Dritte bitte Gebrauchsanweisung
mitgeben.
Bestimmungsgemäße Verwendung
Dieser Staubsauger ist nur für den
Gebrauch im Haushalt und nicht für
gewerbliche Zwecke bestimmt.
Den Staubsauger ausschließlich gemäß
den Angaben in dieser
Gebrauchsanweisung verwenden.
Der Hersteller haftet nicht für eventuelle
Schäden, die durch nicht bestimmungs-
gemäßen Gebrauch oder falsche
Bedienung verursacht werden.
Deshalb beachten Sie bitte unbedingt
die nachfolgenden Hinweise!
Der Staubsauger darf nur bedient
werden mit:
䡲
Original-Filterbeutel
MEGAfilt
®
SuperTEX
䡲
Original-Ersatzteilen, -Zubehör oder
-Sonderzubehör
Der Staubsauger ist nicht geeignet
für:
䡲
das Absaugen von Menschen oder
Tieren
䡲
das Aufsaugen von:
– Kleinlebewesen
– gesundheitsschädlichen,
scharfkantigen, heißen oder
glühenden Substanzen
– feuchten oder flüssigen Substanzen
– leicht entflammbaren oder
explosiven Stoffen und Gasen.
– Asche, Ruß aus Kachelöfen und
Zentral-Heizungsanlagen
Sicherheitshinweise
Dieser Staubsauger entspricht den
anerkannten Regeln der Technik und den
einschlägigen Sicherheitsbestimmungen
Wir bestätigen die Übereinstimmung mit
den folgenden europäischen Richtlinien:
89/336/EWG (geändert durch RL
91/263/EWG, 92/31/EWG und
93/68/EWG). 73/23/EWG (geändert
durch RL 93/68/EWG).
䡲
Staubsauger nur gemäß Typenschild
anschließen und in Betrieb nehmen.
䡲
Niemals ohne Staubbehälter oder
Filterbeutel MEGAfilt
®
SuperTEX
saugen.
=> Gerät kann beschädigt werden!
䡲
Kindern die Benutzung des Staub-
saugers nur unter Aufsicht gestatten.
䡲
Vermeiden Sie das Saugen mit Düse
und Rohr in Kopfnähe.
=> Es besteht Verletzungsgefahr!
䡲
Das Netzanschlusskabel nicht
zumTragen/ Transportieren des
Staubsaugers benutzen.
䡲
Bei mehrstündigem Dauerbetrieb
Netzanschlusskabel vollständig
ausziehen.
䡲
Nicht am Netzanschlusskabel,
sondern am Stecker ziehen, um das
Gerät vom Netz zu trennen.
䡲
Das Netzanschlusskabel nicht über
scharfe Kanten ziehen und nicht
einquetschen.
䡲
Vor allen Arbeiten an Staubsauger und
Zubehör Netzstecker ziehen.
䡲
Beschädigten Staubsauger nicht in
Betrieb nehmen. Beim Vorliegen einer
Störung Netzstecker ziehen.
䡲
Um Gefährdungen zu vermeiden,
dürfen Reparaturen und Ersatzteile-
austausch am Staubsauger nur vom
autorisierten Kundendienst durch-
geführt werden.
Gerätebeschreibung de
1 Schlauchhandgriff
2 Zubehörhalter
3 Kombi-Zubehör
4 Saugschlauch
5 Bohrdüse*
6 Ein- bzw. Austaste
7 Bereitschafts-Anzeige*
8 Filterwechselanzeige
9 Verschlusslasche
10 Ausblasfilter*
11 Parkhilfe (mit Abschaltautomatik*)
12 Rahmen für Ausblasfilter
13 Saugkraftregler
14 Staubraumdeckel
15 Ausblasfilter-Abdeckung
16 Netzanschlusskabel
17 Staubbehälter oder alternativ
18 Filterbeutel
MEGAfilt
®
SuperTEX
19 Filterhalterung
20 Motorschutzfilter
21 Abstellhilfe (an der Geräteunterseite)
22 umschaltbare Bodendüse*
23 Teppichheber*
24 umschaltbare Bodendüse mit
Entriegelungshülse
*
25 Verschlusshebel
26 Teleskoprohr mit Schiebetaste
*
27 Teleskoprohr mit Schiebemanschette
*
28 Teleskoprohr mit Schiebemanschette
und Entriegelungshülse*
*
je nach Ausstattung
341 2
20
19
21
9
26*
27*
28*
25
24*
22*
11
12
13
16
15
17
6
7*
8
10*
18
14
5*
23*

7
de
6
de
Bild
a) Netzanschlusskabel am Stecker
greifen, auf die gewünschte Länge
herausziehen und Netzstecker
einstecken.
b)Bei Geräten mit elektronisch aus-
lösender Kabeltrommel leuchtet jetzt
die Bereitschafts-Anzeige»grün«.
Bild
Staubsauger durch Betätigen der Ein-
bzw. Austaste in Pfeilrichtung ein- bzw.
ausschalten.
Saugen
Bild
Bodendüse einstellen:
䡲
Zum Saugen von Teppichen
und Teppichböden =>
䡲
Zum Saugen von Hartböden =>
Bodendüse mit Teppichheber*
Bild
Beim Zurückziehen der Bodendüse
wird der Teppich angehoben und
ermöglicht so ein Saugen unter dem
Teppichrand.
Hinweise über die Anwendung und
Wartung der ELECTROMATIC
®
- Bürste
bzw. TURBO-UNIVERSAL
®
-Bürste siehe
beiliegende Gebrauchsanweisung
(je nach Ausstattung).
9*
8
7
6
Bitte Bildseiten ausklappen!
Inbetriebnahme
Bild
a) Saugschlauchstutzen in die
Saugöffnung einrasten.
b)Beim Entfernen des Saugschlauches
beide Rastnasen zusammendrücken
und Schlauch herausziehen.
Bild
a) Handgriff und Teleskoprohr
zusammenstecken.
b)Handgriff bis zum Einrasten in das
Teleskoprohr schieben.
Zum Lösen der Verbindung
Entriegelungshülse drücken und
Handgriff herausziehen.
Bild
䡲
Teppichheber auf die Düse setzen.
䡲
Teppichheber durch seitlichen Druck
verrasten.
Bild
a) Bodendüse und Teleskoprohr
zusammenstecken.
b)Teleskoprohr bis zum Einrasten in den
Stutzen der Bodendüse schieben.
Zum Lösen der Verbindung
Entriegelungshülse drücken und
Teleskoprohr herausziehen
Bild
Durch Drücken der Schiebetaste /
Schiebemanschette in Pfeilrichtung
Teleskoprohr entriegeln und
gewünschte Länge einstellen.
5*
4*
3*
2*
1
*
je nach Ausstattung
dede
䡲
Staubsauger vor Feuchtigkeit und
Hitzequellen schützen.
䡲
Gerät ausschalten, wenn nicht
gesaugt wird.
䡲
Ausgediente Geräte sofort
unbrauchbar machen, danach das
Gerät einer ordnungsgemäßen
Entsorgung zuführen.
䡲
Aus Sicherheitsgründen ist der
Staubsauger mit einem Überhitzungs-
schutz ausgestattet. Sollte eine
Blockierung auftreten und das Gerät
zu heiß werden, schaltet es sich
automatisch ab. Ziehen Sie den
Netzstecker und stellen Sie sicher,
dass Düse Saugrohr oder Schlauch
nicht verstopft sind, bzw. der Filter
gewechselt werden muß.
Nach Beseitigung der Störung lassen
Sie das Gerät mindestens 1 Stunde
abkühlen. Danach ist das Gerät
wieder einsatzbereit.
Hinweise zur Entsorgung
䡲
Verpackung
Die Verpackung schützt den
Staubsauger vor Beschädigung auf
dem Transport.
Sie besteht aus umweltfreundlichen
Materialien und ist deshalb recycelbar.
Entsorgen Sie nicht mehr benötigte
Verpackungsmaterialien an den
Sammelstellen für das
Verwertungssystem »Grüner Punkt«.
䡲
Altgerät
Altgeräte enthalten vielfach noch
wertvolle Materialien.
Geben Sie deshalb Ihr ausgedientes
Gerät bei Ihrem Händler bzw. einem
Recyclingcenter zur Wiederverwertung
ab.
Aktuelle Entsorgungswege erfragen
Sie bitte bei Ihrem Händler oder Ihrer
Gemeindeverwaltung.
!
Bitte beachten
Das Gerät nur an eine Steckdose
anschließen, die mit einer Sicherung
von mindestens 16 A abgesichert ist!
Sollte die Sicherung beim Einschalten
des Gerätes einmal ausgelöst werden,
so kann dies daran liegen, dass
gleichzeitig andere Elektrogeräte mit
hohem Anschlusswert am
gleichen Stromkreis angeschlossen
sind.
Das Auslösen der Sicherung ist
vermeidbar, in dem Sie vor dem
Einschalten des Gerätes die niedrigste
Leistungsstufe einstellen und erst
danach eine höhere Leistungsstufe
wählen.

9
de
Leeren des Staubbehälters
Bild
Der Staubbehälter sollte nach
jedem Saugvorgang entleert werden.
Spätestens jedoch dann, wenn die
Filterwechselanzeige, bei vom
Fußboden abgehobener Düse und
höchster Saugleistungseinstellung,
intensiv und gleichmäßig rot
aufleuchtet.
Bild
Staubraumdeckel durch Betätigung
des Verschlusshebels in Pfeilrichtung
öffnen.
Bild
Staubbehälter am Tragegriff fassen
und herausnehmen.
Bild
䡲
Durch Betätigung der Klappenverrie-
gelung in Pfeilrichtung Bodenklappe
öffnen und Staubbehälter entleeren.
䡲
Bei starker Verschutzung der Boden-
klappe (grober Schmutz), diese
zunächst reinigen, z. B. durch
Absaugen mit der Fugendüse.
(Dazu unbedingt Filterbeutel in das
Gerät einlegen - siehe Bild 29)
䡲
Bodenklappe schließen.
Bild
Staubbehälter wieder in den
Staubsauger einsetzen, Tragegriff
seitlich umlegen und Staubraum-
deckel schließen.
21
20
19
18
17
䡲
Sollten Sie nicht wünschen, dass das
Netzanschlusskabel komplett aufrollt
(z.B. bei Steckdosenwechsel) wird die
Kabelbremse durch Ziehen am
Netzanschlusskabel aktiviert.
Bild
Durch Drücken der
Schiebetaste/Schiebemanschette in
Pfeilrichtung Teleskoprohr entriegeln
und zusammenschieben.
Bild
Zum Abstellen / Transportieren des
Gerätes können Sie die Abstellhilfe an
der Geräteunterseite benutzen. Gerät
aufrecht hinstellen. Kunststoffrippe an
der Bodendüse in die Aussparung an
der Geräteunterseite schieben.
Sie haben einen Bodenstaubsauger
erworben, mit dem Sie jegliche Art von
Trockenschmutz sowohl mit dem
Staubbehälter als auch mit dem
MEGAfilt
®
SuperTEX Filterbeutel
aufsaugen können.
Wir empfehlen den Einsatz
- des Staubbehälters besonders im
Hobbybereich, z.B. zum Entfernen von
Sägespänen, usw.
- des MEGAfilt
®
SuperTEX Filterbeutels
vor allem für herkömmliche
Reinigungsarbeiten im Haushalt.
Arbeiten mit dem Staubbehälter
Bild
Für optimale Saugergebnisse den
Leistungssteller auf Maximalstellung
bringen.
Nur bei sehr empfindlichen Materialien
empfehlen wir, die Leistung
zurückzuregeln.
16
15
14
*
je nach Ausstattung
de
8
de
*
je nach Ausstattung
䡲 Bohrdüse wird durch die Saugkraft in
der gewünschten Position gehalten.
Eventuell empfiehlt es sich die
Leistung höher nachzuregulieren, je
nach Oberflächenbeschaffenheit der
zu bohrenden Wand, um das Fest-
saugen der Bohrdüse sicherzustellen.
Beim Bohren wird der Feinstaub
automatisch aufgesaugt.
!
Achtung: Die Bohrdüse sollte nur in
Verbindung mit dem cycle-tech
Behälter eingesetzt werden, da
feiner Bohrstaub die Funktion des
Filterbeutels beeinträchtigen kann.
Bild
Bei kurzen Saugpausen können Sie
die Parkhilfe an der Geräterückseite
benutzen. Kunststoffrippe am
Düsenstutzen in die Aussparung an
der Geräterückseite schieben.
Bei Geräten mit Abschaltautomatik
schaltet das Gerät ab
=> Bereitschaftsanzeige leuchtet
»grün«.
Nach der Arbeit
Bild
䡲
Gerät ausschalten, Netzstecker aus
der Steckdose ziehen.
䡲
Kurz am Netzanschlusskabel ziehen
und loslassen (Kabel rollt sich
automatisch auf).
䡲
Durch erneutes Ziehen am Netzan-
schlusskabel wird die Kabelbremse
wieder aktiv, durch kurzes Ziehen
am Kabel deaktiviert.
䡲
Bei Geräten mit elektronisch aus-
lösender Kabeltrommel rollt sich das
Netzanschlusskabel beim Ziehen des
Netzsteckers aus der Steckdose
automatisch auf.
13
12*
Saugen mit Zubehör
Bild
Kombi-Zubehör durch Ziehen in
Pfeilrichtung aus dem Zubehörhalter
lösen.
a) Fugendüse
Zum Absaugen von Fugen und Ecken.
Für schwer zugängliche Stellen kann
das Kombi-Zubehör durch teleskop-
artiges Ausziehen der Fugendüse in
2 Stufen verlängert werden.
䡲
Fugendüse in beiden Stufen soweit
ausziehen bis sie hörbar einrastet.
䡲
Durch Lösen der Teleskopverriege-
lungen (drücken in Pfeilrichtung)
kann die Fugendüse wieder
zusammengeschoben werden.
b)Polsterdüse
Zum Absaugen von Polstermöbeln,
Vorhängen usw.
c) Möbelpinsel
Zum Absaugen von Fensterrahmen,
Schränken, Profilen usw.
䡲
Polsterdüse in Pfeilrichtung
umklappen.
䡲
Durch Drehen in Pfeilrichtung wird
der Borstenkranz ausgefahren.
䡲
Vor dem Einsetzen des Kombi-
Zubehörs in den Zubehörhalter
muss der Borstenkranz
eingedreht und die Polsterdüse
zurückgeklappt werden.
Bild
䡲 Bohrdüse am Handgriff befestigen
und so an der Wand platzieren, dass
die Bohrlochöffnung der Düse direkt
über dem zu bohrenden Loch sitzt.
䡲 Gerät auf niedrigem Leistungsniveau
einstellen und dann einschalten.
11
10
de

11
de
10
de
Sie haben ein sehr leistungs- und
saugstarkes Gerät erworben.
Die max. Leistungsstellung empfielt sich
deshalb nur bei stark verschmutzten
Niedrigflor-Teppichböden oder
Hartböden.
Durch Betätigen des Saugkraftreglers
(s. Bild 16) kann die gewünschte Saugkraft
stufenlos eingestellt werden.
䡲
Niedriger Leistungsbereich:
Für das Absaugen empfindlicher
Stoffe, z. B. Gardinen.
䡲
Mittlerer Leistungsbereich:
Für die tägliche Reinigung bei geringer
Verschmutzung.
䡲
Hoher Leistungsbereich:
Zur Reinigung robuster Bodenbeläge,
Hartböden und bei starker
Verschmutzung.
Filterbeutel MEGAfilt
®
SuperTEX
austauschen
Bild
䡲
Leuchtet, bei vom Teppich
abgehobener Düse und höchster
Saugleistungseinstellung, die
Filterwechselanzeige intensiv und
gleichmäßig auf, muss der Filterbeutel
gewechselt werden, auch wenn er
noch nicht voll sein sollte. In diesem
Fall macht die Art des Füllgutes den
Wechsel erforderlich.
䡲
Staubraumdeckel durch Betätigung
des Verschlusshebels in Pfeilrichtung
öffnen.
Bild
Filterbeutel MEGAfilt
®
SuperTEX durch
Ziehen an der Verschlusslasche
verschließen und herausnehmen.
28
27
Bild
Neuen Filterbeutel
MEGAfilt
®
SuperTEX in die Halterung
einlegen und Staubraumdeckel
schließen.
!
Achtung: Staubraumdeckel schließt
nur mit eingelegtem Filterbeutel
MEGAfilt
®
SuperTEX bzw. Textilfilter
oder Staubbehälter.
Sollte nach Austausch des Filter-
beutels die Filterwechselanzeige
weiterhin leuchten, bitte über-
prüfen, ob Düse, Rohr oder Saug-
schlauch verstopft sind.
29
de
*
je nach Ausstattung
!
Achtung: Nach mehrmaligem
Saugen kann der Staubbehälter
innen zerkratzt werden und milchig
anlaufen. Dies hat jedoch keinerlei
Einwirkung auf die Funktion des
Staubsaugers, d.h. er ist weiterhin
voll funktionsfähig.
Dauer- und Microfilter reinigen
Wann muss ich reinigen:
䡲
Wenn bis zum Aufleuchten der
Filterwechselanzeige gesaugt wird.
䡲
Nach jedem Störbetrieb, d.h. nach
jeder Beseitigung einer Verstopfung.
䡲
Spätestens halbjährlich.
Bild
䡲
Durch Drücken der beiden Rastnasen
in Pfeilrichtung Filterhalterung lösen
und aufklappen.
Bild
䡲
Micro- und Dauerfilter entnehmen und
durch Ausklopfen säubern.
!
Achtung: Das waschbare, weiße
Vlies muss halbjährlich oder nach
einer vollständigen Befüllung des
Staubbehälter handgewaschen
werden und darf erst nach einer
Trockenzeit von ca. 24 Stunden
wieder eingesetzt werden.
23
22
Störbetrieb
Beseitigen einer Verstopfung im
Staubbehälter.
Bild
䡲
Die 4 Schnappverriegelungen durch
Drücken in Pfeilrichtung lösen und
Deckel des Staubbehälters
abnehmen. Verstopfung lösen,
z. B. mit Hilfe eines Schrauben-
drehers, und durch Ausklopfen
oder Aussaugen beseitigen.
(Zum Aussaugen unbedingt
Filterbeutel in das Gerät
einlegen - siehe Bild 29)
Bild
䡲
Deckel des Staubbehälters
aufsetzen und in Pfeilrichtung
drücken, bis die 4 Schnappver-
riegelungen hörbar einrasten.
!
Achtung: Nach jedem Störbetrieb
müssen Micro- und Dauerfilter ge-
reinigt werden (s. Bilder 22 u. 23).
Arbeiten mit Filterbeutel
MEGAfilt
®
SuperTEX
Bei Bedarf kann auch an Stelle des
Staubbehälters ein Filterbeutel
MEGAfilt
®
SuperTEX
verwendet werden.
Bild
䡲
Staubraumdeckel öffnen (s. Bild 18)
䡲
Staubbehälter entnehmen und
Filterbeutel MEGAfilt
®
SuperTEX
einsetzen.
䡲
Staubraumdeckel schließen.
26
25
24
*
je nach Ausstattung
de

13
de
12
de
Bild
䡲
Durch Drücken der Verschlusslasche
in Pfeilrichtung Ausblasfilter-
Abdeckung entriegeln und öffnen.
䡲
Filterrahmen durch Drücken des
Verschlusses in Pfeilrichtung
entriegeln und herausnehmen.
Bild
䡲
Schaumstoff und Micro-Hygienefilter
aus Filterrahmen entnehmen.
䡲
Micro-Hygienefilter entsorgen und
neuen Micro-Hygienefilter einlegen.
䡲
Schaumstoff z. B. durch Ausklopfen
säubern und ebenfalls wieder in den
Filterrahmen einlegen.
Nach dem Aufsaugen feiner Staub-
partikel (wie z. B. Gips, Zement, usw.),
Motorschutzfilter durch Ausklopfen
reinigen, evtl. Motorschutzfilter und
Micro- Hygienefilter austauschen.
Beim Saugen mit Staubbehälter oder
MEGAfilt
®
SuperTEX Filterbeutel
Aktivkohle-Filter austauschen*
Bild
䡲
Aktivkohle-Filter herausnehmen und
im Hausmüll entsorgen.
䡲
Neuen Aktivkohle-Filter einlegen.
Bild
䡲
Filterrahmen unter die beiden
Halterippen schieben und in Pfeil-
richtung schwenken bis er einrastet.
䡲
Ausblasgitter schließen.
Hepa-Filter austauschen*
Ist Ihr Gerät mit einem Hepa-Filter
ausgestattet, muss dieser jährlich
ausgewechselt werden.
(Filterwechsel siehe Bilder 31 und 33)
34
33*
32*
31
Kombination Hepa-Aktivkohle-Filter*
Ist Ihr Gerät mit einem Hepa-Aktivkohle-
Filter ausgestattet, müssen Hepa-Filter
und Aktivkohle-Filter jährlich ausge-
wechselt werden.
(Filterwechsel siehe Bilder 31, 32, 33)
Pflege
Vor jeder Reinigung des Staubsaugers,
muss dieser ausgeschaltet und der
Netzstecker gezogen werden.
Staubsauger und Zubehörteile aus Kunst-
stoff können mit einem handelsüblichen
Kunststoffreiniger gepflegt werden.
!
Keine Scheuermittel, Glas oder
Allzweckreiniger verwenden.
Staubsauger niemals in Wasser
tauchen.
Der Staubraum kann bei Bedarf mit einem
zweiten Staubsauger ausgesaugt, oder
einfach mit einem trockenen Staubtuch /
Staubpinsel gereinigt werden.
Technische Änderungen vorbehalten
de
Austausch von Motorschutz- /
Ausblasfilter
Beim Saugen mit Staubbehälter
Motorschutzfilter reinigen
Der Motorschutzfilter sollte in regel-
mäßigen Abständen durch Ausklopfen
bzw. Auswaschen gereinigt werden!
Bild
䡲
Staubraumdeckel öffnen
(siehe Bild 18).
䡲
Motorschutzfilter in Pfeilrichtung
herausziehen.
䡲
Motorschutzfilter durch Ausklopfen
reinigen.
䡲
Bei starker Verschmutzung sollte der
Motorschutzfilter ausgewaschen
werden.
Den Filter anschließend mindestens
24 Stunden trocknen lassen.
䡲
Nach der Reinigung, Motorschutzfilter
in das Gerät einschieben und Staub-
raumdeckel schließen.
Microsan-Ausblasfilter*
Der Microsan-Ausblasfilter sollte einmal
jährlich ausgetauscht werden.
Einen neuen Microsan-Ausblasfilter
erhalten Sie als Ersatzteil vom Kunden-
dienst (siehe Ersatzteile S.15).
Bild
䡲
Durch Drücken der Verschlusslasche
in Pfeilrichtung Ausblasfilter-
Abdeckung entriegeln und öffnen.
䡲
Filterrahmen durch Drücken des Ver-
schlusses in Pfeilrichtung entriegeln
und herausnehmen.
31
30
Bild
䡲
Schaumstoff und Microsan-Ausblas-
filter aus Filterrahmen entnehmen.
䡲
Microsan-Ausblasfilter entsorgen und
neuen Microsan-Ausblasfilter
einlegen.
䡲
Schaumstoff z. B. durch Ausklopfen
säubern und ebenfalls wieder in den
Filterrahmen einlegen.
Beim Saugen mit MEGAfilt
®
SuperTEX
Filterbeutel
Motorschutzfilter reinigen
Der Motorschutzfilter sollte in regel-
mäßigen Abständen durch Ausklopfen
bzw. Auswaschen gereinigt werden!
Bild
䡲
Staubraumdeckel öffnen
(siehe Bild 18).
䡲
Motorschutzfilter in Pfeilrichtung
herausziehen.
䡲
Motorschutzfilter durch Ausklopfen
reinigen.
䡲
Bei starker Verschmutzung sollte der
Motorschutzfilter ausgewaschen
werden.
Den Filter anschließend mindestens
24 Stunden trocknen lassen.
䡲
Nach der Reinigung, Motorschutzfilter
in das Gerät einschieben und Staub-
raumdeckel schließen.
Microsan-Ausblasfilter austauschen*
Wann tausche ich aus: Bei jeder neuen
Austauschfilterpackung
(spätestens nach 5 Filterbeuteln-
Microsan-Ausblasfilter in
Austauschfilterpackung enthalten).
30
32*
de

de
4
5
1514
de
Sonderzubehör de
Ersatzteile
(
können bei Bedarf über den Kundendienst bezogen werden.)
de
Fadenheber (1/2) und Poliereinsatz (3)
Fadenheber (1): Ident-Nr. 188565
Fadenheber (2): Ident-Nr. 184773
Poliereinsatz (3): Ident-Nr. 482209
Dauerfilter (4) und Microfilter (5)
für Staubbehälter.
Dauerfilter für Staubbehälter (4):
Ident-Nr. 489502
Microfilter für Staubbehälter (5):
Ident-Nr. 418714
Microsan-Ausblasfilter (6) und
Motorschutzfilter (7)
Microsan-Ausblasfilter (6):
Ident-Nr. 483332
Motorschutzfilter (7):
Ident-Nr. 187622
3
2
1
TURBO-UNIVERSAL
®
-Bürste BBZ102TBB
Bürsten und Saugen in einem Arbeitsgang von kurz-
florigen Teppichen und Teppichböden bzw. für alle
Beläge. Besonders geeignet zum Aufsaugen von
Tierhaaren. Antrieb der Bürstenwalze erfolgt über
Saugstrom des Staubsaugers.
Kein Elektroanschluss erforderlich.
Bodendüse BBZ082BD
Umschaltbare Bodendüse, geeignet für Teppiche und
glatte Böden.
67
Sonderzubehör de
Aktivkohle-Filter BBZ190AF
Extra dickes Aktivkohlekissen. Verhindert für lange
Zeit störende Gerüche. Jährlich auswechseln.
Nur in Verbindung mit HEPA-Filter (BBZ151HF)
oder Microsan-Ausblasfilter verwendbar.
Bei Verwenden mit Microsan-Ausblasfilter
Schaumstof
f aus Filterrahmen entfernen und
Aktivkohlefilter einlegen.
Bitte beachten!
Kombination »Hepa-Filter« + »Aktivkohlefilter«
nicht möglich bei Geräten mit Motorschutz-
gitter.
(= Grundausstattung mit Microsan-Ausblasfilter)
Austauschfilterpackung BBZ52AFP1
Inhalt:
5 Filterbeutel MEGAfilt
®
SuperTEX mit Verschluss
1 Microsan-Ausblasfilter
HEPA-Filter (Klasse H12) BBZ151HF
Für Allergiker empfohlen. Für extrem saubere
Ausblasluft.
Jährlich auswechseln.
Textilfilter (Dauerfilter) BBZ10TFP
Wiederverwendbarer Filter mit Klettverschluss.
Typ P / Ident-Nr. 461707

16 17
Please keep this instruction manual
When passing the vacuum cleaner on to
a third party, please also pass on this
instruction manual.
Intended use
This vacuum cleaner is intended for
domestic use only, not for commercial use.
This vacuum cleaner should only be
used in accordance with the instructions
in this manual.
The manufacturer will not accept any
responsibility for damage caused by
improper use or incorrect operation.
Therefore, please note the following
points.
The vacuum cleaner must only be
operated with:
䡲
original MEGAfilt
®
SuperTEX dust
bags
䡲
Manufacturer’s original replacement
parts, accessories and optional
accessories
The vacuum cleaner is not to be used
for:
䡲
vacuuming persons or animals
䡲
vacuuming up:
– Insects and spiders
– Hazardous, sharp-edged, hot or
burning substances.
– Damp or liquid substances.
– Highly flammable or explosive
substances and gases.
– ash and rust from tiled stoves and
central heating systems
Safety information
This vacuum cleaner complies with the
recognised rules of technology and the
relevant safety regulations.
We confirm compliance with the
following European directives:
89/336/EEC (amended by Directives
91/263/EEC, 92/31/EEC and 93/68/EEC).
73/23/EEC (amended by Directive
93/68/EEC).
䡲
Only connect to a power supply and
operate the vacuum cleaner in
accordance with the rating plate.
䡲
Never use the vacuum cleaner
without the dust collector or
MEGAfilt
®
SuperTEX dust bag.
=> This can damage the vacuum
cleaner.
䡲
Only allow children to use the vacuum
cleaner under strict supervision.
䡲
Keep the vacuum cleaner away from
the face when using tools and tubes.
=> Risk of injury.
䡲
Do not carry/transport the vacuum
cleaner by the power cord.
䡲
Fully extend the power cord
if the appliance is to be used
continously for several hours.
䡲
When disconnecting the appliance
from the mains, pull the plug, not the
power cord.
䡲
Do not pull the power cord around
sharp corners or allow it to become
trapped.
䡲
Unplug the power cord from the mains
before carrying out any work on the
vacuum cleaner or its accessories.
䡲
Do not use the vacuum cleaner if it is
damaged. Unplug the power cord
from the mains if a fault is detected.
enYour vacuum cleaner en
1 Handle
2 Accessories holder
3 Combination tool
4 Hose
5 Drill dust nozzle*
6 ON/OFF button
7 Power on indicator*
8 Filter change indicator
9 Locking tab
10 Exhaust filter*
11 Parking aid (automatic switch off*)
12 Carrier for exhaust filter
13 Suction regulation button
14 Dust bag compartment lid
15 Exhaust filter cover
16 Power cord
17 Dust collector or alternatively
18 MEGAfilt
®
SuperTEX dust bag
19 Filter holder
20 Motor protection filter
21 Storage aid (on underside of unit)
22 Adjustable floor nozzle*
23 Carpet lifter*
24 Adjustable floor tool* with locking collar
*
25 Dust bag compartment latch
26 Telescopic tube with adjusting button
*
27 Telescopic tube with adjusting sleeve
*
28 Telescopic tube with adjusting sleeve
and locking collar*
*
Depending on equipment
341 2
20
19
21
9
26*
27*
28*
25
24*
22*
11
12
13
16
15
17
6
7*
8
10*
18
14
5*
23*

18
䡲
For safety reasons, only authorised
after-sales service personnel are
permitted to carry out repairs and fit
replacement parts to the vacuum
cleaner.
䡲
Protect the vacuum cleaner from moi-
sture and sources of heat.
䡲
Switch off the vacuum cleaner when it
is not in use.
䡲
At the end of its life, the vacuum cleaner
should be rendered unusable and then
disposed of in an appropriate manner.
䡲
For safety, the vacuum cleaner is fitted
with a temperature safety switch,
which automatically switches the
vacuum cleaner off if it is blocked and
overheating. Unplug the power cord
from the mains and make sure that the
nozzle, tube and hose are not blocked.
Also check whether the filter needs
changing.
Having cleared the blockage, leave
the vacuum cleaner to cool down
for at least an hour. It can then be
switched back on again.
Disposal information
䡲
Packaging
The packaging is designed to protect
the vacuum cleaner against damage
during transportation.
It is made of environment-friendly
materials and can be recycled.
Dispose of unneeded packaging at
the appropriate recycling stations.
䡲
Used vacuum cleaners
Old appliances still contain many
recyclable materials.
Please take your old cleaner to your
retailer or recycling centre so that it
can be recycled.
For current disposal methods, please
enquire at your appliance dealership or
local council.
!
Please note
Only connect the appliance to a
socket that is protected by at least a
16 amp fuse.
If a fuse should blow when you switch
on the vacuum cleaner, this may be
because other electrical appliances
which have a high current draw are
connected to the same power circuit.
To prevent the fuse tripping, select the
lowest power setting before switching
the vacuum cleaner on, and increase
the power only once it is running.
en
19
Fold out picture pages.
Setting up
Figure
a) Push the hose connector into the
opening on the vacuum cleaner until it
engages.
b)To remove the hose, press the two
lugs together and pull the hose out.
Figure
a) Connect the handle and the
telescopic tube together.
b)Push the handle into the telescopic
tube until it engages.
To release the connection, squeeze the
collar sleeve and pull the handle out.
Figure
䡲
Attach the carpet lifter to the nozzle.
䡲
Press the carpet lifter sideways to
engage.
Figure
a) Connect the floor tool and the
telescopic tube together.
b)Push the telescopic tube into the
connecting piece of the floor tool until
it engages.
Press on the locking collar and pull
out the telescopic tube to disconnect.
Figure
To adjust the length of the telescopic
tube, press the adjusting
button/adjusting sleeve in the
direction of the arrow and adjust the
tube to the required length.
5*
4*
3*
2*
1
Figure
a) Take the mains plug, pull the mains
cable to the required length and insert
the plug into a wall socket.
b)If your unit has electronically actuated
cable rewind, the ready indicator will
now light up green.
Figure
To switch your vacuum cleaner on and
off, press the On/Off key in direction
of the arrow.
Vacuuming
Figure
Adjusting the floor tool:
䡲
For cleaning rugs
and carpets =>
䡲
For cleaning hard floors =>
Floor nozzle with carpet lifter*
Figure
When you pull the floor tool
backwards, the rug is lifted, allowing
you to clean underneath its edge.
For notes on the use and
maintenance of the ELECTROMATIC
®
brush and the TURBO UNIVERSAL
brush
®
, see the instruction manual
provided.
(depending on equipment).
9*
8
7
6
en
*
Depending on equipment

20
Vacuuming with accessories
Figure
Pull the combination tool in the direction
of the arrow to remove it from the tool
holder.
a) Crevice nozzle
For vacuuming in crevices and
corners.
For difficult to get to places, the com-
bination tool can be extended in two
stages by pulling out the crevice
nozzle.
䡲
Extend the crevice nozzle to the
second stop until you can hear it
engage.
䡲
The crevice nozzle can be pushed
back in again by releasing the teles-
copic locking mechanism (pressing
it in the direction of the arrow).
b)Upholstery nozzle
For cleaning upholstery, curtains, etc.
c) Furniture brush. For window frames,
cabinets, profiles etc.
䡲
Fold the upholstery nozzle over in
the direction of the arrow.
䡲
To extend the brush ring, turn in the
direction of the arrow.
䡲
Before replacing combination tool
in the tool holder, retract the bush
ring and fold the upholstery nozzle
back.
Figure
䡲 Secure the drill dust nozzle to the
handle and then place against the wall,
so that the nozzle drill hole opening sits
directly over the hole to be drilled.
䡲 Select the lowest power setting and
then switch on the vacuum cleaner.
䡲 Suction holds the drill dust nozzle in
the required position. Depending on
the surface of the wall to be drilled it
may be necessary to readjust the
11
10
power to a higher setting to ensure
the drill dust nozzle is firmly attached.
Any fine particles are automatically
vacuumed up.
!
Caution: The drill dust nozzle
should only be used in conjunction
with the dust collector since fine
drill dust can impair the function of
the dust bag.
Figure
When stopping cleaning for a
moment, you can use the parking aid
at the back of the vacuum cleaner.
Slide the plastic lug on the tool
connector into the groove at the back
of the vacuum cleaner.
If your cleaner has the automatic
standby function, it will now switch
itself off.
=> Power indicator lights up "green".
12*
en
21
When the work is done
Figure
䡲
Switch the vacuum cleaner off and
unplug the power cord from the
mains.
䡲
Tug the power cord and let go. The
cable then rewinds automatically.
䡲
To reactivate or deactivate the cable
brake, quickly tug the power cord.
䡲
On vacuum cleaners with an
electronically actuated cable rewind,
the power cord automatically rewinds
when the machine is unplugged at the
socket.
䡲
If you do not want the power cord to
rewind completely (e.g. when
changing the plug), you can apply the
cable brake by pulling the power cord.
Figure
Press the adjusting button/sleeve in
the direction of the arrow to unlock
and collapse the telescopic tube.
Figure
To store or transport the vacuum
cleaner, use the storage aid on the
underside of the cleaner. Stand the
vacuum cleaner up on its end. Slide
the plastic lug on the floor into the
groove on the underside of the unit.
15
14
13
You have purchased a floor vacuum
cleaner which can vacuum up any type
of dry dirt and uses a dust collector and
MEGAfilt
®
SuperTEX dust bags.
We recommend that you use
– the dust collector for dirt generated by
DIY in particular, such as sawdust.
– the MEGAfilt
®
SuperTEX dust bags
mainly for everyday household
cleaning.
Using the dust collector
Figure
Set the power setting to maximum for
the best results when vacuuming.
We recommend that you reduce the
setting only when vacuuming very
delicate materials.
Emptying the dust filter
Figure
The dust collector should be emptied
every time the vacuum cleaner is used.
It must be emptied, however, as soon
as the dust indicator constantly lights
up bright red when the nozzle is lifted
from the floor and the setting is at its
highest.
Figure
Open the dust bag compartment lid
by turning the locking lever in the
direction of the arrow.
18
17
16
en
*
Depending on equipment

23
Using MEGAfilt
®
SuperTEX
filter bags
If necessary, a MEGAfilt
®
SuperTEX filter
bag can be used instead of the dust
collector.
Figure
䡲
Open the dust bag compartment
cover (see Figure 18)
䡲
Remove the dust collector and fit thel
MEGAfilt
®
SuperTEX dust bag.
䡲
Close the dust bag compartment
cover.
You have bought an extremely powerful
device. The highest suction setting is
therefore only recommended for heavily
soiled, short-pile carpets and hard floors.
The desired level of suction can be
adjusted to any level using the suction
regulator switch (see Figure 16).
䡲
Low suction range:
For vacuuming delicate fabrics, e.g.
curtains.
䡲
Middle suction range:
For daily vacuuming of lightly soiled
floors.
䡲
High suction range:
For vacuuming durable floor coverings,
hard floors and for heavily soiled
surfaces.
26
Replacing the MEGAfilt
®
SuperTEX
dust bag
Figure
䡲
If the dust bag change indicator lights
up brightly and uniformly when the
nozzle is lifted from the floor and the
vacuum is on its highest setting, you
should change the dust bag, even if it
is not yet full. In this case it is
essential to change the dust bag due
to the type of material it contains.
䡲
Turn the dust compartment locking
lever in the direction of the arrow to
open the dust compartment cover.
Figure
Seal the MEGAfilt
®
SuperTEX dust bag
by pulling the locking tab and then
remove it.
Figure
Place a new MEGAfilt
®
SuperTEX dust
bag in the holder and close the dust
bag compartment cover.
!
Caution: The dust bag compartment
cover will only close when the
MEGAfilt
®
SuperTEX dust bag,
textile filter or dust collector has
been inserted.
If the dust bag change indicator
continues to light up after the dust
bag has been changed, please
check whether the nozzle, pipe or
vacuum hose are obstructed.
29
28
27
en
22
Figure
Grip the dust collector by the carrying
handle and remove it.
Figure
䡲
Press the latch in the direction of the
arrow to open the base and empty the
dust collector by pressing the lid lock
in the direction of the arrow.
䡲
If the base is very dirty (thick dirt) clean
this first e.g. by vacuuming using the
crevice tool.
(Fit dust bag in the vacuum cleaner
when you do this - see illustration 29)
䡲
Close the base.
Figure
Refit the dust collector into the
vacuum cleaner, position the carrying
handle at the side and close the dust
bag compartment lid.
!
Caution: The inside of the dirt
container may become scratched
with use and start to look opaque.
This does not, however, affect the
performance of the vacuum cleaner
in any way, i.e. it will continue to
function as normal.
Cleaning the permanent filters
and microfilters
When must the filters be cleaned:
䡲
If the vacuum cleaner is used until the
dust indicator lights up.
䡲
After any operating problem,
i.e. after a blockage is cleared.
䡲
At least every six months.
Figure
䡲
Unlock the filter holder by pressing in
the two lugs and open in the direction
of the arrow.
22
21
20
19
Figure
䡲
Remove the microfilters and
permanent filters and shake them
clean.
!
Caution: The washable white fleece
filter should be handwashed every
six months or after every time the
dust collector becomes completely
full, and should only be put back
after drying for about 24 hours.
Blockages
Removing a blockage in the dust
collector.
Figure
䡲
Unfasten the 4 snaplocks by pushing
them in the direction of the arrow and
remove the dust collector cover.
Loosen the blockage
e.g. with a screwdriver, and tap it out.
(Please fit dust bag into the vacuum
cleaner before vacuuming it out
- see Figure 29)
Figure
䡲
Put the dust collector cover back on
and push in the direction of the arrow
until you hear the 4 clasps lock into
place.
!
Caution: The microfilters and
permanent filters must be cleaned
after every blockage.
(see Figures 22 and 23).
25
24
23
en

24
Replacing the motor protection
filter / exhaust filter
When vacuuming using the dust
collector
Cleaning the motor protection filter
The motor protection filter should be
cleaned at regular intervals by tapping it
or washing it out.
Figure
䡲
Open the dust compartment cover
(see figure 18).
䡲
Remove the motor protection filter in
the direction of the arrow.
䡲
Empty the motor protection filter by
tapping it.
䡲
If the motor protection filter is very
dirty, wash it out.
Leave the filter to dry for at least 24
hours.
䡲
After cleaning, insert the motor
protection filter in the machine and
close the dust compartment cover.
Microsan exhaust filter*
The Microsan exhaust filter should be
replaced once a year.
You can obtain a replacement Microsan
exhaust filter from our after–sales
service (see replacement parts p.27).
Figure
䡲
Unlock and open the exhaust filter
cover by pushing the locking tab in
the direction of the arrow.
䡲
Unlock and remove the filter holder by
pressing the latch in the direction of
the arrow.
31
30
Figure
䡲
Remove the foam filter and Microsan
exhaust filter from the filter holder.
䡲
Dispose of the Microsan exhaust filter
and fit a new one.
䡲
Clean the foam filter, e.g. by tapping it
out, and put it, too, back in the filter
holder.
When vacuuming using a
MEGAfilt
®
SuperTEX dust bag
Cleaning the motor protection filter
The motor protection filter should be
cleaned at regular intervals by tapping it
or washing it out.
Figure
䡲
Open the dust compartment cover
(see figure 18).
䡲
Remove the motor protection filter in
the direction of the arrow.
䡲
Empty the motor protection filter by
tapping it.
䡲
If the motor protection filter is very
dirty, wash it out.
Leave the filter to dry for at least 24
hours.
䡲
After cleaning, insert the motor
protection filter in the machine and
close the dust compartment cover.
Replacing the Microsan exhaust filter*
The motor protection filter should be
changed when starting a newpack of
bags (no later than after 5 filter bags,
the Microsan exhaust filter is included in
the pack of filter bags).
30
32*
en
25
Figure
䡲
Unlatch and open the exhaust filter
cover by pulling the locking tab in the
direction of the arrow.
䡲
Unlatch and remove the filter frame by
pressing the latch in the direction of
the arrow.
Figure
䡲
Remove the foam filter and micro-
hygiene filter from the filter frame.
䡲
Dispose of the micro-hygiene filter
and fit a new micro-hygiene filter.
䡲
Clean the foam filter, e.g. by tapping it
out, and put it back in the filter frame
also.
If you have used the vacuum cleaner
for fine dust particles (such as plaster
or cement), clean the motor protection
filter by tapping it and, if necessary,
replace the motor protection filter and
the micro-hygiene filter.
When vacuuming using the dust
collector or a MEGAfilt
®
SuperTEX
dust bag
Replacing the activated carbon filter*
Figure
䡲
Remove the activated carbon filter
and dispose of it as normal waste.
䡲
Fit a new activated carbon filter.
Figure
䡲
Slide the filter frame under the two
retaining ribs and push in the direction
of the arrow until it engages.
䡲
Close the exhaust grille.
34
33*
32*
31
Replacing the Hepa filter*
If your vacuum cleaner is equipped with
a Hepa filter, this should be replaced
once a year. (See figures 31 and 33 for
changing the filter)
HEPA activated carbon filter system
If your vacuum cleaner is equipped with
a Hepa activated carbon filter system,
the Hepa filter and the activated carbon
filter should be replaced once a year.
(see Figures 31, 32, 33 for changing the
filters)
Care
Always switch the vacuum cleaner off
and disconnect the power cord from the
mains before cleaning the vacuum
cleaner.
The vacuum cleaner and plastic
accessories can be cleaned with a
commercial plastic cleaner.
Do not use abrasive, glass or all-
purpose cleaners. Never immerse the
vacuum cleaner in water.
The dust compartment can, if necessary,
be cleaned with a second vacuum
cleaner or simply wiped with a dry cloth
or dusting brush.
Subject to technical changes.
en
*
Depending on equipment
*
Depending on equipment

26 27
Optional accessories en
Activated carbon filter BBZ190AF
Extra thick activated carbon pad. Combats unpleasant
odours. Replace once a year.
Can only be used in combination with HEPA-Filter
(BBZ151HF) or Microsan exhaust filter.
If used with Microsan exhaust filter, r
emove foam
from filter holder and replace with activated
carbon filter.
Please note
Combination of Hepa filter and activated carbon
filter not possible on cleaners with motor
protection grille.
(= standard Microsan exhaust filter)
Optional accessories en
Replacement parts
(
can if necessary be obtained from our after–sales service.)
en
Pile lifter (1/2) and polishing attachment (3)
Pile lifter (1): Product code 188565
Pile lifter (2): Product code 184773
Polishing insert (3): Product code 482209
Permanent filters (4) and microfilters (5)
for dust collector.
Permanent filter for dust collector (4):
Product code 489502
Microfilter for dust collector (5):
Product code 418714
Microsan exhaust filters (6) and
motor protection filters (7)
Microsan exhaust filter (6):
Product code 483332
Motor protection filter (7):
Product code 187622
TURBO-UNIVERSAL
®
brush BBZ102TBB
All in one brushing and vacuuming of short-pile rugs
and carpets and all hard floor coverings. Especially
suitable for picking up pet hair. The brush roller is
driven by the suction air flow.
No separate electrical connection is needed.
Floor nozzle BBZ082BD
Adjustable floor tool, suitable for carpets and hard
floors.
4
5
3
2
1
67
Replacement filter pack BBZ52AFP1
Contains:
5 MEGAfilt
®
SuperTEX dust bags self sealing bags
1 Microsan exhaust filter
HEPA filter (Class H12) BBZ151HF
Recommended for allergy sufferers.
Ensures very clean exhaust air.
Replace once a year.
Textile bag (permanent bag) BBZ10TFP
Reusable bag with Velcro(R) fastener.
Typ P / Product code 461707

29
Conservez cette notice d’utilisation.
Si vous remettez l’aspirateur à un tiers,
veuillez-y joindre sa notice d’utilisation.
Utilisation conforme aux
prescriptions et à l’emploi prévu
Cet aspirateur est destiné exclusivement à
l’emploi domestique et non pas à l’usage
industriel.
Utilisez l’aspirateur exclusivement selon
les indications figurant dans cette notice
d’utilisation.
Le fabricant n’est pas responsable
d’éventuels dommages résultant
d’un emploi non conforme ou d’un
maniement incorrect.
Veuillez donc respecter impérativement
les consignes suivantes!
L’aspirateur doit être utilisé uniquement
avec:
䡲
un sac aspirateur
MEGAfilt
®
SuperTEX
d’origine
䡲
des pièces de rechange, accessoires ou
accessoires spéciaux d’origine
L’aspirateur n’est pas approprié à:
䡲
aspirer sur des personnes ou animaux
䡲
aspirer des:
– petits organismes vivants
– substances nocives, à arêtes vives,
chaudes ou incandescentes
– substances humides ou liquides
– substances et gaz facilement
inflammables ou explosifs.
– cendres, de la suie provenant de
poêles en faïence et de chauffages
centrales.
Consignes de sécurité
Cet aspirateur répond aux règles
techniques reconnues et aux prescriptions
de sécurité applicables.
Nous déclarons que l’appareil correspond
aux directives européennes suivantes:
89/336/CEE (modifiée par la directive
91/263/CEE, 92/31/CEE et 93/68/CEE).
73/23/CEE (modifiée par la directive
93/68/CEE).
䡲
Raccorder et mettre l’aspirateur en
service uniquement selon les indications
figurant sur la plaque signalétique.
䡲
Ne jamais aspirer sans collecteur de
poussières ou sac aspirateur
MEGAfilt
®
SuperTEX.
=> L’appareil peut être endommagé!
䡲
Permettre aux enfants d’utiliser
l’aspirateur uniquement sous surveillance.
䡲
Eviter d’aspirer avec le suceur et le tube
à proximité de la tête.
=> Il y a risque de blessure!
䡲
Ne pas utiliser le cordon électrique pour
porter/ transporter l’aspirateur.
䡲
En cas de fonctionnement continu
de plusieurs heures, dérouler
complètement le cordon électrique.
䡲
Ne pas tirer sur le cordon électrique,
mais sur le connecteur pour déconnecter
l’appareil du secteur.
䡲
Ne pas tirer le cordon électrique pardessus
d’arêtes vives et ne pas le coincer.
䡲
Avant tous les travaux sur l’aspirateur et
les accessoires, retirer le connecteur de
la prise.
䡲
Ne pas mettre l’aspirateur en service s’il
est défectueux. En cas de panne, retirer
le connecteur de la prise.
䡲
Pour éviter des dangers, seul le service
après-vente agréé est autorisé à
effectuer des réparations et le
remplacement de pièces de rechange
sur l’aspirateur.
䡲
Ne pas exposer l’aspirateur à l’humidité
ni aux sources de chaleur.
䡲
Eteignez l’appareil si vous n’aspirez pas.
fr
28
Description de l’appareil fr
1 Poignée de flexible
2 Porte-accessoires
3 Accessoire combiné
4 Flexible d’aspiration
5 Suceur pour trous de perçage*
6 Bouton marche/arrêt
7 Voyant "prêt à fonctionner"
8 Indicateur pour le changement du sac
aspirateur
9 Attache de fermeture
10 Filtre de sortie d’air*
11 Position parking (avec arrêt automatique*)
12 Cadre pour le filtre de sortie d’air
13 Régulateur de la puissance d’aspiration
14 Couvercle du compartiment de poussière
15 Capot du filtre de sortie d’air
16 Cordon électrique
17
Collecteur de poussières ou comme alternative
18 Sac aspirateur MEGAfilt
®
SuperTEX
19 Support de filtre
20 Filtre de protection du moteur
21 Dispositif de rangement (sur la face inférieure
de l’appareil)
22 Buse pour sols commutable*
23 Lève-tapis*
24 Brosse commutable pour sols avec manchon de
déverrouillage
*
25 Levier de fermeture
26 Tuyau télescopique avec poussoir
*
27 Tuyau télescopique avec manchette coulissante
*
28
Tuyau télescopique avec manchette coulissante
et manchon de déverrouillage*
*
selon l’équipement
341 2
20
19
21
9
26*
27*
28*
25
24*
22*
11
12
13
16
15
17
6
7*
8
10*
18
14
5*
23*

31
Veuillez déplier les pages d’images!
Mise en service
Fig.
a) Enclencher l’embout du flexible
d’aspiration dans l’orifice d’aspiration.
b) Pour enlever le flexible d’aspiration,
presser les deux nez d’enclenchement
et retirer le flexible.
Fig.
a) Assembler la poignée et le tuyau
télescopique.
b) Pousser la poignée dans le tuyau
télescopique jusqu’à son enclenchement.
Pour le désassemblage, presser le
manchon de déverrouillage et retirer la
poignée.
Fig.
䡲
Poser le lève-tapis sur la brosse.
䡲
Enclencher le lève-tapis par une
pression latérale.
Fig.
a) Assembler la buse pour sols et le tuyau
télescopique.
b) Pousser le tuyau télescopique dans le
manchon de la buse pour sols jusqu’à
son enclenchement.
Pour le désassemblage, presser le
manchon de déverrouillage et retirer le
tuyau télescopique
Fig.
En poussant le poussoir / la manchette
coulissante dans le sens de la flèche,
déverrouiller le tuyau télescopique et
régler la longueur souhaitée.
5*
4*
3*
2*
1
Fig.
a) Saisir le cordon électrique par le connec-
teur, retirer le cordon à la longueur
souhaitée et connecter le connecteur.
b) En cas d’appareils avec enrouleur de
câble à déclenchement électronique,
le voyant "prêt à fonctionner" s’allume
maintenant en "vert".
Fig.
Allumer / éteindre l’aspirateur en
actionnant le bouton marche/arrêt dans
le sens de la flèche.
Aspiration
Fig.
Réglage de la buse pour sols:
䡲
Pour aspirer sur des tapis
et des moquettes =>
䡲
Pour aspirer sur des sols durs =>
Buse pour sols avec lève-tapis*
Fig.
En tirant la buse pour sols en arrière, le
tapis est soulevé et il est possible
d’aspirer sous le bord du tapis.
Pour des indications concernant
l’utilisation et l’entretien de la brosse
ELECTROMATIC
®
ou la brosse TURBO-
UNIVERSAL
®
, voir la notice d’utilisation
jointe
(selon l’équipement).
9*
8
7
6
fr
30
䡲
Rendre immédiatement inutilisables les
appareils hors d’usage, ensuite mettre
l’appareil au rebut de manière
réglementaire.
䡲
Pour des raisons de sécurité,
l’aspirateur est équipé d’une protection
contre une surchauffe. En cas de
blocage et de surchauffe de l’appareil, il
s’arrête automatiquement. Retirez le
connecteur de la prise et vérifiez que la
buse, le tube d’aspiration ou le flexible
ne sont pas obstrués ou si le filtre (sac)
doit être changé.
Après l’élimination du dérangement,
laissez refroidir l’appareil au moins 1
heure. Ensuite l’appareil est de nouveau
opérationnel.
Indication pour la mise au rebut
䡲
Emballage
L’emballage protège l’aspirateur contre
un endommagement pendant le
transport.
Il est constitué de matériaux
écologiques et est donc recyclable.
Les matériaux d’emballage qui ne sont
plus utilisés doivent être mis au rebut
aux points collecteurs du système de
recyclage
Système de recyclage "Point vert".
䡲
Appareil usagé
Les appareils usagés contiennent
souvent des matériaux précieux.
Remettez donc votre appareil usagé à
votre revendeur ou à un centre de
recyclage pour la revalorisation.
Pour connaître les possibilités
d’élimination actuelles, demandez à
votre revendeur ou à votre mairie.
!
Important
Brancher l’appareil uniquement sur une
prise qui est protégée par un fusible
d’au moins 16 A!
Si le disjoncteur se déclenche lors de la
mise en marche de l’appareil, ceci peut
être dû au fait que d’autres appareils
électriques d’une puissance connectée
élevée sont branchés en même temps
sur le même circuit électrique.
Le déclenchement du disjoncteur peut
être évité en réglant l’appareil sur la plus
faible puissance avant de le mettre en
marche et en le réglant ensuite sur une
puissance supérieure.
fr
*
selon l’équipement
La page est en cours de chargement...
La page est en cours de chargement...
La page est en cours de chargement...
La page est en cours de chargement...
La page est en cours de chargement...
La page est en cours de chargement...
La page est en cours de chargement...
La page est en cours de chargement...
La page est en cours de chargement...
La page est en cours de chargement...
La page est en cours de chargement...
La page est en cours de chargement...
La page est en cours de chargement...
La page est en cours de chargement...
La page est en cours de chargement...
La page est en cours de chargement...
La page est en cours de chargement...
La page est en cours de chargement...
La page est en cours de chargement...
La page est en cours de chargement...
La page est en cours de chargement...
La page est en cours de chargement...
La page est en cours de chargement...
La page est en cours de chargement...
La page est en cours de chargement...
La page est en cours de chargement...
La page est en cours de chargement...
La page est en cours de chargement...
La page est en cours de chargement...
La page est en cours de chargement...
La page est en cours de chargement...
La page est en cours de chargement...
La page est en cours de chargement...
La page est en cours de chargement...
La page est en cours de chargement...
La page est en cours de chargement...
La page est en cours de chargement...
La page est en cours de chargement...
La page est en cours de chargement...
La page est en cours de chargement...
La page est en cours de chargement...
La page est en cours de chargement...
La page est en cours de chargement...
La page est en cours de chargement...
La page est en cours de chargement...
La page est en cours de chargement...
La page est en cours de chargement...
La page est en cours de chargement...
La page est en cours de chargement...
-
 1
1
-
 2
2
-
 3
3
-
 4
4
-
 5
5
-
 6
6
-
 7
7
-
 8
8
-
 9
9
-
 10
10
-
 11
11
-
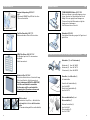 12
12
-
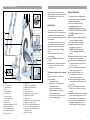 13
13
-
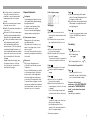 14
14
-
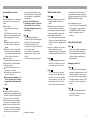 15
15
-
 16
16
-
 17
17
-
 18
18
-
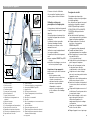 19
19
-
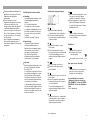 20
20
-
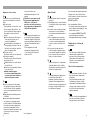 21
21
-
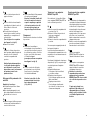 22
22
-
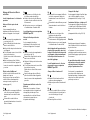 23
23
-
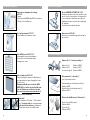 24
24
-
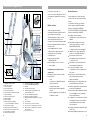 25
25
-
 26
26
-
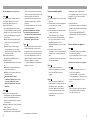 27
27
-
 28
28
-
 29
29
-
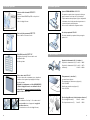 30
30
-
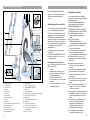 31
31
-
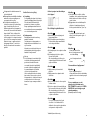 32
32
-
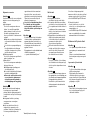 33
33
-
 34
34
-
 35
35
-
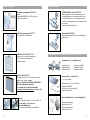 36
36
-
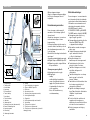 37
37
-
 38
38
-
 39
39
-
 40
40
-
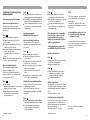 41
41
-
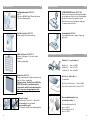 42
42
-
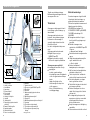 43
43
-
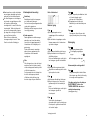 44
44
-
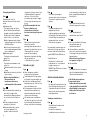 45
45
-
 46
46
-
 47
47
-
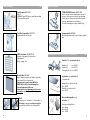 48
48
-
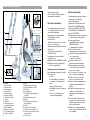 49
49
-
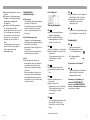 50
50
-
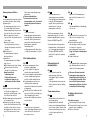 51
51
-
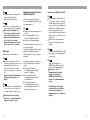 52
52
-
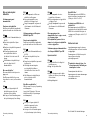 53
53
-
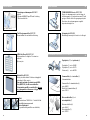 54
54
-
 55
55
-
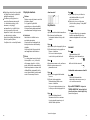 56
56
-
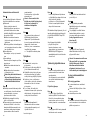 57
57
-
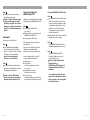 58
58
-
 59
59
-
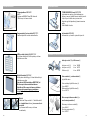 60
60
-
 61
61
-
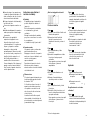 62
62
-
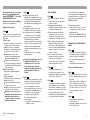 63
63
-
 64
64
-
 65
65
-
 66
66
-
 67
67
-
 68
68
-
 69
69


Bosch BSG81885/01 Manuel utilisateur
- Catégorie
- Aspirateurs
- Taper
- Manuel utilisateur
dans d''autres langues
- italiano: Bosch BSG81885/01 Manuale utente
- español: Bosch BSG81885/01 Manual de usuario
- Nederlands: Bosch BSG81885/01 Handleiding
- dansk: Bosch BSG81885/01 Brugermanual
- eesti: Bosch BSG81885/01 Kasutusjuhend
- svenska: Bosch BSG81885/01 Användarmanual
Documents connexes
-
Bosch BSG82070/01 Manuel utilisateur
-
-
-
-
Bosch BSG82222/01 Manuel utilisateur
-
-
-
-
-
Autres documents
-
Siemens VS08G1885 Manuel utilisateur
-
Siemens VS08G2214/03 Manuel utilisateur
-
Siemens VS08G1880/03 Manuel utilisateur
-
-
-
-
-
-
-
Princess Royal Jet Vac Le manuel du propriétaire