Royal Sovereign International, Inc.
HCE-220
Owner's Manual
Please read and retain these instructions.
To register your product, please go to www.royalsovereign.com USA.
Click the Customer Support Tab then Registration Tab.
www.royalsovereign.ca
Page en Français 11
DIGITAL CERAMIC
TOWER HEATER

DIGITAL CERAMIC TOWER HEATER
Model HCE-220
INTRODUCTION
Thank you for choosing Royal Sovereign to provide you and your family with all of the “Home
Comfort” requirements for your home, apartment, or office. This Heater can be set-up in just
minutes and can be easily moved from room to room. It is a multi-functional room air comfort
system that offers you Heating and Fan Only modes. This manual will provide you with valuable
information necessary for the proper care and maintenance for your new heater. Please take a
few moments and read the instructions thoroughly. If properly maintained, your heater will give
you many years of trouble free operation.
Because our products are subject to continuous improvement, RS Canada reserves the right to modify product design and
specifications without notice and without incurring any obligation. E&OE

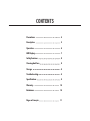
Precautions 4
Description
5
Operation
6
LED Display
7
Safety Features
8
Cleaning And Care
8
Storage
9
Troubleshooting
9
Specifications
9
Warranty
10
Exclusions
10
Page en Français
11
CONTENTS

4
Precautions for use
• Do not block or cover air outlets.
Electrical Specifications and Power Cord
Check to ensure that the electrical service being used is adequate for the model you’ve chosen. The electrical rating of your
new heater is defined on the serial sticker on the unit. Please refer to the rating when checking electrical requirements to
ensure they meet the electrical codes of your location.
• Do not use this appliance if it malfunctions or is dropped or damaged in any manner.
• Do not use outdoors. Do not place on or near a hot gas, electric burner, a microwave, or a heated oven.
• To protect against fire, electric shock or injury, do not p
lace cord, plug, or appliance in water or other liquid.
• The wrong use conflicting with the safeguards voids the customer of the right for warranty service.
• Do not modify any part of this product.
• Do not insert any objects into the product or block the airflow in any way.
• Ensure that the power supply you use has an appropriate voltage rating.
• If the electrical outlet you intend to use is not adequately grounded or protected by a time delay fuse or circuit breaker,
you should have a qualified electrician install the proper outlet.
• Do not use this unit with any extension cords or adapter plugs.
• If the cord or plug is damaged in any way, please call
the Royal Sovereign Service Department
• Turn the unit off and unplug, when cleaning the heater or when the heater will not be used for an extended time period.
• When overheating should occur the built-in overheating safety device will shut the appliance off.
General Use
• Do not block air outlets with any obstacles.
• Do not insert any objects into the heater.
• Do not pour water on the housing or control panel.
• Do not place heavy items or sit on the heater.
• Never pull or damage the power cord in any way.
• Don’t let your children use the appliance.
• The repair of the appliance must be performed by a professional. Mistakes in r
epair are dangerous and can bring great
hazard to the user.

HCE-220
5
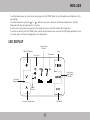
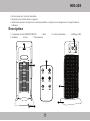
Description
1. ON/OFF Rocker Switch
2. Filter
3. Power Cable
4. LED Display
5. Ventilation
6. Base
7. Remote
1
2
3
4
5
7
6

6
OPERATION
Using The Remote
NOTE: Pull away the small plastic tab located on the bottom of the Remote (7) to activate the battery.
The Remote has 6 functions:
NOTE: The functions are non-effective when the heater is in standby mode except for the Power Button.
1. POWER - To power the unit on/off (in between standby and on).
NOTE: This will only work when the ON/OFF Rocker Switch (1) is on.
NOTE: When the Heater is powered off, the fan will run for approximately 60 seconds before powering off completely.
2. MODE - Changes the power settings:
• Fan-only • Low power- 750W • High power - 1500W
3. TIMER - The timer function allows you to set the leng
th of operation for up to 9 hours for automatic switch off.
Pressing the ‘TIMER’ button increases the length of operation by 1 hour each time the button is pressed.
Once the timer has been set, it will count down the hours in 1 hour intervals; when the time reaches zero, the Heater will
automatically switch off and enter standby mode.
Pressing the ‘TIMER’ button once more when the display shows 9 hours will reset the Heater to run continuously.
4. OSCILLATING - Switches the oscillating function on or off.
5. UP - Increases the temperature in 1°F increments.
When increasing the temperature using the button (circled above),
press the button repeatedly rather than holding
your finger over it for a prolonged period. Holding your finger over the button for more than 2 seconds will set the
LED Display to show the temperature in °C.
Should this happen, simply hold your finger on the button for 2 seconds to revert back to °F.
6. DOWN - Decreases the temperature in 1°F increments.
Using The Heater
Use the ON/OFF Rocker Switch (1) on the rear of the Heater to switch it on.
Press the ‘POWER’ button and the Heater will switch on from standby and the LED Display (4) will show the room
temperature. The Heater will begin to heat up to the preset temperature of 77°F.
NOTE
: If the room temperature is 2°F higher than the preset temperature, then only the fan will operate. The Heater will
switch back on again once the room temperature drops 2° to 3°F.
If the Heater is not operated for 3 seconds, the LED Display will show the room temperature.
The Heater will cycle on and off to maintain the preset temperature. This is not a fault with the appliance.

HCE-220
7
To set the heating power, or to use the fan-only mode, press the ‘MODE’ button to cycle through low heat, high heat or fan-
only settings.
To set the temperature, press the or buttons to increase or decrease to the desired temperature. The LED
Display will show the set temperature for 3 seconds.
Once the room reaches the set temperature, the Heater will cycle on and off to maintain this temperature.
To set the set auto off, press the ‘TIMER’ button until the desired time has been reached. The LED Display will show for up to
3 seconds, then revert back to displaying the room temperature.
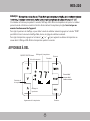
LED DISPLAY
Timer
Low Power/
High Power/
Fan-only
Timer Icon
Oscillation
Power
Display
°Fahrenheit
Temperature
Display
ON/OFF/Standby
Increase Temperature
Decrease
Temperature

8
SAFETY FEATURES
This Heater is fitted with an overheat protection switch (thermal cut-out) which will power off the appliance
automatically in case of overheating. Should this occur, unplug the appliance and allow to cool fully for approximately 30
minutes.
Follow the operation instructions to restart the appliance after removing the source of the overheating (poor ventilation,
item covering the heater etc.). The Heater should function normally. Should the problem persist, please contact Designer
Habitat Customer Services.
To avoid damage and to regulate the temperature, this Heater is fitted with a thermostatic safety device. The
safety
device will activate and cut out the power to the Heater once a certain temperature is reached. The Heater will start again
once the temperature has lowered.
The Heater is also fitted with a tip switch which will cut off the power to the Heater if it is knocked over. Should this
happen, disconnect at the mains and allow to cool fully before attempting to move the Heater. Inspect the Heater for
damage. If - and only if - the Heater is free from damage, plug back into the mains. The Heater should function normally.
CLEANING AND CARE
IMPORTANT: Turn off the Heater. Switch off the ON/ OFF Rocker Switch and disconnect from the power socket. Wait for the
Heater to be completely cool befor
e cleaning.
Vacuum-clean air vents and grilles to remove dust from these areas.
To remove dust on external surfaces, wipe the Heater with a damp (not wet) lint-free cloth rinsed in hot soapy water only.
CAUTION: Do not use any harsh detergents or abrasive cleaners.
WARNING! Do not spray with any liquids or submerge in liquid or water.
WARNING! Do not attempt to clean the interior of the Heater. Do not attempt to open the casing at any time. There are no
user-servicable parts.
Remove the Filter (6) and clean regularly. To remove the Filter, locate the 3 small screws on the rear of the Heater, remove
the Filter Cover and Filter and rinse the Filter using clean water. Leave to dry completely before replacing.
CAUTION: Ensure the Filter is completely dry before returning it to the Heater. Failure to follow this instruction could
damage the product, invalidating any warranty.

HCE-220
9
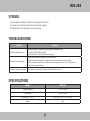
STORAGE
Store the Heater carefully in a dust-free area during the off season.
It is ideal to store the Heater in the box in which it was supplied.
Neatly wind the cord of the Heater to prevent damage.
TROUBLESHOOTING
Problem Solution
The heater will not power on
Ensure the Heater is switched on and connected to themains power.
Activate the ON/OFF Rocker Switch.
Ensure the Base is fitted and the Heater is upright.
The heater is not heating up
Check that the Heater is plugged in at the mains outlet.
Ensure that the set temperature is higher than the room temperature on the display.
Make sure that the Heater has not gone into overheat protection mode (see ‘Safety Features’).
The vents may need cleaning.
The heater becomes damaged Discontinue use and contact Designer Habitat Customer Services.
SPECIFICATIONS
Model HCE-220
Voltage/Frequency AC 120V~60Hz
Input power 750W / 1500W
Dimension (w × h × d) 8.7in. (W)× 6.5 in. (D) × 22.4in. (H)
Weight 7 lbs

10
WARANTY
Royal Sovereign warrants each heater to be free from defects in material and workmanship. Our obligation under this
warranty is limited to the repair or replacement, free of charge, when delivered to an authorized Royal Sovereign service
center, of any defective part(s) thereof, other than parts damaged in transit. This warranty is in effect to the ozzriginal
purchaser, for a period of one year from the date of purchase and is not transferable. This warranty shall apply only if the
heater is used in accordance with the factory provided instructions which accompany it.
EXCLUSIONS
This warranty excludes and does not cover defects, malfunctions or failures of your Royal Sovereign Heater, caused by
repairs by unauthorized persons or service centers, mishandling, improper installation, modification or unreasonable use
including incorrect voltage, acts of God, or failure to provide reasonable and necessary maintenance. This warranty is in lieu
of any and all expressed warranties. In no event shall Royal Sovereign be liable for consequential or incidental damages.
This limitation would not apply if you live in a location that does not permit the exclusion of limitation of incidental or
consequential damages. This warranty gives you specific legal rights and you may also have other rights which vary from
state to state.
ROYAL SOVEREIGN INTERNATIONAL, INC.
2 Volvo Drive Rockleigh, NJ 07647 USA
TEL : +1) 800-397-1025 FAX : +1) 201-750-1022
RS INTERNATIONAL CANADA INC.
191 Superior Blvd., Mississauga, ON L5T 2L6 CANADA
TEL : +1) 905-461-1095 TF # : +1) 866-961-6673
FAX : +1) 905-461-1096
www.royalsovereign.com
www.royalsovereign.ca

Royal Sovereign International, Inc.
HCE-220
Guide d’utilisation
Veuillez lire et conserver ces instructions pour consultation ultérieure.
Pour le soutien à la clientèle, veuillez choisir l’onglet “Support” de la page
www.royalsovereign.com (États-Unis)
www.royalsovereign.ca (Canada)
Français
RADIATEUR TOUR
NUMÉRIQUE EN CÉRAMIQUE

RADIATEUR TOUR NUMÉRIQUE EN
CÉRAMIQUE
Modèle HCE-220
INTRODUCTION
Nous vous remercions d’avoir choisi le Royal Sovereign pour vous offrir à vous et votre famille
des solutions de confort de l’air optimal pour votre maison, appartement ou bureau. Ce
déshumidificateur peut être réglé en quelques minutes et vous offrir des années de
fonctionnement sans difficulté s’il est entretenu correctement. Ce guide d’utilisation vous fournira
de précieuses informations nécessaires à l’entretien de votre nouvel appareil. Veuillez prendre
quelques instants afin de lire attentivement le guide d’utilisation.
Parce que nos produits font constamment l'objet d'améliorations, Royal Sovereign se réserve le droit de modifier
le modèle et la fiche technique sans avis ni obligation du fabricant. E&OE

Précautions 14
Description
15
Fonctionnement
16
Affichage à DEL
17
Caractéristiques de sécurité
18
Nettoyage et entretien
18
Entreposage
19
Dépannage
19
Spécifications
19
Garantie
20
Exclusions
20
Page en Français
11
CONTENU

14
Précautions d’utilisation
• N’obstruez pas et de recouvrez pas les ouvertures de ventilation.
Spécifications électriques et cordon d’alimentation
Vérifiez que le service électrique utilisé est adéquat pour le modèle de que vous avez. La puissance nominale de votre
nouveau radiateur est définie sur l’autocollant de série de l’appareil. Veuillez consulter la note lors de la vérification des
caractéristiques électriques afin de vous assurer qu’ils répondent les codes d’électricité de votre emplacement.
• N’utilisez pas cet appareil s’il ne fonctionne pas correctement ou s’il a été échappé ou endommagé de quelque manière
que ce soit.
• Ne l’utilisez pas à l’extérieur. Ne le placez pas près d’une du
gaz, d’un élément électrique, d’un four à micro-ondes ou
d’un four chaud.
• Pour vous protéger d’un incendie, d’une électrocution ou d’une blessure, ne placez pas le cordon, la fiche ou l’appareil
dans l’eau ou un autre liquide.
• Une utilisation erronée ou ne respectant pas les mesures de sécurité annulera le droit à l’utilisateur d’utiliser l’appareil et
annulera la garantie.
• Ne modifiez aucune partie de cet appareil.
• N’insérez pas d’objet dans l’appareil et ne bloquez pas la ventilation d’aucune manière.
• Assurez-vous que l’alimentation utilisée correspond à la tension appropriée pour l’appareil.
• Si la prise de courant que vous dé
sirez utiliser n’est pas correctement mise à la terre ou protégée par un fusible
temporisé ou un disjoncteur, vous devriez faire installer une prise adéquate par un électricien qualifié.
• N’utilisez pas cet appareil avec une rallonge ou un adaptateur.
• Si le cordon est endommagé, veuillez communiquer avec le soutien à la clientèle de Royal Sovereign.
• Mettez l’appareil hors fonction et débranchez-le avant de procéder au nettoyage ou lorsque le radiateur ne doit pas être
utilisé pendant une période prolongée.
• Si une surchauffe survient, ou une surchauffe du dispositif de sécurité intégré survient, appareil ne mettra hors fonction.
Utilisation générale
• N’obstruez pas les ouvertures de ventilation.
• N’insérez aucun objet dans le radiateur.
• Ne versez pas d’eau sur le boîtier ou le panneau de contrôle.
• Ne déposez pas d’objets lourds sur le radiateur.

HCE-220
15
• Ne tirez jamais sur le cordon d’alimentation.
• Ne laissez pas les enfants utiliser cet appareil.
• Confiez toute réparation de l’appareil à un technicien qualifié. Les réparations sont dangereuses et risquent de blesser
l’utilisateur.
Description
1. Commutateur de mise EN/HORS FONCTION 2. Filtre 3. Cordon d’alimentation 4. Affichage à DEL
5. Ventilation 6. Base 7. Télécommande
1
2
3
4
5
7
6

16
Fonctionnement
Utilisation de la télécommande
REMARQUE : Retirez le petit onglet de plastique situé sous la télécommande (7) afin d’activer la pile.
La télécommande est dotée de 6 fonctions :
REMARQUE : Les fonctions ne sont pas disponibles lorsque le radiateur est en mode de veille, à l’exception du bouton
de mise en/hors fonction.
1. POWER - Appuyez pour mettre l’appareil en/hors fonction (entre la mise en veille et la mise hors fonction).
REMARQUE : Ceci ne fonctionnera que lorsque le commutateur de mise EN/HORS FONCTION (1) est à la position en fonction.
REMARQUE : Lorsque le radiateur est hors fonction, l
e ventilateur fonctionnera pendant environ 60 secondes avant de
se mettre hors fonction complètement.
2. MODE - Permet de changer les réglages des modes
• Ventilateur seulement • Puissance faible - 750 watts • Puissance élevée - 1,500 watts
3. TIMER - La fonction de minuterie vous permet de régler la durée du mode de fonctionnement à un maximum de 9
heures avant la mise hors fonction automatique. Appuyez sur le bouton “TIMER” pour augmenter la durée du
fonctionnement de 1 heure à chaque pression du bouton. Lorsque la minuterie sera réglée, le compte à rebours sera
activé par intervalle d’une heure; lo
rsque zéro est atteint, le radiateur se mettra automatiquement hors fonction et
accèdera au mode de veille.
Appuyez une fois de plus sur le bouton “TIMER” lorsque l’affichage indique 9 heures réinitialisera le radiateur afin qu’il
fonctionne en mode continu.
4. OSCILLATING - Permet de mettre la fonction d’oscillation en ou hors fonction.
5. UP
Lorsque vous augmentez la température à l’aide du bouton “ ” (le bouton du cercle), appuyez successivement sur le
bouton plutôt que de le maintenir enfoncé pendant une période donnée. Si vous maintenez le bouton enfoncé avec votre
6. DOWN
Utilisation du radiateur
Utilisez le commutateur de mise EN/HORS FONCTION (1) située à l’arrière du radiateur.
Appuyez sur le bouton “POWER” et le radiateur permutera en mode de veille et le voyant à DEL (4) affichera la

HCE-220
17
REMARQUE :
Si le radiateur ne fonctionne pas pendant 3 secondes, l’affichage à DEL affichera la température de la pièce. Le radiateur
passera du mode en fonction au mode hors fonction afin de maintenir la température préréglée. Ceci n’est pas un
mauvais fonctionnement de l’appareil.
Pour régler la puissance de chauffage, ou pour utiliser le mode de ventilateur seulement, appuyez sur le bouton “MODE”
pour défiler à travers le niveau de chauffage faible, élevé ou le réglage du ventilateur seulement.
Pour régler la température, appuyez sur les boutons “ ” ou “ ” pour augmenter ou diminuer la température au
niveau désiré. L’affichage à DEL affichera
la température pendant 3 secondes.
AFFICHAGE À DEL
Minuterie
Puissance faible/
puissance élevée/
ventilateur seulement
Icône de la minuterie
Oscillation
Affichage de
la puissance
Fahrenheit
Affichage de la température
EN/HORS FONCTION attente
Augmentation de la température
Diminution de
la température

18
CARACTÉRISTIQUES DE SÉCURITÉ
Le radiateur est doté d’un commutateur de protection contre la surcharge (coupe-circuit thermique) qui mettra
l’appareil hors fonction automatiquement dans les cas de surcharge. Si ceci se produit, débranchez l’appareil et laissez-le
se refroidir complètement pendant environ 30 minutes.
Procédez tel que décrit aux instructions pour redémarrer l’appareil après avoir réglé la source de la surchauffe (ventilation
inadéquate, objet recouvrant le radiateur, etc.). Le radiateur devrait fonctionner normalement. Si le problème persiste,
veuillez contacter le soutien à la clientèle de Royal Sovereign.
Af
in d’éviter d’endommager et afin de régulariser la température, ce radiateur est doté d’un commutateur de protection
contre la surcharge (coupe-circuit thermique) qui mettra l’appareil hors fonction automatiquement dans les cas de
surcharge. Le radiateur s’activera à nouveau dès que la température sera moins élevée.
Le radiateur est également doté d’un commutateur tip switch (commutateur de pointe) qui coupera l’alimentation si le
radiateur est renversé. Si ceci se produit, débranchez-le de la prise de courant et laissez-le se refroidir complètement avant
de tenter de déplacer le radiateur. Inspectez-le pour vous assurer qu’il n’est pas endommagé. Si - et seulement si - le
radiateur n’est pas endommagé, branchez-le à la prise de courant. Le radiateur devrait fonctionner correctement.
SOIN ET ENTRETIEN
IMPORTANT : Mettez le radiateur hors fonction. Glissez le commutateur de MISE EN/HORS FONCTION à la position “Off” et
débranchez-le de la prise de courant. Attendez que le radiateur refroidisse complètement avant de procéder au nettoyage.
Utilisez un aspirateur pour aspirer la poussière dans les orifices de ventilation. Pour retirer la poussière de la surface
externe de l’appareil, utilisez un chiffon humide (non mouillé) sans charpie et de l’eau légèrement savonneuse seulement.
MISE
EN GARDE : N’utilisez pas de nettoyant puissant ou abrasif.
AVERTISSEMENT! Ne vaporisez pas de liquide et ne submergez pas l’appareil dans l’eau.
AVERTISSEMENT! Ne tentez pas de nettoyer l’intérieur du radiateur. Ne tentez pas d’ouvrir le boîtier sous aucune
considération. Aucune pièce pouvant être réparée par l’utilisateur ne se trouve à l’intérieur.
Retirez le filtre (6) et nettoyez-le régulièrement. Pour retirer le filtre, localisez les trois petites vis du radiateur, retirez le
couvercle du filtre, retirez le filtre et rincez-le dans l’eau propre. Laissez-le sécher complètement avant de le replacer.
MISE EN GARDE : Assurez-vous que le filtre est complètement sec a
vant de le replacer dans le radiateur. Si le filtre n’est
pas complètement sec, vous pourriez endommager l’appareil et annuler la garantie.

HCE-220
19
SPÉCIFICATIONS
Modèle HCE-220
Tension/fréquence 120V CA - 60 Hz
Puissance à l’entrée 750 watts/1,500 watts
Dimensions (l x h x p) 8,7 po (L) x 6,5 po (P) x 22,4 po (H)
Poids 7 lb
ENTREPOSAGE
Conservez le radiateur dans un endroit à l’abri de la poussière lorsque vous ne l’utilisez plus pour la saison.
Il est idéal de ranger le radiateur dans sa boîte originale pour l’entreposer.
Enroulez adéquatement le cordon du radiateur pour ne pas l’endommager.
TROUBLESHOOTING
Problème Solution
Le radiateur ne se met pas en
fonction
- Assurez-vous que le radiateur est en fonction et que le cordon d’alimentation est branché à une
prise de courant.
- Mettez le commutateur de mise EN/HORS FONCTION à la position “On”.
- Assurez-vous que la base est installée et que le radiateur est vertical.
Le radiateur n’émet pas de
chaleur
- Vérifiez que le radiateur est branché à la prise de courant.
- Assurez-vous que la température réglée est supérieure à la température de la pièce affichée à
l’affichage à DEL.
- Les ouvertures de ventilation pourraient être bloquées.
Le radiateur est endommagé Cessez l’utilisation et contactez le soutien à l
a clientèle de Royal Sovereign.

20
GARANTIE D’UN AN
Royal Sovereign garantit que chaque déshumidificateur est exempt de tout vice de matériau et de fabrication. Nos
obligations en vertu de cette garantie sont limitées à la réparation ou au remplacement, sans frais, livrés à un centre de
service agréé Royal Sovereign, de toute pièce défectueuse, sauf les pièces endommagées pendant le transport. Cette
garantie est en vigueur à l’acheteur original, pour une période d’un an à compter de la date d’achat et n’est pas
transférable. Cette garantie s’applique uniquement si le déshumidificateur utilisé sur le circuit de courant alternatif (CA),
selon les directives accompagnant le produit.
EXCLUSIONS
Cette garantie exclut et ne couvre pas les défauts, pannes ou défaillances de votre déshumidificateur Royal Sovereign,
causés par la réparation par des personnes ou des centres de service non autorisés, une mauvaise manipulation, une
mauvaise installation, une modification ou une utilisation abusive, y compris l’utilisation de tension incorrecte, un cas de
force majeure ou l’échec d’un entretien raisonnable et nécessaire. Cette garantie tient lieu de toute garantie expresse. En
aucun cas Royal Sovereign ne sera responsable des dommages directs ou indirects. Cette restriction ne s’appliquerait pas
si vous vivez dans un endroit qui ne permet pas l’exclusion de la limitation de dommages accessoires ou indirects. Cette
garantie vous donne des droits légaux spécifiques et vous pouvez avoir aussi d’autres droits qui varient d’un État ou d’une
province à l’autre.
ROYAL SOVEREIGN INTERNATIONAL, INC.
2 Volvo Drive Rockleigh, NJ 07647 USA
TEL : +1) 800-397-1025 FAX : +1) 201-750-1022
RS INTERNATIONAL CANADA INC.
191 Superior Blvd., Mississauga, ON L5T 2L6 CANADA
TEL : +1) 905-461-1095 TF # : +1) 866-961-6673
FAX : +1) 905-461-1096
www.royalsovereign.com
www.royalsovereign.ca
-
 1
1
-
 2
2
-
 3
3
-
 4
4
-
 5
5
-
 6
6
-
 7
7
-
 8
8
-
 9
9
-
 10
10
-
 11
11
-
 12
12
-
 13
13
-
 14
14
-
 15
15
-
 16
16
-
 17
17
-
 18
18
-
 19
19
-
 20
20


Royal Sovereign HCE-220 Le manuel du propriétaire
- Taper
- Le manuel du propriétaire
- Ce manuel convient également à
dans d''autres langues
Documents connexes
-
Royal Sovereign HCE-220 Manuel utilisateur
-
Royal Sovereign HCE-200 Le manuel du propriétaire
-
Royal Soverign RDHC-110 Commercial Dehumidifier Le manuel du propriétaire
-
Royal Sovereign RDHC-110 Manuel utilisateur
-
Royal Sovereign HFN-02 Manuel utilisateur
-
Royal Sovereign HFN-20 Mode d'emploi
-
 Royal Sovereign International RPH-260G Le manuel du propriétaire
-
-
Royal Sovereign RDH-130K/170K Le manuel du propriétaire
-