Robern CARTESIAN Series Important Safety Instructions Manual
- Taper
- Important Safety Instructions Manual

1
© 2018 Robern, Inc. 701 N. Wilson Ave. Bristol, PA 19007 U.S.A.
800.877.2376 www.robern.com
Installation instructions
Part no. 209-1231-D-Cartesian, Profiles H1 rev. 05/16/18
Cartesian™ Vanity, and Profiles™ Vanity
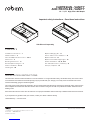
CARTESIAN™ VANITY
AND PROFILES™ VANITY
H1 - 7-1/2" High, D18 & D21 Depth
CONTENTS
Installation Instructions - 1
Model Numbers - 2
Parts and Optional Accessories - 3 & 4
Dimensions - 5
Blocking Dimensions - 6
Electric Option Rough-in - 7
Frame Installation - 8 & 9
Stacking Kit - 10
Optional Ganging Kit - 11
Alcove and Corner Installations - 12
Optional Side kit - 13
Optional Selectable Night Light - 13
Drawer Installation - 14, 15, & 16
Use and Maintenance / Warranty - 17
Français / Español - 18
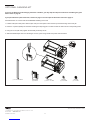
INSTALLATION INSTRUCTIONS
This instruction manual contains information on how to install the 7-1/2" high Cartesian Vanity, and Proles Vanity. This series comes
in several sizes and variations. Electrical option(s) may be provided with your vanity(s). The vanity series are modular and can be
mounted individually, ganged or stacked together.
This vanity series needs special site preparation. Do not install vanities until all framing, plumbing and electrical option rough-ins have
been completed and wall surface has been nished. We recommend using the services of a professional installer. Observe all local
building codes.
Save these instructions for future use and reference. An improper installation voids the warranty. Installed vanities cannot be returned.
If you experience any problems with your vanities, contact your dealer or Robern directly.
Limited Warranty — One Year Term
Important safety instructions - Save these instructions
Side Kits sold separately

2
© 2018 Robern, Inc. 701 N. Wilson Ave. Bristol, PA 19007 U.S.A.
800.877.2376 www.robern.com
Installation instructions
Part no. 209-1231-D-Cartesian, Profiles H1 rev. 05/16/18
Cartesian™ Vanity, and Profiles™ Vanity
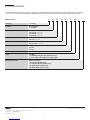
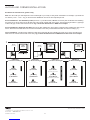
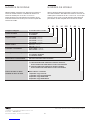
Use the chart Below to learn how to build a Cartesian or Proles model number. This chart references the model number for a 24" W x
7-1/2" H x 21" D vanity with plumbing drawer and night light. Consult the Robern Price Book for a complete list of model numbers.
MODEL NUMBERS
Model Numbers V M 24 H1 D21 P ## L
V = Vanity
12 = 12 1/8" / 308 mm
24 = 24 1/8" / 613 mm
30 = 30 1/8" / 765 mm
36 = 36 1/8" / 918 mm
H1 = 7.5" / 191mm
H2 = 15" / 381mm
D18 = 18-3/4" / 476mm
D21 = 21-3/4" / 552 mm
P = Plumbing
F = Full
T = Tip
## = Decorative glass
N = Base
L = 5000 Kelvin Night Light (Cartesian only)
S = Selectable 2700 / 4000 Kelvin Night Light
Depth
Width
Glass Finish
Category
Drawer Style
Height
Light
Product M = Cartesian
P = Proles
Blank = Cartesian
76 = Chrome (Proles only)
77 = Polished Nickel (Proles only)
82 = Matte Gold (Proles only)
83 = Matte Black (Proles only)
Metal Frame Finish

3
© 2018 Robern, Inc. 701 N. Wilson Ave. Bristol, PA 19007 U.S.A.
800.877.2376 www.robern.com
Installation instructions
Part no. 209-1231-D-Cartesian, Profiles H1 rev. 05/16/18
Cartesian™ Vanity, and Profiles™ Vanity
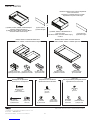
PARTS
[216-1147]
Drawer front Hardware Bag
[216-1073]
Mounting Hardware Bag
[216-1145]
Stacking Hardware Bag
[203-1198]
(3) Washer
[SS674]
(5) #10 x 2" Screw
[203-1317]
(4) 10-32 Nut
[203-1270]
T-30 Driver
[203-1390]
(4) #10 Washer
[203-1256]
(4) 5/16" x 2-1/2"
Structural Bolt
[SS268]
(4) 10-32 Screw
(1) 12", 24", 30", or 36" frame
30" shown here (1) Drawer front(1) Drawer front
24", 30", or 36" Plumbing Drawer 12", 24", 30", or 36" Full Drawer
[202-1356]
(1) Glass Center Bin
[202-1123]
(2) Large Glass Bin
[202-1123]
(2) Large Glass Bin
[202-1124]
(2) Medium Glass Bin
[202-1124]
(2) Medium Glass Bin
(1) 24", 30", or 36"
Tip Out Drawer and frame
or
Plumbing and full drawers are not
available with Tip out drawer
[SS348]
(3) Screw Cap
[203-1382]
(3) Screw
or or

4
© 2018 Robern, Inc. 701 N. Wilson Ave. Bristol, PA 19007 U.S.A.
800.877.2376 www.robern.com
Installation instructions
Part no. 209-1231-D-Cartesian, Profiles H1 rev. 05/16/18
Cartesian™ Vanity, and Profiles™ Vanity
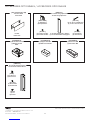
OPTIONAL ACCESSORIES
Side Kit
[VM(1, 2)SKH1D(18, 21)##]
Side Kit
[SS267]
(4) 10-32 Nut
[203-1390]
(4) #10 Washer
[SS268]
(4) 10-32 Screw
[VMAKITH1]
7-1/2" Alcove nishing kit
[VMGKITH1]
7-1/2" Ganging kit
(1) 7-1/2" Filler / Bumper
[R290-1-462R]
(4) Spacers
[203-1302]
(4) 1/4-20 x 1 7/8" Bolt
[203-1301]
(4) 1/4" Washer
[203-1261]
(4) 1/4-20 Nut
[GLASSBIN6.38]
(1) Glass Center Bin
[GLASSBIN8.5]
(2) Large Glass Bin
[GLASSBIN5.25]
(2) Medium Glass Bin

5
© 2018 Robern, Inc. 701 N. Wilson Ave. Bristol, PA 19007 U.S.A.
800.877.2376 www.robern.com
Installation instructions
Part no. 209-1231-D-Cartesian, Profiles H1 rev. 05/16/18
Cartesian™ Vanity, and Profiles™ Vanity
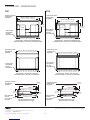
DIMENSIONS
D21 Top View - Section with Plumbing Drawer D18 Top View - Section with Plumbing Drawer
D21 Top View - Section with Full Drawer D18 Top View - Section with Full Drawer
D21 Cross-section with drawer D18 Cross-section with drawer
6-1/8"
(156 mm) 6-1/8"
(156 mm)
22-1/2" / 28-1/2" / 34-1/2"
(572 mm / 724 mm / 876 mm) 22-1/2" / 28-1/2" / 34-1/2"
(572 mm / 724 mm / 876 mm)
12-1/8" / 24-1/8" / 30-1/8" / 36-1/8"
(308 mm / 613 mm / 765 mm / 918 mm)
12-1/8" / 24-1/8" / 30-1/8" / 36-1/8"
(308 mm / 613 mm / 765 mm / 918 mm)
24-1/8" / 30-1/8" / 36-1/8"
(613 mm / 765 mm / 918 mm)
24-1/8" / 30-1/8" / 36-1/8"
(613 mm / 765 mm / 918 mm)
15-3/8"
(391 mm) 12-3/8"
(314 mm)
7-1/2"
(191 mm)
21-3/4"(552 mm) 18-3/4"(476 mm)
18-1/2"(470 mm) 15-1/2"(394 mm)
10-1/2" / 22-1/2" / 28-1/2" / 34-1/2"
(267 mm / 572 mm / 724 mm / 876 mm) 10-1/2" / 22-1/2" / 28-1/2" / 34-1/2"
(267 mm / 572 mm / 724 mm / 876 mm)
D21 D18
7/8"(22 mm) 7/8"(22 mm)
2-3/4"
(70 mm)
5-1/2"
(140 mm) 2-1/2"
(64 mm)
With Side kits
With Side kits
Sink clearance
Sink clearance
With Drawer
Front With Drawer
Front
With Side kits With Side kits
Sink clearance Sink clearance
Sink clearance Sink clearance
7-1/2"
(191 mm)
2-3/4"
(70 mm)

6
© 2018 Robern, Inc. 701 N. Wilson Ave. Bristol, PA 19007 U.S.A.
800.877.2376 www.robern.com
Installation instructions
Part no. 209-1231-D-Cartesian, Profiles H1 rev. 05/16/18
Cartesian™ Vanity, and Profiles™ Vanity
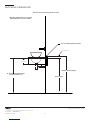
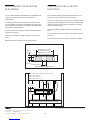
2" (51 mm)
2" x 10"
Side view showing blocking location in wall
Backing material height
Frame height
Backing material location
**Plumbing installations are not typical
with full drawers or 12 inch vanities
34-1/2" Recommended height
for undercounter sink
7-1/2"
(191 mm)
BLOCKING DIMENSIONS

7
© 2018 Robern, Inc. 701 N. Wilson Ave. Bristol, PA 19007 U.S.A.
800.877.2376 www.robern.com
Installation instructions
Part no. 209-1231-D-Cartesian, Profiles H1 rev. 05/16/18
Cartesian™ Vanity, and Profiles™ Vanity
6-1/8"(156 mm)
5"
(127 mm)
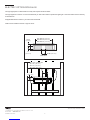
ELECTRIC OPTION ROUGH-IN
The night light option is ordered with the vanity and requires electrical outlets.
The night light has no switch. It is recommended that you switch the outlet to operate the night light. Locate the switch near the doorway
to the bathroom.
All applicable electrical codes in your area must be followed.
Outlet can be installed to the left or right of center.
6"
(152 mm)
C
L
Single gang box must be installed horizontally
12" = 12" = center line
24" = 4" (102 mm)
30" = 7" (179 mm)
36" = 10" (254 mm)
3-3/4"
(95 mm)
24"=18-1/2" (470 mm)
30"=24-1/2" (622 mm)
36"=30-1/2" (775 mm)
Drain Area

8
© 2018 Robern, Inc. 701 N. Wilson Ave. Bristol, PA 19007 U.S.A.
800.877.2376 www.robern.com
Installation instructions
Part no. 209-1231-D-Cartesian, Profiles H1 rev. 05/16/18
Cartesian™ Vanity, and Profiles™ Vanity
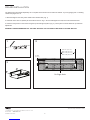
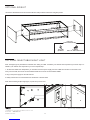
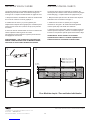
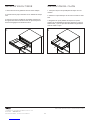
FRAME INSTALLATION
1 2
3
For Single Units
C
L
2-1/2"
(64 mm)
12" = 4" (102 mm)
24" = 10" (254 mm)
30" = 13" (330 mm)
36" = 16" (406 mm)
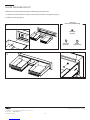
The drawer fronts are packed separately. Do not unpack them until the room is safe from hazards. If you are ganging and / or stacking
vanities see pages 10 & 11.
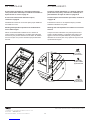
1. Mark the height for the vanity frame install on the nished wall ( Fig. 1).
2. Install two of the #10 x 2" (SS674) at the locations shown in Fig. 2. Do not install tight to the wall, leave 1/8" behind the head.
3. Place the vanity frame on the screws using the top left and right keyholes ( Fig. 3). The keyhole on the left allows for up and down
adjustment.
WARNING: THESE SCREWS ARE NOT THE FINAL SUPPORT FOR THE VANITY! SEE PAGE 9 FOR FINAL BOLT UP.

9
© 2018 Robern, Inc. 701 N. Wilson Ave. Bristol, PA 19007 U.S.A.
800.877.2376 www.robern.com
Installation instructions
Part no. 209-1231-D-Cartesian, Profiles H1 rev. 05/16/18
Cartesian™ Vanity, and Profiles™ Vanity
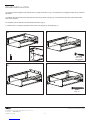
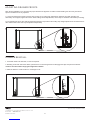
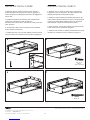
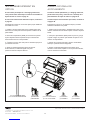
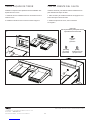
4. Level the frame and tighten to the wall as shown on page 8 and here in Fig. 4. The left keyhole is elongated to allow for up and down
adjustment.
5. Install the four Structural Screws (203-1256) into the four top frame holes (Fig. 5). A T-30 Torx Bit is provided. If the wall is bowed,
shim where required.
6. If required, shim the bottom at the frame/side intersection (Fig. 6).
7. Install two #10 x 2" (SS674) through the narrow slot of the keyhole on the ange (Fig. 7).
FRAME INSTALLATION
4
6
5
7
[203-1256]
5/16" x 2 1/2"
4-Structural Bolt
4-Boulon
4-Perno estructural
SS674
#10 - 2"

10
© 2018 Robern, Inc. 701 N. Wilson Ave. Bristol, PA 19007 U.S.A.
800.877.2376 www.robern.com
Installation instructions
Part no. 209-1231-D-Cartesian, Profiles H1 rev. 05/16/18
Cartesian™ Vanity, and Profiles™ Vanity
STACKING KIT
If you are not Stacking and/or Ganging Cartesian or Proles, you may skip this step and continue to assembling the glass
drawer front on page 15.
If you purchased the optional side kits, continue to page 13. For the optional Alcove Kit continue to page 12.
Assemble frames on a clean level surface BEFORE installing on the wall.
Stacking is only available on vanities with the same width.
Place the one Cartesian or Proles vanity on top of another. Install 4 screws (SS268) and 4 washers (203-1390) into the holes
closest to the front and back edge. Using the 4 nuts (203-1317) tighten the assembly until rmly secure.
[203-1317]
(4) 10-32 Nut
[203-1390]
(4) #10 Washer
[SS268]
(4) 10-32 Screw

11
© 2018 Robern, Inc. 701 N. Wilson Ave. Bristol, PA 19007 U.S.A.
800.877.2376 www.robern.com
Installation instructions
Part no. 209-1231-D-Cartesian, Profiles H1 rev. 05/16/18
Cartesian™ Vanity, and Profiles™ Vanity
If you are not Stacking and/or Ganging Cartesian or Proles, you may skip this step and continue to assembling the glass
drawer front on page 15.
If you purchased the optional side kits, continue to page 13. For the optional Alcove Kit continue to page 12.
Assemble frames on a clean level surface BEFORE installing on the wall.
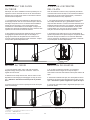
1. Install 4 bolts (203-1302) and 4 washers (203-1301) into the square holes near the top and bottom edge of the side pan.
2. Place the 4 spacers (R290) over the bolts and bring the adjoining pan in location to slide the bolts into the corresponding holes.
3. Using the 4 nuts (203-1261) tighten the assembly until rmly secure.
4. Slide the Filler/Bumper down over the anges. If loose, pinch using needle nose pliers as shown below.
OPTIONAL GANGING KIT
[R290-1-462R]
(4) SPACERS
[203-1302]
(4) 1/4-20 x 1 7/8” BOLT
[203-1301]
(4) 1/4” WASHER
[203-1261]
(4) 1/4-20 NUT
(1) 15” FILLER/BUMPER

12
© 2018 Robern, Inc. 701 N. Wilson Ave. Bristol, PA 19007 U.S.A.
800.877.2376 www.robern.com
Installation instructions
Part no. 209-1231-D-Cartesian, Profiles H1 rev. 05/16/18
Cartesian™ Vanity, and Profiles™ Vanity
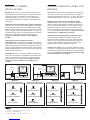
ALCOVE AND CORNER INSTALLATIONS
See Alcove kit instructions for greater clarity.
Note: The Alcove Kit you order depends on the overall height of your vanity or vanity stack combination. For example, if you stack two
H1 vanities (7-1/2" + 7-1/2" = 15") you would use the VMAKITH2. One Alcove kit is required per side.
Alcove Installations - For standard top sizes (Nominal + 1") Two Alcove Kits, VMAKIT are used in place of side kits when installing
the vanity into an alcove. Each Alcove kit adds 3/8" to the overall nominal width of the vanity. The wall opening should be 1" gap larger
to allow 1/8" gap on either side of the Alcove kit. Fig. 1 shows the dimension for a VM30 as an example.
Alcove Installations –Requiring extra llers Two Alcove Kits, VMAKIT are used in place of side kits when installing the vanity into an
alcove. Each Alcove kit adds 3/8" to the overall nominal width of the vanity. Field installed extra ller to match the wall (Fig. 2).
Corner Installation - One Alcove Kit, VMAKIT is used with a single side kit when installing the vanity into a corner. Each Alcove kit
adds 3/8" to the overall nominal width of the vanity. Fig. 3 shows the dimension for a VM30 with one Alcove kit as an example.
[SS267]
(4) 10-32 Nut
[SS267]
(4) 10-32 Nut
[SS267]
(8) 10-32 Nut
(8) écrou / (8) tuerca
[SS267]
(8) 10-32 Nut
[203-1390]
(4) #10 Washer
[203-1390]
(4) #10 Washer
[203-1390]
(8) #10 Washer
(8) rondelle / (8) arandela
[203-1390]
(8) #10 Washer
[SS268]
(4) 10-32 Screw
[SS268]
(4) 10-32 Screw
[SS268]
(8) 10-32 Screw
[SS268]
(8) 10-32 Screw
[VMAKITH1]
7-1/2" Alcove nishing kit
[VMAKITH3]
22-1/2"Alcove nishing kit
[VMAKITH2]
15” Alcove nishing kit
[VMAKITH4]
30" Alcove nishing kit
30 3/4"
(781 mm)
30 3/4"
(781 mm)
30 3/8"
(772 mm)
1 2 3
WallWall Wall
Custom Alcove Width
31" Wall opening
Filler Board
VM30
example
VM30
example VM30
example

13
© 2018 Robern, Inc. 701 N. Wilson Ave. Bristol, PA 19007 U.S.A.
800.877.2376 www.robern.com
Installation instructions
Part no. 209-1231-D-Cartesian, Profiles H1 rev. 05/16/18
Cartesian™ Vanity, and Profiles™ Vanity
OPTIONAL SIDE KIT
Use the #10 CB-SS676 screws and washer CB-203-1198 provided to attach the side glass panels.
[216-1077]
Side kit Hardware Bag
[203-1198]
(9) Washer
9 [SS676]
#10 x 1/2" Sheet metal screw
Note: The Night Light is preinstalled to a default color setting of 2700K. If 2700K is your desired color temperature, proceed to step 2. If
4000K is your desired color temperature you must complete step 1.
1. To select the 4000K color temperature you must disconnect the power supply from the 2700K wires located on the inside of the
vanity. Once located, disconnect the wires labeled 2700K and connect the wires labeled 4000K.
2. Plug in the power supply into the wall and test.
3. Neatly restrain wires to avoid interference with drawer or drawer slides.
Note: When installing multiple night lights, a power strip can be used.
OPTIONAL SELECTABLE NIGHT LIGHT
2700K
4000K
12

14
© 2018 Robern, Inc. 701 N. Wilson Ave. Bristol, PA 19007 U.S.A.
800.877.2376 www.robern.com
Installation instructions
Part no. 209-1231-D-Cartesian, Profiles H1 rev. 05/16/18
Cartesian™ Vanity, and Profiles™ Vanity
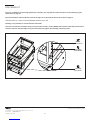
DRAWER INSTALLATION
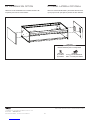
1. Lay the drawer onto the drawer slides as shown (Fig.1).
2. Push the drawer in until an audible sound, a series of clicks, is heard on each side (Fig. 2).
3. Ensure that the locking pin on the back of the drawer slides engage the drawer on both sides, and that the clips are rmly engaged
before letting go of the drawer.
1 2

15
© 2018 Robern, Inc. 701 N. Wilson Ave. Bristol, PA 19007 U.S.A.
800.877.2376 www.robern.com
Installation instructions
Part no. 209-1231-D-Cartesian, Profiles H1 rev. 05/16/18
Cartesian™ Vanity, and Profiles™ Vanity
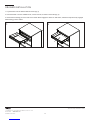
GLASS DRAWER FRONT
Install the counter top and plumbing before installing the glass drawer front.
1. Thread the screw and washer through the holes inside the drawer to the glass front (Fig.1).
2. Install the screw caps (Fig. 2).
1
2
[216-1147]
Drawer front Hardware Bag
[203-1198]
(3) Washer
[SS348]
(3) Screw Cap
[203-1382]
(3) Screw

16
© 2018 Robern, Inc. 701 N. Wilson Ave. Bristol, PA 19007 U.S.A.
800.877.2376 www.robern.com
Installation instructions
Part no. 209-1231-D-Cartesian, Profiles H1 rev. 05/16/18
Cartesian™ Vanity, and Profiles™ Vanity
Note: Proper installation is very important for proper drawer front alignment on Robern vanities. Making sure the vanity is level and
square in all directions is very important.
1. Loosen the drawer front mounting screws (refer to page 15) to make rough adjustments. Adjust the front both vertically and
horizontally. Once aligned, tighten the screws. When working with multiple drawers, do this step on all drawer fronts before proceeding.
2. Fine adjustments can be done with the adjustment features incorporated in the locking clips. Height adjustment of the drawer front is
done with the slider. Each side may be adjusted independently.
ADJUSTING DRAWER FRONTS
DRAWER REMOVAL
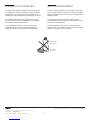
1. If a drawer needs to be removed, no tools are required.
2. Reaching under each side of the drawer, pull the levers on the locking devices to disengage the clips, and pull out the drawer.
! Caution: You will now be carrying the weight of the drawer!
3. Place the drawer in a safe location so no damage occurs.

17
© 2018 Robern, Inc. 701 N. Wilson Ave. Bristol, PA 19007 U.S.A.
800.877.2376 www.robern.com
Installation instructions
Part no. 209-1231-D-Cartesian, Profiles H1 rev. 05/16/18
Cartesian™ Vanity, and Profiles™ Vanity
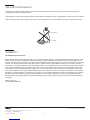
The vanity sides, drawer front and interior are constructed of glass and aluminum. Use only a damp cloth to clean. Ammonia or
vinegarbased cleaners can damage mirrors.
A 50/50 solution of water and isopropyl alcohol is recommended for cleaning the vanity. A mild detergent may be used on the surfaces.
When cleaning, spray the cloth, not the vanity, mirror, or surround surfaces. Do not use abrasive cleansers on any part of the vanity.
Limited Warranty One Year Term
Robern warrants to the original purchaser that, it will, at its election repair, replace, or make appropriate adjustment to products made
by this company shown to have signicant defects in material or workmanship which are reported to Robern in writing within one (1)
year from the date of delivery. Robern is not responsible for installation costs. The warranty is void in the event the product is damaged
in transit, or if damage or failure is caused by abuse, misuse, abnormal usage, faulty installation, damage in an accident, improper
maintenance, or any repairs other than those authorized by Robern. At the expiration of the one year warranty period, Robern shall be
under no further obligation under any warranty, expressed or implied, including the implied warranty of merchantability. Robern shall
not be liable for any consequential damages arising out of or in connection with the use or performance of its products. Some states
do not allow limitations on how long an implied warranty lasts or do not allow the exclusion or limitation of incidental or consequential
damages, so the above limitation or exclusion may not apply to you. Any liability against Robern under any implied warranty, including
the warranty of merchantability, is expressly limited to the terms of this warranty. Permission to return any merchandise under this
warranty must be authorized by Robern and returned prepaid by the purchaser. Claims under this warranty should be sent directly to
your dealer.
©2016 Robern, Inc.
ALL RIGHTS RESERVED
USE AND MAINTENANCE
WARRANTY
No Ammonia
No Vinegar

18
© 2018 Robern, Inc. 701 N. Wilson Ave. Bristol, PA 19007 U.S.A.
800.877.2376 www.robern.com
Instructions d'installation / Instrucciones de instalación
No. de pièce / Pieza n.° 209-1231-D Cartesian, Profiles H1 rev. 05/16/18
Meuble-lavabo Cartesian™, Profiles™ / Tocador Cartesian™, Profiles™
MEUBLE-LAVABO PROFILES™ CARTESTIAN™
H1 - 7-1/2" Hauteur
D18 & D21 Profondeur
TOCADOR PROFILES™ CARTESTIAN™
H1 - 7-1/2" Altura
D18 & D21 Profundidad
CONTENU CONTENIDO
Instructions d’installation - 19
Numéros de modèle - 20
Pièces et Accessoires optionnels - 21 & 22
Dimensions - 23
Blocage Dimensions - 24
Emplacement Pour Option Électrique - 25
Installation du cadre - 26 & 27
Kit d'empilage - 28
Jeu de regroupement en option - 29
Alcôve et Corner Installations - 30
Kit latéraux en option - 31
Installation du tiroir - 32, 33, & 34
Utilisation et Entretien - 35
Garantie - 36
Instrucciones de instalación - 19
Números de modelo - 20
Piezas y Accesorios Opcionales - 21 & 22
Dimensiones - 23
El bloqueo Dimensiones - 24
Empotrado de la Optión Eléctrica - 25
Instalación del marco - 26 & 27
Kit apilamiento - 28
Equipo opcional de acoplamiento - 29
Instalaciones de alcoba y de esquina - 30
Kit Panel lateral Opcional - 31
Instalación del cajón - 32, 33, & 34
Uso y Mantenimiento - 35
Garantía - 36
Consignes de sécurité importantes - Enregistrez ces instructions
Instrucciones de seguridad importantes - Guarda estas instrucciones
Kits secondaires vendus séparément
Kits secundarios se venden por separado

19
© 2018 Robern, Inc. 701 N. Wilson Ave. Bristol, PA 19007 U.S.A.
800.877.2376 www.robern.com
Instructions d'installation / Instrucciones de instalación
No. de pièce / Pieza n.° 209-1231-D Cartesian, Profiles H1 rev. 05/16/18
Meuble-lavabo Cartesian™, Profiles™ / Tocador Cartesian™, Profiles™
Ce manuel d’instructions contient de l’information sur comment
installer les 191 mm Cartesian meuble-lavabo. Ces séries sont
disponibles en plusieurs tailles et variations. Des options
électriques peuvent être offertes avec votre meuble-lavabo.
Les meuble-lavabos de la série sont modulaires et peuvent
être installées séparément, couplées ou empilées ensemble.
Cette série de meuble-lavabo nécessite une préparation
de site spécial. Ne pas installer meuble-lavabo jusqu’à ce
que tous charpente, la plomberie et les options électriques
rugueux-ins ont été achevés et la surface du mur a été
terminé. Nous recommandons d’utiliser les services d’un
installateur professionnel. Respectez tous les codes de
construction locaux.
Conservez ces instructions pour référence et utilisation future.
Une mauvaise installation annule la garantie. Les meuble
lavabo installées ne peuvent pas être retournées.
Si vous éprouvez de la difculté avec votre meublelavabo,
veuillez contacter soit votre marchand ou contactez
directement Robern.
Garantie limitée — d’une durée d’un an
Este manual de instrucción contiene información sobre la
instalación de la 191 mm Cartesian tocador. Esta serie viene
en varios tamaños y variaciones. Se puede proporcionar la
opción eléctrica con su(s) tocador(s). La serie de tocador
es modular y puede montarse individualmente, agruparse o
apilarse.
Esta serie de tocador necesita preparación especial del
sitio. No instale tocadores hasta que todos los ásperos-
ins de encuadre, de plomería y de opción eléctrica se
han completado y supercie de la pared se ha acabado.
Recomendamos el uso de los servicios de un instalador
profesional. Observe todos los códigos de construcción
locales. Si tiene algún problema con su espejo de pared,
comuníquese con su distribuidor o directamente con Robern.
Guarde estas instrucciones para uso y referencia futura. La
instalación inadecuada invalida la garantía. Los tocadors
instalados no podrán devolverse.
Si usted tiene algún problema con su tocador, póngase en
contacto con su distribuidor o directamente con Robern.
Garantía Limitada – Término de Un Año
INSTRUCTIONS D’INSTALLATION INSTRUCCIONES DE INSTALACIÓN

20
© 2018 Robern, Inc. 701 N. Wilson Ave. Bristol, PA 19007 U.S.A.
800.877.2376 www.robern.com
Instructions d'installation / Instrucciones de instalación
No. de pièce / Pieza n.° 209-1231-D Cartesian, Profiles H1 rev. 05/16/18
Meuble-lavabo Cartesian™, Profiles™ / Tocador Cartesian™, Profiles™
Utilisez le tableau ci-dessous pour apprendre à construire un
numéro de modèle cartésien. Ce tableau fait référence au
numéro de modèle pour un 24" W x 7-1/2" H x 21"
meuble-lavabo D avec la plomberie tiroir et lumière de nuit.
Consultez la Robern Prix du livre pour une liste complète des
numéros de modèle.
Utilice la siguiente tabla para aprender a construir un número
de modelo cartesiano. Esta tabla hace referencia al número de
modelo para un tocador de 24" W x 7-1/2" H x 21 " D con cajón
plomería y luz de noche. Consulte la Robern Precio Reserva
para obtener una lista completa de los números de modelo.
V M 24 H1 D21 P ## L
V = Meuble-lavabo / Tocador
12 = 12 1/8" / 308 mm
24 = 24 1/8" / 613 mm
30 = 30 1/8" / 765 mm
36 = 36 1/8" / 918 mm
H1 = 7.5" / 191mm
H2 = 15" / 381mm
D18 = 18-3/4" / 476mm
D21 = 21-3/4" / 552 mm
P = Plomberie / Plomería
F = Complet / Completo
T = Déverser / Verter
## = Verre décoratif / Vidrio decorativo
N = Base
L = Sélectionnable 2700 / 4000 Kelvin Veilleuse Cartesian,
Seleccionable 2700 / 4000 Kelvin Luz de noche Cartesian
S = Sélectionnable 2700 / 4000 Kelvin Veilleuse Proles
Seleccionable 2700 / 4000 Kelvin Luz de noche Proles
Profondeur / Profundidad
Largeur / Ancho
Glass Finition / cristal Acabado
Catégorie / Categoría
Tiroir style / Estilo del cajón
Hauteur / Altura
lumière / Luz
Produit / Producto M = Cartesian
P = Proles
Blanc / Blanco = Cartesian
76 (Proles only) = Chrome
77 (Proles only) = Polished Nickel
82 (Proles only) = Matte Gold
83 (Proles only) = Matte Black
Finition de cadre en métal /
Acabado de marco de metal
NUMÉROS DE MODÈLE NÚMEROS DE MODELO
La page est en cours de chargement...
La page est en cours de chargement...
La page est en cours de chargement...
La page est en cours de chargement...
La page est en cours de chargement...
La page est en cours de chargement...
La page est en cours de chargement...
La page est en cours de chargement...
La page est en cours de chargement...
La page est en cours de chargement...
La page est en cours de chargement...
La page est en cours de chargement...
La page est en cours de chargement...
La page est en cours de chargement...
La page est en cours de chargement...
La page est en cours de chargement...
-
 1
1
-
 2
2
-
 3
3
-
 4
4
-
 5
5
-
 6
6
-
 7
7
-
 8
8
-
 9
9
-
 10
10
-
 11
11
-
 12
12
-
 13
13
-
 14
14
-
 15
15
-
 16
16
-
 17
17
-
 18
18
-
 19
19
-
 20
20
-
 21
21
-
 22
22
-
 23
23
-
 24
24
-
 25
25
-
 26
26
-
 27
27
-
 28
28
-
 29
29
-
 30
30
-
 31
31
-
 32
32
-
 33
33
-
 34
34
-
 35
35
-
 36
36


Robern CARTESIAN Series Important Safety Instructions Manual
- Taper
- Important Safety Instructions Manual
dans d''autres langues
- español: Robern CARTESIAN Series
Documents connexes
-
Robern EDGEPULL-84 Manuel utilisateur
-
Robern CM2430W20369 Manuel utilisateur
-
Robern MPUSHKIT Manuel utilisateur
-
-
-
-
Robern CRAFT Series Manuel utilisateur
-
Robern P2PUSHKIT Manuel utilisateur
-
-