
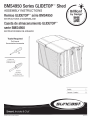
BMS4950
Series
GLIDETOPTm
Shed
ASSEMBLY
INSTRUCTIONS
Remise
GLIDETOrm
série
BMS4950
INSTRUCTIONS
D'ASSEMBLAGE
Caseta
de
almacenamiento
GLIDETOPTm
serie
BMS4950
INSTRUCCIONES
DE
ARMADO
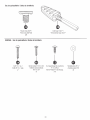
Tools
Required
Outil
requis
Herramientas
necesarias
Included
in
kit
Compris
dans
le
kit
Se
incluye
en
el
kit
0102104
Easy
Driver
Outil
Easy
Driver
Herramienta
Easy
Driver
Brilliant
by
Design'
un
English
3
Français
/
Espanol
19
C)
2023
Suncast
Corporation,
Batavia,
IL
0361167H

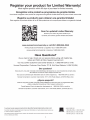
Register
your
product
for
Limited
Warranty!
Must
register
product
within
90
days
of
purchase
for
limited
warranty
Enregistrez
votre
produit
au
programme
de
garantie
limitée
Vous
devez
enregistrer
votre
produit
au
programme
de
garantie
limitée
dans
les
90
jours
suivant
votre
achat.
¡Registre
su
producto
para
obtener
una
garantía
limitada!
Debe
registrar
el
producto
dentro
de
los
90
días
posteriores
a
la
compra
para
obtener
una
garantía
limitada
Scan
for
updated
Limited
Warranty
Scanner
pour
obtenir
la
grantie
limitée
à
jour
Escanear
para
obtener
garantía
limitada
actualizada
www.suncast.com/warranty
or
call
US
1 (
800)
846-2345
www.suncast.conn/warranty
ou
appelez-nous
1 (
800)
846-2345
www.suncast.conn/warranty
o
Ilannenos
1 (
800)
846-2345
Have
Questions?
We
are
here
to
help.
Check
out
our
resource
library
along
with
helpful
tips,
videos
and
FAQ's
at
https://support.suncast.com
You
may
call
the
Customer
Care
Center
directly
at: 1 (
800)
846-2345
or
write
Suncast
Corporation,
Customer
Care
Center,
701
N.
Kirk
Road,
Batavia,
IL
60510 (
USA)
Des
questions?
Nous
pouvons
vous
aider.
Consultez
notre
bibliothèque
de
ressources
où
vous
trouverez
des
conseils
utiles,
des
vidéos
et
une
FAQ
sur
https://support.suncast.com.
Vous
pouvez
communiquer
directement
avec
le
centre
d'appels
au:
1-800-846-2345
ou
écrire
à
Suncast
Corporation,
Customer
Care
Center,
701
N.
Kirk
Road,
Batavia,
IL
60510 (
États-Unis)
¿Alguna
pregunta?
Estamos
aquí
para
ayudarle.
Consulte
nuestra
biblioteca
de
recursos
junto
con
sugerencias
utiles,
videos
y
preguntas
frecuentes
en
https://support.suncast.com.
Puede
llamar
al
Centro
de
atención
directamente
al:
1 (
800)
846-2345
o
escribir
a
Suncast
Corporation,
Customer
Care
Center,
701
N.
Kirk
Road,
Batavia,
IL
60510
(
EE.UU.)
To
purchase
Suncast
replacement
parts
and
learn
about
other
Suncast
products
visit
us
online or
call.
Pour
acheter
des
pièces
de
rechange
Suncast
et
pour
plus
d'informations
sur
d'autres
articles
Suncast,
rendez-vous
sur
notre
site
Internet
ou
appelez-nous.
Para
comprar
piezas
de
repuesto
Suncast
y
obtener
más
información
acerca
de
otros
productos
Suncast,
visítenos
en
línea
o
llámenos
por
teléfono.
`fc
vvvvvv.suncast.com
1-800-846-2345
or
1-630-381-6309.
1-800-846-2345
ou
le
1-630-381-6309.
1-800-846-2345
o
al
1-630-381-6309.
2

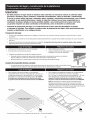
A
Before
You
Begin...
•
Consult
your
local
authorities
for
any
permits
required
to
construct
shed.
Prior
to
the
construction
of
your
shed,
check
with
the
local
building
code
official
to
review
any
required
permits
or
building
limitations.
• A
level
and
sturdy
foundation
is
required
before
shed
construction
can
begin.
Site
preparation
information
is
available
on
later
in
this
manual.
A
foundation
that
differs
from
the
specifications
described
within
this
manual
could
prevent
proper
assembly
and
may
damage
parts.
•
Read
instructions
thoroughly
prior
to
assembly.
This
kit
contains
parts
that
can
be
damaged
if
assembled
incorrectly
or
in
the
wrong
sequence.
•
Please
follow
instructions.
Suncast
is
not
responsible
for
replacing
parts
lost
or
damaged
due
to
incorrect
assembly.
•
Check
for
all
parts
before
you
begin
assembly.
Using
the
provided
parts
check
list,
verify
that
you
have
all
the
parts
required
to
construct
your
shed
model.
COMPLETE
SITE
PREPARATION
AND
FOUNDATION
CONSTRUCTION
BEFORE
UNPACKING
ALL
PARTS.
• •
•
Assistance
is
required
during
entire
assembly.
ple-A
A
Caution
•
Proper
site
preparation
required.
•
Shed
not
intended
for
storage
of
flammable
or
caustic
chemicals.
•
Hot
items,
such
as
recently
used
grills,
blowtorches,
etc.,
must
not
be
stored
in
the
shed.
•
Shed
not
intended
for
use
by
children.
•
DO
NOT
stand,
sit,
or store
items
on
storage
shed
roof.
•
Repair
or
replace
broken
parts
immediately.
•
Suncast
is
not
responsible
for
damage
caused
by
weather
or
misuse.
•
At
regular
intervals,
inspect
your
shed
to
make
sure
that
assembly
integrity
has
been
maintained.
3

Assembly
Day
Tips
•
Complete
site
preparation
and
foundation
construction
before
unpacking
parts
and
beginning
assembly.
•
Make
sure
you
have
assistance
nearby
to
lift
and
secure
parts
in
place.
•
Once
roof
is
assembled,
a
flashlight
may
be
of
use
when
assembling
smaller
components
inside
shed.
•
DO
NOT
use
a
torque
wrench
or
hand
drill
to
tighten
provided
Easy
Bolts.
Use
provided
Easy
Bolt
Easy
Driver
tool
ONLY.
•
For
customer
convenience,
Suncast
provides
extra
hardware.
In
some
cases,
there
will
be
small
fasteners
remaining,
after
assembly
is
complete.
Maintenance
•
To
maintain
the
look
of
your
product,
we
recommend
cleaning
it
at
regular
intervals
with
mild
soap
and
water.
DO
NOT
use
bleach,
ammonia
or
other
caustic
cleaners,
and
DO
NOT
use
stiff
bristle
brushes.
Failure
to
perform
cleaning
at
regular
intervals
could
result
in
permanent
staining of
the
plastic.
This
type
of
damage
is
not
covered
under
warranty..
4

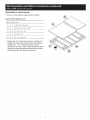
Site
Preparation
and
Platform
Construction
Materials
NOT
supplied
with
Shed
Kit
Important:
•
Site
preparation
is
required
for
this
shed.
Placing
the
shed
on
a
properly
constructed,
square,
flat
and
level
foundation,
as described
below,
is
required.
Without
a
properly
constructed,
square,
flat
and
level
foundation,
settling
will
eventually
occur,
causing
distortion
and
damage
to
the
shed.
Suncast
is
not
responsible
for
replacing
parts
damaged
or
property
lost
due
to
incorrect
foundation
construction.
Warranty
requires
a
properly
constructed
foundation
as
described
below.
•
Complete
the
site
preparation
and
foundation
construction
before
unpacking
parts
and
beginning
assembly.
For
tips
on
site
preparation,
go
to
www.suncast.com,
consult
retailer,
or
local
codes.
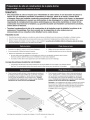
Site
Preparation
1.
Consult
your
local
authorities
for
building
codes
and
covenants
before
beginning
foundation
or
erecting
shed.
2.
Before
any
digging,
check
with
local
utilities
to
determine
location
of
buried
cables,
pipes,
etc.
3.
Decide
which
type
of
foundation
is
most
suitable
for
your
installation.
The
foundation
surface
must
be
square,
flat
and
level.
Follow
the
below
guidelines
for
foundation
options:
Concrete
Slab
•
Construct
a
slab
of
at least
4"
thickness.
•
The
use
of
reinforcement
bar
is
recommended.
Wood
Platform
•
Use
exterior
grade
wood.
•
Set
the
wood
platform
on
pier
blocks
or
footing.
4.
Complete
the
foundation
preparations
as
follows:
• A
vapor
barrier
may
be
applied
over
the
foundation
to
prevent
excessive
condensation
in
the
shed.
Follow
local
building
codes
for
a
proper
vapor
barrier.
•
The
ground
should
slope
away
from
the
foundation
area
to
provide
drainage.
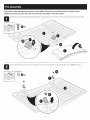
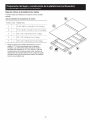
Anchoring
the
Floor
Panels
to
the
Foundation
•
Shed
floor
panels
include
flattened
areas
where
anchors
or
lag
screws
are
to
be
secured.
These
flat
areas
must
be
drilled
through
prior
to
securing
the
floor
panels
to
the
foundation.
Concrete
Slab
•
Secure
shed
to
concrete
slab
using
3/8"
masonry
anchors
with
1"
washers.
Masonry
anchors
and
1"
washers
are
avail-
able
at
most
local
hardware
retailers.
8
masonry
anchors
are
required
for
the
Suncast
BMS4950
Series
Shed.
Shed
Footprint
(for
both
concrete
and
wood)
Anchor
section
example
Wood
Platform
•
Secure
shed
to
wood
platform
using
1/4" -
3/8"
x
3"
lag
screws
with
1"
washers.
Lag
screws
and
1"
washers
are
available
at
most
local
hardware
retailers.
8
lag
screws
are
required
for
the
Suncast
BMS4950
Series
Shed.
Note:
Shed
floor
fastening
locations
are
designed
to
align
with
the
under-
structure
layout.
Be
sure
the
front
of
the
base
panels
are
oriented
correctly
on
the
platform
to
ensure
lag
bolts
engage
with
the
under-
structure.
"
Dimensions
allow
for
shed
to
fit
within
the
nearest
1"
on
each
side.
5

Site
Preparation
and
Platform
Construction (
continued)
Materials
NOT
supplied
with
Shed
Kit
Wood
platform
critical
spacing
•
Check
all
critical
spacing
measurements
carefully.
Wood
Platform
Materials
List
Item
Qty
Size
A 1
48"
X
54-1/2
X
3/4
B 1
30-1/2"
x
54-1/2"
x
3/4"
C 6
2"
x
6"
x
51-1/2"
D 4
2"
x
6"
x
14"
E 2
2"
x
6"
x
78-1/2"
•
Please
note,
2 x 6
dimensional
lumber
is
actually
1/2"
smaller
than
noted
sizes.
Dimensions
given
presume
standard
1.5"
x
5.5"
actual
size
lumber.
Lumber
dimensions
can
vary.
Check
lumber
dimensions
before
cutting
and
make
appropriate
adjustments
to
achieve
given
dimensions.
Cut
sizes
are
actual
size.
6

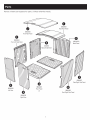
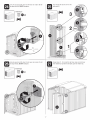
Parts
Names
or
letters
are
engraved
on
parts. (*
Unless
otherwise
noted.)
OB00093
Front
Roof
Panel
o
OB00864
Front
Left
Side
Panel
OB00099
Left
Door
OB00090
Right
Door
OB00095
Floor
Panel
x2
o
OB00863
Rear
Roof
Panel
OB00097A
Back
Panel
OB00867
Rear
Right
Side
Panel
OB00865
Front
Right
Side
Panel
7

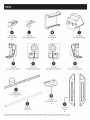
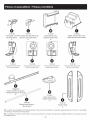
Pads
*0102196
Inner
Roof
Guide
x2
*0102192
*0102197
Back-
to-
Roof
Retainer
x2
*0102194
*0102198
Outer
Roof
Clip
x2
*0102193
Left
Lower
Door
Retainer
Left
Upper
Door
Retainer
Right
Upper
Door
Retainer
a
*1MRG02022
46.8"
Header
Beam
x2
*0464738
Support
Tube
*0102801
Rear
Roof
Hold
Down
x4
*0102102
Handle
x2
*0102802
Rear
Roof Bar
Support
*0102195
Right
Lower
Door
Retainer
Hardware
shown
at
actual
size (*
Unless
otherwise
noted.)
Extra
hardware
provided.
Not
all
are
used.
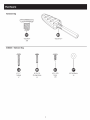
8

Hardware
Hardware
Bag
I'
*Easy
Bolt®
x26
*Easy
Driver®
0480564 -
Hardware
Bag
è
#10
x
1"
Fastener
x7
#8-10
x
3/4
Pan
Head
Screw
x5
#10
x .
625
Screw
x16
#8
Flat
Washer
x5
9

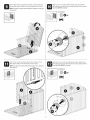
Pre-
Assembly
ti
Using
the
easy
driver (
DD),
secure
the
back-
to-
roof
retainers (
L)
to
the
rear
back
panel (
I)
with
one
easy
bolt
each (
EE)
as
shown.
DO
NOT
over
tighten.
This
product
uses
self-
tapping
screws
in
some
areas.
There
are
no
pre-
drilled
holes.
Use
force
when
starting
to
drive
the
screw.
Once
the
screw
pierces
the
plastic
it
will
drive
easier.
Position
the
rear
roof
panel (
I)
with
the
smooth
side facing
down.
Using
four
screws (
CC),
secure
the
rear
roof
bar
support (
T) to
the
rear
roof
panel
as
shown.
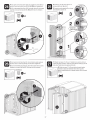
10

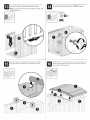
0
Postition
the
front
roof
panel (
J)
with
the
smooth
side
facing
down.
Using
the
easy
driver (
DD),
secure
the
inner
roof
guides (
K)
to
the
rear
front
panel
with
one
easy
bolt
each (
EE)
as
shown.
DO
NOT
over
tighten.
Assembly
4
huti
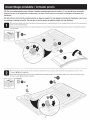
Place
the
floor
panels (
A)
against
each
other
as
shown.
With
the
help
of
another
person,
push
the
floor
panels
FIRMLY
together
until
they
interlock.
—g-
-g— —
3— —
3-
-g— —
3— —
2— —
2-
-g—
—
0—
—
2— —8— —
o-
-g
—
—
R..-
-g— - —
g— —g— _
g_
— —
g—
9
u _
g— —
g—
—g—
—
g—
_
g_
—
g—
—g—
—g—
o_ . --
_g
_
_
g_
a_ —
8—
a—a —
g— —
g—
u - ...
a_
—g— —
g— —
g— —
g— —
g—
a
_g-
- _
g_
_8_
—g—
—
a-
-8— —
g— —g— —
g-
-g— —
8— —3— —
g-
-g— —
g— —
g-
-g— —
g-
1 1

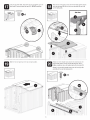
O
Using
a
phillips
screwdriver,
attach
the
floor
panels (
A)
together
with
six
screws (
AA).
Place
and
center the
floor
assembly
onto
the
prepared
foundation.
0x6
6
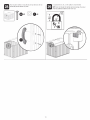
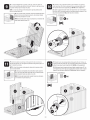
Insert
the
tabs
on
the
front
right
side
panel (
B) into
the
slots
in
the
floor
panel (
A).
Slide
the
front
right
side
panel
to
lock
in
place.
NOTE:
The
edge
of
front
right
side
panel
with
hinge
tabs
will
be
the
front
of
the
shed.
Using
the
easy
driver (
DD), attach
the
front
and
rear
right
side
panels
(B,
C)
together
with
two
easy
bolts (
EE).
DO
NOT
over
tighten.
hinge
tabs
Ell
Insert
the
tabs
on
rear
right
side
panel (
C) into
the
slot
in
floor
panel (
A).
Slide
the
rear
right
side
panel
to
lock
in
place.
NOTE:
The
edge
of
the
rear
right
side
panel
overlaps
to
the
inside
of
the
front
right
side
panel (
B).
8
12

9
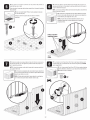
With
the
back
panel
at
an
angle,
insert
the
tabs
on
back
panel (
D)
into
the
back
floor
panel (
A).
Rotate the
back
panel
upright
to
lock
in
place.
NOTE:
The
edge
of
the
back
panel
overlaps
the
outside
of
the
rear
right
side
panel (
C).
Insert
the
tabs
on
the
rear
left
side
panel (
E)
into
the
slots
in
the
rear
floor
panel (
A).
Slide
the
rear
left
side
panel
to
lock
in
place.
NOTE:
The
edge
of
the
rear
left
side
panel
overlaps
to
the
outside
of
the
back
panel (
D).
13
10
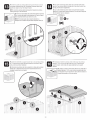
Bend
the
corner
on
the
back
panel (
D)
inward.
Using
the
easy
driver
(DD),
attach
the
back
panel
to
the
rear
right
side
panel (
C)
with
two
easy
bolts (
EE).
DO
NOT
over
tighten.
all
Bend
the
corner
of
the
rear
left
side
panel (
E)
inward.
Using
the
easy
driver (
DD), attach
the
rear
left
side
panel
to
the
back
panel (
D)
with
two
easy
bolts (
EE).
DO
NOT
over
tighten.

mi
Insert
the
tabs
on
the
front
left
side
panel (
F)
into
the
slot
in
the
front
floor
panel (
A).
Slide
the
front
left
side
panel
to
lock
in
place.
NOTE:
The edge
of
the
front
left
side
panel
overlaps
the
outside
of
the
rear
left
side
panel (
E).
14
Using
the
easy
driver (
DD), attach
the
front
left
side
panel (
F)
to
the
rear
left
side
panel (
E)
with
two
easy
bolts (
EE).
DO
NOT
over
tighten.
to
Insert
the
ends
of
the
support
tube (
U)
across
the
side
panels (
B,
F).
Be
sure
the
support
tube
rests
in
the
curved
recesses
as
shown.
--40
110
"-
16
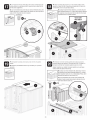
Position
and
center the
rear
roof
panel (
I)
across
the
side
panels (
C,
D,
E)
and
over
the
roof
support
bar (
U).
Be
sure
the
rear
roof
bar
support (
T)
rests
securely
on
the
support
tube.
14

Slide
the
front
roof
panel (
J)
to
the
rear
and
open
position.
In
Using
the
easy
driver (
DD), attach
both
back-
to-
roof
retainers (
L)
to
the
back
panel (
D)
using
one
easy
bolts
each (
EE).
DO
NOT
overtighten.
2
18
Place
the
front
roof
panel (
J)
across
the
front
left
side
panel (
F)
and
the
front
right
side
panel (
B).
Be
sure
the
inner
roof
guides (
K)
snap
fully
over
the
side
panels.
19
20
Position
one
of
the
header
beams (
S)
into
the
channel
across
the
front
left
side
panel (
F)
and
the
rear
left
side
panel (
E).
Using
a
phillips
screwdriver,
secure
the
header
beam
with
six
screws (
CC).
Repeat
for
the
remaining
header
beam
across
the
front
right
side
panel (
B)
and
the
rear
right
side
panel (
C)
15

El
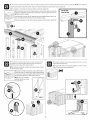
From
the
underside
of
rear
roof
panel (
I),
use
the
easy
driver (
DD)
to
attach
two
rear
roof
hold
downs
(
vv)
using
one
easy
bolts (
EE)
each.
DO
NOT
overtighten.
Be
sure
the
rear
roof
hold
downs
attach
onto
the
header
beams (
S)
as
shown
before
tightening
easy
bolts.
Repeat
for
other
side with
the
two
remaining
rear
roof
hold
downs
(
q.
4
EEI
Slide
the
front
roof
panel (
J)
forward
to
the
closed
position.
On
the
outside
of
the
shed,
on
both
sides,
snap
one
outer
roof
clamp (
M)
over
the
front
roof
panel
and
the
rear
roof
panel
(
I).
NOTE:
Position
the
outer
roof
clamps
with
the
text at
the
bottom.
16
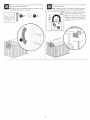
Es11
Snap
the
left
lower
door
retainer (
R)
into
place
at
the
bottom
of
the
front
left
side
panel (
F).

24
26
Using
the
easy
driver (
DD), attach
the
left
lower
door
retainer (
R)
with
two easy
bolts (
EE).
DO
NOT
overtighten.
El
Insert
the
left
door (
G)
into
the
front
left
side
panel (
F).
Using
the
easy
driver (
DD), attach
the
left
upper
door
retainer (
P)
with
one easy
bolt (
EE).
DO
NOT
overtighten.
Ea
Repeat
steps
23 -
26
to
install
the
right
door
using
parts
right
lower
door
retainer (
N),
right
door (
H)
and
right
upper
door
retainer (
Q).
17

28
Attach
the
door
handles (
V)
to
the
left (
G)
and
right (
H)
doors
with
two
screws (
BB)
and
two
washers
(
FF)
each.
0
x4
1
_._____
II
Jpj
A
l
it
iiiitill
1 i
1111111111111
i
.,
in
..„................„,
4
29
To
properly
lock
the
unit,
a
5/16"
padlock
is
recommended.
NOTE:
Lock
not
included.
To
maintain
warranty
coverage,
the
product
should
be
padlocked
at
all
times
when
not
in
use.
18

A
Avant
de
commencer...
•
Consulter
les
autorités
locales
pour
les
permis
nécessaires
à
la
construction
de
la
remise.
Avant
de
construire
la
remise,
demander
à
un
représentant
des
autorités
locales
chargées
des
codes
et
de
la
réglementation
afin
de
connaître
les
limitations
des
permis
de
construire.
•
Il
est
obligatoire
de
construire
des
fondations
robustes
avec
une
surface
à
niveau
avant
de
commencer.
Les
recommendations
et les
choix
concernant
les
fondations
sont
indiqués
aux
pages
20
et
21
du
manuel.
•
Lire
complètement
les
instructions
avant
de
procéder
à
l'assemblage.
Ce
kit
comprend
des
pièces
qui
peuvent
être
endommagées
si
elles
ne
sont
pas
assemblées
correctement
ou
si
elles
ne
sont
pas
assemblées
dans
le
bon
ordre.
•
Suivre
les
instructions.
Suncast
décline
toute
responsabilité
en
ce
qui
concerne
le
remplacement
de
pièces
perdues
ou
endommagées
suite
à
un
mauvais
assemblage.
•
Vérifier
toutes
les
pièces
avant
de
commencer.
Utiliser
la
liste
de
pièces
fournies
aux
pages
18
et
19
et
vérifier
que
toutes
les
pièces
sont
présentes
afin
de
construire
la
remise.
EFFECTUER
COMPLÈTEMENT
LA
PRÉPARATION
DES
FONDATIONS
AVANT
DE
DÉBALLER
TOUTES
LES
PIÈCES.
• •
•
Il
est
nécessaire
de
recevoir
l'aide
d'une
autre
personne
pendant
tout
l'assemblage.
MO
A
it
A
Attention
•
Une
préparation
appropriée
du
site
d'installation
est
requise.
•
La
remise
n'a
pas
été
conçue
afin
d'entreposer
des
produits
chimiques
inflammables
ou
caustiques.
•
Ne
pas
placer
d'appareils
chauds
dans
la
remise
tels
que
les
grils
et
barbecues,
lampes
à
souder
et
chalumeaux,
etc.
venant
d'être
utilisés.
•
La
remise
ne
doit
pas
être
utilisée
pas
de
enfants.
La
remise
n'est
pas
un
coffre
à
jouets.
•
Ne
pas
se
tenir
debout,
assis
ni
ranger
d'articles
sur
le
toit
de
la
remise.
•
Réparer
ou
remplacer
immédiatement
tout
élément
cassé.
•
Suncast
décline
toute
responsabilité
en
cas
de
dommages
provoqués
par
les
intempéries
ou
par
tout
mauvais
usage.
•
Inspecter
cet
article
régulièrement
pour
vérifier
que
le
montage
n'a
pas
pris
de
jeu.
19

Conseils
pour
le
jour
de
l'assemblage
•
Terminer
complètement
la
préparation
du
site
et
les
fondations
avant
de
déballer
les
pièces
et
de
com-
mencer
l'assemblage.
•
S'assurer
que
quelqu'un
se
trouve
a
proximité
pour
aider
à
soulever
et
mettre
en
place
les
pièces.
•
Après
que
le
toit
soit
monté,
une
lampe
de
poche
pourra
être
utile
pour
monter
les
petites
pièces
à
l'intérieur
de
la
remise.
•
NE
PAS
utiliser
de
clé
dynamométrique
ni
de
perceuse
pour
serrer
les
boulons
Easy
BoltsTM.
Utiliser
UNIQUEMENT
l'outil
spécial
Easy
Driver (
fourni).
•
Suncast
fourni
des
pièces
supplémentaires
telles
que
les
petites
pièces
de
boulonnerie
pour
vous
faciliter
la
vie.
Dans
certains
cas,
il
restera
des
petites
pièces
de
boulonnerie
après
avoir
terminé
l'assemblage.
Instructions
d'entretien
•
Pour
préserver
l'aspect
de
cet
article,
nous vous
recommandons
de
le
nettoyer
régulièrement
avec
de
l'eau
et
du
savon
doux.
NE
PAS
utiliser
d'eau
de
Javel,
d'ammoniaque
ou
tout
autre
nettoyant
caustique,
et
NE
PAS
utiliser
des
brosses
à
poils
durs.
Si
le
nettoyage
n'est
pas
effectué
régulièrement,
le
plastique
pourrait
rester
souillé
de
façon
permanente.
Ce
type
de
dommage
n'est
pas
couvert
par
la
garantie.
20
La page est en cours de chargement...
La page est en cours de chargement...
La page est en cours de chargement...
La page est en cours de chargement...
La page est en cours de chargement...
La page est en cours de chargement...
La page est en cours de chargement...
La page est en cours de chargement...
La page est en cours de chargement...
La page est en cours de chargement...
La page est en cours de chargement...
La page est en cours de chargement...
La page est en cours de chargement...
La page est en cours de chargement...
La page est en cours de chargement...
La page est en cours de chargement...
La page est en cours de chargement...
La page est en cours de chargement...
La page est en cours de chargement...
La page est en cours de chargement...
-
 1
1
-
 2
2
-
 3
3
-
 4
4
-
 5
5
-
 6
6
-
 7
7
-
 8
8
-
 9
9
-
 10
10
-
 11
11
-
 12
12
-
 13
13
-
 14
14
-
 15
15
-
 16
16
-
 17
17
-
 18
18
-
 19
19
-
 20
20
-
 21
21
-
 22
22
-
 23
23
-
 24
24
-
 25
25
-
 26
26
-
 27
27
-
 28
28
-
 29
29
-
 30
30
-
 31
31
-
 32
32
-
 33
33
-
 34
34
-
 35
35
-
 36
36
-
 37
37
-
 38
38
-
 39
39
-
 40
40


dans d''autres langues
- italiano: Suncast BMS4950 Manuale utente
- English: Suncast BMS4950 User manual
- español: Suncast BMS4950 Manual de usuario
Documents connexes
-
Suncast BMS4912D Manuel utilisateur
-
-
-
-
-
-
-
-
-