La page est en cours de chargement...

LED Behaviors
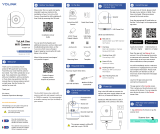
Get to Know Your Valve
Controller 2
EGet to Know Your
Bulldog Valve Robot
F
Keyhole
Mounting Slot
Status LED
(See LED Behav-
iors, below)
SET Button
Battery Housing
Cover
Mounting Hole
12VDC Input Cable
Valve Status Cable
Valve Control
Cable
In the Kit
C
4 x AA Batteries
(Pre-Installed)
Bulldog Valve
Robot
Phillips Head
Screws(3)
Blinking Red Once, Then Green
Once
Device Start-Up
Blinking Red And Green
Alternately
Restoring to Factory Defaults
Blinking Red Once
Valve Closing
Quick Blinking Red Twice
Valve is Closed
Blinking Green Once
Valve Opening
Quick Blinking Green Twice
Valve is Open
Slow Blinking Green Twice
Connecting to Hub
Quick Blinking Green
Control-D2D Pairing in Progress
Quick Blinking Red
Control-D2D Unpairing in
Progress
Slow Blinking Green
Updating
Fast Blinking Red Once Every
30 Seconds
Low Battery, Replace Batteries
Soon
Add Your Valve Controller
2 to the App
G
1. Tap Add Device (if shown) or tap the
scanner icon:
Scanner icon
2. Approve access to your phone’s
camera, if requested. A viewfinder will be
shown on the app.
Required Items
Wall AnchorsDrill with Drill Bits
Medium Phillips
Screwdriver
These tools or items may be required:
D
Clutch Pin
Mounting Tab
Rocker Arm and
Handle-Supporting
Bolt
Output Shaft of
Bulldog
Brackets
Handle and Position Indicator
Quick Start Guide
YS5003-UC & BULLDOG
Valve Controller 2 &
Bulldog Valve Robot Kit
Revision Feb. 06, 2023
Welcome!
A
Thank you for purchasing YoLink
products! We appreciate you trusting
YoLink for your smart home & automa-
tion needs. Your 100% satisfaction is our
goal. If you experience any problems
with your installation, with our products
or if you have any questions that this
manual does not answer, please contact
us right away. See the Contact Us
section for more info.
Thank you!
Eric Vanzo
Customer Experience Manager
Pour des instructions en
français, scannez les codes
QR dans la section suivante.
Para obtener instrucciones en
español, escanee los códigos
QR en la siguiente sección.
Fr
Es
Before You Begin
B
Installation & User
Guide
Product Support
Support produit
Soporte de producto
You can also find all current guides and
additional resources, such as videos and
troubleshooting instructions, on the
Valve Controller 2 and Bulldog Valve
Robot Kit Product Support Page by
scanning the QR code below or by
visiting:
https://shop.yosmart.com/pages/
valve-controller-2-product-support
Please note: this is a quick start guide,
intended to get you started on the
installation of your Valve Controller 2
and Bulldog Valve Robot Kit. Download
the full Installation & User Guide by
scanning this QR code:
Please note: the existing ball valve must be in
good working order. It must open and close
smoothly, with minimal effort, and it must
close fully, shutting off the water completely.
The Bulldog Valve Robot is not able to correct
mechanical issues of the ball valve.
Your Valve Controller 2 wirelessly connects to
the internet via a YoLink Hub or SpeakerHub,
and it does not directly connect to your WiFi or
local network. In order for remote access to
the device from the app, and for full-function-
ality, a YoLink hub is required. This guide
assumes the YoLink app has been installed on
your phone, and a YoLink Hub or SpeakerHub
is installed and online.
If installing the Valve Controller 2 and Bulldog
Valve Robot outdoors, please refer to the
environmental range specifications found on
the Valve Controller 2 product support page.
While these devices can be installed outdoors,
it should be protected from rain and direct
sunlight by an enclosure or overhead cover,
such as a rain hood.
The following icons are used in this guide to
convey specific types of information:
Very important information
(can save you time!)
Good to know info but may not apply
to you
Valve Controller 2 Plug-in Power
Supply
Large & Small
Brackets
Quick Start Guide
3. Hold the phone over the QR code so
that the code appears in the viewfinder.
If successful, the Add Device screen will
be displayed.
4. Follow the instructions to add your
Valve Controller 2 to the app.

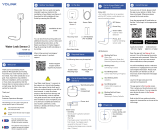
3. Place the upper bracket and lower
bracket on the valve, as shown, and
loosely tighten the screws.
4. Position the bracket so that it is
aligned with the pivot point of the ball
valve, by visualizing a line between the
tab slot and the pivot point, as shown.
5. Remove the screw from the tab slot,
then attach the Valve Robot to the
bracket.
6. Keeping the center axis of the Valve
Robot’s motor shaft aligned with the ball
valve shaft, as indicated by the red
dashed line, reinsert and tighten the tab
slot screw.
Contact Us
K
Install the Bulldog Valve Robot, Continued.
I
We are here for you, if you ever need any
assistance installing, setting up or using
a YoLink app or product!
Need help? For fastest service, please
email us 24/7 at [email protected]
Or call us at 831-292-4831 (US phone
support hours: Monday - Friday, 9AM to
5PM Pacific)
You can also find additional support and
ways to contact us at:
www.yosmart.com/support-and-service
Or scan the QR code:
Finally, if you have any feedback or
suggestions for us, please email us at
Thank you for trusting YoLink!
Eric Vanzo
Customer Experience Manager
Support
Home Page
15375 Barranca Parkway
Ste. J-107 | Irvine, California 92618
© 2022 YOSMART, INC IRVINE,
CALIFORNIA
Pivot Point
Tab Slot
Power Up, Final
Connections & Testing
J
1. The Valve Controller will appear offline
until it is turned on and it wirelessly
connects to a YoLink hub. Turn on the
Valve Controller by pressing the SET
button until you see the LED blink (red,
then green, indicates the Valve Controller
2 has connected to the cloud).
2. In the app, verify the Valve Controller
is indicated as online.
3. Connect the valve controller’s valve
control cable to the control cable of the
Bulldog Valve Robot.
4. Connect the valve controller’s valve
status cable to the valve status cable of
the Bulldog Valve Robot.
5. If using the power adapter, and before
plugging in the power adapter to the AC
power outlet, connect the valve control-
ler’s 12VDC input cable to the power
adapter cable. Plug in the power adapter
at the wall outlet.
6. Test the Valve Controller 2 and
Bulldog Valve Robot by pressing the SET
button on the controller, and by watching
the closing or opening action of the
Bulldog and the ball valve. The valve
should open and close completely (verify
no water is flowing through the valve
while closed). Also, listen for an even
sound of the motor operating. If the
Bulldog sound increases or appears to
be straining, this may indicate incorrect
or sub-optimal Bulldog installation
and/or a mechanical issue with the ball
valve (such as too stiff or too much
resistance to turning). Return to section
K, if needed.
7. Test the operation of the Valve
Controller 2 from the app. From the
Rooms or Favorite screen, locate your
Valve Controller 2, tap the image, then
tap Close to turn off the water, and tap
Open to turn it on.
Refer to the full installation and user
guide to complete the setup of your
Valve Controller 2 and Bulldog Valve
Robot.
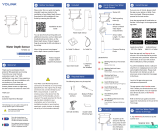
Preparing for installation:
Determine where you will install your
Valve Controller 2. Typically, it should be
wall-mounted, no farther away from the
Bulldog Valve Robot than the length of
the cables allow (if you have purchased
optional extension cables, the valve
controller can be installed at a location
separate from the Bulldog Valve Robot).
Note: use of the 12VDC power adapter is
optional. If not used, batteries are
required. If the power adapter is used,
batteries are optional.
Determine how you will mount the valve
controller to the wall, and have hardware
and anchors appropriate for the wall
surface on hand.
1. Mark the location of the hole for each
of the valve controller's three mounting
points on the wall. Install anchors, if
applicable, per the anchor manufactur-
er's instructions. Insert the screw for the
topmost mounting point, leaving enough
space to hang the controller.
2. Hang the controller on this top screw,
then insert the two remaining screws
into their respective anchors or
locations.
3. Tighten all three screws, ensuring the
valve controller is secured to the wall.
Install the Valve
Controller 2
H
If it is not possible to align the parts as
shown, or if the bracket can not be
secured to the ball valve, consider
rotating the ball valve handle 180°. After
removing the Bulldog, this can be done
by removing the ball valve handle, and
then reinstalling it on the other side.
Reinstall the Bulldog (on the other side
of the ball valve) and check if alignment
is better in this position.
7. Securely tighten the two screws on
the bracket. Gently tug on the Bulldog,
and tighten the screws until the Bulldog
is firmly held in place by the bracket and
tab screw.
8. Remove the nuts and collars from the
two handle supporting bolts, as shown.
9. Place the bolts in the slot on the
rocker arm, with one on each side of the
valve handle, as shown.
10. Put the collars back on the bolts.
Next, while holding the bolts and collar
pieces in place, attach the bottom
supporting bracket, as shown. Then,
attach and loosely tighten the nuts to the
bolts. Finally, position both bolts and
collars so that they are snug against
each side of the valve lever.
1. Select the appropriate bracket for your
application. The appropriate bracket fit
over the ball valve, and will allow for
clamping securely to it when the screws
are tightened. If the bracket does not fit
over the ball valve or seems to be too
loose, use the other bracket.
2. Loosen the two screws, to separate
the bracket into two pieces, as shown.
Install the Bulldog Valve
Robot
I
/