
20042/270503 © ALL RIGHTS RESERVED MARMITEK ®
ASYTOUCH
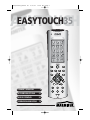
EASYTOUCH35
OWNER’S MANUAL 3
BETRIEBSANLEITUNG 27
MODE D’EMPLOI 51
GEBRUIKSAANWIJZING 75
easytouch35_manual ok 6/17/03 10:30 AM Page 1

2 MARMITEK
EASYTOUCH35
1
17
2
4
7
5
9
11
15
18
16
12
13
10
6
8
3
14
easytouch35_manual ok 6/17/03 10:30 AM Page 2

3EASYTOUCH 35
Contents
1. General Safety Note_______________________________________________________3
2. Introduction _____________________________________________________________4
3. Installing the batteries _____________________________________________________5
4. Description of the ET35 "rubber" keys _______________________________________5
5. Description of the ET35 "Touchscreen" keys __________________________________6
6. Programming using 3 Digit Code Tables for the TV,
VCR, CD, SAT, CBL, DVD, AUDIO and Marmitek X-10 Home Automation keys _____8
7. Programming using Brand search method ____________________________________9
8. Programming using Code search method____________________________________11
9. Identifying codes found using the search procedures __________________________12
10. Programming a Macro____________________________________________________13
11. Channel toggle key ______________________________________________________15
12. Setting key labels________________________________________________________17
13. Code learning___________________________________________________________18
14. Marmitek X-10 Home Automation _________________________________________20
14.1. Changing the home automation House Code___________________________21
14.2. Programming the Home Automation IR/RF mode ________________________21
15. Extra functions __________________________________________________________23
16. Controlling your equipment from any place in your home______________________24
17. Problems and troubleshooting _____________________________________________25
1 General Safety Note
Technical manipulation of the product or any changes to the product are forbidden, due
to security and approval issues.
Do not use sharp or metal objects on the Touchscreen.
Do not press hard on the glass Touchscreen.
Take care of proper starting up the device - consult your user guide. Children should use
the device only under adult supervision.
Avoid the following:
• strong mechanical tear and wear
• high temperature
• strong vibrations
• high humidity
Please also respect the additional safety notes in the various user guide chapters. For
questions not covered from the user guide please visit www.marmitek.com.
To insure a proper set up please read the manual and safety notes carefully.
Battery change:
The device may only be used with 4 AAA batteries - never try to connect to another
power supply. When inserting batteries be sure the right polarity is used. Remove the
batteries when the device is not used for a longer period. Make sure that the batteries are
not short circuited and are not disposed in fire (danger of explosion)
ENGLISH
easytouch35_manual ok 6/17/03 10:30 AM Page 3

4 MARMITEK
Batteries do not belong in children hands. Do not leave batteries lying around openly -
they might be swallowed by children or animals. If this happens see a doctor immediately.
Leaking or damaged batteries can upon contact with skin cause burning or acid damage -
if necessary use suitable gloves
Disposal of batteries:
Batteries are special waste and do not belong in general household waste disposal.
By law, the end-user is required to dispose of used batteries by returning them - disposal
through household waste is forbidden. Your used batteries can be returned to all local
authorized collection points.
Keep the environment safe.
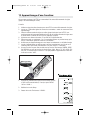
2 Introduction
The ET35 is designed to control up to 8 devices (TV, VCR, CD, SAT, CBL, DVD, AUDIO,
Marmitek X-10 Home Automation). The Marmitek X-10 Home Automation key can be
used to control any other audio/video appliance.
To allow direct control of all these appliances, in a convenient way, the ET35 includes a
Touchscreen. The Touchscreen can display only the functions you need during a certain
sequence e.g.: during the setting of ET35 to control an A/V appliance or when you are
controlling one of your appliances.
The ET35 has unique features, combined to a big storage capacity, such as:
•"Macro" option: a total number of 20 key strokes can be stored under each of the 9
available Macro keys
• code learning, up to 40 keys per each mode
• channel scan/search function
• video plus / show-view key
• All power off feature: to switch off all the modes in 2 presses
• TV Volume/ Mute, whatever the last mode was selected
• Channel toggle key
• Customising of the screen, using a predefined list of symbols, according to your
specific needs
• RF transmission to control your appliances through walls and ceilings (PowerMid
Receiver required, sold separately).
•Marmitek X10 key, which will enable you to control lamps and electric appliances
from a distance. For controlling your lamps or appliances, you will need additional
home automation modules. Visit www.marmitek.com for more information.
The ET35 contains a library of codes that are pre-programmed into the remote control.
This library covers nearly all the audio video products on the market today.
To make it easy for you to find the right code for your audio video appliance, we advise to
use the CODE SEARCH feature.
easytouch35_manual ok 6/17/03 10:30 AM Page 4

5EASYTOUCH 35
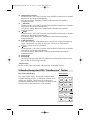
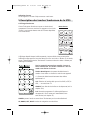
3 Installing the batteries
1. Open the cover on the back of the ET35
2. Insert 4 batteries (AAA size alkaline). Make sure the batteries are the same brand and
are NEW and observe polarities indicated inside the battery compartment.
3.
All the user programmed parameters will be retained indefinitely during battery replacement
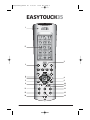
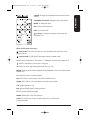
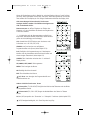
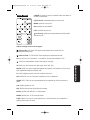
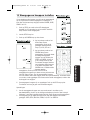
4 Description of the ET35 "rubber" keys
1: LED: Turns on whenever a rubber key or an Touchscreen key is pressed and indicates
when commands are being transmitted.
2: TV, VCR, CD, SAT, CBL, DVD, AUDIO, Marmitek X-10 Home Automation mode:
To select the appliance you wish to control.
The Marmitek X-10 Home Automation key allows you to control any light or
appliances connected to Home Automation (Marmitek X10) modules or to program
and control any kind of devices such as a TV, satellite receiver, video recorder or DVD
player. By default this key is pre-program to control home automation modules.
3: POWER: to switch off the last selected appliance
mode: Turns All Lights on.
4: VOL + / -: to control the volume
mode: brights and dims the selected Home Automation Module.
5: MACRO: to launch a macro (see chapter 10)
6: SET UP: to set the remote control for the appliance you wish to control. Allow the
access to secondary functions:
• Press and release the Setup key (the S segment appears on the top right hand
corner of the Touchscreen)
• Press the desired secondary function key (the "S" is turned off).
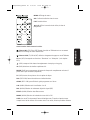
7: MUTE: to turn on and off the sound
mode: turns All Home Automation module off.
8: CHAN +/-: to select the next or the previous channel
mode: turns on or off the selected home automation module.
9: TELETEXT ON: to display Teletext
10: TELETEXT OFF: to turn off Teletext
11: Rew
In VCR, DVD or CD mode: This button works the same way as in your original remotes.
IN TV mode: Coloured key (Red), control of videotext or special equipment functions.
12: Fast Forward
In VCR, DVD or CD mode: This button works the same way as in your original remotes.
IN TV mode: Coloured key (Blue), control of videotext or special equipment functions.
13: Play
In VCR, DVD or CD mode: This button works the same way as in your original remotes.
IN TV mode: Coloured key (Yellow), control of videotext or special equipment functions.
14: Stop
In VCR, DVD or CD mode: This button works the same way as in your original remotes.
IN TV mode: Coloured key (Green), control of videotext or special equipment functions.
15: REC (record)
This key works the same way as the one on your original remote for your VCR. In
order to avoid a mistake you have to press this key twice to activate this feature.
16: Pause
In VCR, DVD or CD mode: This button works the same way as in your original remotes.
IN TV mode: Coloured key (Magenta), control of videotext or special equipment functions.
17: Touch Screen
ENGLISH
easytouch35_manual ok 6/17/03 10:30 AM Page 5

6 MARMITEK
18: Backlighting:
By pressing this key the screen will be illuminated. The backlighting will stay on while
pressing keys, and will time out ten seconds after the last key was pressed.
Error Indication
The LED flashes 3 times and the sounder beeps 3 times for any error condition.
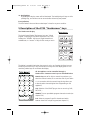
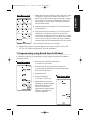
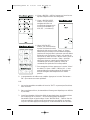
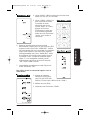
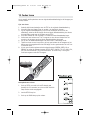
5 Description of the ET35 "Touchscreen" keys
The Touchscreen Display
The Liquid Crystal Display (Touchscreen) acts as a "Virtual
Keypad" comprising a 15 position segmented "key" area.
Pressing the "SCREEN" key lets you toggle between two
available sets, or "screens" of keys for the mode you are in.
The display is normally blank when the remote is not in use. Pressing the Setup key, any
Mode key, the Macro key or any Touchscreen touch key turns the display panel on. The
remaining rubber keys do not activate the display.
All the appliance can be controlled through 2
Touchscreens. Common screen keys are described below.
Numeric keys 0 - 9: For digit or numeric key entries e.g. to
select the channel number, or to enter the code of your device
-/--: In connection with the numeric keys this key allows you
to directly select channels higher than 9 (depending on the
appliance).
A/V: Selection of the SCART plug to view or record e.g. DVD,
SAT, VCR, …
SEARCH: To scan up available program channels or tracks (see
chapter 15.4)
P<P: Allows to program 2 specific channels and switch
between them with a single key press (see chapter 11)
Master Screen
SEARCH
SETUP
EXIT
SV/V+
MEN
U
SCREEN
KEY?
O K
0
79
46
2
8
5
3
S
LEVEL
MACRODSP EFFEC
T
LEARN
VCRTV DVD
STBTUNER TAPE
CD AUDIO DISC
USER1 USER2
CODE
MODEA B
REPEAT ENTER
FA
V
T
-
C
SLEEP
10
P<P
GUID
E
i
AV
AUX
easytouch35_manual ok 6/17/03 10:30 AM Page 6

7EASYTOUCH 35
SCREEN: To toggle access between first and second mode
screens
UP, DOWN, LEFT, RIGHT: Navigation keys used in Menu.
MENU: To display the menu.
OK: Confirms menu selections.
EXIT: To turn Menu OFF
: Info key: to display the program channel and title
information, etc.
Other Useful Touchscreen Keys:
: Teletext Mix: (TV, CBL & SAT) Allows to mix the Teletext and the picture of the
selected channel
: Teletext Hold: (TV, CBL & SAT) Stops page change in teletext mode.
SV/V+: (VCR) corresponds to "Showview" or "Videoplus" functions (see chapter 15.5).
: (VCR) for tape speed i.e. short-play or long play.
10: (DVD) is for track digit entries greater than 0-9 (e.g. +10).
REPEAT: (DVD) to repeat the disc playback either completely or from two User-set points
(Repeat A-B).
T-C: (DVD) Disc Track or Chapter playback
FAV: (SAT & CBL) is for the devices "Favourite" channel function
GUIDE: (SAT & CBL) to call up the devices on-screen program guide
A-B: (AUDIO) Speaker A or B
DSP: (AUDIO) Digital Signal Processing selection
EFFECT: (AUDIO) DSP Effects toggle
MODE: (AUDIO) AM or FM Tuner selection
SLEEP: (TV Only) To turn off your TV after a period of 1 to 99 minutes.
Proceed as follows:
ENGLISH
easytouch35_manual ok 6/17/03 10:30 AM Page 7

8 MARMITEK
1. The remote must be in TV Mode with the "second" display screen being shown.
2. Press and hold the Touchscreen "SLEEP" Key until the LED remains on (occurring after
approximately 2-3 seconds) and display will show the Sleep Setup Screen.
3. Release the "SLEEP" key.
4. Press and release the numeric keys (01-99) for the time required. The LED will blink
off to indicate keypress acceptance and the remote display will return to normal
operation.
5. TV Sleep Timer now set. Leave the Remote pointing towards the TV with an
unobstructed path.
To cancel the Sleep Timer, press and release the Power key in TV Mode or press and hold
the SLEEP key until the remote beeps twice.
Programming the ET35
You program the ET35 using the Setup key and following the procedures below. Each
keypress is acknowledged with an LED blink and a beep from the sounder. 3 LED blinks
and sounder beeps indicate an incorrect or invalid entry.
Attention: You always need to activate the touch screen remote control by
touching the screen before you can start the described proocedure.
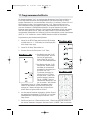
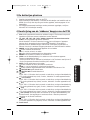
6Programming using 3 Digit Code Tables for the
TV, VCR, CD, SAT, CBL, DVD, AUDIO and Marmitek
X-10 Home Automation keys
Note: you can dedicate any appliance (TV, DVD, SAT...) to the VCR, DVD, SAT, CD, AUDIO,
CBL and Marmitek X-10 Home Automation keys: you need first to enter the 3 digit code
of the appliance you wish to control (found in the code book). In any case, follow the
method below:
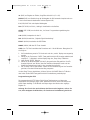
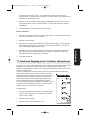
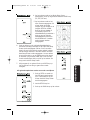
1. Make sure your appliance is
switched on (for example TV)
2. Activate your ET35 remote by
touching the screen
3. Press and hold the Setup key
until the LED remains on
(occurring after approximately
2-3 seconds) and display
shows the Main Setup Screen.
4. Release Setup key.
5. Press and release the
Touchscreen "CODE" Key.
6. Display will show the Mode
Setup Screen. Press and release
desired Mode key (TV, VCR,
SAT, etc.) on the rubber
keypad.
easytouch35_manual ok 6/17/03 10:30 AM Page 8

9EASYTOUCH 35
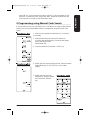
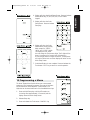
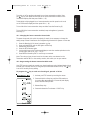
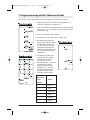
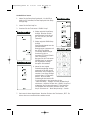
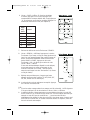
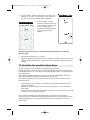
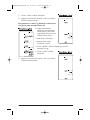
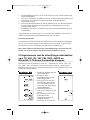
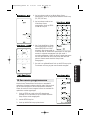
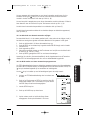
7. Display will show the Code Setup Screen. Enter the 3 digits
of the Device Code from the Library Code Tables. For a
valid Code, the LED blinks off after the last digit is entered.
For an invalid Code, the LED will flash rapidly three times
before going off. In both cases, the display will return to
the Main Setup Screen.
8. Press and release the Touchscreen "EXIT" key to return to
normal operation.
9. Point the remote in the direction of your TV and press the
POWER key. Your device should turn off. Check other
functions (for example for a VCR: FF or REW etc.). If certain
functions are not responding this indicates that the entered
code is not the correct one. In that case repeat the above
procedure with the next corresponding code of your brand.
10.Direct Library Code entry now complete
11. Repeat this procedure for the other appliance you want to control (TV, VCR, DVD,
SAT, CD, CBL, AUDIO and Marmitek X-10 Home Automation)
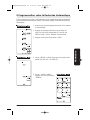
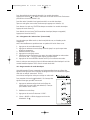
7 Programming using Brand Search Method
It is possible to search for your appliance’s code by entering the brand of the appliance
you wish to control.
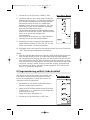
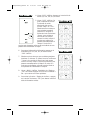
1. Make sure your appliance is switched on.
If not switch it on manually
2. Press and hold Setup key until the LED remains on
(occurring after approximately 2-3 seconds) and display
shows Main Setup Screen.
3. Release Setup key.
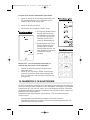
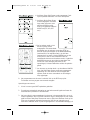
4. Press and release the
Touchscreen "CODE" Key.
5. Display will show the Mode
Setup Screen. Press and release
desired Mode key (TV, VCR,
SAT, etc.) on the rubber
keypad. Note the Brand Search
Method is not available for
CD/Audio appliance.
ENGLISH
easytouch35_manual ok 6/17/03 10:30 AM Page 9

10 MARMITEK
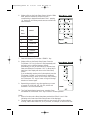
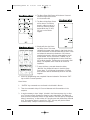
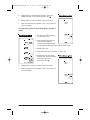
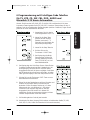
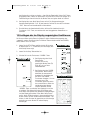
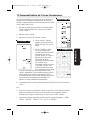
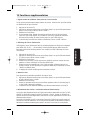
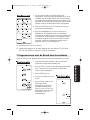
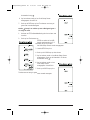
6. Display will show the Code Setup Screen. Using the Table
blow, press and release the numeric key (0-6)
corresponding to desired Manufacturer. Note – pressing
"0" carries out a full library search same as normal Code
Search Method.
Digit
Key Brand
Press
1 PHILIPS
2 SONY
3 THOMSON
4 SABA
5 GRUNDIG
6 NOKIA
7. Press and release the Touchscreen "SEARCH" Key.
8. Display will show the Search Setup Screen. Press the
Touchscreen "UP" key (or Power or Play) repeatedly until
the Device to be controlled changes channel.
Alternatively, you can use the Channel Up & Down keys.
Press and release the Touchscreen "OK" (or Mute) key to
install the Code. Display will return to the Main Setup
Screen.
If you accidentally overshoot the Code required, press the
Touchscreen "DOWN" or Channel Down to backtrack
through the Library to return to the correct code. Pressing
the Touchscreen "UP" key (or Power or Play) will change
direction to forward again.
9. Repeat this procedure for any other appliance you want
to control (TV, VCR, DVD, SAT, CD, CBL, AUDIO and
Marmitek X-10 Home Automation).
10. The Code Search Method entry is now complete. Press
and release the Touchscreen "EXIT" key to return to normal operation.
Notes:
a. When all codes under a Brand have been searched the LED will "error" flash
indicating end of search and Main Setup Screen will be displayed.
b. The above search procedure assumes that you want to store VCR codes under the
VCR key, Cable codes under CBL, etc. If you want, for example, to store a VCR code
easytouch35_manual ok 6/17/03 10:30 AM Page 10

11EASYTOUCH 35
under CBL, etc., then the Mode key must be "primed" for the new appliance. First
follow the "Programming using 3 Digit Code Table" procedure and then enter any
VCR code prior to carrying out the above search steps.
8 Programming using Manual Code Search
If you are unable to find your code either in the Code Tables or by using the Brand Search
Method, you can try all the available codes for the appliance using the Manual Code
Search.
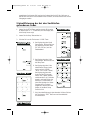
1. Make sure your appliance is switched on. If not switch it
on manually.
2. Press and hold Setup key until the LED remains on
(occurring after approximately 2-3 seconds) and display
shows Main Setup Screen.
Release Setup key.
3. Press and release the Touchscreen "CODE" Key.
4. Display will show the Mode Setup Screen. Press and release
desired Mode key (TV, VCR, SAT, etc.) on the rubber
keypad.
5. Display will show the Code
Setup Screen. Press and release
the Touchscreen "SEARCH"
Key.
ENGLISH
easytouch35_manual ok 6/17/03 10:30 AM Page 11

12 MARMITEK
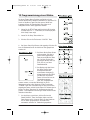
6. Display will show the Search Setup Screen. Press the
Touchscreen "UP" key (or Power or Play) repeatedly until
the Device to be controlled changes channel.
Alternatively, you can use the Channel Up key. Press and
release the Touchscreen "OK" (or Mute) key to install the
Code. Display will return to the Main Setup Screen.
If you accidentally overshoot the Code required, press the
Touchscreen "DOWN" or Channel Down to backtrack
through the Library to return to the correct code. Pressing
the Touchscreen "UP" key (or Power or Play) will change
direction to forward again.
7. Repeat this procedure for any other appliance you want
to control (TV, VCR, DVD, SAT, CD, CBL, AUDIO and
Marmitek X-10 Home Automation).
8. The Code Search Method entry is now complete. Press
and release the Touchscreen "EXIT" key to return to
normal operation.
Notes:
a. When all codes have been searched the LED will "error" flash indicating end of
search and Main Setup Screen will be displayed.
b. The above search procedure assumes that you want to store VCR codes under the
VCR key, Cable codes under CBL, etc. If you want, for example, to store a VCR code
under CBL, etc., then the Mode key must be "primed" for the new appliance. First
follow the "Programming using 3 Digit Code Table" procedure and then enter any
VCR code prior to carrying out the above search steps.
c. If the Device does not have a Channel Up key, use the Play (VCR & CD/Audio only) or
the Power keys instead.
d. Code Search will start from the currently stored three digit number under that Mode
e.g. if the Mode has 100 codes and the currently stored code is 050 then the Code
Search will start from 051 continuing to 100 before looping back to 000 and finishing
at 050. This simplifies the search process by allowing you to bypass codes already
tried.
9
Identifying codes found using the
search procedures
1. Press and hold Setup key until the LED remains on
(occurring after approximately 2-3 seconds) and display
will show the Main Setup Screen.
2. Release Setup key.
3. Press and release the Touchscreen "CODE" Key.
easytouch35_manual ok 6/17/03 10:30 AM Page 12

13EASYTOUCH 35
4. Display will show the Mode Setup Screen. Press and release
desired Mode key (TV, VCR, SAT, etc.) on the rubber
keypad.
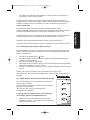
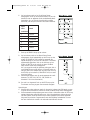
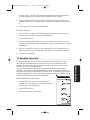
5. Display will show the Code
Setup Screen. Press and release
Setup key.
6. Display will show the Code
Identification Screen (Initially
blank except for "SETUP",
"INFO" and "CODE" labels).
The display will now show
the code using the Touchscreen digits. The 3 digits will be
shown in sequence for 1second each followed by a
0.5 second gap where no digits are shown. This sequence
will only be carried out once then display will return to the
Main Setup Screen.
7. Code Identification is now complete. Press and release the
Touchscreen "EXIT" key to return to normal operation.
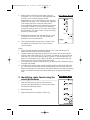
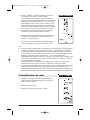
10 Programming a Macro
The Home Theatre Macro function allows you to store several
sequences of IR Commands (key presses). One press of the Macro
key will execute the whole sequence. A total number of 20
keystrokes can be stored under each of the 9 available Macro keys.
1. Press and hold Setup key until the LED remains on
(occurring after approximately 2-3 seconds) and the
display shows the Main Setup Screen.
2. Release Setup key.
3. Press and release the Touchscreen "MACRO" Key.
ENGLISH
easytouch35_manual ok 6/17/03 10:30 AM Page 13

14 MARMITEK
4. The Macro Setup Digit Screen will be shown. Press and
release the digit key the Macro
is to be stored under.
5. The Macro Mode Setup Screen
will be shown. The first key
stored in a Macro must be a
Mode key. Press and release
desired Mode key (TV, VCR,
SAT, etc.) on the rubber
keypad.
6. Display will show the Macro
Key Setup Screen. This screen
comprises the current screen labels for that Mode plus the
SETUP and MACRO Touchscreen labels will be shown. Press
and release the remote keys (maximum of 20) that are
required to be stored in the exact order that they should
be transmitted. Use the Touchscreen "SCREEN" key to
toggle the screen keys displayed and use the Mode keys
for any Mode changes. The Setup key can be used to add
delays – see separate notes. These are all counted as
keystrokes.
7. To store the Macro, press and release the rubber
"MACRO" Key. Display will return to the Main Setup
Screen. Note - if you program the maximum of 20 keys,
then the Macro will be automatically stored on the 20th
keypress.
8. Macro key programming now completed. Press and release the Touchscreen "EXIT"
key to return to normal operation.
Macro Notes:
1. "SHIFTED" key commands are not allowed to be included in Macros.
2. There is an automatic delay of 0.5 second between each IR transmission in the
sequence.
3. It may be necessary to have "delays" included in the Macro sequence (e.g. to allow
your TV warm-up time). Pressing the Setup key can include delays. The display will
show the Macro Delay Setup Screen for digit selection. Press the digit for the required
delay (in seconds) e.g. to enter a delay of 4 seconds, press and release Setup followed
by 4. The maximum delay is 9 seconds. An "EXIT" key entry will give the default
0.5second delay. A delay is counted as one keystroke.
easytouch35_manual ok 6/17/03 10:30 AM Page 14

15EASYTOUCH 35
4. Pressing the Setup key twice allows for the User to abort and exit the Macro routine.
First Setup keypress takes you to the "Delay" screen and the second Setup press
results in abort and exit.
5. It is not possible to include a Macro within a Macro.
To Delete a Macro:
1. Press and hold the Setup key until the LED remains on (occurring after approximately
2-3 seconds) and the display shows Main Setup Screen.
2. Release Setup key.
3. Press and hold either the Touchscreen or rubber MACRO key. The LED will blink off to
indicate the keypress acceptance and the Macro Delete Setup Screen will be shown.
Only set Macros will be shown.
4. Press and release the digit key for the Macro that is to be deleted. The LED will blink
off and the Macro is deleted. Use the EXIT key to abort if required.
5. Macro deletion is now complete.
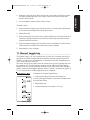
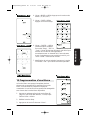
11 Channel toggle key
The Channel-Toggle "P<P" key is a special form of Macro key. The feature allows you to
program in two specific channels and switch between them with a single key-press. For
example, you may want to switch between TV channels 123 and 456. Programming the
"P<P" key will allow you to do this.
Two sets of data are to be entered. Each set of data can be up to 4 key-presses and must
be a minimum of 2. The first keypress in each set must be a Mode key. The following
keystrokes can be any other key (except for Mode, Macro, Setup and Screen) although in
practice, these keys will usually be digit keys. Note no "shifted" commands can be part of
a "P<P" sequence and a SCREEN keypress counts as a keystroke.
To Program the Channel-Toggle Feature:
1. Press and hold Setup key until the LED remains on
(occurring after approximately 2-3 seconds) and display shows
the Main Setup Screen.
2. Release Setup key.
3. Press and release the Touchscreen "P<P" Key.
ENGLISH
easytouch35_manual ok 6/17/03 10:30 AM Page 15

16 MARMITEK
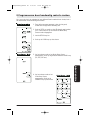
4. Display will show the "P<P1" Mode Setup Screen. Press
and release desired Mode key (TV, VCR, SAT, etc.) on the
rubber keypad.
5. Display will show the "P<P2"
Setup Screen. This screen
comprises the current screen
labels for the Mode plus the
SETUP and "P<P" Touchscreen
labels will be shown. You can
now press up to 3 keys (a
minimum of 1 key must be
pressed). Use the "SCREEN"
Key to toggle the screen keys
displayed – this counts as a
keypress. When 3 keys are
entered you will automatically
continue to Step 6. If less than
3 keys are required then press the Mode key and go
directly to Step 7.
6. To enter the second set of data, press and release desired
Mode key (TV, VCR, SAT, etc.) on the rubber keypad. Display will again show the
"P<P2" Setup Screen.
7. You can now press up to 3 keys (a minimum of 1 key
must be pressed) for the second set of data. Use the
"SCREEN" Key to toggle the screen keys displayed – this
counts as a keypress. When 3 keys are entered you will
automatically continue to Step 8. If less than 3 keys are
required then press the Setup key and go directly to Step
8.
8. Display will return to the Main Setup Screen. Channel
Toggle "P<P" setting routine now complete. Press and
release the Touchscreen "EXIT" key to return to normal
operation.
9. To activate the Channel-Toggle function, Press and release
the Touchscreen "P<P" key repeatedly to alternate
between the two sets of data you entered.
easytouch35_manual ok 6/17/03 10:30 AM Page 16

17EASYTOUCH 35
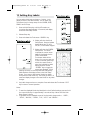
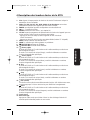
12 Setting Key Labels:
You can select which keys are shown or "hidden" in the
display for each of the Device Modes. You can select any
Touchscreen key for change except for the SCREEN, SLEEP,
SEARCH and P<P keys.
1. Press and hold Setup key until the LED remains on
(occurring after approximately 2-3 seconds) and display
shows the Main Setup Screen.
2. Release Setup key.
3. Press and release the Touchscreen "SCREEN" Key.
4. Display will show the Mode
Setup Screen. Press and release
desired Mode key (TV, VCR,
SAT, etc.) on the rubber keypad.
5. Display will show the SCREEN
Setup Screen. This screen
comprises the current screen
labels for the Mode plus the
SETUP and SCREEN
Touchscreen labels will be
shown. You can now press any
of the Touchscreen panel keys
within the current Mode to
select the individual key label
display required. Use the
"SCREEN" Key to toggle the
screen keys displayed. To Exit,
pressing the Setup or Mute keys will save changed key
label selections and display returns to the Main Setup
Screen. If you want to edit another Mode’s key labels
then press the other Mode key - the Mode you were in is
saved and display changes to the new Mode for any Label
changes.
6. Key Label change routine now complete. Press and release the Touchscreen "EXIT"
key to return to normal operation.
Notes:
1. To reset the displayed Modes key labels back to their Default settings, press and hold
the current Mode key for approximately 3 seconds at Step 4 above until the Main
Setup Screen is shown.
2. These labels are not displayed as part of the Key Label change routine – "SLEEP",
"SETUP", "MACRO", "LEARN", "P<P", "KEY?" and "SEARCH".
ENGLISH
easytouch35_manual ok 6/17/03 10:30 AM Page 17

18 MARMITEK
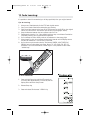
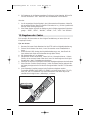
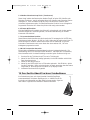
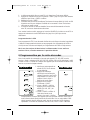
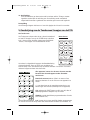
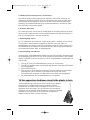
13 Code Learning:
It is possible to learn IR commands (up to 40 keys per Mode) from your original remote.
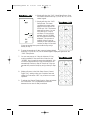
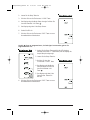
Tips On Learning:
1. Always use of fresh batteries for the ET35 and original remote
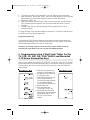
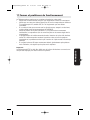
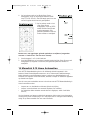
2. Carry out a Master Clear before attempting any Learning.
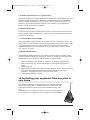
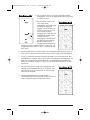
3. Place the original remote to the base of the Touchscreen so the IR LED on the original
remote is in line with the Touchscreen opto-diode input (See graphic below).
4. Keep the distance between the two remotes to about 5 cm.
5. Experiment by Learning 2 or 3 keys initially and then carry out a Master Clear before
completely Learning your original remote’s keyboard.
6. Do not attempt to Learn directly under an incandescent or low-energy light.
7. When Learning a key, do not release the key being Learned until the display returns
and the LED remains on. This can take 2-3 seconds.
8. No functions may be stored under the Touchscreen SCREEN, LIGHT, SLEEP, P<P,
SEARCH keys or under rubber keys Setup, Macro, TV, VCR, DVD, CBL, SAT, CD,
Marmitek X-10 Home Automation or Audio keys. It is not possible to learn under
"shifted keys".
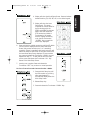
To Learn Commands:
1. Press and hold Setup key until the LED remains on
(occurring after approximately 2-3 seconds) and the
display shows the Main Setup Screen.
2. Release Setup key.
3. Press and release Touchscreen "LEARN" Key.
easytouch35_manual ok 6/17/03 10:30 AM Page 18

19EASYTOUCH 35
4. Display will show the Mode Setup Screen. Press and release
desired Mode key (TV, VCR, SAT, etc.) on the rubber keypad.
5. Display will show the Learn
Setup Screen. This screen
comprises the current labels for
the Mode along with the
SETUP and LEARN Touchscreen
labels. Press and release the
ET35 remote key (rubber or
Touchscreen) to be taught
with the original remote key
code. Use the Touchscreen
"SCREEN" Key to toggle the
screen keys displayed.
6. Press and hold the original remote key until the LED blinks
off once and the display shows the Learn Next Setup
Screen (this process can take up to 2 or 3 seconds to
complete). If there is a problem with learning the LED will
flash three times but still remain in the Learn routine with
the Learn Next Setup Screen displayed. To learn another
key, press and release the Touchscreen "LEARN" Key and
repeat from Step "5". To save and exit from the Learn
routine, press and release the Touchscreen "OK" Key.
Return to the Main Setup Screen.
7. Learning now complete. Press and release the
Touchscreen "EXIT" key to return to normal operation.
To Clear all stored Learned Commands under a Mode:
1. Press and hold Setup key until
the LED remains on (occurring
after approximately 2-3
seconds) and display shows the
Main Setup Screen.
2. Release Setup key.
3. Press and release the Touchscreen "LEARN" Key.
ENGLISH
easytouch35_manual ok 6/17/03 10:30 AM Page 19

20 MARMITEK
4. Display will show the Mode Setup Screen. Press and
release desired Mode key (TV, VCR, SAT, etc.) on the
rubber keypad. The LED will blink off once to indicate the
keypress acceptance.
5.Display will show the Learn
Setup Screen. Press and hold
the Setup Key until the Main
Setup Screen is displayed. All
Learned Command entries
under that Mode are now
cleared.
Master Clear - To Clear all stored Learned Commands (recommended on first time
Learning)
1. Carry Steps 1 and 2 same as above.
2. Press and hold the Touchscreen "LEARN" Key until the Main Setup Screen is displayed
(after approx. 5 seconds). All Learned Command entries are now cleared.
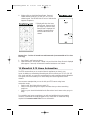
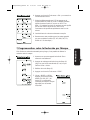
14 Marmitek X-10 Home Automation
The ET35 remote allows you to control all electric appliances you have in your
house. In addition to transmitting infrared signals, which controls your TV, VCR, CD, SAT,
CBL, Audio and DVD, your remote is equipped with a radio transmitter sending Marmitek
X10 signals, which will enable you to control lamps and electric appliances from a
distance.
Here are some examples that you can do with your ET35 remote using home
automation mode:
•Switch on/off, dim lights while you watch TV.
•Switch on the lights at night to frighten intruders when you detect something
suspicious.
• Switch on your electric blanket before the film ends to have it warm when you go to
sleep.
For controlling your lamps or appliances, you will need additional home automation
modules. The modules are simply plugged into AC outlets with no additional wiring
required. Visit www.marmitek.com for more information.
easytouch35_manual ok 6/17/03 10:30 AM Page 20
La page est en cours de chargement...
La page est en cours de chargement...
La page est en cours de chargement...
La page est en cours de chargement...
La page est en cours de chargement...
La page est en cours de chargement...
La page est en cours de chargement...
La page est en cours de chargement...
La page est en cours de chargement...
La page est en cours de chargement...
La page est en cours de chargement...
La page est en cours de chargement...
La page est en cours de chargement...
La page est en cours de chargement...
La page est en cours de chargement...
La page est en cours de chargement...
La page est en cours de chargement...
La page est en cours de chargement...
La page est en cours de chargement...
La page est en cours de chargement...
La page est en cours de chargement...
La page est en cours de chargement...
La page est en cours de chargement...
La page est en cours de chargement...
La page est en cours de chargement...
La page est en cours de chargement...
La page est en cours de chargement...
La page est en cours de chargement...
La page est en cours de chargement...
La page est en cours de chargement...
La page est en cours de chargement...
La page est en cours de chargement...
La page est en cours de chargement...
La page est en cours de chargement...
La page est en cours de chargement...
La page est en cours de chargement...
La page est en cours de chargement...
La page est en cours de chargement...
La page est en cours de chargement...
La page est en cours de chargement...
La page est en cours de chargement...
La page est en cours de chargement...
La page est en cours de chargement...
La page est en cours de chargement...
La page est en cours de chargement...
La page est en cours de chargement...
La page est en cours de chargement...
La page est en cours de chargement...
La page est en cours de chargement...
La page est en cours de chargement...
La page est en cours de chargement...
La page est en cours de chargement...
La page est en cours de chargement...
La page est en cours de chargement...
La page est en cours de chargement...
La page est en cours de chargement...
La page est en cours de chargement...
La page est en cours de chargement...
La page est en cours de chargement...
La page est en cours de chargement...
La page est en cours de chargement...
La page est en cours de chargement...
La page est en cours de chargement...
La page est en cours de chargement...
La page est en cours de chargement...
La page est en cours de chargement...
La page est en cours de chargement...
La page est en cours de chargement...
La page est en cours de chargement...
La page est en cours de chargement...
La page est en cours de chargement...
La page est en cours de chargement...
La page est en cours de chargement...
La page est en cours de chargement...
La page est en cours de chargement...
La page est en cours de chargement...
La page est en cours de chargement...
La page est en cours de chargement...
-
 1
1
-
 2
2
-
 3
3
-
 4
4
-
 5
5
-
 6
6
-
 7
7
-
 8
8
-
 9
9
-
 10
10
-
 11
11
-
 12
12
-
 13
13
-
 14
14
-
 15
15
-
 16
16
-
 17
17
-
 18
18
-
 19
19
-
 20
20
-
 21
21
-
 22
22
-
 23
23
-
 24
24
-
 25
25
-
 26
26
-
 27
27
-
 28
28
-
 29
29
-
 30
30
-
 31
31
-
 32
32
-
 33
33
-
 34
34
-
 35
35
-
 36
36
-
 37
37
-
 38
38
-
 39
39
-
 40
40
-
 41
41
-
 42
42
-
 43
43
-
 44
44
-
 45
45
-
 46
46
-
 47
47
-
 48
48
-
 49
49
-
 50
50
-
 51
51
-
 52
52
-
 53
53
-
 54
54
-
 55
55
-
 56
56
-
 57
57
-
 58
58
-
 59
59
-
 60
60
-
 61
61
-
 62
62
-
 63
63
-
 64
64
-
 65
65
-
 66
66
-
 67
67
-
 68
68
-
 69
69
-
 70
70
-
 71
71
-
 72
72
-
 73
73
-
 74
74
-
 75
75
-
 76
76
-
 77
77
-
 78
78
-
 79
79
-
 80
80
-
 81
81
-
 82
82
-
 83
83
-
 84
84
-
 85
85
-
 86
86
-
 87
87
-
 88
88
-
 89
89
-
 90
90
-
 91
91
-
 92
92
-
 93
93
-
 94
94
-
 95
95
-
 96
96
-
 97
97
-
 98
98


X10 EasyTouch35 Manuel utilisateur
- Taper
- Manuel utilisateur
- Ce manuel convient également à
dans d''autres langues
- English: X10 EasyTouch35 User manual
- Deutsch: X10 EasyTouch35 Benutzerhandbuch
- Nederlands: X10 EasyTouch35 Handleiding
Documents connexes
Autres documents
-
Marmitek Control Anywhere Manuel utilisateur
-
-
-
-
-
Grundig PC CONTROL Manuel utilisateur
-
Thomson ROC 5404 Le manuel du propriétaire
-
Audiovox ARRS05G Manuel utilisateur
-
Marmitek EASY ICON 10 RF Manuel utilisateur
-