
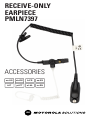
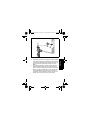
RECEIVE-ONLY
EARPIECE
PMLN7397
ACCESSORIES
de-DE
fr-FR es-ES
it-IT
pt-PT
nl-NL
ru-RU
en-US

MN002332A01.book Page 2 Wednesday, October 30, 2019 3:32 PM

1
English
Foreword
RF Energy Exposure and Product Safety Guide
for Portable Two-Way Radios
Attention!
These Earpieces, when attached to the radio, are
restricted to occupational use only to satisfy FCC/ICNIRP
RF energy exposure requirements. Before using this
product, read the RF Energy Exposure and Product Safety
Guide that ships with the radio which contains instructions
for safe usage and RF energy awareness and control for
compliance with applicable standards and regulation.
Acoustic Safety
Exposure to loud noises from any source for extended
periods of time may temporarily or permanently affect your
hearing. The louder the volume, the less time is required
before your hearing could be affected. Hearing damage
from loud noise is sometimes undetectable at first and can
have a cumulative effect. To protect your hearing:
• Use the lowest volume necessary to do your job.
• Turn up the volume only if you are in noisy
surroundings.
• Turn down the volume before connecting headset or
earpiece.
• Limit the amount of time you use headsets or
earpieces at high volume.
• When using the radio without a headset or earpiece,
do not place the radio’s speaker directly against your
ear.
MN002332A01.book Page 1 Wednesday, October 30, 2019 3:32 PM

2
English
• If you experience hearing discomfort, ringing in your
ears, or speeches that are muffled, you should stop
listening to your radio through your headset or
earpiece, and have your hearing checked by your
doctor.
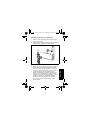
Description
The PMLN7397 Earpiece comes with a 1 Cord Quick
Disconnect adapter that allows the user to quickly
disconnect the earpiece from the surveillance kit. This
feature will enable multiple users to swap earpieces easily.
This earpiece also consists of exchangeable rubber ear tip
for low noise conditions and foam ear tube plug for
extreme noise conditions.
Operation
Attaching the Accessory to the Radio
1. Turn the radio off.
2. Attach the kit connector to the radio, and secure the
connector.
3. Turn the radio on and adjust the audio volume to a
comfortable listening level.
Receiving
When the accessory is connected to the radio side
connector, the radio’s speaker is muted, and the audio is
only heard from the earpiece speaker.
Removing the Accessory
Turn the radio off before removing the accessory from the
radio side connector.
MN002332A01.book Page 2 Wednesday, October 30, 2019 3:32 PM

3
English
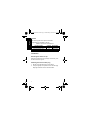
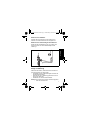
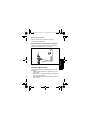
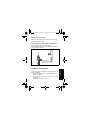
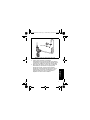
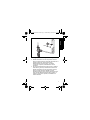
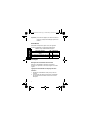
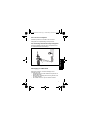
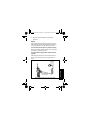
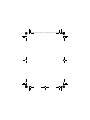
Disconnecting the Transparent Audio Tube
Rotate the Quick Disconnect about 90º and release it from
the audio tube adapter. Refer to
Figure 1.
Figure 1: Disconnecting the audio tube
Care and Maintenance
Clean the accessory, especially the ear tube and ear tip
by:
• washing periodically with a mild liquid soap and rinsing
with water.
• wiping off each used part that touched the ear with a
tissue.
• keeping canal free and clear of wax.
Important: For hygienic reasons, do not return any items
once the package seal is broken.
QUICK DISCONNECT
MN002332A01.book Page 3 Wednesday, October 30, 2019 3:32 PM

4
English
Service
The following replacement parts and alternate
configurations are available for the kits.
Installation
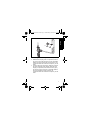
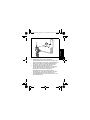
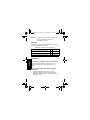
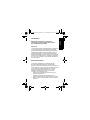
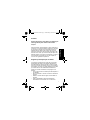
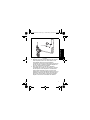
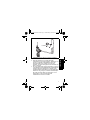
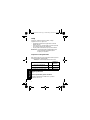
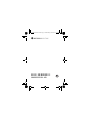
Removing the rubber ear tip
Remove the rubber ear tip by pulling it out and away from
the elbow. Refer to
Figure 2
.
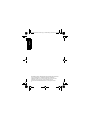
Attaching the foam ear tube plug
1. Slip the end of the black tube over the elbow.
2. Use your fingertips to squeeze the foam ear tube plug
fairly tight around the center of the black tube.
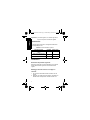
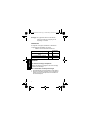
Table 1: Replacement Parts/Options
Part Description Quantity Part Number
Quick disconnect acoustic tube 1 RLN6242_
Noise attenuating plugs 25 5080384F72
Ear tip, clear 25 5080370E97
MN002332A01.book Page 4 Wednesday, October 30, 2019 3:32 PM

5
English
Figure 2: Removing the rubber ear tip
3. While the ear tube plug foam is compressed, insert it
into your ear canal far enough to be worn comfortably.
Within a few seconds after the ear tube insertion, the
compressed foam will conform to the shape of your ear
canal.
4. To further reduce the noise level, replace the ear tip to
the noise attenuating foam earplug. While the foam
earplug is compressed, insert it into the other (open)
ear canal far enough to be worn comfortably. Within a
few seconds after the earplug insertion, the
compressed foam will conform to the shape of your ear
canal.
EAR TIP
ELBOW
MN002332A01.book Page 5 Wednesday, October 30, 2019 3:32 PM

6
English
MOTOROLA, MOTO, MOTOROLA SOLUTIONS and the Stylized M
logo are trademarks or registered trademarks of Motorola
Trademark Holdings, LLC and are used under license. All other
trademarks are the property of their respective owners.
© 2015 and 2019 Motorola Solutions, Inc. All rights reserved.
MN002332A01.book Page 6 Wednesday, October 30, 2019 3:32 PM

1
Deutsch
Vorwort
Handbuch zur HF-Energiestrahlung und
Produktsicherheit für tragbare Funkgeräte
Achtung!
Diese Ohrmuscheln sind nach dem Anschließen an das
Funkgerät nur auf die berufliche Verwendung beschränkt,
um die FCC/ICNIRP-Anforderungen für die HF-
Energiebelastung zu erfüllen. Bevor Sie dieses Produkt
verwenden, lesen Sie das Handbuch zur HF-
Energiestrahlung und Produktsicherheit, das im
Lieferumfang des Funkgeräts enthalten ist. Das Handbuch
enthält Anweisungen für die sichere Verwendung sowie
Informationen zum Gefahrenbewusstsein und zur
Risikovermeidung gemäß anwendbaren Normen und
Vorschriften.
Schutz vor akustischer Belastung
Längere Belastung durch laute Geräusche und Lärm jeder
Art können das Gehör zeitweilig oder bleibend
beeinträchtigen. Je höher der Lautstärkepegel des
Funkgeräts, desto schneller kann es zu einer Schädigung
Ihres Gehörs kommen. Durch Lärm verursachte
Gehörschäden sind zunächst oft nicht feststellbar, können
aber mit der Zeit durch kumulative Wirkung entstehen.
Zum Schutz Ihres Gehörs wird Folgendes empfohlen:
• Verwenden Sie stets den niedrigsten notwendigen
Lautstärkepegel.
• Erhöhen Sie die Lautstärke nur, wenn Sie sich in einer
geräuschvollen Umgebung befinden.
• Stellen Sie die Lautstärke niedrig ein, bevor Sie
Kopfhörer bzw. Ohrhörer anschließen.
• Begrenzen Sie, wie lange Sie Kopfhörer bzw. Ohrhörer
jeweils mit hoher Lautstärke verwenden.
MN002332A01.book Page 1 Wednesday, October 30, 2019 3:32 PM

2
Deutsch
• Halten Sie den Lautsprecher Ihres Funkgeräts nicht
direkt an Ihr Ohr, wenn Sie das Funkgerät ohne
Kopfhörer bzw. Ohrhörer benutzen.
• Sollten bei Ihnen irgendwelche Hörbeschwerden
auftreten, einschließlich Druck- oder Spannungsgefühl
in den Ohren, Ohrenklingeln oder dumpfes
Hörempfinden, sollten Sie Ihr Headset bzw. Ihren
Kopfhörer nicht mehr benutzen und Ihr Gehör von
einem Arzt untersuchen lassen.
Beschreibung
Im Lieferumfang des Ohrhörers PMLN7397 ist ein Adapter
mit Kabel-Schnelltrennung enthalten, der es dem
Benutzer ermöglicht, den Ohrhörer schnell vom
Überwachungsset zu trennen. Mithilfe dieser Funktion
können Ohrhörer leicht zwischen mehreren Benutzern
ausgetauscht werden. Der Ohrhörer verfügt außerdem
über austauschbare Gummiohrstücke für niedrige
Geräuschbelastung und Akustikschlauchstöpsel aus
Schaumstoff für extreme Geräuschbelastung.
Betrieb
Anbringen des Zubehörs am Funkgerät
1. Schalten Sie das Funkgerät aus.
2. Befestigen Sie den Setanschluss am Funkgerät, und
sichern Sie den Anschluss.
3. Schalten Sie das Funkgerät ein, und stellen Sie die
Lautstärke auf einen angenehmen Pegel ein.
Empfangen
Wenn das Zubehör an den Seitenanschluss des Funkgeräts
angeschlossen ist, werden die Lautsprecher des Funkgeräts
stumm geschaltet, sodass die Audiosignale nur über die
Ohrhörer-Lautsprecher wiedergegeben werden.
MN002332A01.book Page 2 Wednesday, October 30, 2019 3:32 PM

3
Deutsch
Entfernen des Zubehörs
Schalten Sie das Funkgerät vor dem Entfernen des
Zubehörs vom Seitenanschluss des Funkgeräts aus.
Entfernen des durchsichtigen Hörschlauchs
Drehen Sie die Schnelltrennung um ca. 90 Grad, und
entfernen Sie sie vom Hörschlauchadapter. Siehe
Abbildung 1
.
Abbildung 1: Trennen des Hörschlauchs
Pflege und Wartung
Halten Sie das Zubehör, insbesondere das Ohrröhrchen
und den Ohreinsatz, wie folgt sauber:
• regelmäßig mit einer milden Flüssigseife waschen und
gut mit Wasser abspülen.
• jedes mit dem Ohr in Berührung gekommene Teil mit
einem Tuch abwischen.
• Gehörkanal von Ohrenschmalz freihalten.
Wichtigt: Aus hygienischen Gründen einmal ausgepackte
Teile nicht zurücksenden.
QUICK DISCONNECT
SCHNELLTRENNUNG
MN002332A01.book Page 3 Wednesday, October 30, 2019 3:32 PM

4
Deutsch
Service/Wartung
Die folgenden Ersatzteile und Alternativkonfigurationen
sind für die Sets verfügbar.
Installation
Entfernen des Gummiohrstück
Entfernen Sie das Gummiohrstück, indem Sie es aus dem
Winkel-Steckverbinder ziehen. Siehe
Abbildung 2.
Anbringen des röhrchenförmigen
Schaumstoffeinsatzes
1. Schieben Sie das Ende des schwarzen Röhrchens
über den Winkel-Steckverbinder.
2. Drücken Sie den Schaumstoffeinsatz zwischen
Daumen und Zeigefinger um die Mitte des schwarzen
Röhrchens fest zusammen.
Tabelle 1: Ersatzteile/Zubehör
Beschreibung des Ersatzteils Anzahl Teile-Nr.
Hörschlauch mit Schnelltrennung 1 RLN6242_
Lärmdämpfeinsätze 25 5080384F72
Ohreinsatz, durchsichtig 25 5080370E97
MN002332A01.book Page 4 Wednesday, October 30, 2019 3:32 PM

5
Deutsch
Abbildung 2: Entfernen des Gummiohrstücks
3. Schieben Sie den zusammengedrückten
Schaumstoffeinsatz in den äußeren Gehörgang, bis er
gut sitzt und angenehm zu tragen ist. Einige Sekunden
nach dem Einsetzen des Schaumstoffeinsatzes ins
Ohr passt er sich der Form Ihres Gehörgangs an.
4. Verwenden Sie anstatt der Ohrstücke die
geräuschdämmenden Ohrstöpsel aus Schaumstoff,
um den Geräuschpegel noch weiter zu senken.
Schieben Sie den zusammengedrückten
Schaumstoffeinsatz in den anderen (offenen)
Gehörgang, bis er gut sitzt und angenehm zu tragen
ist. Einige Sekunden nach dem Einsetzen des
Schaumstoffeinsatzes ins Ohr passt er sich der Form
Ihres Gehörgangs an.
EAR TIP
ELBOW
EINSATZ
WINKEL-STECKVERBINDER
MN002332A01.book Page 5 Wednesday, October 30, 2019 3:32 PM

6
Deutsch
MOTOROLA, MOTO, MOTOROLA SOLUTIONS und das stilisierte
M-Logo sind Marken oder eingetragene Marken der Motorola
Trademark Holdings, LLC, ihre Benutzung ist lizenzpflichtig. Alle
anderen Marken sind Eigentum ihrer jeweiligen Inhaber.
© 2015 und 2019 Motorola Solutions, Inc. Alle Rechte vorbehalten.
MN002332A01.book Page 6 Wednesday, October 30, 2019 3:32 PM

1
Français
Avant-propos
Sécurité des produits et exposition RF pour les
radios professionnelles portatives
Attention !
Lorsqu'elles sont connectées à la radio, ces oreillettes
sont réservées à un usage professionnel pour des raisons
de conformité avec la réglementation FCC/ICNIRP sur
l’exposition aux fréquences radioélectriques. Avant d'utiliser
ce produit, lisez le guide Sécurité des produits et exposition
RF fourni avec la radio. Il contient des instructions de
fonctionnement relatives à la sécurité et à l'exposition aux
RF, ainsi que des informations sur le contrôle de conformité
aux normes et réglementations applicables.
Sécurité Acoustique
L’exposition à des niveaux sonores excessifs pendant de
longues périodes peut, quelle que soit la source,
temporairement ou définitivement provoquer une perte de
la capacité auditive. Plus le volume de votre radio est
élevé, plus rapidement la capacité auditive est affectée.
De telles détériorations peuvent parfois rester
imperceptibles et s’accumuler avant de devenir évidentes.
Pour protéger votre capacité auditive :
• Choisissez le volume sonore le plus bas nécessaire
pour votre travail.
• Augmentez uniquement le volume sonore lorsque
l’environnement est bruyant.
• Réduisez le volume sonore avant de brancher un
casque / une oreillette sur votre radio.
• Limitez la durée d’utilisation d’un casque / d’une
oreillette si le niveau de volume est élevé.
MN002332A01.book Page 1 Wednesday, October 30, 2019 3:32 PM

2
Français
• Lorsque vous utilisez la radio sans casque / oreillette, ne
placez pas le haut-parleur contre votre oreille.
• Si vous ressentez une gêne auditive, entendez des
acouphènes tels que bourdonnement ou sifflement, si
vous avez des difficultés à comprendre des paroles,
vous devez cesser d’utiliser un casque / une oreillette
et demander à un médecin d’examiner votre audition.
Description
L'oreillette PMLN7397 est accompagnée d'un raccord de
déconnexion rapide à 1 câble qui permet à l'utilisateur de
débrancher rapidement l'oreillette du kit de surveillance.
Cette fonctionnalité permet à plusieurs utilisateurs de
changer facilement d'oreillette. Cette oreillette comprend
également un embout auriculaire en caoutchouc
interchangeable pour une utilisation en conditions peu
bruyantes et un bouchon intra-auriculaire en mousse pour
les environnements très bruyants.
Fonctionnement
Connexion de l'accessoire à la radio
1. Éteignez la radio.
2. Branchez le connecteur du kit sur la radio et fixez le
connecteur.
3. Allumez la radio et réglez le volume à un niveau
d’écoute confortable.
Réception
Lorsque l'accessoire est branché au connecteur latéral de
la radio, le haut-parleur de la radio est désactivé. Le son
peut être uniquement entendu via l'oreillette.
MN002332A01.book Page 2 Wednesday, October 30, 2019 3:32 PM

3
Français
Retrait de l'accessoire
Éteignez la radio avant de retirer l'accessoire du
connecteur latéral de la radio.
Déconnexion du tube acoustique transparent
Faites pivoter de 90º l'élément de déconnexion rapide et
sortez-le de l’adaptateur du tube. Voir
Figure 1
.
Figure 1 : Débranchement du canal audio
Entretien et Maintenance
Pour nettoyer l’accessoire et en particulier le tube et son
adaptateur :
• Utilisez régulièrement un savon liquide doux et rincez
avec de l’eau.
• Essuyez avec un mouchoir en papier chaque partie qui
est en contact avec l’oreille.
• Vérifiez régulièrement que le canal auditif est propre et
sans cérumen.
QUICK DISCONNECT
DÉCONNECTEUR
RAPIDE
MN002332A01.book Page 3 Wednesday, October 30, 2019 3:32 PM

4
Français
Important : pour des raisons d’hygiène, veuillez ne pas
renvoyer les produits dont le sceau
d’emballage est rompu.
Entretien
Les pièces de rechange et configurations suivantes sont
également disponibles pour les kits.
Installation
Pour retirer le protège-oreillette en caoutchouc
Retirez l'embout auriculaire en caoutchouc en tirant
dessus pour l'extraire du coude. Reportez-vous à la
Figure 2.
Pour fixer l’adaptateur en mousse du tube
acoustique
1. Engagez l’extrémité du tube noir sur le coude.
2. Du bout des doigts, comprimez assez fermement
l’adaptateur en mousse du tube acoustique autour du
centre du tube noir.
Tableau 1 : Options / pièces de rechange
Description Qté Référence
Tube acoustique à déconnexion
rapide
1 RLN6242_
Adaptateurs réducteurs de bruit 25 5080384F72
Protège-oreillettes transparents 25 5080370E97
MN002332A01.book Page 4 Wednesday, October 30, 2019 3:32 PM

5
Français
Figure 2 : Retrait de l'embout auriculaire en caoutchouc
3. Pendant que la mousse est comprimée, insérez-la dans
votre canal auditif, assez profondément pour assurer un
port stable et confortable. Après quelques secondes, la
mousse se détend et prend la forme de votre canal
auditif.
4. Pour réduire davantage le niveau de bruit, remplacez
l'embout auriculaire par le bouchon d'atténuation du
bruit en mousse. Pendant que la mousse est comprimée,
insérez-le protège-oreillette dans l’autre canal auditif,
assez profondément pour assurer un port stable et
confortable. Après quelques secondes, la mousse se
détend et prend la forme de votre canal auditif.
EAR TIP
ELBOW
PROTÈGE-OREILLETTE
COUDE
MN002332A01.book Page 5 Wednesday, October 30, 2019 3:32 PM

6
Français
MOTOROLA, MOTO, MOTOROLA SOLUTIONS et le logo stylisé M
sont des marques de commerce ou des marques déposées de
Motorola Trademark Holdings, LLC et sont utilisées sous licence.
Les droits des propriétaires de toutes les autres marques déposées
mentionnées sont reconnus.
© 2015 et 2019 Motorola Solutions, Inc. Tous droits réservés.
MN002332A01.book Page 6 Wednesday, October 30, 2019 3:32 PM
La page est en cours de chargement...
La page est en cours de chargement...
La page est en cours de chargement...
La page est en cours de chargement...
La page est en cours de chargement...
La page est en cours de chargement...
La page est en cours de chargement...
La page est en cours de chargement...
La page est en cours de chargement...
La page est en cours de chargement...
La page est en cours de chargement...
La page est en cours de chargement...
La page est en cours de chargement...
La page est en cours de chargement...
La page est en cours de chargement...
La page est en cours de chargement...
La page est en cours de chargement...
La page est en cours de chargement...
La page est en cours de chargement...
La page est en cours de chargement...
La page est en cours de chargement...
La page est en cours de chargement...
La page est en cours de chargement...
La page est en cours de chargement...
La page est en cours de chargement...
La page est en cours de chargement...
La page est en cours de chargement...
La page est en cours de chargement...
La page est en cours de chargement...
La page est en cours de chargement...
La page est en cours de chargement...
La page est en cours de chargement...
-
 1
1
-
 2
2
-
 3
3
-
 4
4
-
 5
5
-
 6
6
-
 7
7
-
 8
8
-
 9
9
-
 10
10
-
 11
11
-
 12
12
-
 13
13
-
 14
14
-
 15
15
-
 16
16
-
 17
17
-
 18
18
-
 19
19
-
 20
20
-
 21
21
-
 22
22
-
 23
23
-
 24
24
-
 25
25
-
 26
26
-
 27
27
-
 28
28
-
 29
29
-
 30
30
-
 31
31
-
 32
32
-
 33
33
-
 34
34
-
 35
35
-
 36
36
-
 37
37
-
 38
38
-
 39
39
-
 40
40
-
 41
41
-
 42
42
-
 43
43
-
 44
44
-
 45
45
-
 46
46
-
 47
47
-
 48
48
-
 49
49
-
 50
50
-
 51
51
-
 52
52


dans d''autres langues
- italiano: Motorola PMLN7397 Manuale utente
- English: Motorola PMLN7397 User manual
- español: Motorola PMLN7397 Manual de usuario
- Deutsch: Motorola PMLN7397 Benutzerhandbuch
- русский: Motorola PMLN7397 Руководство пользователя
- Nederlands: Motorola PMLN7397 Handleiding
- português: Motorola PMLN7397 Manual do usuário
Documents connexes
-
Motorola PMLN6533 Manuel utilisateur
-
-
-
-
-
-
Motorola CP 140 Basic User's Manual
-
-
-
Motorola CP150 Manuel utilisateur