Hitachi Dust extractor system Manuel utilisateur
- Catégorie
- Outils électroportatifs
- Taper
- Manuel utilisateur

Designed for operating in USA & Canada only.
When this product is used in areas other than the USA & Canada,
we cannot guarantee the product quality and performance.
SAFETY INSTRUCTIONS AND INSTRUCTION MANUAL
WARNING
IMPROPER OR UNSAFE use of this power tool can result in death or serious bodily injury!
This manual contains important information about product safety. Please read and understand
this manual BEFORE operating the power tool. Please keep this manual available for other
users and owners before they use the power tool. This manual should be stored in safe place.
INSTRUCTIONS DE SECURITE ET MODE D’EMPLOI
AVERTISSEMENT
Une utilisation INCORRECTE OU DANGEREUSE de cet outil motorisé peut entraîner la mort
ou de sérieuses blessures corporelles!
Ce mode d’emploi contient d’importantes informations à propos de la sécurité de ce produit.
Prière de lire et de comprendre ce mode d’emploi AVANT d’utiliser l’outil motorisé. Garder ce
mode d’emploi à la disponibilité des autres utilisateurs et propriétaires avant qu’ils utilisent
l’outil motorisé. Ce mode d’emploi doit être conservé dans un endroit sûr.
INSTRUCCIONES DE SEGURIDAD Y MANUAL DE INSTRUCCIONES
ADVERTENCIA
¡La utilización INAPROPIADA O PELIGROSA de esta herramienta eléctrica puede resultar
en lesiones de gravedad o la muerte!
Este manual contiene información importante sobre la seguridad del producto. Lea y
comprenda este manual ANTES de utilizar la herramienta eléctrica. Guarde este manual para
que puedan leerlo otras personas antes de utilizar la herramienta eléctrica. Este manual debe
ser guardado en un lugar seguro.
Dust Extractor System for Hitachi
Cordless Rotary Hammer
Système extracteur de poussière pour
marteau rotatif sans fi l Hitachi
Sistema extractor de polvo para el martillo
perforador a batería de Hitachi

2
English
Page Page
Français
Page Page
Español
Página Página
TABLE DES MATIÈRES
ÍNDICE
CONTENTS
IMPORTANT SAFETY INSTRUCTIONS ................. 3
MEANINGS OF SIGNAL WORDS ........................... 3
SAFETY........................................................................ 3
GENERAL POWER TOOL SAFETY WARNINGS .... 3
DUST EXTRACTOR SYSTEM
SAFETY WARNINGS ........................................ 5
SYMBOLS ................................................................. 5
FUNCTIONAL DESCRIPTION .................................... 6
NAME OF PARTS ..................................................... 6
OPTIONAL ACCESSORIES (sold separately) ......... 6
SPECI FICATIONS ..................................................... 7
ASSEMBLY AND OPERATION ................................... 8
APPLICATIONS ........................................................ 8
HOW TO USE ............................................................ 8
MAINTENANCE AND INSPECTION ......................... 13
TROUBLESHOOTING ............................................... 15
PARTS LIST ............................................................... 44
CONSIGNES DE SÉCURITÉ IMPORTANTES ........16
SIGNIFICATION DES MOTS D’AVERTISSEMENT ... 16
SÉCURITÉ ................................................................. 16
AVERTISSEMENTS DE SÉCURITÉ GÉNÉRAUX
CONCERNANT LES OUTILS ÉLECTRIQUES ... 16
AVERTISSEMENTS DE SÉCURITÉ POUR LE
SYSTÈME EXTRACTEUR DE POUSSIÈRE .... 18
SYMB O L ES .............................................................. 19
DESCRIPTION FONCTIONNELLE ........................... 20
NOM DES PARTIES ................................................ 20
ACCESSOIRES EN OPTION
(vendus séparément) ....................................... 20
SPÉCI FICATIONS ................................................... 21
ASSEMBLAGE ET FONCTIONNEMENT .................. 22
APPLICATIONS ...................................................... 22
COMMENT UTILISER ............................................ 22
ENTRETIEN ET INSPECTION .................................. 27
DÉPANNAGE ............................................................. 29
LISTE DES PIÈCES ................................................... 44
INSTRUCCIONES IMPORTANTES SOBRE
SEGURIDAD .................................................... 30
SIGNIFICADO DE LAS PALABRAS DE
SEÑALIZACIÓN............................................... 30
SEGURIDAD .............................................................. 30
ADVERTENCIAS DE SEGURIDAD GENERAL
DE LA HERRAMIENTA ELÉCTRICA ............... 30
ADVERTENCIAS DE SEGURIDAD DEL
EXTRACTOR DE POLVO ................................ 32
SÍMBOLOS.............................................................. 33
DESCRIPCIÓN FUNCIONAL .................................... 34
NOMENCLATURA .................................................. 34
ACCESSORIOS OPCIONALES
(vendidos por separado) .................................. 34
ESPECIFICACIONES ............................................. 35
MONTAJE Y OPERACIÓN ........................................ 36
APLICACIONES ...................................................... 36
MODO DE EMPLEO ............................................... 36
MANTENIMIENTO E INSPECCIÓN .......................... 41
SOLUCIÓN DE PROBLEMAS ................................... 43
LISTA DE PIEZAS ..................................................... 44

IMPORTANT SAFETY INSTRUCTIONS
Read all of the safety precautions, warnings and operating instructions in the Instruction Manual before operating or
maintaining this power tool.
Most accidents that result from power tool operation and maintenance are caused by the failure to observe basic safety
rules or precautions. An accident can often be avoided by recognizing a potentially hazardous situation before it occurs,
and by observing appropriate safety procedures.
Basic safety precautions are outlined in the “SAFETY” section of this Instruction Manual and in the sections which
contain the operation and maintenance instructions.
Hazards that must be avoided to prevent bodily injury or machine damage are identifi ed by WARNINGS on the power
tool and in this Instruction Manual.
NEVER use this power tool in a manner that has not been specifi cally recommended by HITACHI.
MEANINGS OF SIGNAL WORDS
WARNING indicates a potentially hazardous situations which, if ignored, could result in death or serious injury.
CAUTION indicates a potentially hazardous situations which, if not avoided, may result in minor or moderate injury, or
may cause machine damage.
NOTE emphasizes essential information.
SAFETY
GENERAL POWER TOOL SAFETY WARNINGS
WARNING
Read all safety warnings and all instructions.
Failure to follow the warnings and instructions may result in electric shock, fi re and/or serious injury.
Save all warnings and instructions for future reference.
The term “power tool” in the warnings refers to your mains-operated (corded) power tool or battery-operated
(cordless) power tool.
1) Work area safety
a) Keep work area clean and well lit.
Cluttered or dark areas invite accidents.
b) Do not operate power tools in explosive
atmospheres, such as in the presence of
fl ammable liquids, gases or dust.
Power tools create sparks which may ignite the
dust or fumes.
c) Keep children and bystanders away while
operating a power tool.
Distractions can cause you to lose control.
2) Electrical safety
a) Power tool plugs must match the outlet.
Never modify the plug in any way.
Do not use any adapter plugs with earthed
(grounded) power tools.
Unmodifi ed plugs and matching outlets will reduce
risk of electric shock.
b) Avoid body contact with earthed or grounded
surfaces such as pipes, radiators, ranges and
refrigerators.
There is an increased risk of electric shock if your
body is earthed or grounded.
c) Do not expose power tools to rain or wet
conditions.
Water entering a power tool will increase the risk
of electric shock.
d) Do not abuse the cord. Never use the cord
for carrying, pulling or unplugging the power
tool. Keep cord away from heat, oil, sharp
edges or moving parts.
Damaged or entangled cords increase the risk of
electric shock.
e) When operating a power tool outdoors, use
an extension cord suitable for outdoor use.
Use of a cord suitable for outdoor use reduces the
risk of electric shock.
f) If operating a power tool in a damp location
is unavoidable, use a residual current device
(RCD) protected supply.
Use of an RCD reduces the risk of electric shock.
3) Personal safety
a) Stay alert, watch what you are doing and use
common sense when operating a power tool.
Do not use a power tool while you are tired
or under the infl uence of drugs, alcohol or
medication.
3
English

A moment of inattention while operating power
tools may result in serious personal injury.
b) Use personal protective equipment. Always
wear eye protection.
Protective equipment such as dust mask, non-skid
safety shoes, hard hat, or hearing protection used
for appropriate conditions will reduce personal
injuries.
c) Prevent unintentional starting. Ensure the
switch is in the off -position before connecting
to power source and/or battery pack, picking
up or carrying the tool.
Carrying power tools with your fi nger on the switch
or energising power tools that have the switch on
invites accidents.
d) Remove any adjusting key or wrench before
turning the power tool on.
A wrench or a key left attached to a rotating part of
the power tool may result in personal injury.
e) Do not overreach. Keep proper footing and
balance at all times.
This enables better control of the power tool in
unexpected situations.
f) Dress properly. Do not wear loose clothing or
jewellery. Keep your hair, clothing and gloves
away from moving parts.
Loose clothes, jewellery or long hair can be caught
in moving parts.
g) If devices are provided for the connection
of dust extraction and collection facilities,
ensure these are connected and properly
used.
Use of dust collection can reduce dust-related
hazards.
4) Power tool use and care
a) Do not force the power tool. Use the correct
power tool for your application.
The correct power tool will do the job better and
safer at the rate for which it was designed.
b) Do not use the power tool if the switch does
not turn it on and off .
Any power tool that cannot be controlled with the
switch is dangerous and must be repaired.
c) Disconnect the plug from the power source
and/or the battery pack from the power tool
before making any adjustments, changing
accessories, or storing power tools.
Such preventive safety measures reduce the risk
of starting the power tool accidentally.
d) Store idle power tools out of the reach of
children and do not allow persons unfamiliar
with the power tool or these instructions to
operate the power tool.
Power tools are dangerous in the hands of
untrained users.
e) Maintain power tools. Check for misalignment
or binding of moving parts, breakage of parts
and any other condition that may aff ect the
power tool’s operation.
If damaged, have the power tool repaired
before use.
Many accidents are caused by poorly maintained
power tools.
f) Keep cutting tools sharp and clean.
Properly maintained cutting tools with sharp
cutting edges are less likely to bind and are easier
to control.
g) Use the power tool, accessories and tool bits
etc. in accordance with these instructions,
taking into account the working conditions
and the work to be performed.
Use of the power tool for operations diff erent
from those intended could result in a hazardous
situation.
5) Battery tool use and care
a) Recharge only with the charger specifi ed by
the manufacturer.
A charger that is suitable for one type of battery
pack may create a risk of fi re when used with
another battery pack.
b) Use power tools only with specifi cally
designated battery packs.
Use of any other battery packs may create a risk of
injury and fi re.
c) When battery pack is not in use, keep it away
from other metal objects, like paper clips,
coins, keys, nails, screws or other small metal
objects, that can make a connection from one
terminal to another.
Shorting the battery terminals together may cause
burns or a fi re.
d) Under abusive conditions, liquid may be
ejected from the battery; avoid contact. If
contact accidentally occurs, fl ush with water.
If liquid contacts eyes, additionally seek
medical help.
Liquid ejected from the battery may cause irritation
or burns.
6) Service
a) Have your power tool serviced by a
quali
fi ed repair person using only identical
replacement parts.
This will ensure that the safety of the power tool is
maintained.
PRECAUTION
Keep children and infi rm persons away.
When not in use, tools should be stored out of
reach of children and infi rm persons.
4
English

– WARNING –
To reduce the risk of injury, user must read
instruction manual.
WARNING
Some dust created by power sanding, sawing,
grinding, drilling, and other construction activities
contains chemicals known to the State of California
to cause cancer, birth defects or other reproductive
harm. Some examples of these chemicals are:
●
Lead from lead-based paints,
●
Crystalline silica from bricks and cement and
other masonry products, and
●
Arsenic and chromium from chemically-treated
lumber.
Your risk from these exposures varies, depending on
how often you do this type of work. To reduce your
exposure to these chemicals: work in a well ventilated
area, and work with approved safety equipment, such
as those dust masks that are specially designed to
fi lter out microscopic particles.
SAVE THESE INSTRUCTIONS
AND
MAKE THEM AVAILABLE TO OTHER USERS
AND
OWNERS OF THIS TOOL!
DUST EXTRACTOR SYSTEM SAFETY
WARNINGS
1. Before using the cordless rotary hammer, be sure to
read its instruction manual carefully.
2. Do not use the tool for any purposes other than those
specifi ed.
3. Follow the instruction manual when attaching the dust
extractor system to the cordless rotary hammer, and
when cleaning the dust extractor system, changing its
fi lter, etc.
4. Use only the accessories and attachments that are
specifi ed.
Use only the accessories and attachments that are
specifi ed in this instruction manual and our company’s
catalogs.
5. Substances such as silica and asbestos are harmful
to the human body. Perform anti-dust measures when
working with materials that contain such substances.
6. Wear safety goggles and a dust mask.
7. If any tools or equipment are accidentally dropped or
bumped, carefully inspect them to make sure there is
no damage, cracks, or deformation.
Using tools or equipment with damage, cracks, or
deformation may result in injury.
SYMBOLS
WARNING
The following show symbols used for the
machine. Be sure that you understand their
meaning before use.
Direct current
V
Rated voltage
5
English

FUNCTIONAL DESCRIPTION
NOTE
The information contained in this Instruction Manual is designed to assist you in the safe operation and maintenance
of the power tool.
NEVER operate, or attempt any maintenance on the tool unless you have fi rst read and understood all safety
instructions contained in this manual.
Some illustrations in this Instruction Manual may show details or attachments that diff er from those on your own
power tool.
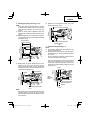
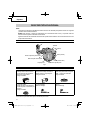
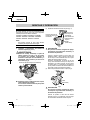
NAME OF PARTS
Nozzle
Dust box latch
Dust box
Terminal
Latch (both sides)
Depth adjustment button
Motor (internal)
Nozzle adjustment button
Filter (internal)
Fig. 1
OPTIONAL ACCESSORIES (sold separately)
○
Filter
Replace the fi lter about once every
100 times the dust extractor system
becomes full.
Code No. 370520
○
Dust box set
This product set includes a fi lter
cover, fi lter, and dust box.
Code No. 370518
○
Nozzle seal
Replace this part if it becomes
cracked or damaged, or if it loses its
elasticity.
Code No. 370494
○
Brush cap
Replace this part if the bristles are
falling out or becoming shorter from
friction.
Code No. 370496
○
Deltagon bit
(SDS plus shank)
○
Drill bit
(SDS plus shank)
Optional accessories are subject to change without notice.
6
English

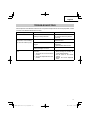
SPECIFICATIONS
Model Dust Extractor System
Voltage
For use with 18 V or 36 V
(depending on the voltage specifi cations of tool to which it is attached)
Max. Airfl ow 12.4 CFM (0.35 m
3
/min)
Dust box capacity 0.08 gal. (0.3 L)
Max. stroke 3-15/16" (100 mm)
Max. hole-drilling depth 3-11/32" (85 mm)
Diameter of drill 11/64" – 25/32" (4.3 – 20 mm)
Max. length of drill (eff ective length) 3-15/16" (100 mm) or shorter
Dimensions (W × H × D)
3-35/64" × 12-3/64" × 14-57/64"
(90 × 306 × 378 mm)
3-35/64" × 12-3/64" × 16-3/16"
(90 × 306 × 411 mm)
Weight 4.0 lbs. (1.8 kg) 4.0 lbs. (1.8 kg)
7
English

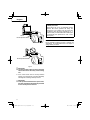
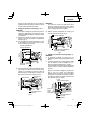
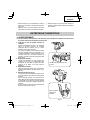
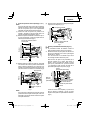
(1) Attaching the dust extractor system (Fig. 3)
Terminal insertion
port of tool body
Rail section of
tool body
Protruding section of
dust extractor system
Latch (both sides)
Fig. 3
CAUTION
To prevent accident, make sure to turn the switch
off , then disconnect the battery and the drilling
tool.
Place the dust extractor system on a stable platform,
and line up and insert the rail section of the tool
body into the protruding section of the dust extractor
system.
Fully insert the rail section of the tool body until the
tool body and the dust extractor system come into full
contact with each other, and ensure that the latches
on both sides of the dust extractor system are properly
and securely fastened.
(2) Removing the dust extractor system (Fig. 4)
2
1
Latch (both sides)
Fig. 4
CAUTION
To prevent accident, make sure to turn the switch
off , then disconnect the battery and the drilling
tool.
Press the latches on both sides of the dust extractor
system, and remove the tool body from the dust
extractor system.
ASSEMBLY AND OPERATION
APPLICATIONS
Dust extractor system specialized for drilling concrete, for
use with the following Hitachi cordless rotary hammers:
DH18DBL / DH18DBDL / DH18DBQL / DH18DBML
DH36DBL / DH36DBDL / DH36DBQL / DH36DBML
DH36DPA / DH36DPB / DH36DPC / DH36DPD
NOTE
This dust extractor system is only to be used for
drilling concrete.
HOW TO USE
1. Attaching and removing the dust extractor
system (Fig. 2, 3, 4)
WARNING
●
When attaching, removing, or adjusting the dust
extractor system, in order to prevent an unlikely
accident, be sure to turn off the tool’s switch, and
remove the tool’s battery and tool bit. (Fig. 2)
Tool bit (drill bit)
Battery
Fig. 2
●
Make sure the dust extractor system is fully
attached.
If not fully attached, the dust extractor system
could come loose and result in injury.
8
English

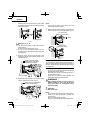
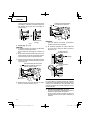
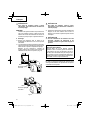
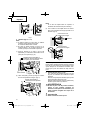
2. Adjusting the nozzle position (Fig. 5, 6, 7)
NOTE
If the nozzle position adjustment button is pressed
to release the lock while the nozzle is in any position
other than fully extended, the nozzle may pop
outward.
(1) Press the nozzle position adjustment button and
ensure that the nozzle is in the fully extended position.
(Fig. 5)
(2) While holding the tool in a way so that the switch does
not get pressed, place the nozzle against the material
to be drilled. (Fig. 5)
Material
Nozzle
Fully extended
position of nozzle
Nozzle adjustment
button
Place against
material
1
2
Fig. 5
(3) While pushing the nozzle adjustment button in the
direction of the arrow, press the tool toward the
material, allowing the nozzle position to shorten until
it reaches the position where the drill bit comes into
contact with the material.(Fig. 6)
3
4
Material
While pressing button
Push forward
Drill bit
Fig. 6
NOTE
If the nozzle position is shortened before the nozzle
adjustment button is pressed, the nozzle won’t be
locked in position even if the nozzle adjustment button
lock is released.
(4) Release the nozzle adjustment button to lock the
position of the nozzle. (Fig. 7)
5
6
Material
When the nozzle adjustment
button is released
The nozzle becomes locked
Fig. 7
3. Adjust the drilling depth (Fig. 8, 9)
NOTE
○
The maximum drilling depth when using the dust
extractor system is 85 mm.
○
The dust extractor system can be used with drill bits
with diameters of 4.3 – 20 mm and eff ective lengths of
50 – 100 mm.
If using a drill bit with a diameter of greater than 20
mm, remove the dust extractor system.
Press the depth adjustment button in the direction
of the arrow to release the lock, move the nozzle to
set the stroke equal to the depth that you want to drill,
and release the depth adjustment button to lock the
position. (Fig. 8)
1
3
2
Release
Material
Depth
adjustment
button
While pressing button
Move to set depth of
hole you want to drill
Stroke
(drilling depth)
Fig. 8
9
English

When the end of the nozzle and the tip of the drill bit
are aligned, the distance that the nozzle can move is
drilling depth. (Fig. 9)
A: Drilling depthA
Fig. 9
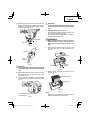
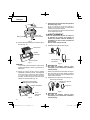
4. Drilling (Fig. 10, 11, 12)
NOTE
○
The dust extractor system is only to be used when
drilling concrete.
Do not use it while drilling metal or wood.
○
Do not use the dust extractor system with wet
concrete or in a wet environment. Doing so may result
in a malfunction.
(1) Grasp the nozzle with your hand and pull it back
slightly, and align the tip of the drill bit with the spot to
be drilled. (Fig. 10)
1
Spot to be drilled
Nozzle
Pull the nozzle back slightly
and align the tip of the drill bit
with the spot to be drilled.
Fig. 10
(2) Release the nozzle and allow it to make fi rm contact
with the surface of the concrete. (Fig. 11)
2
End of the nozzle in fi rm contact
with the concrete surface
Fig. 11
NOTE
If the nozzle is raised off the surface, the dust
extraction performance declines.
(3) With the end of the nozzle still in fi rm contact with the
surface of the concrete, proceed with drilling. (Fig. 12)
3
Firm contact with
the concrete surface
Drilling
Raised off the
concrete surface
Fig. 12
Delayed stop function
The dust extractor system’s internal motor stops after a
delay of several seconds from when the tool’s switch is
released. This allows dust to be extracted without leaving
any dust behind.
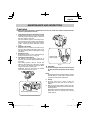
5. Emptying the dust (Fig. 13, 14, 15)
If too much dust is collected in the dust box, the dust
extraction performance declines.
Additionally, if the dust box is full, dust may leak out of
the dust extractor system.
Inspect the dust extractor system regularly, and
dispose of the dust before it becomes full.
WARNING
When emptying the dust, in order to prevent an
unlikely accident, be sure to turn off the tool’s
switch and remove the rechargeable battery
from the tool body.
CAUTION
Wear a dust mask.
NOTE
Do not directly touch the fi lter with a hard brush or
similar tool, or blast the backside of the fi lter with
compressed air.
Also, do not wash the fi lter with water.
Doing so may scratch the fi lter and/or shorten its life.
10
English

CAUTION
To prevent accident, make sure to turn the switch
off , then disconnect the battery and the drilling
tool.
6. Replacing the fi lter (Fig. 16, 17, 18)
If the fi lter inside the dust box becomes clogged, the
dust extraction performance declines.
As a guideline, replace the fi lter after every 100 times
that the dust box becomes full.
WARNING
When replacing the fi lter, in order to prevent an
unlikely accident, be sure to turn off the tool’s
switch and remove the battery from the tool
body.
(1) Insert a fl at-head screwdriver into the groove on the
side of the fi lter cover and remove the fi lter cover.
(Fig. 16)
2
1
Dust box
Filter cover
Groove of
dust box
Fig. 16
(2) Remove the fi lter from inside, and replace it with a
new one. (Fig. 17)
Dust box
Filter (internal)
Seal packing
Fig. 17
NOTE
When removing the fi lter cover, be sure that the seal
packing of the dust box does not peel off .
(1) While keeping the dust extractor system level and
upright, press and hold the dust box latches and pull
the dust box out of the dust extractor system. Dispose
of the dust inside. (Fig. 13, 14)
2
1
Dust box latch
Dust box
Fig. 13
Dust box
Filter
(internal)
Fig. 14
CAUTION
To prevent accident, make sure to turn the switch
off , then disconnect the battery and the drilling
tool.
(2) When cleaning the fi lter, face the opening in the dust
box downward and tap the dust box gently to knock
the dust out. (Fig. 14)
(3) If dust is adhered to the intake port (mesh covering)
or the area around it, clean it off with a soft brush.
(Fig. 15)
Dust extractor system intake port
(mesh covering)
Fig. 15
11
English

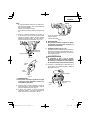
(b) Replacing the brush cap (Fig. 20)
Bump on nozzle seal
Groove in brush cap
C-ring
Fig. 20
CAUTION
To prevent accident, make sure to turn the switch
off , then disconnect the battery and the drilling
tool.
1
Use pliers or a similar tool remove the C-ring, and
replace the brush cap with a new one.
2
Align the groove of the new brush cap with the bump
on the nozzle and fi t them together.
3
Reattach the C-ring in its original position, making
sure that it is secure and won’t fall off .
(3) Press the fi lter cover against the seal packing of the
dust box. While pressing the latch, attach the fi lter
cover so that it fi ts into the bumps of the dust box,
making sure that the latch does not get in the way of
the fi lter cover. (Fig. 18)
3
2
1
Bumps
Seal packing
Press fi lter cover
against seal packing
While
pressing latch
Attach
Fig. 18
7. Replacing the nozzle seal and brush cap
(Fig. 19, 20)
As the nozzle seal and brush cap wear out, the dust
extracting performance declines.
If the nozzle seal or brush cap is worn out, replace it
with a new one.
WARNING
When replacing the nozzle seal or brush cap, in
order to prevent an unlikely accident, be sure to
turn off the tool’s switch and remove the battery
from the tool body.
Also, remove the tool bit.
(a) Replacing the nozzle seal (Fig. 19)
Nozzle
Notch in nozzle seal
Nozzle seal
Fig. 19
CAUTION
To prevent accident, make sure to turn the switch
off , then disconnect the battery and the drilling
tool.
1
Remove the nozzle seal as shown in the fi gure.
2
Attach a new nozzle seal. Align the nozzle seal so that
its notch fi ts onto the outer shape of the nozzle.
12
English

1. Inspecting the body of the dust extractor system
Regularly inspect the places where the various parts
of the dust extractor system fi t together to make sure
there is no rattling or loose parts.
If the dust extractor system is used while parts of it
are loose, there is a risk of injury or other accidents.
If there is anything abnormal with the dust extractor
system, consult the Hitachi Authorized Service
Center.
2. Cleaning on the outside
When the power tool is stained, wipe with a soft dry
cloth or a cloth moistened with soapy water. Do not
use chloric solvents, gasoline or paint thinner, for they
melt plastics.
3. Handling the motor
Be careful not to allow oil, water, or other fl uids to get
inside the internal motor. (Fig. 1 on page 6)
4. Cleaning the terminal (Fig. 21)
The terminal of the dust extractor system is an
important component that supplies electrical current
to the motor.
After drilling concrete, if there is concrete dust
adhered to the terminal, use a soft brush or a similar
tool to clean off the adhered concrete dust before
using the dust extractor system again.
Additionally, clean the area around the terminal
insertion port of the tool body. (Fig. 21)
Terminal insertion port of tool body
MAINTENANCE AND INSPECTION
WARNING
When performing inspections or maintenance, be sure to turn off the tool’s switch and remove the dust
extractor system from the tool body.
Terminal of dust
extractor system
Fig. 21
CAUTION
To prevent accident, make sure to turn the switch
off , then disconnect the battery and the drilling
tool.
NOTE
Using the dust extractor system while there is concrete
dust still adhered to it may result in a faulty terminal
connection and may cause a malfunction.
5. Storage
○
Store the power tool in a place in which the
temperature is less than 50°C and out of reach of
children.
○
When storing the dust extractor system, press the
nozzle adjustment button to put the nozzle in the fully
extended position.
Keeping the nozzle contracted inside the dust extractor
system may result in its pressing force becoming
weaker. (Fig. 22)
13
English

Nozzle adjustment button
Nozzle
2
1
Nozzle adjustment button
Nozzle
Fig. 22
CAUTION
To prevent accident, make sure to turn the switch
off , then disconnect the battery and the drilling
tool.
○
If the nozzle doesn’t return to the fully extended
position, pull it outward with your hand. Repeatedly
extending and contracting it will help it recover.
CAUTION
In the operation and maintenance of power tools,
the safety regulations and standards prescribed
in each country must be observed.
Important notice on the batteries for the Hitachi
cordless power tools
Please always use one of our designated genuine
batteries. We cannot guarantee the safety and
performance of our cordless power tool when used
with batteries other than these designated by us, or
when the battery is disassembled and modifi ed (such
as disassembly and replacement of cells or other
internal parts).
NOTE
Due to HITACHI’s continuing program of research and
development, the specifi cations herein are subject to
change without prior notice.
14
English

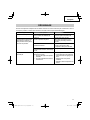
TROUBLESHOOTING
Use the inspections in the table below if the tool does not operate normally. If this does not remedy the problem, consult
your dealer or the Hitachi Authorized Service Center.
Symptom Possible cause Remedy
Tool doesn’t run. There is dust adhered to the terminal,
resulting in a faulty connection.
Remove any dust from the terminal
parts of the dust extractor system and
the tool body.
The dust extraction performance
has declined, or dust is leaking
out of the dust extractor system.
The dust case is full. Empty the dust from the dust case and
clean the dust case.
The fi lter inside the dust case is
clogged.
Empty the dust from the dust case and
clean the fi lter.
Or, replace the fi lter with a new one.
The fi lter, brush cap, or nozzle seal is
cracked, damaged, or worn out.
Replace it with a new one.
The position of the nozzle won’t
lock.
The following incorrect steps were
performed:
1
The nozzle was set to the desired
position
2
The nozzle adjustment button was
pressed
Perform the following steps:
1
While pressing and holding the
nozzle adjustment button...
2
Set the nozzle to the desired
position
3
Release the nozzle adjustment
button
15
English

16
Français
CONSIGNES DE SÉCURITÉ IMPORTANTES
Lire toutes les précautions de sécurité, les avertissements et les instructions de fonctionnement dans ce mode d’emploi
avant d’utiliser ou d’entretenir cet outil motorisé.
La plupart des accidents causés lors de l’utilisation ou de l’entretien de l’outil motorisé proviennent d’un non respect des
règles ou précautions de base de sécurité. Un accident peut la plupart du temps être évité si l’on reconnaît une situation
de danger potentiel avant qu’elle ne se produise, et en observant les procédures de sécurité appropriées.
Les précautions de base de sécurité sont mises en évidence dans la section “SECURITE” de ce mode d’emploi et dans
les sections qui contiennent les instructions de fonctionnement et d’entretien.
Les dangers qui doivent être évités pour prévenir des blessures corporelles ou un endommagement de la machine sont
identifi és par AVERTISSEMENTS sur l’outil motorisé et dans ce mode d’emploi.
NE JAMAIS utiliser cet outil motorisé d’une manière qui n’est pas spécifi quement recommandée par HITACHI.
SIGNIFICATION DES MOTS D’AVERTISSEMENT
AVERTISSEMENT indique des situations potentiellement dangereuses qui, si elles sont ignorées, pourraient entraîner
la mort ou de sérieuses blessures.
PRÉCAUTION indique des situations dangereuses potentilles qui, si elles ne sont pas évitées, peuvent entraîner de
mineures et légères blessures ou endommager la machine.
REMARQUE met en relief des informations essentielles.
SÉCURITÉ
AVERTISSEMENTS DE SÉCURITÉ GÉNÉRAUX CONCERNANT LES OUTILS ÉLECTRIQUES
AVERTISSEMENT
Lire tous les avertissements de sécurité et toutes les instructions
Tout manquement à observer ces avertissements et instructions peut engendrer des chocs électriques, des
incendies et/ou des blessures graves.
Conservez tous les avertissements et toutes les instructions pour vous y référer ultérieurement.
Le terme “outil électrique”, utilisé dans les avertissements, se réfère aux outils électriques (câblé) ou aux outils à
piles (sans fi l).
1) Sécurité de l’aire de travail
a) Maintenir l’aire de travail propre et bien
éclairée.
Les endroits encombrés ou sombres sont
propices aux accidents.
b) Ne pas utiliser d’outils électriques en
présence de liquides, gaz ou poussière
infl ammables, au risque de provoquer une
explosion.
Les outils électriques créent des étincelles
susceptibles d’enfl ammer la poussière.
c) Ne pas laisser les enfants et les visiteurs
s’approcher de vous lorsque vous utiliser un
outil électrique.
Les distractions peuvent faire perdre le contrôle.
2) Sécurité électrique
a) Les prises de l’outil électrique doivent
correspondre à la prise secteur.
Ne jamais modifi er la prise.
Ne pas utiliser d’adaptateurs avec les outils
électriques mis à la masse.
Les prises non modifi ées et les prises secteurs
correspondantes réduisent les risques de choc
électrique.
b) Eviter tout contact avec les surfaces mises
à la masse telles que les tuyaux, radiateurs,
bandes et réfrigérateurs.
Le risque de choc électrique est accru en cas de
mise à la masse du corps.
c) Ne pas exposer les outils électriques à la
pluie ou à des conditions humides.
Si l’eau pénètre dans l’outil, cela augmente les
risques de choc électrique.
d) Ne pas utiliser le cordon à tort. Ne jamais
utiliser le cordon pour transporter ou
débrancher l’outil électrique.

17
Français
Maintenir le cordon loin de la chaleur, de
l’huile, des bords pointus ou des pièces
mobiles.
Les cordons endommagés ou usés augmentent
les risques de choc électrique.
e) En cas d’utilisation d’un outil électrique à
l’extérieur, utiliser un cordon de rallonge
adapté à un usage extérieur.
L’utilisation d’un cordon adapté à l’usage extérieur
réduit les risques de choc électrique.
f) Si vous devez utiliser un outil électrique dans
un endroit humide, utilisez une alimentation
protégée contre les courants résiduels.
L’utilisation d’un dispositif de protection contre
les courants résiduels réduit le risque de choc
électrique.
3) Sécurité personnelle
a) Restez alerte, regarder ce que vous faites et
usez de votre bon sens en utilisant un outil
électrique.
Ne pas utiliser d’outil électrique si vous êtes
sous l’infl uence de drogues, d’alcool ou de
médicaments.
Pendant l’utilisation d’outils électrique, un instant
d’inattention peut entraîner des blessures graves.
b) Utiliser un équipement de protection
individuelle. Toujours porter des verres de
protection.
L’utilisation d’équipements de protection tels
que les masques anti-poussière, les chaussures
de sécurité anti-dérapantes, les casques ou
les protections auditives dans des conditions
appropriées réduisent les risques de blessures.
c) Empêcher les démarrages intempestifs.
Veiller à ce que l’interrupteur soit en
position d’arrêt avant de brancher à une
source d’alimentation et/ou une batterie, de
ramasser l’outil au sol ou de le transporter.
Transporter les outils électriques avec le doigt sur
l’interrupteur ou brancher les outils électriques
avec l’interrupteur en position de marche peut
entraîner des accidents.
d) Retirer toute clé de sécurité ou clé avant de
mettre l’outil électrique en marche.
Laisser une clé ou une clé de sécurité sur une
partie mobile de l’outil électrique peut engendrer
des blessures.
e) Ne pas trop se pencher. Toujours garder une
bonne assise et un bon équilibre pendant le
travail.
Cela permet un meilleur contrôle de l’outil
électrique dans des situations imprévisibles.
f) Porter des vêtements adéquats. Ne pas porter
de vêtements amples ni de bijoux. Maintenir
les cheveux, les vêtements et les gants loin
des pièces mobiles.
Les vêtements amples ou les cheveux longs
peuvent se prendre dans les pièces mobiles.
g) En cas de dispositifs destinés au
raccordement d’installations d’extraction et
de recueil de la poussière, veiller à ce qu’ils
soient correctement raccordés et utilisés.
L’utilisation d’un dispositif de collecte de la
poussière peut réduire les dangers associés à la
poussière.
4) Utilisation et entretien d’un outil électrique
a) Ne pas forcer sur l’outil électrique. Utiliser
l’outil électrique adapté à vos travaux.
Le bon outil électrique fera le travail mieux et en
toute sécurité au régime pour lequel il a été conçu.
b) Ne pas utiliser l’outil électrique si
l’interrupteur ne le met pas en position de
marche et d’arrêt.
Tout outil ne pouvant être contrôlé par l’interrupteur
est dangereux et doit être réparé.
c) Débrancher la prise ou retirer la batterie avant
de procéder à des réglages, au remplacement
des accessoires ou au stockage des outils
électriques.
Ces mesures préventives de sécurité réduisent
les risques de démarrage accidentel de l’outil
électrique.
d) Stockez les outils électriques inutilisés hors
de la portée des enfants et ne pas laisser des
personnes non familiarisées avec l’outil ou
ces instructions utiliser l’outil électrique.
Les outils électriques sont dangereux entre les
mains d’utilisateurs non habilités.
e) Entretenir les outils électriques. Vérifi er
l’absence de mauvais alignement ou d’arrêt,
d’endommagement de pièces ou toute autre
condition susceptible d’aff ecter l’opération
de l’outil.
Si l’outil est endommagé, le faire réparer
avant utilisation.
De nombreux accidents sont dus à des outils mal
entretenus.
f) Maintenir les outils coupants aiguisés et
propres.
Des outils coupants bien entretenus avec des
bords aiguisés sont moins susceptibles de se
coincer et plus simples à contrôler.
g) Utiliser l’outil électrique, les accessoires et
les mèches de l’outil, etc. conformément à ces
instructions en tenant compte des conditions
d’utilisation et du travail à réaliser.
L’utilisation de l’outil électrique pour des
opérations diff érentes de celles pour lesquelles il
a été conçu est dangereuse.
5) Utilisation et entretien de la batterie
a) Recharger la batterie uniquement avec le
chargeur recommandé par le fabricant.

18
Français
Un chargeur inadéquat pour le type de batterie
peut entraîner un risque d’incendie en cas
d’utilisation avec une autre batterie.
b) Utiliser les outils électriques uniquement
avec les batteries spécifi ées.
L’utilisation d’autres batteries peut entraîner un
risque de blessures et d’incendie.
c) Lorsque la batterie est inutilisée, la garder
à l’écart d’objets métalliques comme des
trombones, des pièces de monnaie, des clés,
des clous, des vis ou autres petits objets
métalliques pouvant raccorder les bornes.
La connexion des bornes peut entraîner des
blessures ou un incendie.
d) En cas d’utilisation dans des conditions
extrêmes, du liquide peut être émis de la
batterie. Éviter tout contact. en cas de contact
accidentel, rincer à l’eau. Si le liquide entre en
contact avec les yeux, consulter un médecin.
Le liquide émis par la batterie peut entraîner des
irritations et des brûlures.
6) Service
a) Faire entretenir l’outil électrique par un
technicien habilité à l’aide de pièces de
rechange identiques exclusivement.
Cela garantira le maintien de la sécurité de l’outil
électrique.
PRECAUTIONS
Maintenir les enfants et les personnes infi rmes
éloignés.
Quand les outils ne sont pas utilisés, ils doivent
être rangés hors de portée des enfants et des
personnes infi rmes.
–AVERTISSEMENT–
Pour réduire tout risque de blessure, l’utilisateur
doit lire le mode d’emploi.
AVERTISSEMENT
La poussière résultant d'un ponçage, d'un sciage,
d'un meulage, d'un perçage ou de toute autre activité
de construction renferme des produits chimiques
qui sont connus par l'Etat de Californie pour causer
des cancers, des défauts de naissance et autres
anomalies de reproduction. Nous énumérons ci-
dessus certains de ces produits chimiques:
●
Plomb des peintres à base de plomb,
●
Silice cristalline des briques et du ciment et autres
matériaux de maçonnerie, et
●
Arsenic et chrome du bois d'oeuvre traité
chimiquement.
Le risque d'exposition à ces substances varie en
fonction de la fréquence d'exécution de ce genre
de travail. Pour réduire l'exposition à ces produits
chimiques, travailler dans un lieu bien ventilé, et porter
un équipement de protection agréé, par exemple un
masque anti-poussière spécialement conçu pour fi lter
les particules microscopiques.
AVERTISSEMENTS DE SÉCURITÉ
POUR LE SYSTÈME EXTRACTEUR DE
POUSSIÈRE
1. Avant d’utiliser le marteau rotatif sans fi l, s'assurer de
lire attentivement son manuel d'instruction.
2. Ne pas utiliser l'appareil à d'autres fi ns que celles
spécifi ées.
3. Suivez le manuel d'instruction lors de la fi xation du
système extracteur de poussière au marteau rotatif
sans fi l, et lors du nettoyage du système extracteur de
poussière, du changement de son fi ltre, etc.
4. Utiliser seulement les accessoires et équipements
spécifi és.
Utiliser seulement les accessoires et équipements
spécifi és dans ce manuel d'instructions et dans les
catalogues de notre compagnie.
5. Les substances telles que l'amiante et la silice sont
nocives pour le corps humain. Eff ectuez les mesures
anti-poussière quand vous travaillez avec des
matériaux contenant ces substances.
6. Porter des lunettes à coques et un masque
antipoussière.
7. Si un outil ou un équipement échappe
accidentellement ou subit un impact, l'inspecter
soigneusement pour s'assurer qu'il n'y a pas de
dommages, fi ssures ou de déformations.
L'utilisation d'outils ou d'équipement présentant des
dommages, fi ssures ou déformations peut causer des
blessures.

19
Français
SYMBOLES
AVERTISSEMENT
Les symboles suivants sont utilisés pour la
machine. Voyez bien à ce que vous compreniez
leur signifi cation avant utilisation.
Courant direct
V Tension nominale
CONSERVER CES INSTRUCTIONS
ET
LES METTRE A LA DISPOSITION DES AUTRES
UTILISATEURS
ET
PROPRIETAIRES DE CET OUTIL!

20
Français
DESCRIPTION FONCTIONNELLE
REMARQUE
Les informations contenues dans ce mode d’emploi sont conçues pour assister l’utilisateur dans une utilisation sans
danger et un entretien de l’outil motorisé.
NE JAMAIS utiliser ni entreprendre une révision de l’outil sans avoir d’abord lu et compris toutes les instructions de
sécurité contenues dans ce manuel.
Certaines illustrations dans ce mode d’emploi peuvent montrer des détails ou des accessoires diff érents de ceux de
l’outil motorisé utilisé.
NOM DES PARTIES
Buse
Loquet de la boîte à poussière
Boîte à poussière
Borne
Loquet (des deux côtés)
Bouton de réglage
de la profondeur
Moteur (interne)
Bouton de réglage
de la buse
Filtre (interne)
Fig. 1
ACCESSOIRES EN OPTION (vendus séparément)
○
Filtre
Remplacer le fi ltre environ toutes les
100 fois que le système extracteur de
poussière est plein.
Code N° 370520
○
Ensemble de la boîte à poussière
Cet ensemble comprend un
couvercle de fi ltre, un fi ltre et une
boîte à poussière.
Code N° 370518
○
Joint de buse
Remplacer cette pièce si elle est
craquelée ou endommagée, ou si elle
perd son élasticité.
Code N° 370494
○
Capuchon de la brosse
Remplacer cette pièce si les poils
tombent ou raccourcissent à cause
de la friction.
Code N° 370496
○
Mèche Deltagon
(Tige SDS plus)
○
Mèche de foret
(Tige SDS plus)
Les accessoires en option sont sujets à changement sans préavis.
La page est en cours de chargement...
La page est en cours de chargement...
La page est en cours de chargement...
La page est en cours de chargement...
La page est en cours de chargement...
La page est en cours de chargement...
La page est en cours de chargement...
La page est en cours de chargement...
La page est en cours de chargement...
La page est en cours de chargement...
La page est en cours de chargement...
La page est en cours de chargement...
La page est en cours de chargement...
La page est en cours de chargement...
La page est en cours de chargement...
La page est en cours de chargement...
La page est en cours de chargement...
La page est en cours de chargement...
La page est en cours de chargement...
La page est en cours de chargement...
La page est en cours de chargement...
La page est en cours de chargement...
La page est en cours de chargement...
La page est en cours de chargement...
La page est en cours de chargement...
La page est en cours de chargement...
La page est en cours de chargement...
La page est en cours de chargement...
-
 1
1
-
 2
2
-
 3
3
-
 4
4
-
 5
5
-
 6
6
-
 7
7
-
 8
8
-
 9
9
-
 10
10
-
 11
11
-
 12
12
-
 13
13
-
 14
14
-
 15
15
-
 16
16
-
 17
17
-
 18
18
-
 19
19
-
 20
20
-
 21
21
-
 22
22
-
 23
23
-
 24
24
-
 25
25
-
 26
26
-
 27
27
-
 28
28
-
 29
29
-
 30
30
-
 31
31
-
 32
32
-
 33
33
-
 34
34
-
 35
35
-
 36
36
-
 37
37
-
 38
38
-
 39
39
-
 40
40
-
 41
41
-
 42
42
-
 43
43
-
 44
44
-
 45
45
-
 46
46
-
 47
47
-
 48
48


Hitachi Dust extractor system Manuel utilisateur
- Catégorie
- Outils électroportatifs
- Taper
- Manuel utilisateur
dans d''autres langues
Autres documents
-
DeWalt DWH050K Le manuel du propriétaire
-
Bosch GBH18V-20 Mode d'emploi
-
Milwaukee M12 HAMMERVAC Manuel utilisateur
-
-
-
-
Hikoki Dust extractor system Manuel utilisateur
-
jbc JTS Stand Le manuel du propriétaire