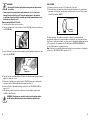
George Foreman GP200C Le manuel du propriétaire
- Catégorie
- Barbecues
- Taper
- Le manuel du propriétaire

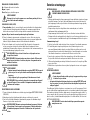
Please Read and Save this Use and Care Book
Veuillez lire et conserver ce guide d’entretien et d’utilisation
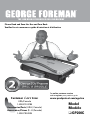
Model
Modèle
❑
GP200C
Customer Care Line:
USA/Canada
1-800-231-9786
Accessories/Parts (USA / Canada)
Accessoires/Pièces (É.-U./Canada)
1-800-738-0245
For online customer service
and to register your product go to
www.prodprotect.com/applica
®
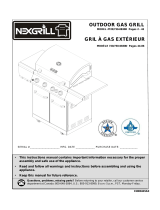
THE LEAN MEAN FAT REDUCING GRILLING MACHINE
TM

2
3
If you smell gas:
1. Shut off gas to the appliance.
2. Extinguish any open flame.
3. Open lid.
4. If odor continues, immediately call your gas
supplier or your fire department.
Failure to follow these instructions could result in fire or
explosion, which could cause property damage, personal injury
or death.
DANGER
WARNING!
• THIS INSTRUCTION MANUAL CONTAINS IMPORTANT
INFORMATION NECESSARY FOR THE PROPER ASSEMBLY AND
SAFE USE OF THE APPLIANCE.
• READ AND FOLLOW INSTRUCTIONS CAREFULLY BEFORE
ASSEMBLY OR USE. FAILURE TO FOLLOW THESE INSTRUCTIONS
COULD RESULT IN DEATH, SERIOUS BODILY INJURY, AND/OR
PROPERTY LOSS.
• FOR OUTDOOR HOUSEHOLD USE ONLY. NOT FOR COMMERCIAL
USE.
• SOME PARTS MAY CONTAIN SHARP EDGES - ESPECIALLY WHERE
NOTED IN THIS MANUAL! WEAR PROTECTIVE GLOVES,
IF NECESSARY.
• THESE INSTRUCTIONS MUST BE KEPT WITH THE CONSUMER
AND RETAINED FOR FUTURE USE.
• NOT FOR USE ON BOATS OR RECREATIONAL VEHICLES.
1. Never operate this appliance unattended.
2. Never operate this appliance within 10 ft.
(3.0 m) of any structure, combustible material
or other gas cylinder.
3. Never operate this appliance within 25 ft.
(7.5 m) of any flammable liquid.
4. If a fire should occur, keep away from the appliance and
immediately call your fire department. Do not attempt to
extinguish an oil or grease fire with water.
Failure to follow these instructions could result in fire, explosion
or burn hazard, which could cause property damage, personal
injury or death.
DANGER

4
5
• If the fire involves the cylinder, leave it alone, evacuate the area and
call the fire department.
• If there is any type of fire that threatens either personal safety
or endangers property, call the fire department.
8. Check the grease tray for grease buildup. Remove excess grease to avoid a
grease fire in the pan. Never use the grill without Grease Tray in place.
9. This installation must conform with local codes or, in the absence of local
codes, with either the National Fuel Gas Code, ANSI Z223.1/NFPA 54 Storage
and handling of Liquefied Petroleum Gases ANSI/NFPA 58 or CSA B149.1
Natural Gas and Propane Installation Code.
10. If an external electrical source is utilized, the outdoor cooking appliance,
when installed, must be electrically grounded in accordance with local codes
or, in the absence of local codes, with the National Electrical Codes, ANSI/
NFPA 70, or the Canadian Electrical Code. CSA C22.1.
11. Keep any electrical supply cord away from any heated surfaces. Electric
cords should be placed away from walkways to avoid a tripping hazard.
12. Combustible materials should never be within 36 in. of the back or sides of
your LP gas grill.
13.
WARNING! Always Store LP Cylinders upright and where
temperatures do not exceed 125 degrees Fahrenheit. Never store a
spare or disconnected LP cylinder under or near this LP gas grill.
14. Check the LP gas grill for gas leaks and burner obstructions before
each use. WARNING! Do not use a flame to check for gas leaks.
See BEFORE USING YOUR LP GAS GRILL section of this manual for
correct leak test procedures. A clogged burner tube can lead to a
fire.
15.
DANGER! If you see, smell, or hear the hiss of escaping gas from
the LP cylinder:
A. Get away from the cylinder.
B. Do not attempt to correct the problem yourself.
C. Call your local fire department.
16.
WARNING! Do not operate an LP gas grill if you have knowledge
of or suspect a gas leak.
17. Always inspect the regulator assembly before each use. Always turn the
LP cylinder to the “OFF” position before inspecting parts. If it is bent, cut
or damaged, do not use the LP gas grill. Contact the manufacturer, as the
regulator assembly must be replaced with an assembly specified by the
manufacturer prior to further use of the LP gas grill.
IMPORTANT SAFEGUARDS
FAILURE TO FOLLOW THESE SAFEGUARDS COULD RESULT IN DEATH,
SERIOUS BODILY INJURY, AND/OR PROPERTY LOSS. READ AND FOLLOW ALL
INSTRUCTIONS CAREFULLY BEFORE ASSEMBLY OR USE OF THE LP GAS GRILL.
SAVE THESE INSTRUCTIONS.
1. WARNING! Read and follow all instructions. This grill comes fully
assembled, with the exception of the regulator assembly. Do not
use grill if it is not COMPLETELY assembled, parts are not securely
fastened, or parts are missing.
2. For Household Outdoor Use Only - Do Not Use Indoors or on recreational
vehicles or boats. Never use as a space heater. NOT FOR COMMERCIAL USE.
3. WARNING! To reduce the risk of serious or fatal injury from
breathing toxic fumes and from explosion and fire as a result of
leaking gas, use only outdoors in an open area with good ventilation.
As with all conventional fuels, the burning process consumes oxygen and
produces toxic gases, including carbon monoxide. In addition, the combustion
products of such fuels, including liquefied petroleum (LP), contain chemicals
known to the state of California and other authorities to cause cancer, birth
defects and other reproductive harm.
4. Place your Liquefied Petroleum (LP) gas grill on a firm, level surface. Grill
should be set up away from high traffic areas and combustible materials.
5. Locate your LP gas grill at least 10 feet away from your house or any
building. Do not use the grill in a garage, breezeway, carport, porch, or in any
enclosed area or high traffic area. Do not locate this appliance under or near
combustible structures, materials, gasoline, and other flammable liquids or
vapors. The grill must be on a level, stable surface. Asphalt surface (blacktop)
may not be acceptable for this purpose.
6. When cooking, have a type BC or ABC fire extinguisher readily available.
In the event of an oil or grease fire, do not attempt to extinguish with water.
Immediately call the fire department. A type BC or ABC fire extinguisher may,
in some circumstances, contain the fire.
7.
WARNING! If your grill catches on fire:
• If the fire is in the grill portion and you can safely reach the
Regulator Knob, then turn it “OFF” by turning knob clockwise.
If you cannot safely reach the Regulator Knob, call the fire
department.

6
7
34. Never store an LP gas cylinder indoors (empty or filled). If storing your gas
grill indoors, disconnect LP gas cylinder and store it outdoors out of the
reach of children.
35. Never leave an LP cylinder inside a vehicle which may become overheated
by the sun.
36. Never lean your body over the LP gas grill when lighting it or while it is in use
or hot.
37. Do not attempt to disconnect, move or alter any gas fittings while your LP gas
grill is in operation.
38. Your LP gas grill should be cleaned on a regular basis. Refer to CARE AND
CLEANING
section in this manual.
39. Do not move the grill when in use. Allow to cool before moving, putting on or
removing parts and before cleaning or storing the grill.
40. Never douse the grill with water when its surfaces are hot because it may
cause grease to splatter causing a burn.
41. When not in use, the gas must be turned “OFF” on the regulator knob.
42. Do not operate the grill after it malfunctions, or is dropped or damaged in any
manner. Contact Customer Service for advice and replacement of parts.
43. The use of accessory attachments not recommended by the grill
manufacturer may cause injury and void warranty.
44. The use of alcohol, prescription or non-prescription drugs may impair the
consumer’s ability to properly assemble or operate the appliance.
45. In the event of rain, snow, hail, sleet or other forms of precipitation while
cooking with oil or grease, cover the cooking vessel immediately and turn off
the appliance burners and gar supply. Do not attempt to move the appliance
or cooking vessel.
46. Do not place empty cooking vessel on the appliance while in operation. Use
caution when placing anything in the cooking vessel while the appliance is in
operation.
47 This appliance is not intended for and should never be used as a heater.
48. This appliance will be hot during and after use. Use insulated oven mitts or
gloves for protection from hot surfaces or splatter from cooking liquids.
SAVE THESE INSTRUCTIONS.
18. WARNING! Before lighting the LP gas grill, open the lid to prevent
an explosion from gas build-up. See OPERATION OF YOUR LP GAS
GRILL
section.
19. If burner does not light, turn off regulator knob. Wait five minutes before
attempting to light.
20. If burner goes out during operation, turn “OFF” regulator knob. Wait five
minutes before attempting to light.
21. Exercise reasonable care when using this LP gas grill. Never leave grill
unattended during use or cleaning.
22. Do not leave the appliance unattended. Keep children and pets away from the
appliance at all times.
23. Always turn off the LP gas cylinder at the regulator knob when not in use.
Allow grill to cool before handling parts or cleaning.
24.
WARNING! Do not move an LP gas grill when in use or hot.
25.
WARNING! Never touch hot surfaces. Use heat resistant gloves,
long-handled tongs, or cooking mitts at all times. The grill will
become very hot. Be careful when cooking to avoid burns from the
hot vapors and steam generated by the grill.
26. Use only the regulator assembly that is supplied with your LP gas grill and/or
specified by the manufacturer.
27. Use of this LP gas grill other than for the intended use, or alteration of LP gas
grill in any way may not be safe and will void any warranty.
28. Never attempt to refill or repair the LP gas cylinder. Properly discard the bad
LP cylinder and replace it with a good one. Call local refuse utility or recycle
center to discard.
29. LP gas is not natural gas. The conversion or attempted use of natural gas
in an LP unit, or LP gas in a natural gas unit is dangerous and will void your
warranty.
30. Do not use charcoal in an LP gas grill. Do not use aerosols or store flammable
liquids or materials near this LP gas grill.
31.
WARNING! Do not wear loose clothing (for example: hanging shirt
tails, clothing with frills, etc.) around an LP gas grill while in use
or hot.
32. Never use an LP cylinder if it shows signs of: dents, gouges, bulges, fire
damage, corrosion, leakage, excessive rust or other forms of visual external
damage. Do not use an LP cylinder with a damaged valve.
33. Even though your LP cylinder may appear to be empty, gas may still be
present and the cylinder should be transported and stored accordingly.

8
9
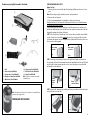
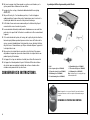
PREPARATION AND GRILL SET-UP
Before First Use
1. Remove grill from carton and discard all the packaging. Make sure there are no loose
parts.
Note: Before using your grill, read the instructions and your manual.
2. Remove and save literature.
3. Please go to www.prodprotect.com/applica to register your warranty.
Follow instructions for each step in the order they are listed as you look at the diagrams.
This will allow for easier assembly.
If you have any questions which require help, contact Customer Service and be sure to
mention the model number of your grill, which can be viewed on the underside of the grill
through the opening in the bottom of the bowl.
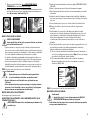
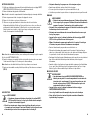
STEP 1. Place the grill on a flat table top or level surface where you will be using it. Make
sure the torsion bar is locked in the vertical position. If necessary, push the torsion bar
lock button and rotate the torsion bar upward; the lock button will lock back in place once
the torsion bar is fully engaged.
STEP 2. Grasp the spring loaded pull handle of the right and left hand level adjusters at
the same time. Pull out and rotate away from you and toward the back of the grill. This will
unlock the lid. Continue rotating adjusters as you loosen the pull pressure and until the
pull handles lock into the bowl.
STEP 3. Open the lid. Swing the right and left panel braces out and insert the hook into the
small slot at the front of the grill.
Before rotating
torsion bar
Fig. 1
Fig. 2
After rotating
torsion bar
Rotate
counterclockwise
Fig. 4
Pull level
adjusters
together
Fig. 3
Open lid
Fig. 5
Secure
panel
braces
Fig. 6
Product may vary slightly from what is illustrated.
Note: This appliance is designed for use with a self-contained LP-gas
or propane gas supply system.
PROPANE GAS NOT INCLUDED.
1. Grill
† 2. Grease tray (Part # GP200-02)
† 3. Cooking surface (Part # GP200-01)
† 4. Regulator assembly (Part # GP200-03)
† 5. Match holder (Part # GP200-04)
† 6. Carrying strap (Part # GP200-05)
† 7. Wire Electrode (Part # GP200-06)
† 8. Igniter (Part # GP200-07)
Note: † indicates consumer replaceable/
removable parts.

10
11
BEFORE USING YOUR LP GAS GRILL
SELECTING A LOCATION
WARNING! Do not use an LP gas grill indoors, on recreational vehicles,
or on a boat.
• This LP gas grill is for outdoor use only and should be placed on firm, level
table or surface. The grill should be placed in an open area with good
ventilation, away from high traffic areas and combustible materials. Asphalt
surface (blacktop) may not be acceptable for this purpose.
• Combustible or flammable materials should never be used or stored within
36 inches of the back or sides of your LP gas grill.
• Locate your LP gas grill at least 10 feet away from your house or any building.
Do not use the grill in a garage, breezeway, carport, porch, or under a surface that
can catch fire.
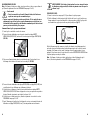
STEP 1. With lid open, perform a leak test.
Warning!
• Always perform a leak test before each use.
• Leak test must be performed in a well ventilated area.
• Never perform a leak test on a grill while in use or hot.
• If you detect a gas leak that cannot be corrected by using the leak test procedures
below, do not use the LP gas grill.
• Never smoke or have an open flame near the grill
SUPPLIES NEEDED FOR A LEAK TEST
Clean paint brush, water, and dishwashing liquid.
LEAK TEST INSTRUCTIONS: See leak test diagram on page 12.
WARNING! Never use an open flame to test for gas leaks.
1) Make sure the regulator control knob is turned to the OFF/LOCK position.
2) Remove the protective cap from the LP cylinder gas nozzle.
3) Hold LP cylinder upright. Do not turn it upside down when connecting to the
regulator.
egulator nipple and turn counterclockwise making
sure the connection does not cross thread.
5) Hand tighten until a snug fit is obtained. Do not use tools.
6) Mix ¼ cup of water with one teaspoon of dishwashing liquid.
7) Check for leaks by brushing the soap solution around the connection between the
gas cylinder and the regulator and the regulator and tube connection (as shown by
the heavy arrow in the diagram on page 12). Make sure you generously brush the
locations with the soap solution, completely surrounding the connections and
fittings.
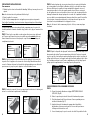
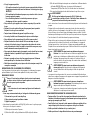
STEP 4. Lift the cooking surface and remove the grease tray and the regulator assembly
located inside the bowl. Lay regulator assembly aside for a future step. Make sure the
pegs at each end of the grill plate always fit into the holes of the front bowl brackets.
Allow the cooking surface lip to orient downward over the grease tray for drainage.
When changing surfaces to grill on: simply flip the cooking surface over toward you to
automatically orient the proper position for the front lip. Install the grease tray by hanging
the hooks over the wide notch in the bowl just under the cooking surface.
Note: The ribbed side is a grill and the smooth side is a griddle.
STEP 5. Adjust the level of the adjusters by pulling both lever adjustors at the same time;
rotate one clockwise and the other counterclockwise until they are locked in place in a
flat grill position or a tilted grill position. The flat grill position is for grilling vegetables and
tilted grilling position is for grilling meat to allow for grease drainage. Rotate all the way
away from you for flat grilling and all the way toward you for tilted grilling.
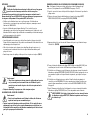
ATTACHING REGULATOR ASSEMBLY AND LP GAS CYLINDER
STEP 6
A. Turn the regulator knob to the OFF/LOCK position. (FIG 10)
B Remove the protective cap from the LP cylinder gas nozzle.
C. Hold LP cylinder upright. Do not turn it upside down when connecting to the
regulator assembly. (FIG 11)
D. Push the LP cylinder nozzle into regulator nipple and turn counterclockwise.
Make sure the connection does not cross thread.
E. Hand tighten until a snug fit is obtained. Do not use tools.
F. Perform a leak test. (See LEAK TEST INSTRUCTIONS, but first go to next page.)
G. Insert nozzle end of the regulator/cylinder assembly to the burner Venturi tube.
Thread the coupling clockwise into the Venturi tube by hand. Do not tighten
with tools. (FIG 12)
Pegs
Fig. 7a
Fig. 7b
Pegs
Bowl
bracket hole
Fig. 7c
Hang drip
tray
Cooking plate lip
Pull level
adjuster
Fig. 8
Rotate
clockwise
Fig. 9
Fig. 12Fig. 11
Fig. 10
Venturi
tube

12
13
GAS CYLINDER AND REGULATOR INFORMATION
The LP gas grill is only for use with propane gas. Propane cylinders will supply gas all
year round, even on cold winter days.
LP CYLINDER
DANGER! If the instructions included in these warnings are not followed
exactly, a fire causing death or serious injury may occur.
DANGER!
- Read and follow all warnings on LP gas cylinder.
- If you see, smell, or hear the hiss of LP gas escaping from the cylinder:
1) Evacuate all people from the grilling area.
2) Do not attempt to correct the problem yourself.
3) Call the local fire department.
• The LP gas cylinder (1lb. disposable), for use with the LP gas grills, must meet the
following requirements:
1) Use only cylinder marked “Propane Fuel”.
2) Size should be 4” diameter x 8” tall.
3) Must be constructed and marked in accordance with the U.S. Department
of Transportation (DOT) or the National Standard of Canada, CAN\CSA-B339.
(See LP cylinder for marking.)
4) Must have a cylinder cap to protect LP cylinder valve when not in use.
WARNING!
Use only 1 lb. propane bottles as specified above. Use of other gas bottles
could cause gas leak or fire.
• Read manufacturer’s instructions and warnings on LP cylinder.
• Never use an LP gas cylinder if it shows signs of: dents, gouges, bulges, fire damage,
corrosion, leakage, excessive rust or other forms of visual external damage; it may be
hazardous and should be checked by a liquid propane supplier.
• Keep children away from LP gas cylinder at all times.
• Do not use, store, or transport the LP gas cylinder where it would be exposed to
heat, sparks or flame. The relief valve may open which will allow a large amount of
flammable gas to escape. Never leave an LP gas cylinder inside a vehicle which may
become overheated by the sun.
• WARNING! Never store an LP cylinder indoors. Storage of an outdoor
cooking gas appliance indoors is permissible only if the cylinder is
disconnected and removed from the outdoor cooking gas appliance.
LP Cylinders must be stored outdoors out of the reach of children and must
not be stored in a building, garage, or any other enclosed area.
• WARNING! Never store a spare LP gas cylinder near the grill. All spare and
disconnected LP gas cylinders must have safety caps installed on the
LP cylinder valve.
• LP gas is not natural gas. The conversion or attempted use of natural gas
in an LP unit or LP gas in a natural gas unit is dangerous and will void your
warranty.
8) If “growing” bubbles appear on any of the connection points, then you have
detected a gas leak. Immediately disconnect the LP cylinder from the regulator.
A) If a leak appears at the cylinder/regulator connection, unscrew the cylinder
and retighten, but do not over tighten. (Note: Only hand tighten. Do not use any
tools) Repeat Leak Test.
B) If a leak can not be stopped, disconnect the LP cylinder and do not use the grill.
Call Customer Service at 1-800-231-9786.
STEP 2. If no leaks are found, the grill is ready to be operated.
OPERATING YOUR LP GAS GRILL
WARNING!
• Before proceeding, make certain you understand the IMPORTANT
SAFEGUARDS at the beginning of this manual.
• Before lighting the LP gas grill, you must open the Lid to prevent an explosion from
gas build-up.
• If your LP gas grill catches on fire:
- If the fire is in the grill portion and you can safely reach the regulator knob, then
turn it to the Off position.
- If the fire involves the cylinder or tube, leave it alone, evacuate the area and
call the fire department.
- If there is any type of fire that threatens either personal safety or endangers
property, call the fire department.
• Do not operate an LP gas grill if you have knowledge of or suspect a gas leak.
• Never allow children to operate or play near an LP gas grill. Do not leave grill
unattended.
• Always turn off the LP gas cylinder when not in use.
• Allow grill to cool before handling parts or cleaning.
• Do not move an LP gas grill when in use or hot.
• Never touch hot surfaces. Use heat resistant gloves, long-handled tongs,
or cooking mitts at all times since the grill will become very hot. Do not attempt
to close the lid when cooking to avoid serious burns.
• Do not wear loose clothing (example: hanging shirt tails, clothing with frills, etc.)
around a LP gas grill while in use or hot.
• Never lean your body over the LP gas grill when lighting it or while it is in use
or hot.
• Always empty grease cup before it fills up to prevent any grease fires.
Fig. 13
Leak test at
regulator/gas
cylinder
connection

14
15
LIGHTING THE GRILL USING THE IGNITER
WARNING!
• Open the grill fully before lighting the burner to prevent an explosion from
gas buildup.
• Always inspect the regulator/tube assembly before each use. If it is
bent, cut or damaged, do not use the LP gas grill. Contact the manufacturer, as the
regulator assembly must be replaced with an assembly specified by the manufacturer
prior to the further use of the LP gas grill.
HOW TO LIGHT YOUR LP GAS GRILL (See diagram below for illustrations)
Note: If the flame is accidentally extinguished, repeat the procedure below for lighting the
grill. (See also TROUBLESHOOTING on pages 24 – 25.)
1) Open the lid and rotate the level adjusters to the grilling position desired.
2) Push in and turn the regulator knob counterclockwise from the OFF/ LOCK position to
HIGH. (FIG 15A)
3) Push the igniter button several times so that it clicks each time. (FIG 15B)
4) Turn the regulator knob from HIGH to LOW, while checking the flame through the
match light hole to make sure it is lit.
5) If burner does not light or igniter does not work, turn regulator knob to OFF/LOCK.
Remove the cooking surface to dissipate the gas. Wait five minutes then repeat
steps 2 thru 4.
6) If burner still fails to light, repeat step 5, wait five minutes and refer to the
TROUBLESHOOTING page. If it fails to light, the burner can be lit manually, see
MANUAL LIGHTING OF THE GRILL on page 16.
7) After ignition, preheat the grill and cooling surface by turning the regulator knob
to HIGH for about 8 minutes.
WARNING: If the burner goes out while cooking, turn the regulator knob
to the OFF position. Wait five minutes before attempting to relight the grill.
MANUAL LIGHTING OF THE GRILL
Note: If the flame is accidentally extinguished, repeat the procedure below for lighting
the grill. (See also TROUBLESHOOTING on pages 24 – 25.)
Fig. 15a
Fig. 15b
• WARNING! Never attempt to repair or refill a 1# LP gas cylinder and its
valve. These could cause a hazard or explosion. Replace gas cylinder with
a spare.
• When transporting an LP gas cylinder, keep it secured in an upright position with the
protective cap on.
CONNECTING/ DISCONNECTING LP GAS CYLINDER TO GRILL
• Always check for gas leaks when you disconnect and reconnect the regulator to the
LP gas cylinder, especially after a period of storage (for example, over winter).
• Check tubes that lead into the burner for any blockage from insects, spiders, or food
grease before using.
• Check regulator tube for bends or crimping.
• Check tube nozzle and threaded collar for damage.
REGULATOR ASSEMBLY
WARNING!
Using a regulator assembly that has not been supplied by the manufacturer of
this LP gas grill, could result in serious bodily injury or property loss.
The LP gas cylinder shall be constructed and marked in accordance with the
specifications for LP gas cylinders of the Department of Transportation (DOT).
• Use only regulator assembly that has been furnished with this LP gas grill. If the
regulator assembly is not working properly and you need a replacement, contact the
manufacturer at (1-800-231-9786).
• Inspect the regulator assembly before each use. If it is bent, cut or damaged, do not
use the LP gas grill. Contact the manufacturer, as the regulator assembly must be
replaced with an assembly specified by the manufacturer prior to the further use of the
LP gas grill.
PREPARATION BEFORE COOKING
• Wash the cooking surface with a mixture of hot water and dish detergent. Do not use
an abrasive scrubber. This product is Teflon coated and harsh cleansers will ruin the
finish.
• Empty the grease tray after each cooking session so excessive grease does not
accumulate. Wash same as cooking surface.
• Make sure grease tray is in place before each grilling session. (FIG 14)
WARNING!
• Empty the grease tray after each cooking session so excessive grease does
not accumulate. Failure to remove grease may result in a grease fire in the
tray or bowl.
• Never light the LP gas grill without the grease tray in place.
Fig. 14

16
17
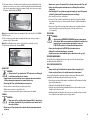
GRILL COOKING
1) Follow the instructions on page 15 / 16 to light your LP gas grill.
2) Check your flame. Your burner has been preset by the manufacturer for optimal flame
performance. A blue flame, possibly with a small yellow tip, is the result of the optimal
air and LP gas mixture. (FIG 17)
The flame should be checked before the initial cooking session and periodically
throughout the grilling season, especially after storing the grill over a long period of time.
If the flame is significantly yellow in color, then you are not getting the appropriate amount
of LP gas in the air /LP gas mixture. You should follow the BURNER MAINTENANCE
section of this manual for cleaning the burners.
Note: If the flame is accidentally extinguished, repeat the procedure above for lighting the
grill. (See also TROUBLESHOOTING on pages 24 – 25.)
Fig. 17
Yellow tip
Primarily
blue flame
WARNING!
• Open the grill lid before lighting the burner to prevent an explosion from
gas buildup.
• Always inspect the regulator/tube assembly before each use. If it is bent, cut or
damaged, do not use the LP gas grill. Contact the manufacturer, as the regulator
assembly must be replaced with an assembly specified by the manufacturer prior to
the further use of the LP gas grill.
How to manually Light your LP Gas Grill
1) Open the grill on a table top or level surface.
2) Turn the regulator knob counterclockwise from the OFF/LOCK position, push in and turn
to HIGH. (FIG 16A)
3) Insert a lit match on the match holder through the match lighting hole at the front, right
side of the grill (FIG 16B)
4) Turn the regulator knob from HIGH to LOW, while checking the flame through the match
light hole to make sure it is lit.
5) If burner does not light, turn regulator knob to OFF/LOCK. Remove the cooking surface
to dissipate the gas. Wait five minutes then repeat steps 2 thru 4.
6) If burner still fails to light, wait five minutes and refer to the TROUBLESHOOTING on
pages 24 – 25.
7) After ignition, preheat the grill and cooking surface by turning the regulator knob
to HIGH for about 8 minutes.
WARNING: If the burner goes out while cooking, turn the regulator knob to
the OFF position. Wait five minutes before attempting to relight the grill.
Fig. 16a
Fig. 16b
Match
holder
Match
lighting hole

18
19
Please note: To be sure your food is fully cooked the USDA recommends the following
guidelines. Using a meat thermometer cook test for doneness by inserting the meat
thermometer into the center of the food being cooked and make sure the thermometer is
not touching the bone.
FOOD TO BE COOKED MEDIUM WELL DONE OR
FULLY COOKED
Chicken Breast 170ºF 77ºC
Chicken Thigh 180ºF 82ºC
Beef / Lamb/Veal 160ºF 71ºC 170ºF 77ºC
Pork 160ºF 71ºC
Reheated cooked meats
and poultry
160ºF 74ºC
On the Griddle:
The following are meant to be used as a guideline only. The times reflect a full grill of
food. Cooking time will depend upon thickness of food. Use a fork inserted into the center
of the food or meat thermometer to test for doneness. (Be careful not to touch the grilling
plate.) If the food needs longer cooking, check periodically to avoid overcooking the food.
These foods can be grilled on the grilling plates or on the griddle.
Sausage, link or patty
Turn often
8 - 12 minutes Cooked to 160ºF
Bacon
Turn often
8 – 10 minutes Cooked till crisp
Eggs, over easy; turn when white
is set
2 – 4 minutes To desired doneness
Scrambled eggs 3 – 5 minutes To desired doneness
GRILLING TIPS
• Do not overfill the appliance; it will hold approximately 4 to 6 servings comfortably.
• When first cooking a particular food, check for doneness several minutes before
suggested time; if necessary, adjust the cooking time.
• If cooking more than one piece of food, try to have them similar in size and thickness.
• Watch carefully to avoid overcooking.
• For added flavor, add dry seasonings before grilling or marinate foods before cooking.
SUGGESTED GRILL SETTINGS
Low: Use to reheat fully cooked foods.
Medium: Vegetables
High: Beef, Pork, Poultry and Lamb
WARNING! Never leave your LP gas grill unattended during use or cleaning.
FOOD COOKING TIME COMMENTS
MEAT
Hamburger (5 oz.) 12 - 14 minutes ¾-inch thick
Cooked to medium (160ºF)
NY Strip Steak (Shell Steak) 6 oz. 14 – 16 minutes ¾-inch thick
Cooked to medium rare
(145ºF)
NY Strip Steak (Shell Steak) 6 oz. 16 – 18 minutes ¾-inch thick
Cooked to medium (160ºF)
T-bone steak (8 oz.) 17 to 20 minutes ¾-inch thick
Cooked to medium (160ºF)
Pork loin chops, boneless 12 - 14 minutes ¾-inch thick
Cooked to 160ºF
Pork loin chops, bone in 14 to 16 minutes ½ -inch thick
Cooked to 160ºF
Hot dogs 11 - 13 minutes Cooked to 160ºF
Chicken breast, boneless and
skinless (8 oz.)
24 - 28 minutes Cooked to 170ºF
Turkey burgers (5 oz.) 12 - 14 minutes Cooked to 170ºF
Marinated Pre-cooked
Barbecued Baby Back Ribs
15 – 18 minutes Cooked to 160ºF
Chicken Drumsticks (3-4 oz., ea.) 40 – 45 minutes Cooked to 180ºF
Vegetables
Sliced zucchini and yellow
squash
8 – 10 minutes To desired doneness
ON THE GRILL
The following are meant to be used as a guideline only. The times reflect a full grill of food.
Cooking time will depend upon thickness and cut being used. Use a cooking thermometer
as a test for doneness. If the food needs longer cooking, check periodically to avoid
overcooking the food.

20
21
Care and Cleaning
CLEANING THE GRILL
CAUTION: Some of the metal edges may be sharp. be careful handling it.
Regularly clean your LP gas grill between uses and after extended storage.
To prolong the life and condition of your grill, the portable unit should not be
stored outside for any length of time, especially during the winter months.
• Do not clean any grill part in a self-cleaning oven. The extreme heat will damage the
finish.
• Do not immerse the burner in water. Make sure any water is removed from the burner.
• Never use oven cleaner, steel wool or other abrasive cleaning products on the painted
and nonstick surfaces. These will cause damage to the finish or parts.
How to Clean the Grill
1. After grill has cooled, empty and clean the grease tray in hot soapy water.
2. Remove excess grease and drippings from the grill bowl with a soft plastic or wooden
scraper. If necessary, use a nylon bristle brush to loosen hardened food particles.
Wash the cooking surface in hot soapy water or in the dishwasher. Rinse and dry
thoroughly.
3. Wash exterior parts with a soft sponge and warm soapy water. Non-abrasive
cleansers may be used. Rinse and dry thoroughly.
4. Use a damp cloth to clean the inside of the grill lid and grill body. Rinse and dry
thoroughly.
5. Replace the grease tray inside the bowl and the cooking surface on the bowl brackets.
BURNER MAINTENANCE
WARNING!
• Do not obstruct the flow of combustion and ventilation of air.
• Check the LP gas grill for gas leaks and burner obstructions before each
use.
• Always turn off the regulator knob when not in use. Allow grill to cool before
handling parts or cleaning.
Provided that the burner is operating correctly, in normal usage, burning off the residue
after cooking will keep the burner clean. The burner should be cleaned annually, or
whenever heavy build-up is found, to ensure that there are no signs of blockage (debris,
insects) in the burner portholes, the primary air inlet, or the neck of the burner. (See
BURNER CLEANING INSTRUCTIONS below.)
CAUTION: Some of the metal edges may be sharp. be careful in handling.
How to Clean the Burner
1) Make sure the LP cylinder and regulator knob is turned to the OFF/LOCK,
and the grill has completely cooled.
2) Remove the LP cylinder and regulator.
Note: Keep ventilation opening(s) of the cylinder enclosure are free and clear from debris.
3) Carefully remove grease tray and the cooking plate.
4) Remove 4 screws from top of grease deflector.
GRILL COOKING CONTINUED
3) To preheat: With the grill lid open, preheat on high for about 8 minutes. During the first
use, you may notice a slight odor caused by the curing oil used in manufacture.
Important: Do not close the grill lid while in use.
4) Carefully place food on the cooking surface. Cook to desired doneness, turning food
halfway through the cooking time for most foods. Adjust flame as needed with the
regulator knob.
5) When food is cooked, remove food with long-handled heat resistant, nylon or wooden
utensils to avoid scratching the non-stick surface. Never use metal tongs, forks or
knives as these can damage the cooking surface.
CAUTION: Do not leave any utensils on the cooking plate surface while
it is hot.
CAUTION: Never touch hot surfaces. Use heat resistant gloves, long-handled
tongs, or cooking mitts at all times.
END OF COOKING SESSION
WARNING!
• Always turn OFF the regulator knob when not in use. Allow the grill to cool
before handling parts or cleaning.
• Do not move an LP gas grill when in use or hot.
CAUTION: Do not remove the grill plates while the appliance is hot. Always
allow them to cool to room temperature before removing or cleaning.
TURN OFF YOUR LP GAS GRILL
1. Turn the regulator knob clockwise to the OFF/LOCK position.
2. Wait until the grill is cool before cleaning the grill or closing the lid.
3. After the grill is cool, disconnect the LP cylinder and regulator assembly from the grill.
Store these parts in a safe place.
WARNING! Never store an LP gas cylinder indoors (empty or filled). If storing
the gas grill indoors, disconnect LP gas cylinder and store it outdoors out of
the reach of children.

22
23
• Never store a spare or disconnected LP gas cylinder under or near the LP gas grill.
• Always turn off the regulator knob when not in use. Allow grill to cool before
transporting.
• Even though your LP gas cylinder may appear to be empty, gas may still be present
and the LP cylinder should be transported and stored accordingly.
• Store your LP gas grill in a cool dry place.
• Disconnect LP gas cylinder from grill and store outside, in a dry, well-ventilated
area, away from any sources of heat or ignition. Recap LP cylinder valve with the
safety cap.
• Check your LP gas grill for gas leaks, deterioration, proper assembly, and burner
obstructions before using the grill after periods of storage and/or non-use
(i.e. over winter).
PRECAUTIONS
WARNING!
• Carefully read the IMPORTANT SAFEGUARDS section at the beginning
of this manual. Make sure you understand and follow all instructions and
warnings. If you have any questions regarding this section, call
1-800-231-9786 and ask for a Customer Service Representative.
• Always turn the regulator to the OFF/LOCK position when not in use.
• Allow grill to cool before handling parts or cleaning.
• Do not use aerosols or store flammable liquids or materials near this gas grill.
PREVENTIVE MAINTENANCE
Periodically check and tighten all nuts, bolts, and screws. Check if the grill works
mechanically and the grill lid locks.
EASY-CARRY SHOULDER STRAP
Note:
• Always lock the grill lid with level lock adjusters before carrying this grill.
• Do not carry the grill unless it has cooled down and has been cleaned.
Your gas grill comes with a convenient shoulder carrying strap. When the grill has
completely cooled down, and the grill and all the parts are clean:
• Return the grease tray and the regulator assembly to inside the bowl and cooking
plate on the bowl brackets.
• Fold and lock the grill lid with the level adjusters.
• Slide the strap lock back with your thumb and hook into the hole under the back
handle on each side of your grill.
• Hold the grill with one hand; place the strap over your shoulder and you are ready
to go. Adjust the strap length to fit your carrying comfort.
5) Use a pipe cleaner to clear obstructions from the burner holes and inlet hole. Verify
that there are no insects, insect nests or debris blocking the inlet hole. Normal wear
and corrosion may enlarge some holes, however, if large cracks or holes are found,
the burner should be replaced. (FIG 18)
Note: Before reassembly of burner you may want to fully clean the grill. See CLEANING
THE GRILL section.
6) After cleaning, reassemble burner assembly and other parts in reverse order of
previous steps 2-5 disassembly.
Note: When refitting the burner, be sure to check that it is positioned correctly.
7) Check burner operation after cleaning (FIG 19).
GREASE TRAY
WARNING!
• Always turn the LP gas cylinder valve “OFF” when not in use. Allow grill
to cool before handling parts or cleaning.
• Empty the grease tray after each use so excessive grease does not accumulate.
Failure to remove grease may result in a grease fire in the tray.
• Never light the LP gas grill without the grease tray in place.
• Before each use, remove all grease from your grease tray.
• Make sure grease tray is in place before use.
• Failure to remove grease from the grease cup may cause a fire hazard.
STORAGE
WARNING!
• Never store an LP gas cylinder indoors (empty or filled). If storing the gas
grill indoors, disconnect the LP gas cylinder and store it outdoors out of
the reach of children.
• Never leave an LP gas cylinder inside a vehicle which may become overheated
by the sun.
Fig. 18
Fig. 19

24
25
Burner will not
light using a
match.
• LP gas cylinder is
empty.
• Regulator tube
coupling nut is not fully
connected to Venturi.
• Obstructions in burner
• Dispose of empty cylinder and
replace with a full one.
• Tighten coupling nut until a
snug fit is obtained. Make
sure coupling nut is not cross-
threaded.
• Clean burner (See BURNER
MAINTENANCE in Care
and Cleaning section of this
manual.)
Flames blow out
• High or gusting winds
• Gas in LP cylinder is
low.
• Turn front of grill away from
wind or increase flame height.
• Check LP gas cylinder.
Replace if necessary.
Persistent grease
fire
• Grease trapped in bowl
and around burner
system.
• Turn regulator knob OFF. Let
fire burn out and remove grid
plate. After the grill cools,
clean all parts.
Humming or
whistling from
the regulator
• Outside temperature,
humidity, barometric
pressure, and the gas
level within the tank
may cause the rubber
diaphragm inside the
regulator to vibrate,
making a humming or
whistling sound.
• Although this sound may
be alarming, this is NOT
dangerous as long as it is not
accompanied by the smell of
gas. Simply adjust the burner
settings and usually the sound
will subside. If the humming
sound persists, a change in
atmospheric conditions will
eventually stop the vibration.
Should you smell gas, do not
use the grill and call Customer
Service at 1-800-231-0786.
Low flame or low
heat
• Gas in LP cylinder
is low.
• Check LP gas cylinder.
Replace if necessary.
TROUBLESHOOTING
Problem Possible Cause Solution
Burner will not
light using the
igniter.
• Burner not assembled
correctly.
• Not pausing long
enough before clicking
the Igniter.
• No spark
• LP gas cylinder is
empty.
• Regulator tube
coupling nut is not fully
connected to Venturi.
• Excess flow valve
tripped in Regulator.
• Obstructions in burner
or Venturi tube.
• Electrode and burner
are wet.
• Wire is loose or
disconnected.
• Wire is shorting
(sparking between
igniter wire and
electrode.
• See Assembly Instructions for
INSTALLING THE BURNER.
• When lighting the burner,
push-in and turn regulator
knob counter-clockwise to the
high position. Push in igniter
button several times so that it
clicks each time.
• The spacing between
electrode and burner ports
should be approximately 3/16”.
Make sure wire connections
are secure and burner is
attached securely to brackets.
• Use a pipe cleaner to clear
Venturi tube.
• Dispose of empty cylinder and
replace with a full one.
• Tighten coupling nut until a
snug fit is obtained. Make
sure Coupling nut is not cross-
threaded.
• Turn regulator knob to OFF
position. Wait five minutes.
Relight LP gas grill. If flame
remains to be low, turn off
gas. Disconnect the LP gas
cylinder from the regulator.
Reconnect the LP gas cylinder
to the regulator. Perform a
leak test. Relight grill. This will
reset the excess flow valve.
• Clean burner (See BURNER
MAINTENANCE in Care
and Cleaning section of this
manual).
• Dry electrode with clean cloth.
• Reconnect the wire.
• Replace igniter wire/electrode
assembly (Call the Customer
Service Department @
1-800-231-9786).

26
27
En cas d'odeur de gaz :
1. Éteindre l’alimentation en gaz de l’appareil.
2. Éteindre tout brûleur allumé.
3. Soulever le couvercle.
4. Si l’odeur persiste, appeler immédiatement le
fournisseur de gaz ou les pompiers.
Le non-respect de ces consignes risque d'entraîner un incendie
ou une explosion pouvant causer des dommages matériels, des
blessures ou la mort.
DANGER
1. Ne jamais laisser cet appareil fonctionner
sans surveillance.
2. Ne jamais utiliser cet appareil à moins de 3 m
(10 pi) de toute structure, de matériel
combustible ou d’une autre bonbonne de
propane.
3. Ne jamais utiliser cet appareil à moins de 7,5 m (25 pi) de tout
liquide inflammable.
4. Si un incendie se produit, rester à l’écart de l’appareil et
appeler immédiatement les pompiers. Ne pas tenter d’utiliser
de l’eau pour éteindre un incendie causé par de l’huile ou de la
graisse.
Le non-respect de ces consignes risque d'entraîner un incendie,
une explosion ou des brûlures pouvant causer des dommages
matériels, des blessures ou la mort.
DANGER
AVERTISSEMENT!
• LIRE ET SUIVRE ATTENTIVEMENT LES INSTRUCTIONS AVANT
D’ASSEMBLER OU D’UTILISER L’APPAREIL. LE NON-RESPECT
DE CES INSTRUCTIONS POURRAIT ENTRAÎNER LA MORT, DES
BLESSURES GRAVES ET/OU DES DOMMAGES MATÉRIELS.
• POUR UTILISATION DOMESTIQUE À L’EXTÉRIEUR SEULEMENT.
NON CONÇU POUR L’USAGE COMMERCIAL.
• CERTAINES PIÈCES PEUVENT ÊTRE COUPANTES,
PARTICULIÈREMENT CELLES QUI SONT ACCOMPAGNÉES D’UNE
REMARQUE À CET EFFET DANS LE PRÉSENT GUIDE! PORTER DES
GANTS PROTECTEURS AU BESOIN.
• LE CONSOMMATEUR DOIT CONSERVER CES INSTRUCTIONS
POUR RÉFÉRENCE ULTÉRIEURE.
• NE PAS UTILISER SUR UN BATEAU NI À BORD D’UN VÉHICULE
RÉCRÉATIF.

28
29
MISES EN GARDE IMPORTANTES
L’OMISSION DE RESPECTER CES MISES EN GARDE POURRAIT ENTRAÎNER LA
MORT, DES BLESSURES GRAVES ET/OU DES DOMMAGES MATÉRIELS. LIRE ET
SUIVRE ATTENTIVEMENT TOUTES LES INSTRUCTIONS AVANT D’ASSEMBLER
OU D’UTILISER LE GRIL AU PROPANE.
CONSERVER CES INSTRUCTIONS.
1. AVERTISSEMENT! Lire et suivre toutes les instructions. Ce gril est
entièrement assemblé. Ne pas utiliser le gril s’il n’est pas assemblé
ni si des pièces sont manquantes ou mal fixées.
2. Pour l’utilisation domestique à l’extérieur seulement – Ne pas utiliser cet
appareil à l’intérieur ni sur un bateau ou à bord d’un véhicule récréatif. Ne
jamais utiliser l’appareil comme un radiateur. NON CONÇU POUR L’USAGE
COMMERCIAL.
3. AVERTISSEMENT! Pour réduire le risque de blessures graves ou
mortelles causées par l’inhalation de vapeurs toxiques ou par une
explosion ou un incendie causés par une fuite de gaz, utiliser
l’appareil uniquement à l’extérieur, dans une zone ouverte et bien ventilée.
Comme c'est le cas avec tout carburant conventionnel, le processus de
combustion du propane consomme de l’oxygène et produit des gaz toxiques,
dont le monoxyde de carbone. En outre, les produits de la combustion de tels
carburants, y compris les gaz de pétrole liquéfiés (propane), contiennent des
produits chimiques reconnus par l’État de la Californie et d’autres autorités
comme causant le cancer, des anomalies congénitales et d’autres problèmes de
reproduction.
4. Placer le gril au propane sur une surface ferme et de niveau. Le gril doit être
installé à l’écart des zones achalandées et des matières combustibles.
5. Placer le gril au propane à au moins 3 m (10 pi) de la maison et de tout autre
bâtiment. Ne pas utiliser le gril dans un garage, sous un passage recouvert,
sous un abri d’automobile, sur une véranda ni dans un endroit fermé ou
très achalandé. Ne pas placer cet appareil sous ou près de structures
ou matières combustibles, d’essence ou d’autres liquides ou vapeurs
inflammables. Le gril doit se trouver sur une surface stable et de niveau. Une
surface asphaltée (revêtement noir) peut ne pas être acceptable.
6. Pendant la cuisson, s’assurer d’avoir à portée de main un extincteur
d’incendie de type BC ou ABC. En cas d’incendie causé par de l’huile ou de
la graisse, ne pas tenter d’éteindre le feu avec de l’eau. Un extincteur de type
BC ou ABC peut, dans certains cas, permettre de contenir l’incendie.
7.
AVERTISSEMENT! Si le gril prend feu :
• Si l’incendie se trouve dans la partie gril et que vous pouvez
atteindre le bouton du régulateur en toute sécurité, tourner ce
bouton vers la droite jusqu’au réglage ARRÊT (OFF). Si vous ne
pouvez pas l’atteindre de façon sécuritaire, appeler les pompiers.
• Si l’incendie touche la bonbonne de propane, ne pas toucher à celle-ci;
évacuer la zone et appeler les pompiers.
• En cas d’incendie qui menace la sécurité de personnes ou qui risque
d’endommager des biens, appeler les pompiers.
8. Vérifier si de la graisse s'est accumulée dans le bac récepteur. Enlever
l’excès de graisse afin d’éviter qu’elle ne prenne feu dans le bac récepteur.
Ne jamais utiliser le gril sans le bac récepteur en place.
9. L’installation doit être conforme aux règlements locaux ou, en leur absence, à
la norme canadienne CSA B149.1 régissant l’installation des appareils au gaz
naturel et au propane, à la norme américaine ANSI Z223.1/NFPA 54 relative
aux gaz combustibles ou à la norme américaine ANSI/NFPA 58 régissant
l’entreposage et la manipulation des gaz de pétrole liquéfiés.
10. Si une source externe d’électricité est utilisée, l’appareil de cuisson extérieur
installé doit être mis à la terre conformément aux règlements locaux ou, en
leur absence, au Code canadien de l’électricité (norme CSA C22.1) ou au
code de l'électricité américain (norme ANSI/NFPA 70).
11. Tenir tout cordon d’alimentation électrique à l’écart de toute surface
chauffée. Placer les cordons électriques loin des endroits où les personnes
circulent, afin d’éviter que quelqu’un y trébuche.
12. Les matières combustibles ne doivent jamais se trouver à moins de 91,5 cm
(36 po) de l’arrière ou des côtés du gril au propane.
13.
AVERTISSEMENT! Toujours remiser les bonbonnes de propane
debout, dans un endroit où la température ne dépasse pas 51,6
degrés Celsius (125 degrés Fahrenheit). Ne jamais remiser une
bonbonne de réserve ou débranchée en dessous ou près du gril
au propane.
14. Avant chaque utilisation, vérifier que le gril au propane ne présente pas de
fuite et que le brûleur n'est pas obstrué.
AVERTISSEMENT! Ne pas utiliser une flamme pour déterminer s’il y a des fuites.
Consulter la section Avant d’utiliser le gril au propane du présent guide pour
savoir comment déterminer s’il y a une fuite. L’obstruction du tube d’alimentation
d’un brûleur peut causer un incendie.

30
31
15. DANGER! Si vous voyez, sentez ou entendez du gaz s’échapper
de la bonbonne de propane :
A. S’éloigner de la bonbonne.
B. Ne pas tenter de corriger le problème soi-même.
C. Appeler les pompiers.
16.
AVERTISSEMENT! Ne pas utiliser le gril au propane si vous savez
ou pensez qu’il y a une fuite de gaz.
17. Toujours inspecter le détendeur avant chaque utilisation. Toujours placer le
robinet de la bonbonne de propane au réglage ARRÊT (OFF) avant d’inspecter
des pièces. Si le détendeur est courbé, fissuré ou endommagé, ne pas utiliser
le gril au propane. Communiquer avec le fabricant, car le détendeur doit être
remplacé par un détendeur recommandé par le fabricant avant que vous
puissiez réutiliser le gril au propane..
18.
AVERTISSEMENT! Avant d’allumer le gril au propane, ouvrir
le couvercle pour éviter une explosion causée par une
accumulation de gaz. Consulter la section MODE D'EMPLOI DU
GRIL AU PROPANE.
19. Si le brûleur ne s’allume pas, tourner le bouton du détendeur au réglage
ARRÊT (OFF). Attendre cinq minutes avant de réessayer d’allumer le brûleur.
20. Si le brûleur s’éteint pendant l’utilisation, tourner le bouton du détendeur au
réglage ARRÊT (OFF). Attendre cinq minutes avant de réessayer d’allumer le
brûleur.
21. Faire preuve de bon jugement pendant l’utilisation du gril au propane. Ne
jamais laisser le gril sans surveillance pendant l’utilisation ou le nettoyage.
22. Ne jamais laisser l'appareil sans surveillance. Tenir les enfants et les
animaux à l’écart de l'appareil en tout temps.
23. Toujours tourner le bouton du détenteur de la bonbonne de propane au
réglage ARRÊT (OFF) lorsqu’elle ne sert pas. Laisser le gril refroidir avant d’en
manipuler des pièces ou de le nettoyer.
24.
AVERTISSEMENT! Ne pas déplacer le gril au propane pendant
qu’il est utilisé ou encore chaud.
25. AVERTISSEMENT! Ne jamais toucher aux surfaces chaudes.
Utiliser en tout temps des gants résistants à la chaleur, des
pinces à long manche ou des mitaines de cuisinier. Le gril deviendra très
chaud. Faire preuve de prudence pendant la cuisson, afin d’éviter les brûlures
causées par la vapeur et l’air chaud générés par le gril.
26. Utiliser uniquement le détendeur fourni avec le gril au propane et/ou
recommandé par le fabricant.
27. L’utilisation de ce gril au propane à des fins autres que celles pour lesquelles
il a été conçu, ainsi que toute modification du gril au propane, peuvent être
dangereuses et annuleront la garantie.
28. Ne jamais tenter de remplir ou de réparer une bonbonne de propane. Éliminer
correctement la bonbonne au propane défectueuse et la remplacer par une
bonbonne qui fonctionne correctement. Communiquer avec les services
locaux d’enlèvement des déchets ou avec le centre de recyclage local pour
savoir comment éliminer les bonbonnes défectueuses.
29. Le propane n’est pas du gaz naturel. La conversion ou tentative d'utilisation
de gaz naturel avec un appareil au propane ou de propane avec un appareil
au gaz naturel est dangereuse et annulera la garantie.
30. Ne pas utiliser de charbon de bois dans un gril au propane. Ne pas utiliser
d’aérosols ni ranger des liquides ou matières inflammables près de ce gril au
propane.
31.
AVERTISSEMENT! Ne pas porter de vêtements amples (par
exemple : pans de chandail qui ressortent, vêtements à froufrous)
à proximité d’un gril au propane chaud ou en cours d’utilisation.
32. Ne jamais utiliser une bonbonne de propane qui présente des enfoncements,
des entailles, des bosses, des dommages causés par le feu, de la corrosion,
une fuite, de la rouille excessive ou d'autres types de dommages externes
visibles. Ne pas utiliser une bonbonne de propane dont la valve est
endommagée.
33. Même si la bonbonne de propane peut sembler vide, il se peut qu'il reste du
gaz à l'intérieur; transporter et remiser la bonbonne en conséquence.
34. Ne jamais remiser une bonbonne de propane à l'intérieur (vide ou pleine).
Si vous rangez le gril au propane à l'intérieur, débrancher la bonbonne de
propane et la remiser à l'extérieur, hors de la portée des enfants.
35. Ne jamais laisser une bonbonne de propane à l'intérieur d'un véhicule
susceptible de devenir trop chaud à cause du soleil.
36. Ne jamais s'appuyer contre la bonbonne de propane pendant l'allumage ou
l'utilisation du gril, ni lorsque le gril est chaud.
37. Ne pas tenter de débrancher, de déplacer ni de modifier un raccord de gaz
pendant que le gril au propane fonctionne.
38. Le gril au propane doit être nettoyé régulièrement. Consulter la section
ENTRETIEN ET NETTOYAGE du présent guide.
39. Ne pas déplacer le gril pendant qu'il est utilisé. Le laisser refroidir avant de le
déplacer, d'y installer ou d'en retirer des pièces, et avant de le nettoyer ou de
le remiser.

32
33
40. Ne jamais asperger le gril d'eau quand ses surfaces sont chaudes, car la
graisse pourrait vous éclabousser et vous brûler.
41. Lorsque le gril ne sert pas, le bouton du détendeur doit être au réglage
ARRÊT (OFF).
42. Ne pas utiliser le gril s'il ne fonctionne pas bien, s'il a été échappé ou
endommagé d'une façon ou d'une autre. Communiquer avec le service à la
clientèle pour obtenir des conseils et des pièces de rechange.
43. L'utilisation d'accessoires non recommandés par le fabricant du gril peut
causer des blessures et annuler la garantie.
44. La consommation d'alcool, de médicaments d'ordonnance ou en vente libre
peut nuire à la capacité de l'utilisateur à assembler ou à utiliser correctement
l'appareil.
45. S'il se met à tomber de la pluie, de la neige, de la grêle, du grésil ou d'autres
formes de précipitations pendant que vous cuisinez avec de l'huile ou de la
graisse, recouvrir immédiatement le récipient de cuisson, éteindre le brûleur
du gril et fermer l'alimentation en gaz. Ne pas tenter de déplacer l'appareil ni
le récipient de cuisson.
46. Ne pas placer le récipient de cuisson vide sur le gril allumé. Faire preuve
de prudence lorsque vous placez des aliments dans le récipient de cuisson
pendant que le gril fonctionne.
47. Cet appareil n'est pas un radiateur et ne doit jamais être utilisé comme tel.
48. Cet appareil est chaud pendant et après l'utilisation. Utiliser des mitaines
de cuisinier pour vous protéger les doigts des surfaces chaudes et des
éclaboussures provenant des jus de cuisson.
CONSERVER CES INSTRUCTIONS.
Le produit peut différer légèrement du produit illustré.
Note: Cet appareil est conçu pour être utilisé avec une bonbonne
de propane autonome ou avec un système d'alimentation au gaz
propane.
BONBONNE DE PROPANE NON COMPRISE.
1. Gril
† 2. Bac récepteur (pièce n
° GP200-02)
† 3. Plaque de cuisson (pièce n
° GP200-01)
† 4. Détendeur (pièce n
° GP200-03)
† 5. Porte-allumette (pièce n
° GP200-04)
† 6. Bandoulière (pièce n
° GP200-05)
† 7. Électrode en fil (pièce n
° GP200-06)
† 8. Allumeur (pièce n
° GP200-07)
Note : † indique une pièce remplaçable par
l'utilisateur/amovible.

34
35
PRÉPARATION ET INSTALLATION DU GRIL
Pour commencer
1. Déballer le gril et retirer tout le matériel d'emballage. Vérifier qu'aucune pièce ne s'est
séparée.
Note : Lire les instructions et le guide avant d'utiliser le gril.
2. Retirer le guide et le conserver.
3. Aller à l'adresse www.prodprotect.com/applica pour enregistrer votre garantie.
Pour faciliter l'assemblage, suivre les instructions étape par étape, dans l'ordre indiqué
dans les illustrations.
Si vous avez des questions et avez besoin d'aide, communiquer avec le service à la
clientèle; mentionner le numéro de modèle du gril, visible sous le gril par l'ouverture de la
cuve.
ÉTAPE 1. Placer le gril sur une table ou surface plane et de niveau où vous utiliserez le
gril. S'assurer que la barre de torsion est verrouillée en position verticale. Au besoin,
tourner la barre de torsion vers le haut jusqu'à ce que le bouton de verrouillage soit
complètement enclenché.
ÉTAPE 2. Saisir les poignées à ressort des dispositifs de réglage de l'inclinaison droit
et gauche. Tirer les poignées et les tourner vers l'arrière du gril afin de déverrouiller le
couvercle. Continuer de tourner les dispositifs de réglage pendant que vous réduisez la
pression exercée, jusqu'à ce que les poignées s'enclenchent dans la cuve.
ÉTAPE 3.
Soulever le couvercle. Pousser les supports gauche et droit vers l'extérieur, puis
insérer les crochets dans la petite fente à l'avant du gril.
ÉTAPE 4. Soulever la plaque de cuisson, puis enlever le bac récepteur et le détendeur
qui se trouvent dans la cuve. Mettre le détendeur de côté; il sera installé à une étape
ultérieure. Vérifier que les goupilles à chaque extrémité de la plaque de cuisson se
trouvent toujours dans les trous des supports avant de la cuve. Faire en sorte que le
bec de la plaque de cuisson soit orienté vers le bas et vers le bac récepteur aux fins du
drainage. Au moment de changer la plaque de cuisson de côté : simplement la rabattre
vers vous afin d'assurer automatiquement la bonne position du bec avant. Pour installer
le bac récepteur, le suspendre en plaçant les crochets par-dessus la large encoche
située dans la cuve, immédiatement sous la plaque de cuisson.
Note : Le côté rainuré s'utilise comme une grille, et le côté lisse, comme une plaque
chauffante.
ÉTAPE 5. Régler les dispositifs de réglage de l'inclinaison en tirant en même temps sur les
deux manettes de réglage. Tourner une manette vers la droite et l’autre vers la gauche
jusqu’à ce qu’elles se verrouillent en position de grillage à plat ou incliné. La position de
grillage à plat s'utilise avec les légumes, tandis que la position de grillage incliné s'utilise
avec la viande pour drainer le gras. Tourner complètement vers l'arrière du gril pour le
grillage à plat et complètement vers l'avant du gril pour le grillage incliné.
POSE DU DÉTENDEUR ET DE LA BONBONNE DE PROPANE
ÉTAPE 6
A. Tourner le bouton du détendeur au réglage ARRÊT /VERROUILLAGE
(OFF /LOCK). (Fig. 10)
B. Retirer le capuchon protecteur de la buse de la bonbonne de propane.
C. Tenir la bonbonne droite. Ne pas la tourner à l'envers pendant que vous
installez le détendeur. (Fig. 11)
D. Introduire la buse de la bonbonne de propane dans la tige filetée
du détendeur et la tourner vers la gauche. S'assurer de ne pas fausser
le filetage en effectuant le raccord.
E. Serrer à la main jusqu'à ce que le raccord soit solide. Ne pas utiliser d'outils.
Tourner vers
la gauche
Fig. 4
Tirer les dispositifs
de réglage de
l'inclinaison
Fig. 3
Soulever le
couvercle
Fig. 5
Fixer les
supports en
place
Fig. 6
Goupilles
Fig. 7a
Fig. 7b
Goupilles
Trou de
support de la
cuve
Fig. 7c
Bac récepteur
suspendu
Bec de la plaque de
cuisson
Tirer le
dispositif de
réglage de
l'inclinaison
Fig. 8
Tourner vers
la droite
Fig. 9
Fig. 2
Après la rotation
de la barre de
torsion
Avant la
rotation de la
barre de torsion
Fig. 1

36
37
F. Effectuer un essai d'étanchéité. (Voir les INSTRUCTIONS D'ESSAI
D'ÉTANCHÉITÉ, mais lire d'abord la prochaine page.)
G. Insérer l'extrémité à buse de l'assemblage détendeur/bonbonne dans le tube
de Venturi du gril, puis la visser à la main dans le tube en la tournant vers la
droite. Ne pas serrer à l'aide d'outils. (Fig. 12)
AVANT D'UTILISER LE GRIL AU PROPANE
CHOIX DE L'EMPLACEMENT
Avertissement! Ne pas utiliser le gril au propane à l'intérieur, sur un bateau
ou à bord d'un véhicule récréatif.
• Ce gril au propane est conçu pour l'usage à l'extérieur seulement et doit être
placé sur une surface ou table solide et de niveau. Le gril doit être placé dans une
zone ouverte, bien ventilée et peu achalandée, à l'écart de matières combustibles.
Une surface asphaltée (revêtement noir) peut ne pas être acceptable.
• Les matières combustibles ou inflammables ne doivent jamais être utilisées ou
stockées à moins de 91,5 cm (36 po) de l’arrière ou des côtés du gril au propane.
• Placer le gril au propane à au moins 3 m (10 pi) de la maison et de tout autre
bâtiment. Ne pas utiliser le gril dans un garage, sous un passage recouvert, sous
un abri d’automobile, sur une véranda ni sous une surface qui peut prendre feu.
ÉTAPE 1. Ouvrir le couvercle et effectuer un essai d'étanchéité.
Avertissement!
• Toujours effectuer un essai d'étanchéité avant chaque utilisation.
• L'essai d'étanchéité doit être fait dans un endroit bien ventilé.
• Ne jamais effectuer un essai d'étanchéité sur un gril chaud ou en cours
d'utilisation.
• Si vous décelez une fuite de gaz que vous ne pouvez pas corriger en suivant les
instructions d'essai d'étanchéité ci-dessous, ne pas utiliser le gril au propane.
• Ne jamais fumer ou avoir une flamme nue à proximité du gril.
MATÉRIEL REQUIS POUR L'ESSAI D'ÉTANCHÉITÉ
Pinceau propre, eau et savon à vaisselle.
INSTRUCTIONS D'ESSAI D'ÉTANCHÉITÉ : VOIR LE DIAGRAMME RELATIF À L'ESSAI
D'ÉTANCHÉITÉ À LA PAGE 37.
¡AVERTISSEMENT! Ne jamais utiliser une flamme nue pour déterminer s'il y
a une fuite de gaz.
1) Vérifier que le bouton du détendeur est placé au réglage ARRÊT/VERROUILLAGE
(OFF/LOCK).
2) Retirer le capuchon protecteur de la buse de la bonbonne de propane.
3) Tenir la bonbonne droite. Ne pas la tourner à l'envers pendant que vous installez
le détendeur.
4) Introduire la buse de la bonbonne de propane dans la tige filetée du détendeur
et la tourner vers la gauche. S'assurer de ne pas fausser le filetage en effectuant
le raccord.
5) Serrer à la main jusqu'à ce que le raccord soit solide. Ne pas utiliser d'outils.
6) Mélanger une cuillère à soupe d'eau et à une cuillère à soupe de savon
à vaisselle.
7) Pour déterminer s'il y a une fuite, à l'aide du pinceau, enduire de solution
savonneuse le raccord entre la bonbonne et le détendeur, ainsi que le raccord
entre le détendeur et le tube de Venturi (aux endroits indiqués par les grosses
flèches dans les diagrammes). S'assurer d'enduire généreusement
ces endroits de solution savonneuse, tout autour des raccords et des pièces
de fixation.
8) S'il y a formation de bulles « grossissantes » à n'importe quel point d'un raccord,
vous avez décelé une fuite de gaz. Fermer immédiatement le robinet de la
bonbonne et débrancher la bonbonne du détendeur.
A) Si le raccord entre la bonbonne et le détendeur fuit, dévisser la bonbonne et
serrer le raccord de nouveau, mais pas trop fort. (Note : Ne serrer qu'à la main,
sans utiliser d'outils.) Répéter l'essai d'étanchéité.
B) S'il est impossible d'éliminer la fuite, fermer le robinet de la bonbonne,
débrancher la bonbonne et ne pas utiliser le gril. Appeler le service à la
clientèle au 1 800 231-9786.
ÉTAPE 2. Si aucune fuite n'est décelée, le gril peut être utilisé.
MODE D'EMPLOI DU GRIL AU PROPANE
Avertissement!
• Avant d'utiliser le gril, s'assurer de bien comprendre les MISES EN
GARDE IMPORTANTES figurant au début du présent guide.
• Avant d'allumer le gril au propane, ouvrir le couvercle afin d'éviter une explosion
causée par une accumulation de gaz.
Fig. 13
Essai
d'étanchéité
du raccord
entre le
détendeur et la
bonbonne
Fig. 12Fig. 11
Fig. 10
Venturi
Tube

38
39
• Si le gril au propane prend feu :
- Si l’incendie se trouve dans la partie gril et que vous pouvez atteindre le bouton
du régulateur en toute sécurité, tourner ce bouton vers la droite jusqu’au réglage
ARRÊT (OFF).
- Si l’incendie touche la bonbonne de propane, ne pas toucher à celle-ci; évacuer
la zone et appeler les pompiers.
- En cas d’incendie qui menace la sécurité de personnes ou qui risque
d’endommager des biens, appeler les pompiers.
• Ne pas utiliser le gril au propane si vous savez ou suspectez qu'il y a une fuite
de gaz.
• Ne jamais laisser des enfants utiliser un gril au propane ni jouer à proximité.
Ne jamais laisser le gril sans surveillance.
• Toujours fermer la bonbonne de propane lorsqu'elle ne sert pas.
• Laisser le gril refroidir avant d'en manipuler des pièces ou de le nettoyer.
• Ne pas déplacer le gril au propane lorsqu'il est utilisé ou encore chaud.
• Ne jamais toucher aux surfaces chaudes. Utiliser en tout temps des gants
résistants à la chaleur, des pinces à long manche ou des mitaines de cuisinier,
car le gril deviendra très chaud. Pour éviter le risque de blessures graves, ne pas
tenter de refermer le couvercle pendant la cuisson.
• Ne pas porter de vêtements amples (par exemple : pans de chandail qui ressortent,
vêtements à froufrous) à proximité d’un gril au propane chaud ou en cours
d’utilisation.
• Ne jamais se pencher au-dessus du gril au propane lorsque vous l'allumez ou
encore pendant qu'il est chaud ou en cours d'utilisation.
• Afin d'éviter un incendie de graisse, toujours vider le bac récepteur avant qu'il ne
se remplisse au complet.
INFORMATION RELATIVE À LA BONBONNE ET AU DÉTENDEUR
Le gril au propane ne fonctionne qu’avec du gaz propane. Les bonbonnes de propane
peuvent alimenter le gril à l'année, même pendant les froides journées d'hiver
BONBONNE DE PROPANE
Danger : Si les instructions indiquées dans les présents avertissements
ne sont pas suivies à la lettre, un incendie pouvant causer la mort ou des
blessures graves risque de se produire.
Danger!
- Lire et suivre tous les avertissements qui figurent sur la bonbonne de
propane.
- Si vous voyez, sentez ou entendez du gaz s'échapper de la bonbonne de propane :
1) Évacuer tous les gens de la zone de grillage.
2) Ne pas tenter de corriger le problème soi-même.
3) Appeler les pompiers.
• La bonbonne de propane (jetable, de 454 g [1 lb]), à utiliser avec les grils au propane,
doit respecter les exigences suivantes :
1) Elle doit porter la mention « Propane ».
2) Elle doit faire 10,16 cm (4 po) de diamètre et 20,32 cm (8 po) de hauteur.
3) Elle doit avoir été fabriquée et marquée en conformité avec la Norme nationale
du Canada CAN\CSA-B339 ou avec les exigences du Department of
Transportation (DOT) des États-Unis. (Voir les indications sur la bonbonne.)
4) Un capuchon doit protéger la valve de la bonbonne lorsqu'elle ne sert pas.
AVERTISSEMENT!
N'utiliser qu'une bonbonne de propane de 454 g (1 lb) dotée des
caractéristiques spécifiées ci-dessus. L'utilisation d'autres bonbonnes de
gaz pourrait causer une fuite de gaz ou un incendie.
• Lire les instructions et les avertissements du fabricant qui figurent sur la bonbonne de
propane.
• Ne jamais utiliser une bonbonne de propane qui présente des enfoncements, des
entailles, des bosses, des dommages causés par le feu, de la corrosion, une fuite,
de la rouille excessive ou d'autres types de dommages externes visibles. Une telle
bonbonne peut être dangereuse et doit être inspectée par un fournisseur de propane.
• Tenir les enfants à l'écart de la bonbonne de propane en tout temps.
• Ne pas utiliser, remiser ou transporter la bonbonne de propane à un endroit où elle
serait exposée à de la chaleur, à des étincelles ou à des flammes. La soupape de
décharge pourrait alors s'ouvrir et laisser s'échapper une grande quantité de gaz.
Ne jamais laisser une bonbonne de propane à l'intérieur d'un véhicule susceptible de
devenir trop chaud à cause du soleil.
• AVERTISSEMENT! Ne jamais remiser une bonbonne de propane à
l'intérieur. Il n'est possible de remiser à l'intérieur un appareil de cuisson
extérieur que si la bonbonne est débranchée et retirée de l'appareil. Les
bonbonnes de propane doivent être remisées à l'extérieur, hors de la
portée des enfants; elles ne doivent pas être remisées dans un bâtiment,
un garage ou autre endroit clos.
• AVERTISSEMENT! Ne jamais remiser une bonbonne de propane de
réserve près du gril. La valve de toutes les bonbonnes de propane de
réserve et débranchées doit être protégée à l'aide du capuchon de
sécurité.
• Le propane n'est pas du gaz naturel. La conversion ou tentative d'utilisation de gaz
naturel avec un appareil au propane ou de propane avec un appareil au gaz naturel est
dangereuse et annulera la garantie.
• AVERTISSEMENT! Ne jamais tenter de réparer ou de remplir une
bonbonne de propane à usage unique. Cette tentative pourrait causer un
danger ou une explosion. Remplacer la bonbonne.
• Lorsque vous transportez une bonbonne de propane, la garder en position
debout, avec le capuchon protecteur installé.
BRANCHEMENT/DÉBRANCHEMENT DE LA BONBONNE AU GRIL
• Toujours vérifier s'il y a une fuite de gaz quand vous débranchez et rebranchez le
détendeur à la bonbonne de propane, particulièrement après une longue période de
remisage (par exemple, après l'hiver).
• Avant d'utiliser le gril, inspecter les tubes menant au brûleur pour vérifier qu'ils ne
sont pas bloqués par des insectes, des araignées ou de la graisse d'aliments.
• Vérifier que le tube du détendeur n'est pas courbé ni pincé.
• Vérifier que la buse et la bague filetée du tube ne sont pas endommagées.
La page est en cours de chargement...
La page est en cours de chargement...
La page est en cours de chargement...
La page est en cours de chargement...
La page est en cours de chargement...
La page est en cours de chargement...
La page est en cours de chargement...
La page est en cours de chargement...
La page est en cours de chargement...
-
 1
1
-
 2
2
-
 3
3
-
 4
4
-
 5
5
-
 6
6
-
 7
7
-
 8
8
-
 9
9
-
 10
10
-
 11
11
-
 12
12
-
 13
13
-
 14
14
-
 15
15
-
 16
16
-
 17
17
-
 18
18
-
 19
19
-
 20
20
-
 21
21
-
 22
22
-
 23
23
-
 24
24
-
 25
25
-
 26
26
-
 27
27
-
 28
28
-
 29
29


George Foreman GP200C Le manuel du propriétaire
- Catégorie
- Barbecues
- Taper
- Le manuel du propriétaire
dans d''autres langues
- English: George Foreman GP200C Owner's manual
Autres documents
-
Smoke Hollow SH19032719 Le manuel du propriétaire
-
Nex 820-0007 Le manuel du propriétaire
-
Nexgrill 720-0830D - Old Le manuel du propriétaire
-
 Nexgrill 720-0830D Le manuel du propriétaire
-
DCS BH148RN Guide d'installation
-
-
Delta Heat DHBQ26G-C Mode d'emploi
-
DCS BGC30BQN Guide d'installation
