Beko EFW6000WS Le manuel du propriétaire
- Catégorie
- Ventilateurs ménagers
- Taper
- Le manuel du propriétaire

Tower Fan
User Manual
EFW6000WS
EN
EN/FR/IT/DE/RO
01M-8837593200-4520-01

Please read this user manual rst!
Dear Customer,
Thank you for preferring a Beko product. We hope that you get the best results
from your product which has been manufactured with high quality and state-of-
the-art technology. Therefore, please read this entire user manual and all other
accompanying documents carefully before using the product and keep it as a
reference for future use. If you handover the product to someone else, give the user
manual as well. Follow all warnings and information in the user manual.
Meanings of the symbols
Following symbols are used in the various section of this manual:
C
Important information or
useful hints about usage.
A
Warning for hazardous
situations with regard to life
and property.
Warning to actions that must
never perform.
B
Warning for electric shock.
Warning for danger of fire.
Warning for hot surfaces.
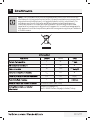
This product has been produced in environmentally friendly, modern facilities
Complies with the WEEE Regulation.

Tower Fan / User Manual
3 / 12 EN
1 Safety nstructons 4
2 Part fgure 6
3 Assembly nstructons 7
4 Operaton nstructons 8
4.1 Remote controller (Fig. 4). . . . . . . . . . . . . . . . . . . . . . . . . . . . . . . . . . . . . . . . . . . . . . . . . . . . . . . . . . . . . . . . . . . . . . . . . . .8
4.2 Buttons on fan body/panel indication (Fig. 6) . . . . . . . . . . . . . . . . . . . . . . . . . . . . . . . . . . . . . . . . . . . . . . . . . . . . . .9
5 Other 10
5.1 Maintenance instructions. . . . . . . . . . . . . . . . . . . . . . . . . . . . . . . . . . . . . . . . . . . . . . . . . . . . . . . . . . . . . . . . . . . . . . . . . 10
5.2 Cleaning. . . . . . . . . . . . . . . . . . . . . . . . . . . . . . . . . . . . . . . . . . . . . . . . . . . . . . . . . . . . . . . . . . . . . . . . . . . . . . . . . . . . . . . . . . . 10
5.3 Technical data . . . . . . . . . . . . . . . . . . . . . . . . . . . . . . . . . . . . . . . . . . . . . . . . . . . . . . . . . . . . . . . . . . . . . . . . . . . . . . . . . . . . 10
6 Dsposal 11
CONTENTS

4 / 12 EN
Tower Fan / User Manual
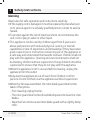
1 Safety nstructons
Warning
Read rules for safe operation and instructions carefully.
•
If the supply cord is damaged, it must be replaced by manufacturer
or its service agent or a similarly qualified person in order to avoid a
hazard.
•
To protect against the risk of electrical shock, do not immerse the
unit, cord or plug in water or other liquid.
•
When the appliance is not in use and before cleaning, unplug the
appliance from the outlet.
•
Keep electrical appliances out of reach from Children or infirm
persons. Do not let them use the appliances without supervision.
•
When the fan was assembled, the rotor blade guard shall not be
taken off anymore.
-
Prior cleaning unplug the fan.
-
The rotor guard shall not be dissembled/opened to clean the rotor
blades.
-
Wipe the fan enclosure and rotor blade guard with a slightly damp
cloth.
•
This appliance can be used by children aged from 8 years and
above and persons with reduced physical, sensory or mental
capabilities or lack of experience and knowledge if they have been
given supervision or instruction concerning use of the appliance in
a safe way and understand the hazards involved. Children shall not
play with the appliance. Cleaning and user maintenance shall not
be made by children without supervision.Young children should be
supervised to ensure that they do not play with the appliance.

Tower Fan / User Manual
5 / 12 EN
1 Safety nstructons
Rules for safe operation
•
Never insert fingers, pencils, or any other object through the grille
when fan is running.
•
Disconnect fan when moving from one location to another.
•
Be sure fan is on a stable surface when operating to avoid
overturning.
•
Do not use fan in window, rain may create electrical hazard.
•
Household use only.
•
This symbol indicates that this product shall not be
disposed with other household wastes at the end of its service
life. Used device must be returned to ocial collection point for
recycling of electrical and electronic devices. To nd these
collection systems please contact to your local authorities or
retailer where the product was purchased. Each household
performs important role in recovering and recycling of old
appliance. Appropriate disposal of used appliance helps
prevent potential negative consequences for the environment
and human health.

6 / 12 EN
Tower Fan / User Manual
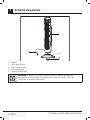
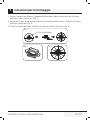
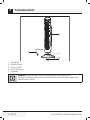
1
2
3
5
4
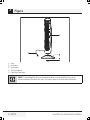
1. Body
2. Front base
3. Rear base
4. Plastic nut
5. Power cord
C
Note: All the pictures in this manual are for explanation purpose only. Any discrepancy
between the real object and the illustration in the drawing shall be subject to the real
subject.
2 Part fgure

Tower Fan / User Manual
7 / 12 EN
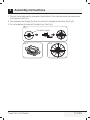
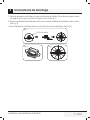
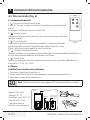
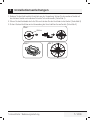
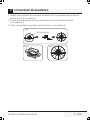
1. Take out the fan body and the spare parts from the box. Put the front base onto rear base and join
them together. (See Fig. 1)
2. Pass the power cord through the flute, then insert the fan body into the base. (See Fig. 3)
3. Fix the fan body on the base with the plastic nut. (See Fig. 2)
The outlet trough
Fig. 1
Fig. 2 Fig. 3
3 Assembly nstructons

8 / 12 EN
Tower Fan / User Manual
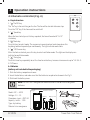
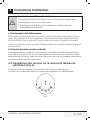
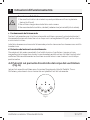
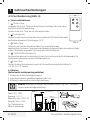
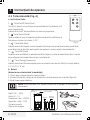
4.1 Remote controller (Fg. 4)
a. Key instructıon
1. “ ” On/Off key
The “On” key is for switching on the fan. The fan will be started at breeze step.
Press the “Off” key if the fan needs to switch off.
2. “ ” Speed key
When the fan started, press this key repeated, the fan will work with “1-2-3”
circulatory.
3. “ ” Mode key
Press this key to select mode. The sequence is normal, natural, and sleep when this
key being touched repeatedly or continuously. The light indicate mode state.
4. “ ” OSC/Louver key
After the fan has started, press this key to select oscillation mode. The lights on the display can
indicate fan oscillation mode.
5. “ ” Timing key
Press this timer key repeatedly to set the time for air delivery. Increase in increments up to "1-2-3-4-5-
6-7-8" hours.
b. Batteries
(battery not included in the packaging)
1. Slide the battery compartment cover.
2. Insert the batteries, and make sure that the batteries are placed as shown in the Fig. 5.
3. Slide back the battery cover.
C
Note: Use size “AAA” manganese or alkaline batteries. Do not use rechargeable
batteries.
Fig. 5
Remote controller
Battery Battery cover
4 Operaton nstructons
Fig. 4
Model <IEC> : LR03
Voltage <V> : 1.5
Dimension <mm> : Ø10*44
Capacity <mAh> : 1150
Type : dry battery
Material : zinc manganese

Tower Fan / User Manual
9 / 12 EN
A
Battery warning as below
1. Do not dispose of batteries in fire, batteries may explode or leak.
2. Do not mix old and new batteries.
3. Do not mix alkaline, standard (carbon-zinc) or rechargeable (nickel-cadmium)
batteries.
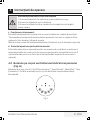
c. Remote controller operation
Point the remote controller at the receptor on body of the fan and press the desired button. The
remote controller will work at distances of up to roughly five meters and the angle of 30 degree
included between right and left from the receptor.
The batteries must be removed from the remote controller before it is scrapped and that they are
disposed of safely.
d. Overheat protection of the motor
The windings of the motor have a thermal-fuse that burns out and the fan switches off and
temperature of the motor is no longer going up so that plastic parts of the fan don’t subject to
deformation so far so to be burned by the overheat if the motor is overheat for any unexpected
reason.
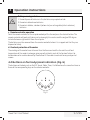
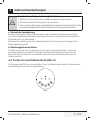
4.2 Buttons on fan body/panel ndcaton (Fg. 6)
The buttons on the body such as On/Off, Speed, Mode, Timer, Oscillation have the same functions as
those of the corresponding keys on the remote controller.
Fig. 6
4 Operaton nstructons

10 / 12 EN
Tower Fan / User Manual
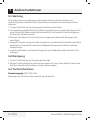
5 Other
5.1 Mantenance nstructons
The fan requires little maintenance. Do not try to fix it by yourself. Refer it to qualified service
personnel if service is needed.
1. Before cleaning and assembling, fan must be unplugged.
2. To ensure adequate air circulation to the motor, keep vents at the rear of the motor free of dust. Do
not disassemble the fan to remove dust.
3. Please wipe the exterior parts with a soft cloth soaking a mild detergent.
4. Do not use any abrasive detergent or solvents to avoid scratching the surface. Do not use any of the
following as a cleaner: gasoline, thinner, bending.
5. Do not allow water or any other liquid into the motor housing or interior parts.
5.2 Cleanng
1. Be sure to unplug from the electrical supply source before cleaning.
2. Plastic parts should be cleaned with a soft cloth moisten with mild soap. Thoroughly remove soap
film with dry cloth.
5.3 Techncal data
Power supply:
Technical and design modifications reserved.
220V-240V, 50Hz

Tower Fan / User Manual
11 / 12 EN
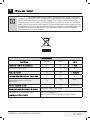
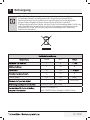
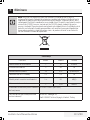
6
Symbol Value
F 21 m
3
P 45 W
SV 0.47 (m
3
P
SB
0.5 W
Fan sound power level L
WA
65 dB(A)
C 2.50 meters/sec
IEC 60879: 1986+ (corr. 1992)
Arcelik A.S. Karaagac Cd.
No:2-6 34445 Sutluce, Beyoglu, Istanbul, Turkey
C
Note: This symbol indicates that this product shall not be disposed with other
household wastes at the end of its service life. Used device must be returned to ocial
collection point for recycling of electrical and electronic devices. To nd these collection
systems please contact to your local authorities or retailer where the product was
purchased. Each household performs important role in recovering and recycling of old
appliance. Appropriate disposal of used appliance helps prevent potential negative
consequences for the environment and human health.

www.beko.com

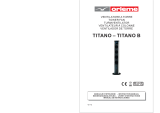
Ventilateur colonne
EFW6000WS
FR
Manuel d'utilisation
EN/FR/IT/DE/RO

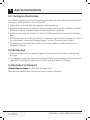
C
A
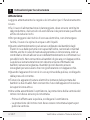
Avertissement relatif aux actions à ne jamais
effectuer.
B
Avertissement : risque d’électrocution.
Avertissement : risque d’incendie.
Avertissement : risque de brûlure.
Ce produit a été fabriqué dans le respect de l’environnement et dans des installations modernes.
Ce produit est conforme à la
réglementation DEEE (Déchets
équipements électriques et
électroniques) en vigueur.
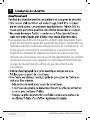
Veuillez d'abord lire ce manuel d’utilisation !
Signication des pictogrammes
:
Chère cliente, cher client, Nous vous remercions d’avoir acheté un produit Beko.
Nous espérons que ce produit vous apportera entière satisfaction. Tous nos
produits sont fabriqués dans une usine moderne et font l’objet d’un contrôle de
qualité minutieux. À cet effet, veuillez lire en intégralité le présent manuel avant
d’utiliser cet appareil et conservez-le soigneusement pour une utilisation
ultérieure. Si vous remettez le produit à un autre utilisateur, remettez-le-lui avec
le manuel de l’utilisateur. Veillez à bien respecter les consignes et les instructions
figurant dans le manuel d’utilisation.
Vous trouverez les symboles suivants dans ce manuel d’utilisation :
Informations importantes et conseils utiles
concernant l’utilisation de l’appareil.
Avertissement à propos des situations
dangereuses qui pourraient entraîner des
blessures ou des dégâts matériels.

3 / 12 FR
1 Consgnes de sécurté 4
2 Schéma des pèces 6
3 Instructons de montage 7
4 Instructons d’utlsaton 8
4.1 Télécommande (Fig. 4) . . . . . . . . . . . . . . . . . . . . . . . . . . . . . . . . . . . . . . . . . . . . . . . . . . . . . . . . . . . . . . . . . . . . . . . . . . . . .8
4.2 Signalétique des touches sur la colonne/le tableau du ventilateur (Fig. 6). . . . . . . . . . . . . . . . . . . . . . . . .9
5 Autres nstructons 10
5.1 Consignes d’entretien. . . . . . . . . . . . . . . . . . . . . . . . . . . . . . . . . . . . . . . . . . . . . . . . . . . . . . . . . . . . . . . . . . . . . . . . . . . . . 10
5.2 Nettoyage. . . . . . . . . . . . . . . . . . . . . . . . . . . . . . . . . . . . . . . . . . . . . . . . . . . . . . . . . . . . . . . . . . . . . . . . . . . . . . . . . . . . . . . . . 10
5.3 Données techniques . . . . . . . . . . . . . . . . . . . . . . . . . . . . . . . . . . . . . . . . . . . . . . . . . . . . . . . . . . . . . . . . . . . . . . . . . . . . . . 10
6 Mse au rebut 11
Tables des matères
Ventilateur colonne/Manuel d'utilisation

4 / 12 FR
1
•
•
•
•
-
-
-
•
Ventilateur colonne/Manuel d'utilisation
Cet appareil peut être utilisé par des enfants âgés d’au moins 8 ans
et par des personnes ayant des capacités physiques, sensorielles ou
mentales réduites ou dénuées d’expérience ou de connaissance, s’ils
(si elles) sont correctement surveillé(es) ou si des instructions
relatives à l’utilisation de l’appareil en toute sécurité leur ont été
données et si les risques encourus ont été appréhendés. Les enfants
ne doivent pas jouer avec l’appareil. Le nettoyage et l’entretien par
l’usager de doivent pas être eectués par des enfants sans
surveillance.

5 / 12 FR
1 Consgnes de sécurté
Consignes de sécurité
•
Ne tentez jamais d’introduire vos doigts, un crayon ou tout autre
objet à travers la grille lorsque le ventilateur est en marche.
•
Débranchez le ventilateur lorsque vous le déplacez d’un endroit à
un autre.
•
Assurez-vous que le ventilateur est placé sur une surface stable
lorsqu’il est en marche, afin d’éviter qu’il ne se renverse.
•
Ne mettez pas le ventilateur en marche à proximité d’une fenêtre
car la pluie pourrait générer un danger électrique en s’infiltrant
dans l’appareil.
•
Cet appareil est uniquement conçu pour un usage domestique.
Ventilateur colonne/Manuel d'utilisation
•
Ce symbole indique que ce produit ne doit pas être jeté
avec les déchets ménagers à la n de sa vie utile. Les appareils
usagés doivent être retournés au point de collecte ociel
destiné au recyclage des appareils électriques et électroniques.
Pour trouver ces systèmes de collecte, veuillez contacter les
autorités locales ou le détaillant auprès duquel vous avez
acheté le produit. Chaque ménage joue un rôle important dans
la récupération et le recyclage des appareils mé nagers usagés.
L’élimination appropriée des appareils usagés aide à prévenir
les conséquences négatives potentielles pour l’environnement
et la santé humaine.

6 / 12 FR
1
2
3
5
4
1. Colonne
2. Partie avant du socle
3. Partie arrière du socle
4. Écrou en plastique
5. Cordon d’alimentation
C
Remarque : Toutes les illustrations présentes dans ce manuel sont données
la forme actuelle prévaut.
2 Schéma des pèces
Ventilateur colonne/Manuel d'utilisation
uniquement à titre d’exemple. En cas de différence entre le produit réel et son
illustration,

7 / 12 FR
1. Sortez la colonne de ventilation et les pièces détachées de la boîte. Placez la partie avant du socle
sur la partie arrière, puis enclenchez-les pour les unir. (Voir Fig. 1)
2. Passez le cordon d’alimentation dans l’orifice, puis insérez la colonne du ventilateur dans le socle.
(Voir Fig. 3)
3. Fixez la colonne du ventilateur dans le socle à l’aide de l’écrou en plastique. (Voir Fig. 2)
Orifice de sortie
Fig. 1
Fig. 2 Fig. 3
3 Instructons de montage
Ventilateur colonne/Manuel d'utilisation

8 / 12 FR
4.1 Télécommande (Fg. 4)
a. Instructions relatives aux touches
1. « » Touche Marche/Arrêt
La touche « Marche » permet de mettre en marche le ventilateur. Le ventilateur se
met en marche sur la vitesse Brise.
Appuyez sur la touche « Arrêt » pour éteindre le ventilateur.
2. « » Touche Vitesse
Une fois le ventilateur en marche, appuyez sur cette touche plusieurs fois de suite
pour modifier la vitesse du souffle selon l’ordre suivant : « 1-2-3 ».
3. « » Touche Mode
Appuyez sur cette touche pour sélectionner un mode. Lorsque vous appuyez sur
cette touche plusieurs fois de suite ou que vous la maintenez enfoncée, les modes défilent selon cet
ordre : Normal, Naturel et Nocturne. Le voyant lumineux indique le mode sélectionné.
4. «
Lorsque le ventilateur est en marche, appuyez sur cette touche pour sélectionner le mode Oscillation.
Les voyants lumineux au niveau de l’affichage peuvent indiquer le mode d’oscillation du ventilateur.
5. «
b. Piles
(piles non fournies)
C
Fig. 5
Télécommande
Pile
Couvercle du
compartiment
4 Instructons d’utlsaton
Fig. 4
Ventilateur colonne/Manuel d'utilisation
» Touche Oscillation
» Touche Minuteur
souffle d’air. Le minuteur augmente par incréments de 1 heure jusqu’à 8 heures.
1. Faites glisser le couvercle du compartiments des piles pour l’ouvrir.
3. Refermez le couvercle du compartiment des piles.
2. Installez les piles comme indiqué dans la Fig. 5.
rechargeables.
Appuyez sur la touche Minuteur plusieurs fois de suite pour définir l’heure de mise en marche du
Remarque : Utilisez des piles alcalines de taille « AAA ». N’utilisez pas de piles
des piles
Modèle <IEC> : LR03
Voltage <V> : 1.5
Dimensions <mm> : Ø10*44
Capacité <mAh> : 1150
Type : batterie sèche
Matériau : zinc manganèse
La page charge ...
La page charge ...
La page charge ...
La page charge ...
La page charge ...
La page charge ...
La page charge ...
La page charge ...
La page charge ...
La page charge ...
La page charge ...
La page charge ...
La page charge ...
La page charge ...
La page charge ...
La page charge ...
La page charge ...
La page charge ...
La page charge ...
La page charge ...
La page charge ...
La page charge ...
La page charge ...
La page charge ...
La page charge ...
La page charge ...
La page charge ...
La page charge ...
La page charge ...
La page charge ...
La page charge ...
La page charge ...
La page charge ...
La page charge ...
La page charge ...
La page charge ...
La page charge ...
La page charge ...
La page charge ...
La page charge ...
-
 1
1
-
 2
2
-
 3
3
-
 4
4
-
 5
5
-
 6
6
-
 7
7
-
 8
8
-
 9
9
-
 10
10
-
 11
11
-
 12
12
-
 13
13
-
 14
14
-
 15
15
-
 16
16
-
 17
17
-
 18
18
-
 19
19
-
 20
20
-
 21
21
-
 22
22
-
 23
23
-
 24
24
-
 25
25
-
 26
26
-
 27
27
-
 28
28
-
 29
29
-
 30
30
-
 31
31
-
 32
32
-
 33
33
-
 34
34
-
 35
35
-
 36
36
-
 37
37
-
 38
38
-
 39
39
-
 40
40
-
 41
41
-
 42
42
-
 43
43
-
 44
44
-
 45
45
-
 46
46
-
 47
47
-
 48
48
-
 49
49
-
 50
50
-
 51
51
-
 52
52
-
 53
53
-
 54
54
-
 55
55
-
 56
56
-
 57
57
-
 58
58
-
 59
59
-
 60
60


Beko EFW6000WS Le manuel du propriétaire
- Catégorie
- Ventilateurs ménagers
- Taper
- Le manuel du propriétaire
dans d''autres langues
- italiano: Beko EFW6000WS Manuale del proprietario
- English: Beko EFW6000WS Owner's manual
- Deutsch: Beko EFW6000WS Bedienungsanleitung
- română: Beko EFW6000WS Manualul proprietarului
Documents connexes
Autres documents
-
Beurer LV 200 Mode d'emploi
-
-
Honeywell HO-1100RE Manuel utilisateur
-
LEVOIT LTF-F361-WEU Mode d'emploi
-
-
-
S&P ARTIC TOWER M Installation Manual And Operating Instructions
-
Klarstein Silent Storm Manuel utilisateur
-
 Orieme TITANO B Manuel utilisateur
-
Koenic KTFC 6020 Le manuel du propriétaire
