
Stand Fan
User Manual
EFS8000WI
EN

Please read this user manual rst!
Dear Customer,
Thank you for preferrng a Beko product. We hope that you get the best results
from your product whch has been manufactured wth hgh qualty and state-of-
the-art technology. Therefore, please read ths entre user manual and all other
accompanyng documents carefully before usng the product and keep t as a
reference for future use. If you handover the product to someone else, gve the user
manual as well. Follow all warnngs and nformaton n the user manual.
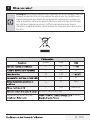
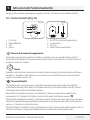
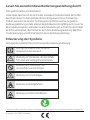
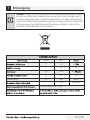
Meanings of the symbols
Followng symbols are used n the varous secton of ths manual:
C
Important nformaton or
useful hnts about usage.
A
Warnng for hazardous
stuatons wth regard to lfe
and property.
Warnng to actons that must
never perform.
B
Warnng for electrc shock.
Warnng for danger of fre.
Warnng for hot surfaces.
This product has been produced in environmentally friendly, modern facilities
Complies with the WEEE Regulation.

Stand Fan / User Manual 3 / 16 EN
1 Safety nstructons 4
2 Part fgure 6
3 Assembly nstructons 7
4 Grll & Fan blade assembly 8
5 Operatng nstructons 9
5.1 Remote controller (Fg. 8). . . . . . . . . . . . . . . . . . . . . . . . . . . . . . . . . . . . . . . . . . . . . . . . . . . . . . . . . . . . . . . . . . . . . . . . . . .9
5.2 Control panel (Fg. 10). . . . . . . . . . . . . . . . . . . . . . . . . . . . . . . . . . . . . . . . . . . . . . . . . . . . . . . . . . . . . . . . . . . . . . . . . . . . . 10
5.3 Tlt adjustment. . . . . . . . . . . . . . . . . . . . . . . . . . . . . . . . . . . . . . . . . . . . . . . . . . . . . . . . . . . . . . . . . . . . . . . . . . . . . . . . . . . . .11
5.4 Heght adjustment. . . . . . . . . . . . . . . . . . . . . . . . . . . . . . . . . . . . . . . . . . . . . . . . . . . . . . . . . . . . . . . . . . . . . . . . . . . . . . . . .11
5.5 Pvotng angle adjustment. . . . . . . . . . . . . . . . . . . . . . . . . . . . . . . . . . . . . . . . . . . . . . . . . . . . . . . . . . . . . . . . . . . . . . . . .11
5.6 Screen-off functon. . . . . . . . . . . . . . . . . . . . . . . . . . . . . . . . . . . . . . . . . . . . . . . . . . . . . . . . . . . . . . . . . . . . . . . . . . . . . . . 12
5.7 Forced shutdown . . . . . . . . . . . . . . . . . . . . . . . . . . . . . . . . . . . . . . . . . . . . . . . . . . . . . . . . . . . . . . . . . . . . . . . . . . . . . . . . . 12
6 Other 13
6.1 Batteres nstructons (Fg. 9). . . . . . . . . . . . . . . . . . . . . . . . . . . . . . . . . . . . . . . . . . . . . . . . . . . . . . . . . . . . . . . . . . . . . 13
6.2 How to use the remote controller correctly . . . . . . . . . . . . . . . . . . . . . . . . . . . . . . . . . . . . . . . . . . . . . . . . . . . . . . 13
6.3 Overheat protecton of the motor . . . . . . . . . . . . . . . . . . . . . . . . . . . . . . . . . . . . . . . . . . . . . . . . . . . . . . . . . . . . . . . . 13
6.4 Mantenance nstructons. . . . . . . . . . . . . . . . . . . . . . . . . . . . . . . . . . . . . . . . . . . . . . . . . . . . . . . . . . . . . . . . . . . . . . . . . 13
6.5 Cleanng. . . . . . . . . . . . . . . . . . . . . . . . . . . . . . . . . . . . . . . . . . . . . . . . . . . . . . . . . . . . . . . . . . . . . . . . . . . . . . . . . . . . . . . . . . . 13
6.6 Techncal data . . . . . . . . . . . . . . . . . . . . . . . . . . . . . . . . . . . . . . . . . . . . . . . . . . . . . . . . . . . . . . . . . . . . . . . . . . . . . . . . . . . . 14
7 Dsposal 15
CONTENTS

4 / 16 EN Stand Fan / User Manual
1 Safety nstructons
Warning
Read rules for safe operaton and nstructons carefully.
•
If the supply cord s damaged, t must be replaced by manufacturer
or ts servce agent or a smlarly qualfed person n order to avod a
hazard.
•
To protect aganst the rsk of electrcal shock, do not mmerse the
unt, cord or plug n water or other lqud.
•
Ths applance can be used by chldren aged from 8 years and above
and persons wth reduced physcal, sensory or mental capabltes
or lack of experence and knowledge f they have been gven
supervson or nstructon concernng use of the applance n a safe
way and understand the hazards nvolved. Chldren shall not play
wth the applance. Cleanng and user mantenance shall not be
made by chldren wthout supervson.
•
When the applance s not n use and before cleanng, unplug the
applance from the outlet.
•
Keep electrcal applances out of reach from Chldren or nfrm
persons. Do not let them use the applances wthout supervson.
•
When the fan was assembled, the rotor blade guard shall not be
taken off anymore.
-
Pror cleanng unplug the fan.
-
The rotor guard shall not be dssembled/opened to clean the rotor
blades.
-
Wpe the fan enclosure and rotor blade guard wth a slghtly damp
cloth.

Stand Fan / User Manual 5 / 16 EN
1 Safety nstructons
Rules for safe operation
•
Never nsert fngers, pencls, or any other object through the grlle
when fan s runnng.
•
Dsconnect fan when movng from one locaton to another.
•
Be sure fan s on a stable surface when operatng to avod
overturnng.
•
Do not use fan n wndow, ran may create electrcal hazard.
•
Household use only.

6 / 16 EN Stand Fan / User Manual
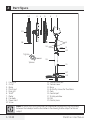
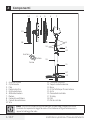
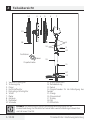
1 2 3 4 5 6 7
8
9
10
11
12
13
14
15
16
17
18
19
Loosen
Tghten
Spnner
1. Front grll
2. Crclp
3. Blade
4. Plastc nut
5. Rear grll
6. Shaft
7. Motor
8. Fan body
9. Power cord
10. Screw
11. Female termnals
12. Column cover
13. Base
14. Butterfly screws for fxed base
15. Pole
16. Control part
17. Dsplay wndow
18. Clp
19. Center pece
C
Note: All the pctures n ths manual are for explanaton purpose only. Any dscrepancy
between the real object and the llustraton n the drawng shall be subject to the real
subject.
2 Part fgure

Stand Fan / User Manual 7 / 16 EN
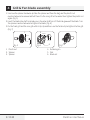
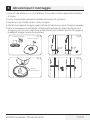
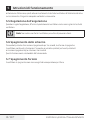
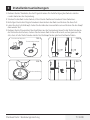
1. Take out the base tube, three butterfly screws for fxed base and the round base from the packng
carton;
2. Insert the tube to the round base, be sure to make the postonng screw algn wth the base;
3. Screw the three butterfly screws nto the holes on the tube and tghten them;
4. Loosen the fastenng knob, adjust the heght of nner tube and tghten the knob;
5. Take out the control part of the fan from the packng carton, loosen the fastenng screw at the back
of the fan, nsert the nner tube nto the bottom hole, make sure that the fastenng screw and the
fastenng knob n the same poston.
Fg. 1
Postoned fxed rope
Postoned fxed gap
Poston logo
Fg. 2
Fg. 3 Fg. 4
3 Assembly nstructons

8 / 16 EN Stand Fan / User Manual
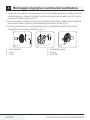
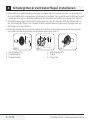
1. Unscrew the spnner clockwse (or take the spnner out from the bag) and the plastc nut
counterclockwse to remove both of them. Fx the rear grll to the motor then tghten the plastc nut
agan. (Fg. 5)
2. Insert the blade nto shaft, and make sure the rotor shaft pn s ftted nto groove of the blade. Turn
the spnner counterclockwse to tghten the blade. (Fg. 6)
3. Fx the front grll and the rear grll wth crclp clp and then use the fasten clp to tghten the fan grll.
(Fg. 7)
Fg. 5 Fg. 6 Fg. 7
1
2
4 5
6
3
Tghten
Tghten
Loosen
1. Plastc nut
2. Spnner
3. Spnner
4. Retanng pn
5. Slot
6. Blade set
4 Grll & Fan blade assembly

Stand Fan / User Manual 9 / 16 EN
Plug n the power adapter, after a "beep" tone, the fan s on standby.
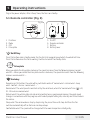
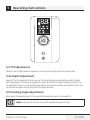
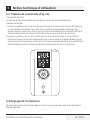
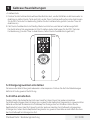
5.1 Remote controller (Fg. 8)
Fg. 8 Fg. 9
1
6 7 8
2
3
4
5
1. Pro/tmer
2. Mode
3. OSC
4. Drve plate
5. On/Off
6. Remote controller
7. Battery
8. Battery cover
“” On/Off key
Press ths button under standby mode, the fan starts at memoral speed whch t worked last tme.
Press ths button when the fan s workng, t wll be turned off to standby state.
“” Drive plate
When you rotate the drve plate clockwse, the speed ncreases from the followng manner: normal
wnd 01......When you rotate the drve plate counter-clockwse, the speed decreases from the followng
manner: normal wnd 12......
“” Mode key
Repeat press ths button, the wnd wll be swtched n order of “normal wnd - natural wnd - sleep
wnd - comfort - slence - normal wnd - ... ".
Normal wnd: The wnd speed s constant set by the wnd level, when the "normal wnd" con " " s lt,
01 - 12 levels are normal wnd.
Natural wnd: Fan wll smulate natural wnd accordng to pre-programmed manner, the wnd speed
changes n accordance wth the program, whch makes people feelng dle, naturally and t lkes to be n
the nature.
Sleep wnd: The wnd weakens step by step durng the preset tme untl stop. And then the fan
swtches automatcally off so that man can drop asleep.
Comfortable wnd: The speed wll be changed wth the room temperature ntellgently.
5 Operatng nstructons

10 / 16 EN Stand Fan / User Manual
If the temperature s lower than 20°C, the fan wll stop workng. If the temperature s hgher than 20°C,
the fan wll work agan. When you choce comfortable wnd, the con " " wll be lghted and the IDM
dsplay "00".
Slence: Press ths key to make the fan swtch to the mute mode, n whch the nose s low and the
mute ndcator “ ” wll be on. Press ths key agan, the fan wll swtch to the normal ar mode and work
at the low speed.
" " OSC key
After the fan starts, repeatedly touch ths button to start or stop oscllaton.
"" PRO key
Under power-on state, tmed power-off can be set. Press the PRO button; t starts the tmng power-
off state. "Tmng" and con dsplayed on the fan dsplay wll flash once per second, the rotate the drve
plate clockwse, the fan dsplay wll dsplay 0.5 → 1.0 → ...... → 12.0 → 00 → 0.5 → ...... n cycle, rotate
the drve plate counterclockwse, t cycles as 7.5 → ...... → 0.5 → 00 → 12.0 → .......
When set a tme, 5 seconds wthout any operaton, the tmng on the dsplay flashes twce and beep to
refer successfully settngs, f there s any button operaton n fve seconds (except for on/off button),
the tme s successfully set and the fan returns to current state mmedately, "Tmng" and con stops
flashng, f the tmng button s pressed n fve seconds then tmng s cancelled. If there s tme settng,
then “Tmng" and con s lt, f not, t s off. When setup s successful, the dsplay returns to dsplay the
wnd level.
Under standby mode, press the PRO button to set power-on tme, "PRO" and con s lt, the operaton
mode please refers to tmed power-off; rotate the drve plate to adjust the tme. After adjustment, the
set tme wll be dsplayed on the screen. To cancel a tme settng, user only need to repeatedly press
the PRO button.
Inqury: Under workng state, press forward/tmng button to enter the tmng status, user can check
the set tme, and user can re-set the tme n fve seconds; f no operaton wthn fve seconds, the tme
shown on the screen flashes twce and returned to the wnd level.
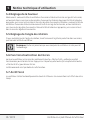
5.2 Control panel (Fg. 10)
•
On/Off button
Same as them on remote control.
•
Functon button
1. Under workng state, short press the functon button, the fan wll alternate between oscllaton
and fx; Long press the button, the fan enters nto the tmng functon, refer to the operatng
nstructons of PRO button on remote control (To cancel the tmer, long press functon button).
2. Under standby mode, short press of the functon button s nvald; Long press the functon button,
the fan enters nto the appontment startng functon, refer to the operatng nstructons of PRO
button on remote control (To cancel the tmer, long press functon button).
5 Operatng nstructons

Stand Fan / User Manual 11 / 16 EN
5 Operatng nstructons
Fg. 10
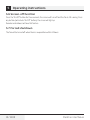
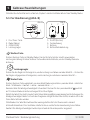
5.3 Tlt adjustment
To adjust the ar flow upward or downward, push the guards lghtly to the desred drecton.
5.4 Heght adjustment
Lowng: lft up the head wth a hand, unscrew the fastenng knob counterclockwse wth the other
hand, slowly lower the head to an approprate heght, and tghten the knob clockwse. Rsng: lft up
the head wth a hand, unscrew the fastenng knob counterclockwse slowly wth the other hand, rses
up the head to a proper heght, and tghten the knob clockwse.
5.5 Pvotng angle adjustment
When adjust the pvotng angle, fx the guards wth hands and reverse the head of fan.
C
Note: Do not forcbly twst the fan n order to avod damage to the fan.

12 / 16 EN Stand Fan / User Manual
5.6 Screen-off functon
Press the “On/Off" button for three seconds, the screen wll turn off and the fan s stll runnng. Press
any button (not nclude "On/Off” button), the screen wll lght up.
Remote control does not have ths feature.
5.7 Forced shutdown
The fan wll be turned off when there s no operaton wthn 12 hours.
5 Operatng nstructons

Stand Fan / User Manual 13 / 16 EN
6 Other
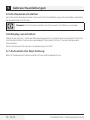
6.1 Batteres nstructons (Fg. 9)
Batteres should be nstalled before usng the remote control. It uses a 3 -volt button battery.
1. Open the battery cover;
2. Install a new battery, pay attenton to the battery polarty (+ and -);
3. Close the battery cover.
6.2 How to use the remote controller correctly
1. The remoter controller must pont to the recevng wndow of the fan when t s used;
2. The remoter controller can be normally used wthn fve meters and 30 degrees from the fan;
3. Avod drect sunlght on the recevng wndow, so as not to affect the recever's effect;
4. Remove the bult-n batteres when do not use the remote control for a long tme or before the
batteres are leaked.
6.3 Overheat protecton of the motor
The wndngs of the motor have a thermal-fuse that burns out and the fan swtches off and
temperature of the motor s no longer gong up so that plastc parts of the fan don’t subject to
deformaton so far so to be burned by the overheat f the motor s overheat for any unexpected
reason.
6.4 Mantenance nstructons
The fan requres lttle mantenance. Do not try to fx t by yourself. Refer t to qualfed servce
personnel f servce s needed.
1. Before cleanng and assemblng, fan must be unplugged.
2. To ensure adequate ar crculaton to the motor, keep vents at the rear of the motor free of dust. Do
not dsassemble the fan to remove dust.
3. Please wpe the exteror parts wth a soft cloth soakng a mld detergent.
4. Do not use any abrasve detergent or solvents to avod scratchng the surface. Do not use any of the
followng as a cleaner: gasolne, thnner.
5. Do not allow water or any other lqud nto the motor housng or nteror parts.
6.5 Cleanng
1. Be sure to unplug from the electrcal supply source before cleanng.
2. Plastc parts should be cleaned wth a soft cloth mosten wth mld soap. Thoroughly remove soap
flm wth dry cloth.

14 / 16 EN Stand Fan / User Manual
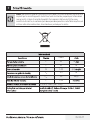
6.6 Techncal data
Power supply: 220V-240V, 50Hz
Techncal and desgn modfcatons reserved.
6 Other

Stand Fan / User Manual 15 / 16 EN
Symbol Value
F 45 m3
P W
SV 1.29 (m3
PSB 0.5 W
Fan sound power level LWA 65 dB(A)
C 2.50 meters/sec
IEC 60879: 1986+ (corr. 1992)
Beyoglu Istanbul Turkey
7
35
C
Note: Do not dspose of electrcal applances as unsorted muncpal waste, use separate
collecton facltes. Contact your local government for nformaton regardng the
collecton systems avalable. If electrcal applances are dsposed of n landflls or dumps,
hazardous substances can leak nto the groundwater and get nto the food chan,
damagng your health and well-beng.

www.beko.com

Ventilateur sur pied
Manuel de l’utilisateur
EFS8000WI
FR

Veuillez lire attentivement ce manuel de l’utilisateur
au préalable !
Cher clent,
Merc d’avor chos un produt Beko. Nous espérons que notre produt, fabrqué
avec une technologe de qualté supéreure et de dernère génératon, satsfera
vos attentes. Par conséquent, veullez lre attentvement ce manuel ans que tous
les autres documents y afférents avant l’utlsaton du produt. Veullez également
conserver ce manuel pour une consultaton ultéreure. S vous remettez le produt à
un autre utlsateur, remettez-le-lu avec le manuel de l’utlsateur. Veullez respecter
tous les avertssements et les nstructons contenus dans ce manuel de l’utlsateur.
Signication des symboles
Les symboles de sécurté c-après sont utlsés dans ce manuel :
C
Indque des nformatons mportantes ou des
consels utles relatfs à l’utlsaton du produt.
A
Indque un danger qu pourrat entraîner des
blessures, la mort ou des dégâts matérels.
Avertssement relatf aux actons à ne jamas
effectuer.
B
Avertssement : rsque d’électrocuton.
Avertssement : rsque d’ncende.
Avertssement : rsque de brûlure.
Ce produit a été fabriqué dans le respect de l’environnement et dans des installations modernes.
Ce produit est conforme à la réglementation
DEEE (Déchets équipements électriques
et électroniques) en vigueur.

Ventlateur sur ped/Manuel de l’utlsateur 3 / 16 FR
1 Consgnes de sécurté 4
2 Schéma des pèces 6
3 Instructons de montage 7
4 Montage de l’hélce et de la grlle du ventlateur 8
5 Notce technque d’utlsaton 9
5.1 Télécommande (Fg. 8) . . . . . . . . . . . . . . . . . . . . . . . . . . . . . . . . . . . . . . . . . . . . . . . . . . . . . . . . . . . . . . . . . . . . . . . . . . . . .9
5.2 Tableau de commande (Fg. 10). . . . . . . . . . . . . . . . . . . . . . . . . . . . . . . . . . . . . . . . . . . . . . . . . . . . . . . . . . . . . . . . . . . .11
5.3 Réglage de l’nclnason . . . . . . . . . . . . . . . . . . . . . . . . . . . . . . . . . . . . . . . . . . . . . . . . . . . . . . . . . . . . . . . . . . . . . . . . . . . .11
5.4 Réglage de la hauteur. . . . . . . . . . . . . . . . . . . . . . . . . . . . . . . . . . . . . . . . . . . . . . . . . . . . . . . . . . . . . . . . . . . . . . . . . . . . . 12
5.5 Réglage de l’angle de rotaton . . . . . . . . . . . . . . . . . . . . . . . . . . . . . . . . . . . . . . . . . . . . . . . . . . . . . . . . . . . . . . . . . . . . 12
5.6 Foncton d’extncton de l’écran. . . . . . . . . . . . . . . . . . . . . . . . . . . . . . . . . . . . . . . . . . . . . . . . . . . . . . . . . . . . . . . . . . . 12
5.7 Arrêt forcé . . . . . . . . . . . . . . . . . . . . . . . . . . . . . . . . . . . . . . . . . . . . . . . . . . . . . . . . . . . . . . . . . . . . . . . . . . . . . . . . . . . . . . . . 12
6 Autres nstructons 13
6.1 Instructons relatves à la ple (Fg. 9) . . . . . . . . . . . . . . . . . . . . . . . . . . . . . . . . . . . . . . . . . . . . . . . . . . . . . . . . . . . . . 13
6.2 Utlser correctement la télécommande . . . . . . . . . . . . . . . . . . . . . . . . . . . . . . . . . . . . . . . . . . . . . . . . . . . . . . . . . . 13
6.3 Protecton du moteur en cas de surchauffe . . . . . . . . . . . . . . . . . . . . . . . . . . . . . . . . . . . . . . . . . . . . . . . . . . . . . . 13
6.4 Consgnes d’entreten. . . . . . . . . . . . . . . . . . . . . . . . . . . . . . . . . . . . . . . . . . . . . . . . . . . . . . . . . . . . . . . . . . . . . . . . . . . . . 13
6.5 Nettoyage. . . . . . . . . . . . . . . . . . . . . . . . . . . . . . . . . . . . . . . . . . . . . . . . . . . . . . . . . . . . . . . . . . . . . . . . . . . . . . . . . . . . . . . . . 14
6.6 Données technques . . . . . . . . . . . . . . . . . . . . . . . . . . . . . . . . . . . . . . . . . . . . . . . . . . . . . . . . . . . . . . . . . . . . . . . . . . . . . . 14
7 Mse au rebut 15
Tables des matères

4 / 16 FR Ventlateur sur ped/Manuel de l’utlsateur
1 Consgnes de sécurté
Avertissement
Veullez lre attentvement les nstructons et consgnes de sécurté.
•
S le cordon d’almentaton est endommagé, l dot être remplacé
par le constructeur, une personne mandatée pour fare le SAV ou
toute autre personne qualfée afn d’évter toute mse en danger.
•
Ne jamas mmerger l’unté, le cordon ou la fche dans de l’eau n
dans tout autre lqude afn d’évter tout rsque d’électrocuton.
•
Cet appareil peut être utilisé par des enfants âgés d’au moins 8 ans
et par des personnes ayant des capacités physiques, sensorielles
ou mentales réduites ou dénuées d’expérience ou de
connaissance, s’ils (si elles) sont correctement surveillé(es) ou si
des instructions relatives à l’utilisation de l’appareil en toute
sécurité leur ont été données et si les risques encourus ont été
appréhendés. Les enfants ne doivent pas jouer avec l’appareil. Le
nettoyage et l’entretien par l’usager ne doivent pas être effectués
par des enfants sans surveillance.
•
Débranchez l’apparel de la prse électrque lorsque vous ne
l’utlsez pas ou avant de le nettoyer.
•
Une fos le ventlateur monté, la grlle de protecton de l’hélce ne
dot plus être enlevée.
-
Débranchez le ventlateur avant de le nettoyer.
-
Il n’est pas nécessare de démonter/d’ouvrr la grlle de protecton
du rotor pour nettoyer l’hélce.
La page charge ...
La page charge ...
La page charge ...
La page charge ...
La page charge ...
La page charge ...
La page charge ...
La page charge ...
La page charge ...
La page charge ...
La page charge ...
La page charge ...
La page charge ...
La page charge ...
La page charge ...
La page charge ...
La page charge ...
La page charge ...
La page charge ...
La page charge ...
La page charge ...
La page charge ...
La page charge ...
La page charge ...
La page charge ...
La page charge ...
La page charge ...
La page charge ...
La page charge ...
La page charge ...
La page charge ...
La page charge ...
La page charge ...
La page charge ...
La page charge ...
La page charge ...
La page charge ...
La page charge ...
La page charge ...
La page charge ...
La page charge ...
La page charge ...
La page charge ...
La page charge ...
-
 1
1
-
 2
2
-
 3
3
-
 4
4
-
 5
5
-
 6
6
-
 7
7
-
 8
8
-
 9
9
-
 10
10
-
 11
11
-
 12
12
-
 13
13
-
 14
14
-
 15
15
-
 16
16
-
 17
17
-
 18
18
-
 19
19
-
 20
20
-
 21
21
-
 22
22
-
 23
23
-
 24
24
-
 25
25
-
 26
26
-
 27
27
-
 28
28
-
 29
29
-
 30
30
-
 31
31
-
 32
32
-
 33
33
-
 34
34
-
 35
35
-
 36
36
-
 37
37
-
 38
38
-
 39
39
-
 40
40
-
 41
41
-
 42
42
-
 43
43
-
 44
44
-
 45
45
-
 46
46
-
 47
47
-
 48
48
-
 49
49
-
 50
50
-
 51
51
-
 52
52
-
 53
53
-
 54
54
-
 55
55
-
 56
56
-
 57
57
-
 58
58
-
 59
59
-
 60
60
-
 61
61
-
 62
62
-
 63
63
-
 64
64


dans d''autres langues
- italiano: Beko EFS8000WI Manuale utente
- English: Beko EFS8000WI User manual
- Deutsch: Beko EFS8000WI Benutzerhandbuch
