
Supplementary Operating Instructions
Instructions d’utilisation supplémentaires
Zusatz-Bedienungsanleitung
Istruzioni supplementari per l’uso
Gebruiksaanwijzing-supplement
Kompletterande bruksanvisning
Manual de instrucciones suplementario
Manual de instruções suplementar
STEREO CASSETTE DECK
PLATINE CASSETTE STEREO
STEREO-CASSETTENDECK
REGISTRATORE STEREO A CASSETTA
STEREO CASSETTEDECK
STEREO KASSETTDÄCK
GRABADORA DE CASETE ESTÉREO
GRAVADOR DE CASSETES ESTÉREO
CT-L77

2
RISK OF ELECTRIC SHOCK
DO NOT OPEN
CAUTION
IMPORTANT 1
CAUTION:
TO PREVENT THE RISK OF ELECTRIC SHOCK, DO
NOT REMOVE COVER (OR BACK). NO USER-
SERVICEABLE PARTS INSIDE. REFER SERVICING TO
QUALIFIED SERVICE PERSONNEL.
The exclamation point within an equilateral triangle is
intended to alert the user to the presence of important
operating and maintenance (servicing) instructions in
the literature accompanying the appliance.
The lightning flash with arrowhead symbol, within an
equilateral triangle, is intended to alert the user to the
presence of uninsulated "dangerous voltage" within the
product's enclosure that may be of sufficient magnitude
to constitute a risk of electric shock to persons.
Thank you for buying this PIONEER product.
Please read through these operating instructions so you
will know how to operate your model properly. After you
have finished reading the instructions, put them away in
a safe place for future reference.
In some countries or regions, the shape of the power plug
and power outlet may sometimes differ from that shown
in the explanatory drawings. However, the method of
connecting and operating the unit is the same.
¶ This component cannot be operated alone; please use
in combination with the CD receiver XC-L77.
Nous vous remercions pour cet achat d’un produit Pioneer.
Nous vous demandons de lire soigneusement ce mode
d’emploi ; vous serez ainsi à même de faire fonctionner
l’appareil correctement. Après avoir bien lu le mode
d’emploi, rangez-le dans un endroit sûr pour pouvoir vous
y référer ultérieurement.
Dans certains pays ou certaines régions, la forme de la fiche
d’alimentation et de la prise d’alimentation peut différer de
celle qui figure sur les schémas, mais les branchements et
le fonctionnement de l’appareil restent les mêmes.
¶ Cet appareil ne peut fonctionner seul; utilisez-le en
l’associant à l’ampli-syntoniseur/lecteur CD XC-L77.
These Supplementary Operating Instructions contain
information relating to connections and specifications
for the Pioneer Stereo Cassette Deck CT-L77.
For information regarding actual operating proce-
dures, consult the Operating Instructions furnished
with the Stereo CD Receiver XC-L77.
(Stereo CD Receiver XC-L77 and MD Recorder MJ-L77
are sold separately.
This product complies with the Low Voltage Directive
(73/23/EEC), EMC Directives (89/336/EEC, 92/31/EEC)
and CE Marking Directive (93/68/EEC).
Ces instructions complémentaires fournissent des
informations à propos des branchements et des
spécifications de la platine-cassette stéréo Pioneer CT-
L77.
En ce qui concerne les démarches de fonctionnement
proprement dites, veuillez consulter le Mode d’emploi,
fourni avec l’ampli-syntoniseur/Lecteur CD stéréo XC-
L77.
(L’ampli-syntoniseur/Lecteur CD stéréo XC-L77 et la
Platine Mini-Disque MJ-L77 sont vendus comme
composants séparés.)
Ce produit est conforme à la directive relative aux appareils
basse tension (73/23/CEE), aux directives relatives à la
compatibilité électromagnétique (89/336/CEE, 92/31/CEE) et
à la directive CE relative aux marquages (93/68/CEE).
WARNING: TO PREVENT FIRE OR SHOCK
HAZARD, DO NOT EXPOSE THIS APPLIANCE TO RAIN
OR MOISTURE.
ATTENTION: AFIN DE PREVENIR TOUS
RISQUES DE CHOC ELECTRIQUE OU D‘INCENDIE, NE PAS
EXPOSER CET APPAREIL A L‘HUMIDITE OU A LA PLUIE.
WARNUNG: ZUR VERMEIDUNG VON BRAND
UND ELEKTRISCHEM SCHLAG DIESE ANLAGE WEDER
REGEN NOCH FEUCHTIGKEIT AUSSETZEN.
ATTENZIONE: PER EVITARE IL RISCHIO DI
FIAMME O SCOSSE ELETTRICHE, NON ESPORRE QUESTI
APPARECCHI ALLA PIOGGIA O ALL’UMIDITÀ.
WAARSCHUWING: STEL DE
APPARATUUR NIET BLOOT AAN REGEN OF VOCHT OM
BRAND OF EEN GEVAARLIJKE ELEKTRISCHE SCHOK TE
VOORKOMEN.
VARNING: FÖR ATT FÖRHINDRA RISKEN FÖR
ELDSVÅDA OCH ELSTÖTAR SKALL DEN HÄR ANLÄGG-
NINGEN INTE UTSÄTTAS FÖR REGN ELLER FUKT.
ADVERTENCIA: PARA EVITAR INCENDIOS
Y DESCARGAS ELÉCTRICAS, NO EXPONGA ESTE
APARATO A LA LLUVIA NI A LA HUMEDAD.
ADVERTÊNCIA: A FIM DE EVITAR O PERIGO
DE INCÊNDIO OU CHOQUE ELÉCTRICO, NÃO EXPONHA O
APARELHO À CHUVA OU HUMIDADE.
Dolby noise reduction manufactured under license
from Dolby Laboratories Licensing Corporation.
“DOLBY” and the double-D symbol are trademarks of
Dolby Laboratories Licensing Corporation.
Réduction de bruit Dolby fabriquée sous licence de Dolby
Laboratories Licensing Corporation.
“DOLBY”, et le symbole double-D sont des marques de
Dolby Laboratories Licensing Corporation.
En/Fr
La page est en cours de chargement...
La page est en cours de chargement...

5
EnglishFrançaisDeutsch
Italiano
SvenskaEspañolPortuguês
Nederlands
Raccordement
Le schéma ci-dessus montre la platine cassette raccordée au
récepteur CD, sans enregistreur MD ou enregistreur CD en option.
(Si vous avez acheté l’un de ces appareils ou les deux, consultez
son mode d’emploi pour les détails du raccordement de cette
platine cassette au reste du système.)
Si vous raccordez seulement le récepteur CD et cette platine
cassette, raccordez-les en utilisant le câble ruban attaché à l’arrière
de la platine cassette. (Voir les Câbles ruban ci-dessous pour les
informations importantes sur leur connexion/déconnexion.)
Voir le mode d’emploi du XC-L77 pour les informations sur le
raccordement des enceintes, antennes et câbles d’alimentation.
Collegamento
Il diagramma di cui sopra mostra la piastra nastri collegata al
ricevitore CD, senza il registratore MD o CD disponibile separatamente.
(In caso si siano acquistati uno o entrambi di questi sistemi, fare
riferimento ai manuali di istruzioni rispettivi per informazioni
dettagliate sul collegamento di questa piastra nastri a tali impianti.)
In caso di collegamento esclusivo del ricevitore CD a questa piastra
nastri, condurre il collegamento utilizzando il cavo a nastro fissato
sulla parte posteriore della piastra nastri. (Vedere Cavi a Nastro, di cui
sotto, per istruzioni importanti sul loro collegamento/scollegamento.)
Vedere le istruzioni del sistema XC-L77 per istruzioni sul collegamento
degli altoparlanti, antenne e cavi di alimentazione.
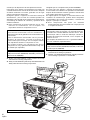
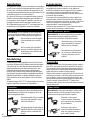
Connecting up
The diagram above shows the tape deck connected to the CD
receiver, without the optional MD recorder or CD recorder. (If you
bought either/both of these, see their respective instruction
manuals for details of connecting this tape deck to the rest of the
system.)
If you are connecting up only the CD receiver and this tape deck,
connect them using the ribbon cable attached to the rear of the
tape deck. (See Ribbon cables, below, for important information
on connecting/disconnecting these.)
See the XC–L77 instructions for information on connecting the
speakers, antennas, and power cables.
To insert, hold the connector and
push firmly into the socket until you
hear it click home.
Ribbon cables
IMPORTANT: Never connect or disconnect the system
ribbon cables while the power plug is connected to the wall
outlet. Doing so may damage the unit.
To remove, hold the connector
securely on either side with thumb
and forefinger and pull out from the
socket.
Anschlüsse
Das obige Diagramm zeigt, wie das Cassettendeck ohne optionalen
MD- oder CD-Recorder an den CD-Receiver anzuschließen ist (ist
einer oder sind beide Recorder vorhanden, so finden Sie Näheres
zum Anschluß des Cassettendecks an das übrige System in der
jeweiligen Bedienungsanleitung).
Werden lediglich der CD-Receiver und das Cassettendeck
angeschlossen, so erfolgt der Anschluß über das Bandkabel an der
Rückseite des Cassettendecks. (Näheres zum Verbinden/Abtrennen
der Bandkabel finden Sie weiter unten.)
Näheres zum Anschluß von Lautsprechern, Antennen und
Netzkabeln finden Sie in der Bedienungsanleitung von XC-L77.
En/Fr/Ge/It
IMPORTANT: Ne branchez et débranchez jamais le câble
ruban lorsque la fiche du cordon d’alimentation est branchée
sur une prise murale. L’appareil risque d’être endommagé.
Câble ruban
Pour brancher le câble, tenez le
connecteur et enfoncez-le à fond
dans la prise jusqu’à ce qu’il
s’encliquette.
Pour débrancher le câble, tenez le
connecteur des deux côtés avec le
pouce et l’index et sortez-le de la
prise.
WICHTIG: Keinesfalls die System-Bandkabel verbinden
oder abtrennen, solange der Netzstecker in der Netzsteckdose
steckt. Andernfalls kann es zu Geräteschäden kommen.
Bandkabel
Zum Verbinden den Stecker fassen
und fest in die Anschlußbuchse
drücken, bis er hörbar einrastet.
Zum Abtrennen den Stecker sicher an
beiden Seiten zwischen Daumen und
Zeigefinger fassen und aus der
Anschlußbuchse herausziehen.
IMPORTANTE: Non collegare e non scollegare mai i cavi
a nastro del sistema quando la spina del cavo di
alimentazione è inserita in una presa a muro. Ciò potrebbe
danneggiare l’apparecchio.
Cavi a nastro
Per inserire, afferrare il connettore e
inserirlo saldamente nella presa fino
a quando lo si sente scattare in
posizione.
Per staccare, afferrare saldamente il
connettore tenendolo per i lati con il
pollice e l’indice, ed estrarlo dalla
presa.
La page est en cours de chargement...

7
EnglishFrançaisDeutsch
Italiano
SvenskaEspañolPortuguês
Nederlands
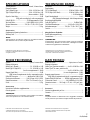
SPECIFICATIONS
Tracking method...................................... 4-track, 2-channel stereo
Frequency response
Type I (Normal) tape ............................... 20 Hz - 16,000 Hz ± 6 dB
Type II (High/CrO2) tape......................... 20 Hz - 16,000 Hz ± 6 dB
(when recorded at –20 dB)
Signal-to-Noise Ratio.............................................................. 56 dB
(EIAJ, peak recording level, audio compensation)
Dolby B NR ON ....................................10 dB improvement at 5 kHz
Wow and Flutter ................................ 0.08 % WRMS ±0.14 % (DIN)
External dimensions .................... 220 (W) x 75 (H) x 310 (D) mm
Weight.......................................................................................2.2 kg
Accessories
Supplementary Operating Instructions ...........................................1
Warranty Card ..................................................................................1
NOTE:
Specifications and design subject to possible modifica-
tion without notice, due to improvement.
FICHE TECHNIQUE
Système....................................................... 4 pistes, 2 canaux stéréo
Réponse de fréquence
Bande Type I (Normal)................................ 20 - 16.000 Hz, ± 6 dB
Bande Type II (High/CrO2) ......................... 20 - 16.000 Hz, ± 6 dB
(lors d’un enregistrement à –20 dB)
Rapport Signal/Bruit .............................................................. 56 dB
(EIAJ, niveau d’enregistrement de crête, compensation audio)
Dolby NR B en service ...........................Amélioration 10 dB à 5 kHz
Pleurage et scintillement .................. 0,08 % W rms ±0,14 % (DIN)
Dimensions externes ........................ 220 x 75 x 310 mm (l x h x p)
Poids .........................................................................................2,2 kg
Accessoires
Instructions d’utilisation supplémentaires .....................................1
Carte de garantie ..............................................................................1
REMARQUE:
Caractéristiques et conception sont sujettes à modifica-
tions sans préavis en vue d’améliorations.
DATI TECNICI
Sistema dei canali ...................................... 4 piste, stereo a 2 canali
Risposta in frequenza
Nastro Tipo I (posizione normale).......... da 20 a 16.000 Hz ± 6 dB
Nastro Tipo II (al cromo, posizione alta)
..................................................................da 20 a 16.000 Hz ± 6 dB
(in caso di registrazione a –20 dB)
Rapporto segnale/rumore........................................................ 56 dB
(EIAJ, livello di registrazione dei picchi, compensazione audio)
Sistema Dolby NR B attivato......... 10 dB di miglioramento a 5 kHz
Fluttuazioni e fruscii......................... 0,08 % WRMS ±0,14 % (DIN)
Dimensioni esterne ........220 (largh.) x 75 (alt). x 310 (prof.) mm
Peso...........................................................................................2,2 kg
Accessori
Istruzioni supplementari per l’uso ................................................. 1
Garanzia.......................................................................................... 1
NOTA:
L’aspetto esterno e i dati tecnici sono soggetti a modifiche
senza preavviso per ulteriori miglioramenti del prodotto.
Published by Pioneer Electronic Corporation.
Copyright © 1999 Pioneer Electronic Corporation.
All rights reserved.
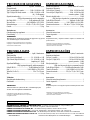
TECHNISCHE DATEN
Decksystem .............................................. 4 Spuren, 2-Kanal-Stereo
Frequenzgang
TYP I (Normalband)................................. 20 Hz bis 16 kHz ± 6 dB
TYP II (High-/CrO2-Band) ....................... 20 Hz bis 16 kHz ± 6 dB
(–20 dB Aufnahme)
Signal-Rauschabstand............................................................ 56 dB
(EIAJ, Spitzenaufnahmepegel, Audio-Kompensierung)
Rauschverminderungseffekt
Dolby NR Typ B Ein................................................. 10 dB bei 5 kHz
Gleichlaufschwankungen ....................... 0,08 % eff. ±0,14% (DIN)
Außenabmessungen..................... 220 (B) x 75 (H) x 310 (T) mm
Gewicht .................................................................................... 2,2 kg
Mitgeliefertes Zubehör
Zusatz-Bedienungsanleitung.......................................................... 1
Garantiekarte .................................................................................. 1
ANMERKUNG:
Änderungen der technischen Daten und der äußeren
Aufmachung bleiben im Sinne der ständigen Produkt-
verbesserung jederzeit vorbehalten.
Publication de Pioneer Electronic Corporation.
© 1999 Pioneer Electronic Corporation.
Tous droits de reproduction et de traduction réservés.
Veröffentlicht von Pioneer Electronic Corporation.
Urheberrechtlich geschützt © 1999 Pioneer Electronic
Corporation. Alle Rechte vorbehalten.
Pubblicato da Pioneer Electronic Corporation.
Copyright © 1999 Pioneer Electronic Corporation.
Tutti i diritti riservati.
En/Fr/Ge/It
La page est en cours de chargement...
-
 1
1
-
 2
2
-
 3
3
-
 4
4
-
 5
5
-
 6
6
-
 7
7
-
 8
8


dans d''autres langues
- italiano: Pioneer CT-L77 Manuale utente
- English: Pioneer CT-L77 User manual
- español: Pioneer CT-L77 Manual de usuario
- Deutsch: Pioneer CT-L77 Benutzerhandbuch
- Nederlands: Pioneer CT-L77 Handleiding
- português: Pioneer CT-L77 Manual do usuário
- svenska: Pioneer CT-L77 Användarmanual