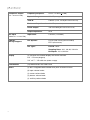
HeadRush Looperboard Guide de démarrage rapide
- Taper
- Guide de démarrage rapide


2
Quickstart Guide (English)
Introduction
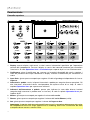
Box Contents
Looperboard Software Download Card
USB Cable Quickstart Guide
Power Adapter Safety & Warranty Manual
Important: This Quickstart Guide covers basic functionality of the HeadRush Looperboard. Visit
headrushfx.com to download the full, detailed User Guide, which may also contain additional
information for new features and improvements after firmware updates.
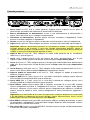
Support
For the latest information about this product (documentation, technical specifications, system
requirements, compatibility information, etc.) and product registration, visit headrushfx.com.
For additional product support, visit headrushfx.com/support.
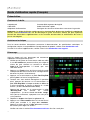
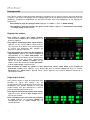
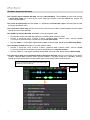
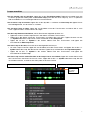
Get Started!
Here are some steps to start recording quickly:
1. Make sure your guitar or other sound source is
connected to an input on the rear panel, and set
the input gain level by turning the Input (1–4)
knob for the input you want to use.
2. Tap Fixed at the bottom of the touchscreen
(Fixed Mode enables playback and/or recording
of all tracks simultaneously).
3. Press the •Rec/Play/Dub footswitch for Track 1,
and start recording!
4. When you are done recording the first track,
press that •Rec/Play/Dub footswitch again. Your
recording will return to the beginning and start
looping in its “playback mode” (the waveform will
turn green).
Press the •Rec/Play/Dub footswitch once more
to enter the “overdub mode” for that track (the
waveform will turn red). You can now overdub
more playing on that track.
5. Repeat Steps 4–5 for Tracks 2–4.
6. Tap the meter icon at the top of the
touchscreen to enter the Meter page. Tap and
drag the gray line at the top of a meter to adjust
its level.
See Basic Operation to learn more.

3
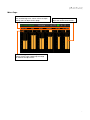
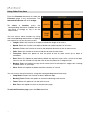
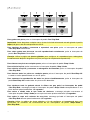
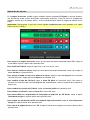
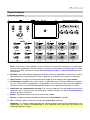
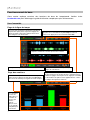
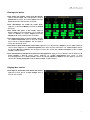
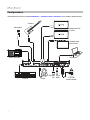
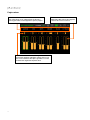
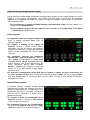
Features
Top Panel
1
2
5
4
5
4
5
4
5
4
5
4
5
4
5
4
5
4
5
4
5
4
5
4
5
4
6
7
8
3333
1. Touchscreen: This full-color multi-touch display shows information relevant to the
Looperboard’s current operation. Touch the display (and use the hardware controls) to control
the interface. See Basic Operation > Overview to learn how it works.
2. Encoder: Turn this encoder to scroll through the available menu options or adjust the parameter
values of the selected field in the display. Push the encoder to confirm your selection.
3. Input Gain: Turn these knobs to adjust the independent gain level of each input.
4. Footswitches: Use these footswitches to perform different functions. The eight right-most
footswitches correspond to the four tracks of a loop. See the Basic Operation chapter to learn
how to use them.
5. Footswitch Indicators: These lights indicate the status of different functions (performed by the
footswitch below each one). See the Basic Operation chapter to learn about them.
6. Master: Turn this knob to adjust the volume level of the outputs.
7. Phones: Turn this knob to adjust the volume level of the Phones output.
8. Aux: Turn this knob to adjust the volume level of the Aux input.
Important: The audio signal from the Aux input is routed directly to the outputs. It is also
unaffected by the master volume or phones volume knobs.

4
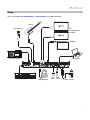
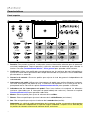
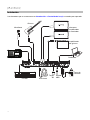
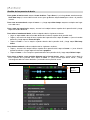
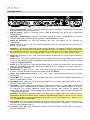
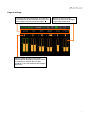
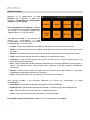
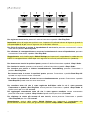
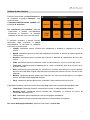
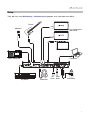
Rear Panel
1
2
3
4
5555
6
7
8
9
10 11 12
13
14
15
1. Power Input (19 VDC, 3.42 A, center-positive): Connect this input to a power outlet using the
included power adapter.
2. Power Adapter Restraint: Secure the power adapter cable to this restraint to prevent it from
accidentally unplugging.
3. Power Switch: Press this button to turn the Looperboard’s power on. Press and hold this button to
turn the Looperboard’s power off.
4. Vent: Make sure this vent is unobstructed while using the Looperboard.
5. Inputs (XLR or 1/4”/6.35 mm, TRS): Connect your guitar, instrument, drum machine, keyboard, or
other audio source to these inputs. You can enable or disable +48V phantom power for these inputs
in the Global Settings page.
Important: Only enable phantom power if your microphone requires it. Most dynamic microphones
and ribbon microphones do not require phantom power, while most condenser microphones do.
Consult your microphone's documentation to find out whether it needs phantom power.
6. Aux Input (1/8”/3.5 mm, TRS): Connect an optional audio source (e.g., smartphone, tablet, etc.) to
this input. Use the Aux knob to control the volume level.
7. Outputs (XLR): Connect these outputs to the inputs of your mixer, active loudspeaker, etc. Use the
Master knob to control the volume level. You can adjust the ground-lift setting for these outputs on
the Global Settings page.
8. Outputs (1/4”/6.35 mm, TRS): Connect these outputs to the inputs of your amplifier, audio interface,
mixer, etc. Use the Master knob to control the volume level. You can switch the level of these
outputs between Amp and Line on the Global Settings page.
9. Phones Output (1/4”/6.35 mm, TRS): Connect stereo headphones to this output. Use the Phones
knob to control the volume level.
10. Expression Pedal Input (1/4”/6.35 mm, TRS): Connect an optional expression pedal to this input.
11. MIDI In (5-pin DIN): Use a standard MIDI cable to connect this input to the MIDI output of an optional
external MIDI device.
12. MIDI Out/Thru (5-pin DIN): Use a standard MIDI cable to connect this output to the MIDI input of an
optional external MIDI device. You can set this output to be a standard MIDI output or MIDI
throughput.
13. USB Type-B Port: Connect this USB port to a computer using a standard USB cable. This
connection allows the Looperboard to send and receive the digital audio signal to and from your
computer. You can also use this connection to import or export loops, individual audio files, backing
tracks, etc. This connection is also used to update the firmware.
Important: To avoid file loss or damage to your media, only disconnect USB and SD storage devices
from HeadRush Looperboard while it is powered off. Alternatively, go to the Import/Export menu
and then tap the name of the device under Unmount.
14. USB Type-A Ports: Connect USB flash drives to these USB ports to import or export loops to or
from Looperboard. You can also connect class-compliant USB devices to these USB ports for
external MIDI control.
15. SD Card Slot: Insert a standard SD/SDHC card into this slot to import or export loops to or from
Looperboard.


6
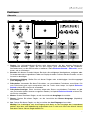
Basic Operation
This chapter describes some of Looperboard’s basic functions. Visit headrushfx.com to download
the complete User Guide for even more information.
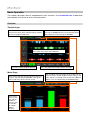
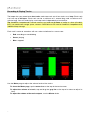
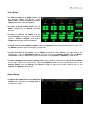
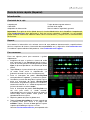
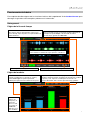
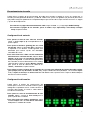
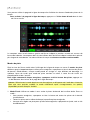
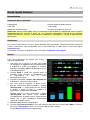
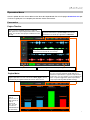
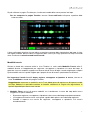
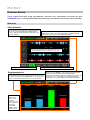
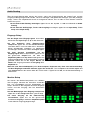
Overview
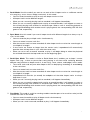
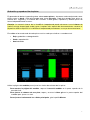
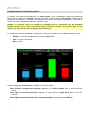
Timeline Page
Meter Page
These four lanes show your recorded loops as
well as how many layers each loop has.
This is the current playback position.
This is the name of the loop. A loop consists of the four
tracks plus the mixer, effect, and loop settings. Double-
tap here to change the loop name.
These meters show the volume level of the tracks as
they play. Tap and drag the gray line at the top of a
meter to adjust the volume level of a track.
These are the
names of each
track and the
number of
layers on each
one. Double-
tap a track
name to
rename it.
Tap an icon to enter each page, which enables you to
mix track levels, monitor playback, adjust settings, and
more. Tap the ••• icon to show a menu with additional
options, such as Loop Settings and Global Settings.
This is the length of the longest track in this loop.
This is the current tempo, which you can change by
pressing the Tempo footswitch at the desired speed
or by tapping here and turning the encoder.

7
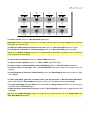
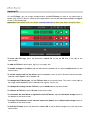
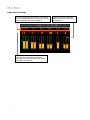
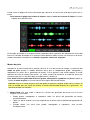
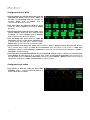
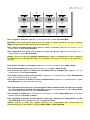
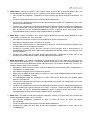
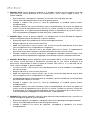
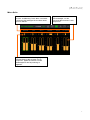
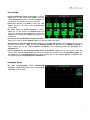
Mixer Page
These are the names of each track, as well as the
Click and Backing track, whose volume and pan
settings you can adjust on this page.
Touch and drag volume faders to
adjust the volume of each track.
Touch and drag pan sliders to adjust the stereo
balance of each track. Double-tap to enlarge
the slider for fine adjustments.

8
Recording & Playing Tracks
The looper lets you record onto four tracks and store each set of four tracks as a loop. Each track
can have up to 99 layers. Each track can be a minimum of 1 second long, and a maximum of 5
minutes long. You can record, play, and stop tracks independently of each other.
Tip: HeadRush Looperboard’s internal memory can hold over 9 hours of audio at a time (all audio),
but if you need more storage space, connect a USB drive or SD card to HeadRush Looperboard for
additional loop storage.
Each track’s meter or waveform will use a color to indicate its current state:
• Red: recording or overdubbing
• Green: playing
• Blue: stopped
Use the Meter page to adjust the volume levels of the tracks.
To show the Meter page, tap the meter icon at the top of the touchscreen.
To adjust the volume of a track, tap and drag the gray line at the top of a meter to adjust its
level.
To adjust the volume of the main outputs, turn the Master knob.

9
To record a track, press its •Rec/Play/Dub footswitch.
Important: Before recording anything, set the input volume level by turning the Input (1–4) knob for
each input you want to use.
To finish recording and start playback of a track, press its •Rec/Play/Dub footswitch again.
To overdub on a track that is currently playing, press the •Rec/Play/Dub footswitch again.
Tip: Use the Global Settings page to set Looperboard to overdub immediately after recording a
track (instead of just playing it).
To stop a track at any point, press its •Stop/–Undo footswitch.
To restart a track's playback, press its •Stop/–Undo footswitch again.
To restart a track and immediately start overdubbing, press its •Rec/Play/Dub footswitch.
To stop all tracks at any point, press the Start/Stop All footswitch when one or more tracks are
playing.
To start playback of all tracks simultaneously, press the Start/Stop All footswitch when all tracks
are stopped.
To undo everything you have recorded since you last pressed a •Rec/Play/Dub footswitch,
press and hold the •Stop/–Undo footswitch for that track for approximately 1.5 seconds.
To re-add everything you just undid, press and hold the •Stop/–Undo footswitch for that track for
approximately 1.5 seconds again.
To peel the most recent layer of a track, hold the •Rec/Play/Dub footswitch for approximately 1.5
seconds.
Tip: Use the Global Settings page to customize the hold functions for the •Stop/–Undo and
•Rec/Play/Dub footswitches.

10
You can use the Timeline page to view the waveforms of the tracks in your loop.
To show the Timeline page, tap the waveform icon at the top of the touchscreen.
The time counter in the lower-left corner indicates the current playback position of the loop. The
time counter in the lower-right corner indicates the length of the longest track in the loop. Both are
displayed as minutes:seconds.centiseconds.
Track Modes
Located at the bottom of the touchscreen in Timeline View, the Track Mode selection provides 5
different modes for Looperboard to record, overdub, and play your looper tracks. Generally, each
mode supports a different style of looping workflow. The best way to find out which Track Mode
works best with your workflow is to experiment and have fun!
To set how the looper records, overdubs, or plays your tracks, tap a Track Mode button at the
bottom of the Timeline page.
Tip: Set your Track Mode before recording or importing any audio into your loop. While you may
be able to change the selected mode after recording, your options may be limited.
1. Fixed Mode: Use this mode if you want 4 looper tracks with the same length. In this mode:
• You can record, overdub, or play all looper tracks simultaneously.
• All track lengths will be the same length as the first recorded looper track.
• When you set a track to record, overdub, or play, it will happen immediately.

11
2. Serial Mode: Use this mode if you want to use each of the 4 looper tracks as a different section
of a song (e.g., verse, chorus, bridge, and outro). In this mode:
• You can record, overdub, or play on only one looper track at a time.
• All looper tracks can be different lengths.
• When you set a currently playing track to overdub, it will happen immediately.
• When you set a currently stopped track to play or record/overdub, it will happen as soon as
the currently playing track reaches its end and stops. When a track is armed for playback or
recording/overdubbing while another track is playing back, the corresponding LED will flash
green or red, respectively.
3. Sync Mode: Use this mode if you want 4 looper tracks with different lengths that always stay in
sync. In this mode:
• You can record or play multiple tracks simultaneously.
• You must record a master track first.
• After the master track has been recorded, all other looper tracks must be the same length, or
a multiple of its length.
• If new tracks are shorter or longer than the master track, Looperboard will automatically
quantize them to keep them in sync with the master track.
• When you set a track to record, overdub, or play, it will begin doing so when the playhead
has reached the end of the loop and starts at the beginning again.
4. Serial-Sync Mode: This mode is similar to Serial Mode, but it enables you to keep 1 master
looper track (e.g., a drum or percussion track) playing at all times while switching between
different song sections on looper tracks 2, 3 and 4 (e.g., verse, chorus, and bridge). In this mode:
• The master track and only one other looper track can be playing, recording, or overdubbing
at the same time.
• You must record track a master track first.
• After the master track has been recorded, all other looper tracks must be the same length, or
a multiple of its length.
• Looperboard will auto-trim (or extend) the endpoints of the other looper tracks to always
keep them in sync.
• When you set a currently playing track to overdub, it will happen immediately.
• When you set a currently stopped track to play or record/overdub, it will happen as soon as
the currently playing track reaches its end and stops. When a track is armed for playback or
recording/overdubbing while another track is playing back, the corresponding LED will flash
green or red, respectively.
5. Free Mode: This mode is useful for creating ambient soundscapes or for musicians who just like
to break the rules! In this mode:
• You can record, overdub, or play all looper tracks simultaneously.
• All looper tr
acks can be different lengths.
• When you set a track to record, overdub, or play, it will happen immediately.

12
Applying FX
On the FX Page, you can assign multiple effects (called FX Racks) at once to an audio input or
looper track. Each FX Rack is made up of multiple effects that can be individually edited and toggled
on the FX Rack edit page.
Important: Download the full User Guide at headrushfx.com to learn more about using FX Racks.
To enter the FX Page, press the footswitch labeled FX, or tap the FX icon at the top of the
touchscreen.
To add an FX Rack, tap the plus sign (+) in an empty slot.
To enable or bypass an effect, tap the footswitches labeled 1–4, or tap the On/Off button on the
touchscreen.
To set the target audio for the effect, tap the dropdown menu in the FX Rack on the touchscreen,
and then select Inputs 1–4 or Tracks 1–4.
To change the FX Rack type, tap the FX Rack icon on the touchscreen. This icon is to the right of
the target audio dropdown menu and looks like a guitar, drums, etc.
To change the settings for the FX Rack, tap the knob icon on the touchscreen.
To remove an FX Rack, tap the X icon on the touchscreen.
To customize the footswitch assignments of the FX Racks, tap the Footswitch Assign button at
the bottom of the touchscreen.
To assign FX parameters to an external expression pedal, tap the Expression Assign button at
the bottom of the touchscreen.
To exit the FX Page, press the footswitch labeled FX, or tap a different page icon at the top of the
touchscreen.

13
Managing Loops
To save the current loop, tap the disk icon. Tap Save (if you have already saved it) or Save New
Loop (if this is a new loop) to save it, or tap Cancel to return to the previous screen.
To create a new loop, tap the ••• icon, and then tap New Loop, or tap anywhere else to close the
menu.
To load a new loop, tap and drag down on the top bar of the touchscreen, and then tap the loop
name.
To edit the loop's name, do any of the following:
• Double-tap the loop name in the top bar of the touchscreen.
• Tap and drag down on the top bar of the touchscreen, tap the ••• icon next to the loop
name, and then tap the pencil icon.
• Tap the ••• icon in the top-right corner of the touchscreen, and then tap Edit Loop Name.
To delete a loop, do either of the following:
• Tap and drag down on the top bar of the touchscreen, tap the ••• icon next to the loop you
would like to delete, and then tap the trash can icon.
• Tap the ••• icon in the top-right corner of the touchscreen, and then tap Delete Loop.
To move a loop to a different position in the loop list, tap and drag down on the top bar of the
touchscreen, tap the ••• icon next to the loop you would like to move, then tap and hold the
arrows icon and drag to the new position.
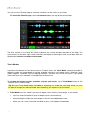
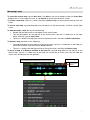
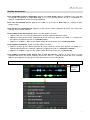
Tap and drag this bar downward to view list of loops.
Tap for more
o
p
tions.
Tap to save loop

14
Audio Routing
You can use the Audio Routing page to control where your input, looper track, and output audio
signals are sent. These settings are global settings (not per loop) so that you can quickly configure
Looperboard to work best for your gear and performance settings.
To show the Audio Routing page, tap the ••• icon and then tap Audio Routing.
To show the page for the inputs, tracks, or outputs, tap Input Setup, Track Setup or Output
Setup respectively.
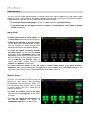
Input Setup
To adjust the level of an input signal, turn
its Input Gain knob (1–4) on the top panel.
To adjust the panning of an input signal,
tap its Pan slider and drag left or right.
You can enlarge this slider to make more
detailed adjustments by double-tapping.
To select an output to directly monitor
the input signal, tap the desired Output
1–4 button or the headphone icon under
Dry Send. Audio signal from the input will
be sent directly to the selected output(s).
Use the Master and Phones knobs to
adjust the output volume level of the
outputs and phones, respectively.
To stereo link your inputs if you are using a stereo audio source (e.g., drum machine,
keyboard, etc.), tap the On button for Inputs 1+2 and/or Inputs 3+4 under Stereo Link on the
right side of the touchscreen. Tap the Off button to disable stereo link.
Monitor Setup
You can use the Monitor Setup page for
listening to your inputs while recording,
overdubbing, and playing back loops. You
can control the level of each input, as well
as which output that you would like to
monitor to them on.
To adjust the monitor level of an input,
tap and drag the orange line at the top of
its meter.
To select an output for monitoring, tap
the desired Output 1–4 button or
headphone icon below an input meter.

15
Track Setup
To route an input to a looper track, tap
the desired Input 1–4 button. When
Stereo Link is enabled, Inputs 1+2 and/or
Inputs 3+4 will be selected together.
To select a track output mode, tap the
Mono (monoaural) or Stereo (binaural)
buttons.
To route a track to an output, tap the
desired Output 1–4 button. If the output
mode is Stereo, Outputs 1+2 and/or
Outputs 3+4 will be selected together.
To route a track to the phones output, tap the headphone icon at the bottom of each track. Use
the Phones knob to adjust the output volume level.
To route the click to an output, tap an Output 1–4 button under Click on the right side of the
touchscreen. Tap the headphone icon to route the click to the phones output. Use the Master
and Phones knobs to adjust the output volume level of the outputs and phones, respectively.
To select routing for the stereo backing track, tap the 1+2 or 3+4 buttons under B. Track Output
on the right side of the touchscreen. Tap the headphone icon to route the backing track to the
phones output. Use the Master and Phones knobs to adjust the output volume level of the
outputs and phones, respectively.
Output Setup
To adjust the output level of an individual
output, tap and drag the orange line at
the top of its meter.

16
Using Other Functions
Press the Function footswitch to show the
Functions page in the touchscreen. The
footswitch indicator will be lit orange.
To select a function, press the
corresponding footswitch (labeled on the
top panel in orange) or tap it on the
touchscreen.
You can access these functions by using
their corresponding footswitches or tapping
the respective icon on the touchscreen:
• Length: Select this function to multiply or divide the length of all tracks.
• Speed: Select this function to multiply or divide the speed and pitch of all tracks.
• Reverse: Select this function to reverse the playback direction of one or more tracks.
• Fade: Select this function to create a fade-out on one or more tracks.
• Transpose: Select this option to shift the pitch of one or more tracks up or down in
semitones.
• Peel: Select this option to permanently delete the top-most layer from a track of the loop.
You can use this function to strip the track all the way down to its original layer!
• Bounce: Select this option to copy one or more tracks of the loop to a single track, creating
available tracks in your loop.
• Clear: Select this option to delete the entire contents of a track.
You can access these functions by using their corresponding footswitches only:
• Loop Select: Select this function to load a different loop.
• Backing Track: Select this option to control the backing track feature.
• Tuner: Select this option to use the built-in tuner.
• Exit: Select this option to return to the previous page.
To exit the Functions page, press the Exit footswitch.

17
Guía de inicio rápido (Español)
Introducción
Contenido de la caja
Looperboard
Cable USB
Adaptador de alimentación
Tarjeta de descarga de software
Guía de inicio rápido
Manual sobre la seguridad y garantía
Importante: Esta guía de inicio rápido abarca la funcionalidad básica de la HeadRush Looperboard.
Visite headrushfx.com para descargar la Guía del usuario completa y detallada, la cual también
puede contener información adicional sobre nuevas características y mejoras tras las actualizaciones
de firmware.
Soporte
Para obtener la información más reciente acerca de este producto (documentación, especificaciones
técnicas, requisitos de sistema, información de compatibilidad, etc.) y registrarlo, visite headrushfx.com.
Para obtener soporte adicional del producto, visite headrushfx.com/support.
Para comenzar
Estos son algunos pasos para comenzar a grabar
rápidamente:
1. Asegúrese de que su guitarra o fuente de audio
esté conectada a una entrada del panel trasero y
ajuste el nivel de ganancia entrada girando la perilla
Input (1–4) correspondiente a la entrada que desea
utilizar.
2. Toque Fixed en la parte inferior de la pantalla táctil
(el modo Fixed activa la reproducción y/o
grabación de todas las pistas simultáneamente).
3. Pulse el interruptor de pedal •Rec/Play/Dub
correspondiente a la pista 1, ¡y comience a grabar!
4. Cuando haya terminado de grabar la primera pista,
pulse ese interruptor de pedal •Rec/Play/Dub
nuevamente. Su grabación regresará al comienzo y
comenzará el bucle en su "modo de reproducción"
(la forma de onda se volverá verde).
Pulsa el interruptor de pedal •Rec/Play/Dub una
vez más para entrar al “modo overdub”
(sobregrabar) para esa pista (la forma de onda se
volverá roja). Ahora puedes sobre grabar más
reproduciendo en esa pista.
5. Repita los pasos 4–5 para las pistas 2–4.
6. Toque el icono del medidor en la parte superior de
la pantalla táctil para entrar a la página del
medidor. Toque y arrastre la línea gris en la parte
superior del medidor para ajustar su nivel.
Consulte Funcionamiento básico para aprender más.

18
Características
Panel superior
1
2
5
4
5
4
5
4
5
4
5
4
5
4
5
4
5
4
5
4
5
4
5
4
5
4
6
7
8
3333
1. Pantalla: Esta pantalla multitáctil a todo color muestra información relevante para la operación
actual del Looperboard. Toque la pantalla (y utilice los controles de hardware) para controlar la
interfaz. Consulte Funcionamiento básico > Vista general para aprender cómo funciona.
2. Codificador: Utilice este codificador para desplazarse por las opciones de menú disponibles o
ajustar los valores de los parámetros del campo seleccionado en la pantalla. Pulse el codificador
para introducir su selección.
3. Ganancia de entrada: Gire estas perillas para ajustar el nivel de ganancia independiente de
cada entrada.
4. Interruptores de pedal: Utilice estos interruptores de pedal para realizar diferentes funciones.
Los ocho interruptores de pedal de más a la derecha corresponden a las cuatro pistas de un
precepto de bucle. Consulte el capítulo Funcionamiento básico para aprender a utilizarlos.
5. Indicadores de los interruptores de pedal: Estas luces indican el estado de las diferentes
funciones (ejecutadas por el interruptor de pedal debajo de cada una). Consulte el capítulo
Funcionamiento básico para aprender sobre ellas.
6. Master: Gire esta perilla para ajustar el volumen de las salidas.
7. Phones: Gire esta perilla para ajustar el volumen de la salida Phones (auriculares).
8. Aux: Gire esta perilla para ajustar el volumen de la entrada Aux (auxiliar).
Importante: La señal de audio proveniente de la entrada auxiliar se encamina directamente
hacia las salidas del Looperboard sin aplicarle ningún modelado. Tampoco se ve afectada por
las perillas de volumen maestro o de volumen de los auriculares.

19
Panel trasero
1
2
3
4
5555
6
7
8
9
10 11 12
13
14
15
1. Entrada de corriente (19 VCC, 3,42 A, centro positivo): Conecte esta entrada a una toma de
corriente utilizando el adaptador d’alimentación incluido.
2. Presilla del adaptador de corriente: Asegure el cable del adaptador de corriente a esta presilla
para evitar que se desconecte accidentalmente.
3. Interruptor de encendido: Pulse este botón para encender el Looperboard. Mantenga pulsado
este botón para apagar el Looperboard.
4. Ventilación: Asegúrese de que esta ventilación no se encuentre obstruida mientras utiliza el
Looperboard.
5. Entradas (XLR o 6,35 mm/1/4 pulg., TRS): Conecte su guitarra, instrumentos u otras fuentes de
audio a estas entradas.
Importante: Active la potencia fantasma solamente si su micrófono lo requiere. La mayoría de
los micrófonos dinámicos y de cinta no requieren alimentación fantasma, mientras que la
mayoría de los micrófonos de condensador la requieren. Consulte la documentación de su
micrófono para averiguar si necesita alimentación fantasma.
6. Entrada Aux (auxiliar) (3,5 mm/1/8 pulg., TRS): Conecte una fuente de audio opcional (por ej., un
teléfono inteligente [smartphone], tableta, etc.) a esta entrada.
7. Salidas (XLR): Conecte estas salidas a las entradas de su mezclador, altavoz activo, etc. Puede
modificar el ajuste de levantamiento de tierra de estas salidas en la página de ajustes globales.
8. Salidas (6,35 mm/1/4 pulg., TRS): Conecte estas salidas a las entradas de su amplificador,
interfaz de audio, etc. Puede conmutar el nivel de estas salidas entre Amp y Línea en la página
de ajustes globales.
9. Salida Phones (auriculares) (6,35 mm/1/4 pulg., TRS): Conecte auriculares estéreo estándar de
6,35 mm (1/4 pulg.) a esta salida. Use la perilla Phones para controlar el nivel de volumen.
10. Entrada del pedal de expresión (6,35 mm/1/4 pulg., TRS): Conecte a esta entrada un pedal de
expresión opcional.
11. Entrada de MIDI: (DIN de 5 patillas): Use un cable MIDI estándar para conectar esta entrada a la
salida MIDI de un dispositivo MIDI externo opcional.
12. Salida MIDI (DIN de 5 patillas): Use un cable MIDI estándar de para conectar esta salida a la
entrada MIDI de un dispositivo MIDI externo.
13. Puerto USB-B: Conecte este puerto USB a un ordenador utilizando un cable USB estándar.
Esta conexión permite que el Looperboard envíe y reciba la señal de audio digital desde y hacia
su ordenador. También puede utilizar esta conexión para importar o exportar equipos, presets
de modelos y listas de equipos. Esta conexión se usa también para actualizar el firmware.
Importante: Para evitar pérdidas de archivos o daños a sus medios, desconecte los dispositivos
de almacenamiento USB y SD de la HeadRush Looperboard únicamente cuando esté apagada.
Como alternativa, vaya al menú Import/Export y luego toque el nombre del dispositivo que
figura bajo Unmount.
14. Puertos USB-A: Conecte unidades de memoria USB a estos puertos USB para acceder
directamente a sus archivos mediante el Looperboard. También puede conectar dispositivos
USB que cumplen con la clase a estos puertos USB para permitir el control MIDI externo.
15. Ranura para tarjeta SD: Inserte una tarjeta SD/SDHC estándar en esta ranura para acceder
directamente a sus archivos mediante el Looperboard.

La page charge ...
La page charge ...
La page charge ...
La page charge ...
La page charge ...
La page charge ...
La page charge ...
La page charge ...
La page charge ...
La page charge ...
La page charge ...
La page charge ...
La page charge ...
La page charge ...
La page charge ...
La page charge ...
La page charge ...
La page charge ...
La page charge ...
La page charge ...
La page charge ...
La page charge ...
La page charge ...
La page charge ...
La page charge ...
La page charge ...
La page charge ...
La page charge ...
La page charge ...
La page charge ...
La page charge ...
La page charge ...
La page charge ...
La page charge ...
La page charge ...
La page charge ...
La page charge ...
La page charge ...
La page charge ...
La page charge ...
La page charge ...
La page charge ...
La page charge ...
La page charge ...
La page charge ...
La page charge ...
La page charge ...
La page charge ...
La page charge ...
La page charge ...
La page charge ...
La page charge ...
La page charge ...
La page charge ...
La page charge ...
La page charge ...
La page charge ...
La page charge ...
La page charge ...
La page charge ...
-
 1
1
-
 2
2
-
 3
3
-
 4
4
-
 5
5
-
 6
6
-
 7
7
-
 8
8
-
 9
9
-
 10
10
-
 11
11
-
 12
12
-
 13
13
-
 14
14
-
 15
15
-
 16
16
-
 17
17
-
 18
18
-
 19
19
-
 20
20
-
 21
21
-
 22
22
-
 23
23
-
 24
24
-
 25
25
-
 26
26
-
 27
27
-
 28
28
-
 29
29
-
 30
30
-
 31
31
-
 32
32
-
 33
33
-
 34
34
-
 35
35
-
 36
36
-
 37
37
-
 38
38
-
 39
39
-
 40
40
-
 41
41
-
 42
42
-
 43
43
-
 44
44
-
 45
45
-
 46
46
-
 47
47
-
 48
48
-
 49
49
-
 50
50
-
 51
51
-
 52
52
-
 53
53
-
 54
54
-
 55
55
-
 56
56
-
 57
57
-
 58
58
-
 59
59
-
 60
60
-
 61
61
-
 62
62
-
 63
63
-
 64
64
-
 65
65
-
 66
66
-
 67
67
-
 68
68
-
 69
69
-
 70
70
-
 71
71
-
 72
72
-
 73
73
-
 74
74
-
 75
75
-
 76
76
-
 77
77
-
 78
78
-
 79
79
-
 80
80


HeadRush Looperboard Guide de démarrage rapide
- Taper
- Guide de démarrage rapide
dans d''autres langues
- italiano: HeadRush Looperboard Guida Rapida
- English: HeadRush Looperboard Quick start guide
- español: HeadRush Looperboard Guía de inicio rápido
- Deutsch: HeadRush Looperboard Schnellstartanleitung
Documents connexes


Autres documents
-
TCHELICON HARMONY V100 Guide de démarrage rapide
-
Boss RC-30 Dual Track Looper Le manuel du propriétaire
-
Roland RC-30 Le manuel du propriétaire
-
Akai E1 Headrush Le manuel du propriétaire
-
-
TC Electronic DITTO X2 LOOPER Guide de démarrage rapide
-
Fender 2314400000 Acoustic Junior GO Guitar Amplifiers Le manuel du propriétaire
-
Yamaha PSR-SX900 Le manuel du propriétaire
-
Yamaha MT120 Le manuel du propriétaire
-