RIDGID DV05000 Mode d'emploi
- Catégorie
- Aspirateurs
- Taper
- Mode d'emploi
Ce manuel convient également à

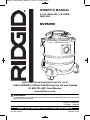
DV05000
5 U.S. GALLON / 18 LITER
ASH VAC
Part No. SP6957 Printed in China
OWNER’S MANUAL
SAVE THIS MANUAL FOR FUTURE REFERENCE
WARNING:
To reduce the risk of injury, the user must read and understand the owner’s manual
before using this product.
!
Thank you for buying a RIDGID product.
QUESTIONS OR INFORMATION CONTACT US AT
1-800-4-RIDGID (1-800-474-3443) from the US and Canada
01-800-701-9811 from Mexico
www.RIDGIDvacs.com
• Español - página 17
• Français - page 33
SP6957-2 ASH RIDGID_SP6957 5/13/16 11:58 AM Page 1

This vacuum is intended to pick up
COLD ash from fireplaces, grills, ovens,
ashtrays, etc. Read and understand this
manual and all labels on this ash vac
before operating.
• Use only as described in this manual.
• Do not pick up anything that is burning
or smoking, like cigarettes, matches or
hot, glowing, or burning embers. Pick up
cold ash only. Be aware that ash/embers
can be hot for days after use.
2
Table of Contents
IMPORTANT SAFETY INSTRUCTIONS
Safety is a combination of using common
sense, staying alert, and knowing how your
Vacuum Cleaner (“Vac”) works.
Safety Signal Words
DANGER: Indicates a hazardous
situation which, if not avoided, will result
in death or serious injury.
WARNING: Indicates a hazardous
situation which, if not avoided, could
result in death or serious injury.
CAUTION: Indicates a hazardous
situation which, if not avoided, could
result in minor or moderate injury.
When using your Vac, always follow basic
safety precautions including the following:
WARNING
- To reduce the risk of fire, heat
damage, electric shock, or injury:
!
!
!
!
• Use caution when vacuuming materials
that appear to have cooled, but may
actually be hot inside. First check for
hot spots by raking through the
ashes/coals. Air flow created during
vacuuming may cause hot ash to
reignite. As you vacuum, constantly
check the nozzle, hose, drum, and
motor for excessive temperatures. If
you notice an increase in temperature,
turn off the vacuum immediately.
Unplug the vacuum and remove the
vacuumed material from the drum.
• The drum must be emptied and
cleaned after each use, and before
picking up other household debris.
• Allow the vacuum to cool before
storage, especially enclosed storage.
• Do not use paper dust bags.
• To reduce the risk of damage from
accidental hot ember pickup, do not
place the vacuum on surfaces
susceptible to heat damage, such as
carpeting, vinyl flooring, or wood
surfaces.
• Do not leave Vac running while
unattended - you may fail to notice
important signs indicating abnormal
operation such as loss of suction,
debris exiting exhaust, or abnormal
motor noises. Immediately stop using
Vac if you notice these signs.
Section Page
Important Safety Instructions . . . . . . . . . 2-4
Grounding Instructions . . . . . . . . . . . . . . . 5
Introduction . . . . . . . . . . . . . . . . . . . . . . . . 6
Unpacking and Checking
Carton Contents . . . . . . . . . . . . . . . . . . . 6
Vac Assembly . . . . . . . . . . . . . . . . . . . . . 7-9
Removal of Power Head Assembly . . . . 7
Caster Assembly . . . . . . . . . . . . . . . . . . 7
Power Head Assembly . . . . . . . . . . . . . . 8
Insert Locking Hose . . . . . . . . . . . . . . . . 8
Hose Assembly . . . . . . . . . . . . . . . . . . . 8
Hose Assembly for LED Lighted Nozzle 9
LED Lighted Nozzle . . . . . . . . . . . . . . . . 9
Section Page
Operation . . . . . . . . . . . . . . . . . . . . . . 10-11
Motor/Electrical. . . . . . . . . . . . . . . . . . . 10
Emptying the Vac Drum . . . . . . . . . . . . 11
Maintenance . . . . . . . . . . . . . . . . . . . . 12-13
HEPA Filter . . . . . . . . . . . . . . . . . . . . . . 12
Filter Removal and Installation . . . . . . . 12
Cleaning a Dry Cartridge Filter . . . . . . 13
Cleaning & Disinfecting the Ash Vac . . 13
Cord Maintenance & Storage. . . . . . . . 13
Ash Vac Storage. . . . . . . . . . . . . . . . . . 13
Casters . . . . . . . . . . . . . . . . . . . . . . . . . 13
Repair Parts . . . . . . . . . . . . . . . . . . . . 14-15
Warranty . . . . . . . . . . . . . . . . . . . . . . . . . 16
SP6957-2 ASH RIDGID_SP6957 5/13/16 11:58 AM Page 2

3
• Do not handle plug, switch, or the Vac
with wet hands.
• Do not pull or carry by cord, use cord
as handle, close a door on cord, or pull
cord around sharp edges or corners.
Do not run vac over cord. Keep cord
away from heated surfaces.
• Only use extension cords that are
intended for outdoor use, such as SJW
or SJTW. Use only three-wire outdoor
extension cords that have three-prong
grounding plugs and grounding
receptacles that accept the vac's plug.
Extension cords in poor condition or
too small in wire size can pose fire and
shock hazards. To reduce the risk of
these hazards, be sure the cord is in
good condition and that liquid does not
contact the connection. Do not use an
extension cord with conductors smaller
than 16 gauge (AWG) in size.
To reduce power loss, use a 14 gauge
extension cord if 25 to 50 ft. (8 to 15 m)
long and 12 gauge for 50 ft. (15 m)
or longer.
• Connect only to a properly-grounded
outlet. See grounding instructions
• Do not put any object into ventilation
openings. Do not vacuum with any
ventilation openings blocked; keep free
of dust, lint, hair or anything that may
reduce air flow.
• Keep hair, loose clothing, fingers, and
all parts of body away from openings
and moving parts.
• To reduce the risk of falls, use extra
care when cleaning on stairs.
• To reduce the risk of back injury or
falls, do not lift a Vac that is heavy with
debris. Partially empty by scooping out
debris.
• To reduce the risk of personal injury or
damage to Vac, use only Ridgid
recommended accessories.
• To reduce the risk of eye injury, wear
safety eyewear. The operation of any
utility Vac can result in foreign objects
being blown into the eyes, which can
result in severe eye damage.
• Do not leave Vac when plugged in.
Unplug from outlet when not in use
and before servicing.
• Sparks inside the motor can ignite
flammable vapors or dust. To reduce
the risk of fire or explosion, do not use
near combustible liquids, gases, or
dusts, such as gasoline or other fuels,
lighter fluid, cleaners, oil-based paints,
natural gas, coal dust, magnesium
dust, grain dust, aluminum dust, or gun
powder.
• To reduce the risk of inhaling toxic
vapors, do not vacuum or use near
toxic or hazardous materials.
• To reduce the risk of electric shock,
do not expose to rain or allow liquid to
enter motor compartment. Store
indoors.
• This Ash Vac is not intended for use by
persons (including children) with
reduced physical, sensory, or mental
capabilities, or lack of experience and
knowledge, unless they have been
given supervision or instruction
concerning use of the appliance by a
person responsible for their safety.
• Do not allow to be used as a toy.
Close attention is necessary when
used by or near children.
• Do not use with a torn filter or without
filter and filter screen installed.
Dry debris ingested by the impeller
may damage the motor or be
exhausted into the air.
• Turn off Vac before unplugging.
• To reduce the risk of injury from
accidental starting, unplug power cord
before changing or cleaning filter.
• Do not unplug by pulling on cord.
To unplug, grasp the plug, not the cord.
• Do not use with damaged cord, plug or
other parts. If your Vac is not working
as it should, has missing parts, has
been dropped, damaged, left outdoors,
or dropped into water, call customer
service.
SP6957-2 ASH RIDGID_SP6957 5/13/16 11:58 AM Page 3

4
Observe the following warnings that
appear on the Lighted Nozzle (select
catalog numbers only).
Observe the following warnings that
appear on the Vacuum.
WARNING: Risk of Electric Shock.
For your own safety, read and
understand owner’s manual.
Do not run unattended. Do not pick
up toxic, flammable, or other
hazardous materials. Do not use
around explosive liquids or vapors.
To reduce the risk of electric shock,
do not use on wet surfaces. Do not
expose to rain. Store indoors.
This is a dry vacuum only; NEVER
vacuum liquids with this product.
!
WARNING: Risk of Fire and Heat
Damage.
This vacuum is intended to pick up
COLD ash from fireplaces, grills,
ovens, ash-trays, etc. Do not pick
up hot, glowing, or burning
ash/embers. Pick up cold ash only.
Be aware that ash/embers can be
hot for days after use. To reduce
the risk of damage from accidental
hot ember pickup, do not place the
vacuum on surfaces susceptible to
heat damage such as carpeting,
vinyl flooring, or wood surfaces.
Empty drum after each use.
Allow to cool before storing,
especially in enclosed spaces.
Do not use dust collection bags.
!
WARNING:
• Keep batteries out of reach of
small children. Consult a physician
immediately if a battery is swallowed;
severe burning or injury may occur.
• Battery contains Perchlorate
Material - Special handling may
apply. See www.dtsc.ca.gov/
hazardouswaste/perchlorate.
!
CAUTION:
•To reduce the risk of hearing damage,
wear ear protectors when using for
extended time or in a noisy area.
• For dusty operations, wear dust mask.
• Static shocks are common when the
relative humidity of the air is low.
Vacuuming fine debris with your Vac can
deposit static charge on the hose or
Vac. To reduce the frequency of static
shocks in your home or when using this
Vac, add moisture to the air with a
humidifier.
!
SAVE THIS MANUAL
SP6957-2 ASH RIDGID_SP6957 5/13/16 11:58 AM Page 4

5
Grounding Instructions
This appliance must be grounded.
If it should malfunction or break down,
ground ing provides a path of least
resistance for electric current to reduce
the risk of electric shock. This appliance
is equipped with a cord having an
equipment-grounding conductor and
grounding plug. The plug must be
inserted into an appropriate outlet that is
properly installed and grounded in
accordance with all local codes and
ordinances.
WARNING:
Improper connection of the
equipment grounding conductor
can result in a risk of electric shock.
Check with a qualified electrician or
service person if you are in doubt
as to whether the outlet is properly
grounded. Do not modify the plug
provided with the appliance - if it
will not fit the outlet, have a proper
outlet installed by a qualified
electrician.
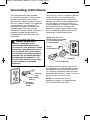
This Vac is for use on a nominal 120-volt
circuit, and has a grounded plug that
looks like the plug shown. A temporary
adapter that looks like the adapter shown
may be used to connect this plug to a
2-pole receptacle, as shown. If a properly
grounded outlet is not available, the
temporary adapter should only be used
until a properly grounded outlet can be
installed by a qualified electrician.
Properly
Grounded
Outlet
Grounding
Prong
3-Prong
Plug
Make sure this is a
metal screw connected
to a known ground
Green
Grounding Lug
2-Prong Outlet
3-Prong Plug
Adapter
The green-colored rigid ear, lug, or the
like, extending from the adapter, must be
connected to a permanent ground such
as a properly grounded outlet box cover.
Whenever the adapter is used, it must be
held in place by a metal screw.
NOTE: In Canada, the use of a
temporary adapter is not permitted by
the Canadian Electrical Code.
!
SP6957-2 ASH RIDGID_SP6957 5/13/16 11:58 AM Page 5

6
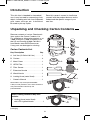
Unpacking and Checking Carton Contents
Remove contents of carton. Check each
item against the Carton Contents List.
For questions or information contact us at
1-800-4-RIDGID (1-800-474-3443) from
the US and Canada 01-800-701-9811
from Mexico www.RIDGIDvacs.com.
If any parts are damaged or missing.
Carton Contents List
Key Description Qty.
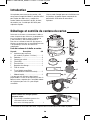
A Ash Vac (5-Gallon/18 Liter) . . . . . . .1
B Casters . . . . . . . . . . . . . . . . . . . . . . .4
C Metal Cover . . . . . . . . . . . . . . . . . . .1
D HEPA Filter . . . . . . . . . . . . . . . . . . . .1
E Filter Screen . . . . . . . . . . . . . . . . . . .1
F Extension Nozzle . . . . . . . . . . . . . . .1
G Wand Nozzle . . . . . . . . . . . . . . . . . .1
H Locking Hose (metal lined) . . . . . . . .1
I Owner’s Manual . . . . . . . . . . . . . . . .1
Some items may come preassembled.
If they are not present in the carton check the
Vac power head to see if they are
preassembled.
AB
E
D
C
F
H
G
I
Introduction
This Ash Vac is intended for household
use. It may be used for vacuuming of dry
debris, including cold ash from fireplaces,
grills, ovens, ash-trays, etc. It should not
be used to pick up liquids.
Read this owner’s manual to familiarize
yourself with the product features and to
understand the specific usage of your
new Vac.
Select Catalog Numbers May Also
Include:
J* Locking Hose (metal lined)
with LED Lighted Nozzle . . . . . . . . .1
* If this item is included with your purchase, it wil appear on the contents list found on the product
packaging.
J*
SP6957-2 ASH RIDGID_SP6957 5/13/16 11:58 AM Page 6

7
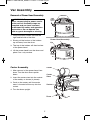
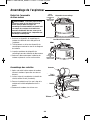
Caster Assembly
1. After removal of the power head from
drum. Turn the dust drum upside
down.
2. Insert the caster stem into the socket
of the caddy, as shown (4 places).
3. Push on the caster until the caster
stem is inserted all the way into the
socket.
4. Turn the drum upright.
Caster
Caster
Stem
Socket
Drum
Vac Assembly
Removal of Power Head Assembly
1. Grasp the drum latches on both the
right and left side of the Vac.
2. Slowly pull the bottom of the latches
up and away from the drum.
3. The top of the latches will then be free
of the power head.
4. Lift the power head from the drum and
place it on a dry surface.
WARNING: For your own safety,
never connect plug to power source
outlet until all assembly steps are
complete and you have read and
understood the safety and operation
instructions. Do not operate Vac
with any parts damaged or missing.
!
SNAP
DOWN
LATCH
Latches
ROTATE
LATCH
UP
Power Head Assembly
Lip
SP6957-2 ASH RIDGID_SP6957 5/13/16 11:58 AM Page 7

8
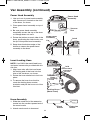
Vac Assembly (continued)
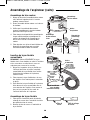
Insert Locking Hose
NOTE: Use ONLY the metal lined hose
and metal accessories provided with this
Ash Vac.
1. Align hose tabs with inlet and insert
the locking end of the hose into the
inlet of the Vac drum, as shown.
2. Rotate the hose clockwise to lock into
place.
3. To remove the hose from the Vac,
rotate the locking hose counter-
clockwise and pull the hose out of the
Vac inlet.
Inlet
Locking Hose
(Metal Lined)
ROTATE HOSE
CLOCKWISE
TO LOCK
Hose
Locking
End
Hose Assembly
1. Slide the round end of the extension
nozzle into the smaller tapered end of
the wand nozzle.
2. Attach wand nozzle to hose end.
Wand
Nozzle Extension
Nozzle
Power Head Assembly
1.Line up front of power head assembly
with vacuum port located on the front
of the drum, as shown.
2.Place power head assembly on top of
drum.
3. Be sure power head assembly
completely covers the top of the drum
so leakage does not occur.
4. Rotate the latches on each side of the
drum, positioning the latch hooks over
the lip of the power head assembly.
5. Snap down the bottom edge of the
latches to secure the power head
assembly to the drum.
Vacuum
Port
Power Head
Assembly
Lip
ROTATE
LATCH
UP
SNAP
DOWN
LATCH
Power Head
Assembly Latch
SP6957-2 ASH RIDGID_SP6957 5/13/16 11:58 AM Page 8

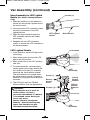
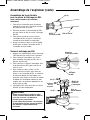
LED Lighted Nozzle
1. Press button to active LED light while
vacuuming.
2. Slide switch forward to lock the LED
light in the ON position.
3. Slide switch back to the OFF position
after use.
4. To access batteries, remove battery
access panel screw, then remove the
four screws from the LED assembly,
releasing the switch button module.
The two batteries are located under
the switch button module. Dispose of
batteries in the proper waste disposal
container.
5. The LED light uses two CR2016
lithium batteries that are replaceable.
LED Button
LED
Assembly
Switch
Button
Module
CR2016
Lithium
Batteries
(2)
Battery
Access
Panel
Screw (1)
Screws (4)
LED
Assembly
WARNING:
• Keep batteries out of reach of
small children. Consult a
physician immediately if a battery
is swallowed severe burning or
injury may occur.
• Battery contains Perchlorate
Material - Special handling may
apply. See www.dtsc.ca.gov/
hazardouswaste/perchlorate.
!
9
Vac Assembly (continued)
Hose Assembly for LED Lighted
Nozzle (For Select Catalog Numbers
Only)
1. Slide the round end of the extension
nozzle into the smaller tapered end of
the wand nozzle.
2. Loosen the two LED assembly screws,
located at the bottom of the LED
Lighted Nozzle.
3. Slide the wand nozzle through the
LED assembly and into the rubber
hose fitting.
4. Retighten the two LED assembly
screws to secure the LED assembly to
the hose assembly.
LED Lighted
Nozzle
Screws (2)
Wand Nozzle
SP6957-2 ASH RIDGID_SP6957 5/13/16 11:58 AM Page 9

10
Operation
WARNING: To reduce the risk of fire, explosion, or damage to Vac:
• Do not leave Vac running while unattended - you may fail to notice
important signs indicating abnormal operation such as loss of suction,
debris exiting the exhaust, or abnormal motor noises. Immediately stop
using Vac if you notice these signs.
• Do not leave Vac plugged in when not in use.
• The vacuum must be emptied after every use of ash pickup.
• Sparks inside the motor can ignite airborne flammables. Do not operate
Vac near flammable liquids or in areas with flammable gases, vapors, or
explosive/airborne dust. Flammable liquids, gases, and vapors include:
lighter fluid, solvent-type cleaners, oil-based paints, gasoline, alcohol, and
aerosol sprays. Explosive dusts include: coal, magnesium, aluminum,
grain, and gun powder.
• Do not vacuum up explosive dusts, flammable liquids, or hot ashes.
WARNING: To reduce the risk of electric shock or injury:
• Do not expose to rain or allow liquid to enter motor compartment.
Store indoors.
• Do not handle plug, switch, or Vac with wet hands.
• Unplug Vac before servicing. If your Vac is not working as it should, has
missing parts, has been dropped, damaged, left outdoors, or dropped into
water, return it to an authorized service center or call customer service.
• When using an extension cord, use only outdoor-rated cords that are in
good condition. Do not allow the connection to come into contact with
liquid.
!
!
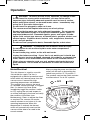
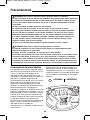
After you plug the power cord into the
outlet, turn the unit on by pushing the
switch from position "O" to position "l".
The symbols used on the switch actuator
are international "On & Off" symbols.
=OFF =ON
"OFF"
"ON"
Motor/Electrical
This Ash Vacuum is rated for use with
120 volt 60 Hz supply. The Vac is
equipped with a thermal protection cutoff
switch which will remove power from the
vacuum motor if excessively high
operating temperatures are detected.
This condition may arise as the result
of a blocked vacuum passage, or clogged
filter. If a thermal trip takes place,
immediately toggle the vacuum’s switch
to OFF, unplug the unit and inspect for
an airflow blockage in the hose and verify
the condition of the filters (see
Maintenance). Clean or replace the filters
as required. The vacuum will require
several minutes to cool down to a safe
operating temperature. When this
temperature is attained, the thermal
switch will automatically reset and the
vacuum will be able to be used in the
normal manner.
SP6957-2 ASH RIDGID_SP6957 5/13/16 11:58 AM Page 10

11
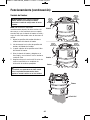
Operation (continued)
NOTE: Do not store the vacuum
immediately after ash removal or other
use in a confined area or enclosed space.
Allow the power head to cool and remove
ash from drum before storage.
1. Grasp the drum latches on both side
of the power head.
2. Slowly pull up on the drum latches,
away from the drum.
3. The top of the latches will be free of
the power head.
4. Lift up on the power head and set it
on a clean dry area while emptying the
drum or changing the filter.
5. Be sure the ash is cool prior to
dumping the contents into the proper
waste disposal container.
WARNING: To reduce the risk of
injury from accidental starting,
unplug power cord before emptying
the Vac drum.
Emptying the Vac Drum
!
CAUTION: To reduce the risk of
hearing damage, wear ear protectors
when using the Vac for extended
hours or when using in a noisy area.
!
Drum
PULL
LATCH
UP AND
AWAY
ROTATE
LATCH
DOWN
ROTATE
LATCH
DOWN
PULL
LATCH
UP AND
AWAY
Latch
Latch
Drum
Cold Ash
SP6957-2 ASH RIDGID_SP6957 5/13/16 11:58 AM Page 11

12
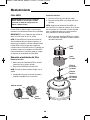
HEPA Filter
Filter
Screen
Raised Lip
Maintenance
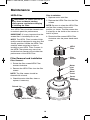
HEPA Filter
Your HEPA Filter should be cleaned often
to maintain peak Vac performance.
IMPORTANT: It is very important that the
screen filter is installed prior to use.
NOTE: The HEPA Filter is made of high
quality material designed to stop dust and
smaller particles. Handle the HEPA Filter
carefully when removing to clean or
installing a new HEPA Filter. Creases in
the HEPA Filter pleats may occur from
installation but creases will not affect the
performance of the HEPA Filter.
Filter Removal and Installation
Filter Removal:
1. Rotate the filter screen/HEPA Filter
counter-clockwise.
2. Remove the HEPA Filter from the filter
screen.
NOTE: The filter screen should be
cleaned with a brush.
3. Check the motor inlet filter, clean or
replace, if necessary.
Power
Head
Assembly
Filter
Screen
HEPA
Filter
Motor
Inlet
Filter
Metal
Cover
WARNING: To reduce the risk of
injury from accidental starting,
unplug power cord before changing
or cleaning the Filter.
!
Filter Installation:
1. Replace motor inlet filter.
2. Replace the HEPA Filter into the filter
screen.
NOTE: Be sure to orient the HEPA Filter
and the filter screen in the correct
position, as shown. The filter screen has
a raised lip on the inside of the screen to
hold it in place.
3. Rotate the filter screen/HEPA Filter
clockwise onto the power head metal
cover.
SP6957-2 ASH RIDGID_SP6957 5/13/16 11:58 AM Page 12

Ash Vac Storage
Before storing your Vac, the drum should
be emptied and cleaned. Wrap the hose
around the top of the cooled power head
assembly, positioning the hose under the
handle, as shown. Accessories should be
kept in the same area as the Vac so they
can be readily available. The Vac should
be stored indoors.
Casters
If your casters are noisy, you may put a
drop of oil on the roller shaft to make
them quieter.
13
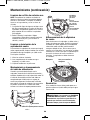
Cleaning A Dry Cartridge Filter
NOTE: For best cleaning results due to
accumulated dust, clean the filter in an
open area. Cleaning SHOULD be done
outdoors and not in the living quarters.
1. Light cleaning of some dry debris from
the Filter can be accomplished without
removing the Filter from the Vac.
Simply slap your hand on top of the
handle while the Vac is turned off.
2. Remove Filter from Vac. Gently tap the
Filter against the inside wall of your
drum, or against the floor, and the
debris will loosen and fall.
Cleaning and Disinfecting the
Ash Vac
To keep your Vac looking its best, clean
the outside with a cloth dampened with
warm water and mild soap.
To clean the drum:
1. Dump debris out.
2. Wash drum thoroughly with warm
water and mild soap.
3. Wipe out with dry cloth.
Cord Maintenance & Storage
When vacuuming is complete, unplug the
cord and wrap it around the power head
handle. If the power cord is damaged,
it must be replaced by the manufacturer or
their service agent or by similarly qualified
personnel to reduce the risk of accident.
Accessories can be stored on the rear
power head or on the caddy base.
Maintenance (continued)
WARNING: To assure product
SAFETY and RELIABILITY, any other
maintenance, repairs and adjustments
should be performed by Authorized
Service Centers, always using RIDGID
replacement parts.
!
Accessory
Storage
Cord
Storage
Power
Head
Assembly
Caddy Base
Accessories
Hose Wrap
Area
Hose
- or -
SP6957-2 ASH RIDGID_SP6957 5/13/16 11:58 AM Page 13

14
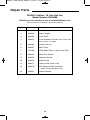
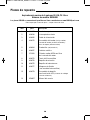
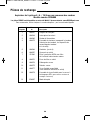
Repair Parts
RIDGID 5 Gallon / 18 Liter Ash Vac
Model Number DV05000
RIDGID parts are available on-line at www.RIDGIDparts.com
Always order by Part Number - Not by Key Number
Key No. Part No. Description
1 836247 Handle, Carry
2 836248 Switch, Toggle
3 836265 Power Cord
4 836375 Drum Assembly (Includes Drum, Drum Inlet,
Drum Latches, & Caddy)
5 836264 Casters (Set of 4)
6 836257 Metal Cover
7 VF1500 HEPA Media Filter w/ Motor Inlet Filter
8 836270 Metal Filter Screen
9 836276 Extension Nozzle
10 836275 Wand Nozzle
11 836277 Locking Hose (Metal Lined)
12 836279 LED Lighted Nozzle Assembly
(Select Catalog Numbers Only)
13 SP6957 Owner’s Manual
SP6957-2 ASH RIDGID_SP6957 5/13/16 11:58 AM Page 14

15
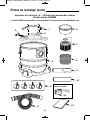
Repair Parts (continued)
RIDGID 5 Gallon / 18 Liter Ash Vac
Model Number DV05000
RIDGID parts are available on-line at www.RIDGIDparts.com
13
5
4
16
8
7
2
3
9
10
11
Select Catalog Numbers
Only:
12
SP6957-2 ASH RIDGID_SP6957 5/13/16 11:58 AM Page 15

Part No. SP6957 Form No. SP6957-2 Printed in China 05/16
QUESTIONS OR INFORMATION CONTACT US AT
1-800-4-RIDGID (1-800-474-3443) from the US and Canada
01-800-701-9811 from Mexico
www.RIDGIDvacs.com
Please have your Model Number and Serial Number on hand when calling.
Stock No. DV0500 / DV0510
Model No. DV05000
Serial Number
Model and serial numbers may be found on the top of the motor cover.
You should record both model and serial numbers in a safe place for future use.
c 2016 Emerson
• What is covered
RIDGID®Vacs are warranted to be free of defects in workmanship and material.
• How long coverage lasts
This warranty lasts for the lifetime of the RIDGID®Vac.
• How to obtain service
To obtain the benefit of this warranty, deliver via prepaid transportation the complete product to
RIDGE TOOL COMPANY, Elyria, Ohio, or any authorized RIDGID®INDEPENDENT SERVICE
CENTER. Pipe wrenches and other hand tools should be returned to the place of purchase.
• What we will do to correct problems
Warranted Vacs will be repaired or replaced, at Ridge Tool Company's option, and returned at no
charge; or, if after three attempts to repair or replace during the warranty period the Vac is still
defective, you can elect to receive a full refund of your purchase price.
• What is not covered
Failures due to misuse, abuse or normal wear and tear are not covered by this warranty. RIDGE
TOOL COMPANY SHALL NOT BE RESPONSIBLE FOR ANY INCIDENTAL OR
CONSEQUENTIAL DAMAGES.
• How local laws relate to the warranty
Some states do not allow the exclusion or limitation of incidental or consequential damages, so the
above limitation or exclusion may not apply to you. This warranty gives you specific rights, and you
may also have other rights which vary from state to state, province to province, or country to
country.
• No other express warranty applies
This FULL LIFETIME WARRANTY is the sole and exclusive warranty for RIDGID®Vacs.
No employee, agent, dealer, or other person is authorized to alter this warranty or make any other
warranty on behalf of Ridge Tool Company.
SP6957-2 ASH RIDGID_SP6957 5/13/16 11:58 AM Page 16

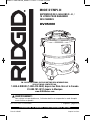
DV05000
ASPIRADORA DE CENIZA
DE 5 GALONES EE.UU./18 LITROS
MANUAL DEL USUARIO
GUARDE ESTE MANUAL PARA REFERENCIA FUTURA
Gracias por comprar un producto RIDGID.
¿PREGUNTAS O COMENTARIOS? COMUNÍQUESE CON NOSOTROS EN
1-800-4-RIDGID (1-800-474-3443) desde los EE.UU. y Canadá
01-800-701-9811 desde México
www.RIDGIDvacs.com
No. de pieza SP6957 Impreso en China
ADVERTENCIA:
Para reducir el riesgo de lesiones, el usuario debe leer y entender el manual del operador
antes de utilizar este producto.
!
•Français - page 33
SP6957-2 ASH RIDGID_SP6957 5/13/16 11:58 AM Page 17

18
Instrucciones de seguridad importantes . . . . . 18-20
Instrucciones de conexión a tierra . . . . . . . . . . . 21
Introducción . . . . . . . . . . . . . . . . . . . . . . . . . . . . . 22
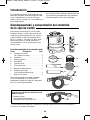
Comprobación del contenido
de la caja de cartón. . . . . . . . . . . . . . . . . . . . . . 22
Ensamblaje de la aspiradora . . . . . . . . . . . . . 23-25
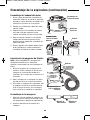
Remoción del ensamblaje del cabezal
del motor. . . . . . . . . . . . . . . . . . . . . . . . . . . 23
Ensamblaje de las ruedecillas . . . . . . . . . . . . . 23
Ensamblaje del cabezal del motor . . . . . . . . . . 24
Inserción de la manguera de fijación . . . . . . . . 24
Ensamblaje de la manguera . . . . . . . . . . . . . . . 24
Ensamblaje de la manguera para la boquilla
con iluminación LED . . . . . . . . . . . . . . . . . . 25
Boquilla con iluminación LED . . . . . . . . . . . . . 25
Funcionamiento. . . . . . . . . . . . . . . . . . . . . . . . 26-27
Funcionamiento del motor/eléctrico . . . . . . . . 26
Vaciado del tambor de la aspiradora . . . . . . . . 27
Mantenimiento . . . . . . . . . . . . . . . . . . . . . . . . 28-29
Filtro HEPA . . . . . . . . . . . . . . . . . . . . . . . . . . . 28
Remoción e instalación del filtro . . . . . . . . . . . 28
Limpieza de un filtro de cartucho sucio . . . . . . 29
Limpieza y desinfección de la aspiradora
de ceniza . . . . . . . . . . . . . . . . . . . . . . . . . . . 29
Mantenimiento y almacenamiento
del cable de alimentación . . . . . . . . . . . . . . 29
Almacenamiento de la aspiradora de ceniza . . 29
Ruedecillas. . . . . . . . . . . . . . . . . . . . . . . . . . . . 29
Piezas de repuesto . . . . . . . . . . . . . . . . . . . 30-31
Garantía . . . . . . . . . . . . . . . . . . . . . . . . . . . . . . 32
INSTRUCCIONES DE SEGURIDAD IMPORTANTES
La seguridad es una combinación de sentido común,
permanecer alerta y saber cómo funciona la
aspiradora (“la aspiradora”).
Palabras de señal de seguridad
PELIGRO: indica una situación peligrosa que,
si no se evita, causará la muerte o lesiones graves.
ADVERTENCIA: indica una situación peligrosa que,
si no se evita, podría causar la muerte o
lesiones graves.
PRECAUCIÓN: indica una situación peligrosa
que, si no se evita, pudiera causar lesiones leves
o moderadas.
Cuando utilice la aspiradora, siga siempre las
precauciones básicas de seguridad, incluyendo
las siguientes:
ADVERTENCIA
– Para reducir el riesgo de incendio, sacudidas
eléctricas o lesiones:
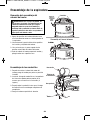
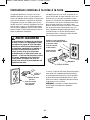
Esta aspiradora está diseñada para recoger cenizas
FRÍAS de chimeneas, parillas, hornos, ceniceros, etc.
Lea y entienda este manual y todas las etiquetas que se
encuentran en esta aspiradora antes de utilizarla.
• Utilice la aspiradora únicamente de la manera que se
describe en este manual.
• No recoja nada que esté ardiendo o humeando,
como cigarrillos, fósforos o brasas que estén
calientes, al rojo o ardiendo. Recoja sólo cenizas
frías. Tenga presente que las cenizas/brasas pueden
estar calientes durante varios días después del uso.
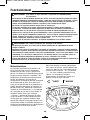
• Tenga precaución cuando aspire materiales que
parezcan haberse enfriado, pero que en realidad
pueden estar calientes en su interior. Compruebe
primero si hay puntos calientes rastrillando a través
de las cenizas/ascuas. El flujo de aire creado durante
la operación de aspiración puede hacer que la ceniza
caliente se reincendie. Mientras limpia con la
aspiradora, compruebe constantemente la boquilla,
la manguera, el tambor y el motor para determinar si
hay temperaturas excesivas. Si observa un aumento
de la temperatura, apague de inmediato la
aspiradora. Desenchufe la aspiradora y saque del
tambor el material aspirado.
• El tambor se debe vaciar y limpiar después de cada
uso, y antes de recoger otros residuos domésticos
• Deje que la aspiradora se enfríe antes de
almacenarla, especialmente si se va a almacenar en
un lugar cerrado.
• No use bolsas de papel para polvo.
• Para reducir el riesgo de daños por causa de la
recogida accidental de brasas calientes, no coloque
la aspiradora sobre superficies susceptibles a los
daños por calor, tales como alfombras, pisos de
vinilo o superficies de madera.
• No deje desatendida la aspiradora mientras esté en
marcha: Puede que usted no observe señales
importantes que indican un funcionamiento anormal,
tales como pérdida de succión, salida de residuos
por el escape o ruidos anormales del motor. Deje de
usar la aspiradora inmedia tamente si observa estas
señales.
Indice
Sección Página
Sección Página
SP6957-2 ASH RIDGID_SP6957 5/13/16 11:58 AM Page 18

• No abandone la aspiradora cuando esté enchufada.
Desenchúfela del tomacorriente cuando no la esté
utilizando y antes de realizar servicio de revisión.
• Las chispas que se producen en el interior del motor
pueden incendiar los vapores inflamables o el polvo.
Para reducir el riesgo de incendio o explosión: No
use la aspiradora cerca de líquidos o gases inflama -
bles o combustibles, o polvos explosivos como
gasolina u otros combustibles, líquido encen dedor,
limpiadores, pinturas a base de aceite, gas natural,
polvo de carbón, polvo de magnesio, polvo de
aluminio, polvo de granos de cereal o pólvora.
• Para reducir el riesgo de que se produzcan peligros
para la salud causados por vapores o polvo, no
recoja con la aspiradora materiales tóxicos ni la use
cerca de dichas materiales.
• Para reducir el riesgo de descargas eléctricas, no
exponga la aspiradora a la lluvia ni deje que entren
líquidos en el compartimiento del motor. Guarde la
aspiradora en un lugar interior.
• Esta aspiradora de ceniza no se destina para
utilizarse por personas (incluyendo niños) cuyas
capacidades físicas, sensoriales o mentales estén
reducidas, o carezcan de experiencia o conocimiento,
a menos que dichas personas reciban una
supervisión o capacitación para el funcionamiento
del aparato por una persona responsable de su
seguridad.
• No permita que la aspiradora se utilice como un
juguete. Se necesita prestar máxima atención cuando
sea utilizada por niños o cerca de éstos.
• No utilice la aspiradora con un filtro desgarrado o sin
tener instalados el filtro y el tamiz del filtro. Los
residuos secos absorbidos por el impulsor podrían
dañar el motor o ser expulsados de vuelta al aire.
• Apague la aspiradora antes de desenchufarla.
• Para reducir el riesgo de lesiones debidas a un
arranque accidental, desenchufe el cordón de energía
antes de cambiar o limpiar el filtro.
• No desenchufe la aspiradora tirando del cordón. Para
desenchufarla, agarre el enchufe y no el cordón.
• No use la aspiradora con el cordón dañado, el
enchu fe dañado u otras piezas dañadas. Si la
aspira dora no funciona como debe, le faltan piezas,
se ha caído, ha sido dañada, se ha dejado a la
intem perie o se ha caído al agua, llame a servicio
al cliente.
• No maneje el enchufe, el interruptor o la aspiradora
con las manos mojadas.
• No tire de la aspiradora usando el cordón ni la lleve
por el cordón, ni use el cordón como asa, ni cierre
una puerta sobre el cordón, ni tire del cordón alre -
dedor de bordes o esquinas afilados. No pase la
aspiradora en marcha sobre el cordón. Mantenga el
cordón alejado de las superficies calientes.
• Utilice únicamente cordones de extensión que estén
diseñados para uso a la intemperie, tales como
SJW o SJTW. Utilice únicamente cordones de
extensión para intemperie de tres cables que
tengan enchufes de conexión a tierra de tres
terminales y tomacorrientes con conexión a tierra
que acepten el enchufe de la aspiradora. Los
cordones de extensión que estén en malas
condiciones o que tengan cables de tamaño
demasiado pequeño pueden causar peligros de
incendio y descargas eléctricas. Para reducir el
riesgo de estos peligros, asegúrese de que el
cordón esté en buenas condiciones y que el líquido
no entre en contacto con la conexión. No utilice un
cordón de extensión que tenga conductores con un
diámetro menor al calibre 16 (AWG). Para reducir la
pérdida de potencia, utilice un cordón de extensión
de calibre 14 si la longitud es de 25 a 50 pies
(8 a 15 m), y de calibre 12 si la longitud es de
50 pies (15 m) o más.
• Conecte la aspiradora solamente a un toma corriente
conectado a tierra adecuada mente. Consulte las
instrucciones de conexión a tierra.
• No ponga ningún objeto en las aberturas de venti -
lación. No recoja nada con la aspiradora cuando
cualquiera de las aberturas de ventilación esté
bloqueada; mantenga dichas aberturas libres de
polvo, pelusa, pelo o cualquier cosa que pueda
reducir el flujo de aire.
• Mantenga el pelo, la ropa holgada, los dedos y
todas las partes del cuerpo alejados de las aber -
turas y de las piezas móviles.
• Para reducir el riesgo de caídas, tenga cuidado
adicional al limpiar en escaleras.
• Para reducir el riesgo de lesiones de espalda o
caídas, no levante una aspiradora que pese mucho
debido a que contiene líquido o residuos. Vacíe
parcialmente la aspiradora extrayendo los residuos.
• Para reducir el riesgo de lesiones corporales
o daños a la aspiradora, utilice únicamente
accesorios recomendados por Ridgid.
• Para reducir el riesgo de lesiones en los ojos, use
pro tección ocular de seguridad. La utilización de
cual quier aspiradora utilitaria o soplador utilitario
puede hacer que se soplen objetos extraños hacia
los ojos, lo cual puede causar daños graves en los
ojos.
19
SP6957-2 ASH RIDGID_SP6957 5/13/16 11:58 AM Page 19

20
GUARDE ESTE MANUAL
PRECAUCIÓN:
• Para reducir el riesgo de daños a la audición, use
protectores de oídos cuando utilice la aspiradora
durante muchas horas seguidas o cuando la
emplee en un área ruidosa.
• Para operaciones que generan polvo, use una
máscara antipolvo.
• Las descargas de estática son comunes cuando
la humedad relativa del aire es baja. Si recoge
residuos finos con la aspiradora, se puede
depositar carga estática en la manguera o en la
aspiradora. El mejor remedio para reducir la
frecuencia de las descargas de estática en su casa
o cuando use esta aspiradora es añadir humedad
al aire con un humidificador.
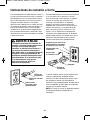
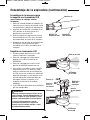
Haga caso de las siguientes advertencias que aparecen
en la boquilla con iluminación (números de catálogo
selectos solamente).
ADVERTENCIA:
• Mantenga las baterías fuera del alcance de los
niños pequeños. Consulte inmediatamente a un
médico si alguien se traga una batería; podrían
ocurrir quemaduras o lesiones graves.
• La batería contiene material a base de
perclorato: Es posible que se requiera un
manejo especial. Consulte www.dtsc.ca.gov/
hazardouswaste/perchlorate.
Haga caso de las siguientes advertencias que aparecen
en la aspiradora.
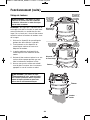
ADVERTENCIA: Riesgo de incendio y daños
por calor.
Esta aspiradora está diseñada para recoger
cenizas FRÍAS de chimeneas, parrillas, hornos,
ceniceros, etc. No recoja cenizas/brasas que
estén calientes, al rojo o ardiendo. Recoja sólo
cenizas frías. Tenga presente que las
cenizas/brasas pueden estar calientes durante
varios días después del uso. Para reducir el
riesgo de daños por causa de una recogida
accidental de brasas calientes, no ponga la
aspiradora sobre superficies susceptibles a los
daños por calor, tales como alfombras, pisos de
vinilo o superficies de madera. Vacíe el tambor
después de cada uso. Deje que la aspiradora se
enfríe antes de almacenarla, especialmente en
espacios cerrados. No utilice bolsas de
recolección de polvo.
ADVERTENCIA: Riesgo de descargas
eléctricas.
Para su propia seguridad, lea y entienda el
manual del usuario. No deje desatendida la
aspiradora cuando esté en marcha. No recoja
materiales tóxicos o inflamables, ni otros
materiales peligrosos. No utilice la aspiradora
cerca de líquidos o vapores explosivos. Para
reducir el riesgo de descargas eléctricas, no use
la aspiradora sobre superficies mojadas. No la
exponga a la lluvia. Almacénela en un lugar
interior. Esta aspiradora está diseñada para
recoger residuos secos solamente; no aspire
NUNCA líquidos con este producto.
SP6957-2 ASH RIDGID_SP6957 5/13/16 11:58 AM Page 20
La page est en cours de chargement...
La page est en cours de chargement...
La page est en cours de chargement...
La page est en cours de chargement...
La page est en cours de chargement...
La page est en cours de chargement...
La page est en cours de chargement...
La page est en cours de chargement...
La page est en cours de chargement...
La page est en cours de chargement...
La page est en cours de chargement...
La page est en cours de chargement...
La page est en cours de chargement...
La page est en cours de chargement...
La page est en cours de chargement...
La page est en cours de chargement...
La page est en cours de chargement...
La page est en cours de chargement...
La page est en cours de chargement...
La page est en cours de chargement...
La page est en cours de chargement...
La page est en cours de chargement...
La page est en cours de chargement...
La page est en cours de chargement...
La page est en cours de chargement...
La page est en cours de chargement...
La page est en cours de chargement...
La page est en cours de chargement...
-
 1
1
-
 2
2
-
 3
3
-
 4
4
-
 5
5
-
 6
6
-
 7
7
-
 8
8
-
 9
9
-
 10
10
-
 11
11
-
 12
12
-
 13
13
-
 14
14
-
 15
15
-
 16
16
-
 17
17
-
 18
18
-
 19
19
-
 20
20
-
 21
21
-
 22
22
-
 23
23
-
 24
24
-
 25
25
-
 26
26
-
 27
27
-
 28
28
-
 29
29
-
 30
30
-
 31
31
-
 32
32
-
 33
33
-
 34
34
-
 35
35
-
 36
36
-
 37
37
-
 38
38
-
 39
39
-
 40
40
-
 41
41
-
 42
42
-
 43
43
-
 44
44
-
 45
45
-
 46
46
-
 47
47
-
 48
48


RIDGID DV05000 Mode d'emploi
- Catégorie
- Aspirateurs
- Taper
- Mode d'emploi
- Ce manuel convient également à
dans d''autres langues
- English: RIDGID DV05000 User guide
- español: RIDGID DV05000 Guía del usuario