
CM20DTS / CM30DTD / CM60DTD
Instruction manual
https://tm.by
Интернет-магазин TM.by

https://tm.by
Интернет-магазин TM.by

CM20DTS
CM30DTD
CM60DTD
Instruction manual
CM20DTS / CM30DTD / CM60DTD
3
CM20DTS / CM30DTD / CM60DTD manual
https://tm.by
Интернет-магазин TM.by

4
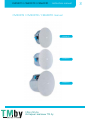
CM design loudspeaker with back can
Important safety instructions
• Read these instructions.
• Keep these instructions.
• Heed all warnings.
• Follow all instructions, particularly those pertaining to rigging,
mounting, hanging and electrical connections.
• This professional device needs to be installed by qualified
personnel only. As improper installation may cause the unit to
fall, resulting in personal injury and/or property damage.
• Take care of the loudspeaker wires; they should be free of
damage. Damaged loudspeaker wires may result in poor sound
quality, in damaged amplifiers, injury and/or electrical shock.
• No mains power shall be connected to the loudspeaker, doing
so will damage the loudspeaker, and increase the risk of fire.
• Respect power rating, to prevent damaged loudspeakers, and
risk of fire.
• Do not open the loudspeaker or attempt to disassemble the
internal parts or modify them in any way. If the loudspeaker
appears to be malfunctioning (no sound or distorted sound),
if you detect smoke or a strange smell coming from the unit,
discontinue use immediately and have it inspected by qualified
Please read carefully before proceeding and keep this manual for
future reference. Always follow the basic precautions listed below
to avoid the possibility of serious injury or even death from electrical
shock, short-circuiting, damages, fire or other hazards. These
precautions include, but are not limited to, the following:
https://tm.by
Интернет-магазин TM.by

Instruction manual
CM20DTS / CM30DTD / CM60DTD
5
personnel.
• Use cables of the right gauge, especially for long runs or high
power systems.
• Use cables with clear colour indication and maintain polarity
throughout the whole system.
• Avoid loud feedback from microphones; this can damage your
loudspeaker.
• Clean only with dry cloth.
• Avoid touching the unit’s sharp metal edge to prevent injury.
• Do not block any ventilation openings. Install in accordance
with the manufacturer’s instructions.
• Only use attachments/accessories that are specified and
approved by the manufacturer.
• Install the loudspeaker in a location that can structurally
support the weight of the unit and its mounting hardware.
• Tighten all speaker clamps securely. Doing otherwise may result
in the unit falling down and causing personal injury and/or
property damage.
• Do not hold the tweeter as a handle to carry the unit; this can
damage your loudspeaker.
• Always attach a safety cable to both seismic safety tabs to
secure the loudspeaker to the building structure. Please, be
guided by applicable building codes here. Otherwise the unit
could fall down, resulting in personal injury or even death.
• Use only industry-accepted mounting tools and methods.
https://tm.by
Интернет-магазин TM.by

6
CM design loudspeaker with back can
• Exposure to loud audio levels over a long time can cause severe
hearing loss.
• Do not forget to consult the local law directions regarding
producing sound in public places.
• Please check the unit’s condition after unpacking. If the outside
or the carton box has been damaged, inform your shipper
immediately.
• Do not expose the device to water, damp or wet conditions.
• The unit is designed for fixed installations in buildings. It is not
fit for use in mobile applications.
• Refer all servicing to qualified personnel.
• Indoor use only.
The warranty of this product and the applicable terms and
conditions are provided by the dealer where you purchased this
product.
https://tm.by
Интернет-магазин TM.by

Instruction manual
CM20DTS / CM30DTD / CM60DTD
7
Consignes de sécurité importantes
• Lisez les présentes consignes.
• Conservez ces consignes.
• Tenez compte de tous les avertissements.
• Respectez toutes les consignes, en particulier celles qui ont trait
au gréement, au montage, à la suspension et aux connexions
électriques.
• Ce matériel professionnel doit être installé par du personnel
qualifié uniquement, étant donné qu’une installation défaillante
peut résulter dans la chute de l’objet, ce qui peut causer des
lésions corporelles et/ou des dégâts matériels.
• Prenez soin des câbles du haut-parleur, ils ne peuvent
aucunement être endommagés. Les câbles de haut-parleurs
endommagés peuvent donner lieu à une mauvaise qualité
sonore, à des dégâts aux amplificateurs, à des lésions et/ou à
des chocs électriques.
• Il ne faut pas connecter les haut-parleurs au réseau électrique,
cela peut endommager le haut-parleur et augmenter le risque
d’incendie.
• Respectez la puissance nominale afin d’éviter les dégâts aux
haut-parleurs ainsi que les risques d’incendie.
Veuillez lire attentivement ce manuel avant de mettre l’appareil
en service et conservez-le pour référence ultérieure. Respectez à
tout moment les consignes énumérées ci-dessous afin d’éviter de
sérieuses lésions ou même le décès suite à un choc électrique, à un
court-circuit, à des dégâts, à un incendie ou à d’autres dangers. Ces
consignes comprennent, sans y être limitées, les suivantes :
https://tm.by
Интернет-магазин TM.by

8
CM design loudspeaker with back can
• N’ouvrez pas le haut-parleur et n’essayez pas de démonter
les pièces internes ni de les modifier de quelque façon que ce
soit. Au cas où le haut-parleur semble mal fonctionner (aucun
son ou son altéré), si vous constatez de la fumée ou une odeur
inhabituelle émanant de l’appareil, cessez immédiatement de
l’utiliser et faites-le inspecter par du personnel qualifié.
• Utilisez des câbles du calibre adéquat, en particulier pour de
longues distances ou pour des systèmes de haute puissance.
• Utilisez des câbles avec une indication de couleur claire et
garantissez la polarité à travers tout le système.
• Évitez un accrochage acoustique trop fort des microphones,
ceci peut endommager votre haut-parleur.
• Nettoyez uniquement au moyen d’un chiffon sec.
• Évitez de toucher le bord tranchant en métal de l’appareil pour
éviter les blessures.
• Ne bloquez aucune ouverture d’aération. Installez selon les
instructions du fabricant.
• Utilisez uniquement des pièces jointes/des accessoires spécifiés
et approuvés par le fabricant.
• Installez le haut-parleur à un endroit qui peut supporter de
façon structurelle le poids de l’appareil et de son équipement
de montage.
• Serrez fermement toutes les pinces du haut-parleur. Y manquer
pourrait mener à la chute de l’appareil et causer ainsi des
lésions aux personnes et/ou des dégâts matériels.
• N’utilisez pas le tweeter comme poignée pour transporter
l’appareil ; cela peut endommager votre haut-parleur.
https://tm.by
Интернет-магазин TM.by

Instruction manual
CM20DTS / CM30DTD / CM60DTD
9
• Attachez toujours un câble de sécurité aux deux attaches de
sécurité sismiques afin de fixer sûrement le haut-parleur à la
structure de construction. Veillez à respecter dans cette optique
les codes de construction qui sont d’application. Dans le cas
contraire, l’appareil pourrait tomber, ce qui peut causer des
lésions aux personnes ou même entraîner la mort.
• Utilisez uniquement des outils et méthodes de montage
reconnus dans le secteur.
• L’exposition à de hauts niveaux sonores pendant une longue
période peut causer de sérieuses pertes auditives.
• N’oubliez pas de consulter les directives légales locales en
matière de production de son dans des lieux publics.
• Veuillez vérifier l’état de l’appareil après l’avoir déballé. Si
l’extérieur ou la boîte en carton a été endommagé, avertissez-
en immédiatement le transporteur.
• N’exposez l’appareil ni à l’eau, ni à l’humidité, ni à des
conditions humides.
• L’appareil est destiné à des installations fixes dans les bâtiments.
Il ne convient pas à l’usage mobile.
• Confiez tout l’entretien et toutes les réparations à du personnel
qualifié.
• Utilisation à l’intérieur uniquement.
La garantie de ce produit et les conditions applicables sont fournies
par le partenaire chez qui vous avez acheté ce produit.
https://tm.by
Интернет-магазин TM.by

10
CM design loudspeaker with back can
Introduction
The CM Design Back Can Series loudspeakers have a sealed
back can and bass reflex port which gives a controlled sound
performance in any kind of ceiling structure. The ultra-slim housing
with minimal built-in depth has been tuned to optimise bass and
midrange performance while maintaining sonic consistency. The
matching Apart sound image allows you to combine various models
in the same room or area. All models have a tool-free rotatable 16
ohm and 70/100 volt power selector on the front. The thin-edge
grille and integrated neodymium grille fixing magnets guarantee
easy, smooth and elegant integration in any kind of environment.
With ease of installation, dynamic sound, pristine clarity and
attractive aesthetics, the CM Design Back Can Series range is the
clear choice for installers seeking a reliable loudspeaker with high
build quality at affordable prices.
Features
• Design ceiling loudspeaker with back can for controlled sound
performance in any kind of ceiling structure
• Matching Apart sound image allows you to combine various
models in the same room or area
• Tuned bass reflex port for optimised low frequency performance
• High intelligibility while remaining perfect music reproduction
quality
• 4.25” LF driver for CM20DTS and CM30DTD, both with 1”
tweeter
• 6.5” LF driver for CM60DTD, with 1” tweeter
• 60 W dynamic power handling for CM20DTS, 80 W for
CM30DTD and 120 W for CM60DTD
https://tm.by
Интернет-магазин TM.by

Instruction manual
CM20DTS / CM30DTD / CM60DTD
11
• Thin-edge loudspeaker grille for elegant integration
• User-friendly grille mounting due to integrated strong
neodymium magnets
• Easily paintable in any RAL colour
• Installer-friendly grille safety wire speeds up installation and
avoids the grille from falling down during and after installation
• Included tile bridge support rails prevent ceiling tile sagging
• Quick installation with two fast screwing loudspeaker clamps
• Minimal built-in depth with uncompromised acoustical
performance
• Loudspeaker overload protection for a 24/7 failsafe operation
• Front panel selection of 16 ohm or 100V/70V operation, this
allows easy and fast adjustment of the loudspeaker power
without the need to remove it from the ceiling or move
connection wires
• Enhanced cable management with incorporated strain relief
and cable guidance along with provision for a cable gland
• In & Link connection with permanent pass through on the
euroblock connector allows easy daisy chaining of multiple
loudspeakers
• Two integrated seismic safety tabs allowing for connection of
safety cables
https://tm.by
Интернет-магазин TM.by

12
CM design loudspeaker with back can
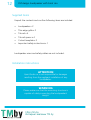
Supplied items
Unpack the contents and confirm following items are included.
• Loudspeaker x 2
• Thin-edge grille x 2
• Tile rail x 4
• Tile rail spacer x 4
• Cutout template x 2
• Important safety instructions x 1
Loudspeaker wires and safety cables are not included.
Installation instructions
ATTENTION
Apart Audio nv is not responsible for damages
resulting from the negligent installation of any
loudspeaker.
WARNING
Please make sure that the mounting structure is
capable of safely supporting the loudspeaker’s
weight.
https://tm.by
Интернет-магазин TM.by

Instruction manual
CM20DTS / CM30DTD / CM60DTD
13
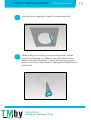
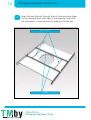
1Use the cutout template to mark the mounting hole.
2When making the hole in your mounting panel, double
check that there are no cables or any other obstructions
behind the mounting panel. Cutting the mounting panel
without this check might result in damaged infrastructure or
power lines.
https://tm.by
Интернет-магазин TM.by

14
CM design loudspeaker with back can
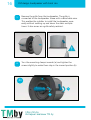
3Insert the two tile rails through the cut hole and place them
on the ceiling surface right next to the opening. Insert the
tile rail spacers in the hole and clip them on the tile rails.
Tile rails
Tile rail spacers
https://tm.by
Интернет-магазин TM.by

Instruction manual
CM20DTS / CM30DTD / CM60DTD
15
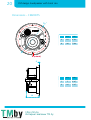
4Open the connection box on the back of the loudspeaker
and take out the euroblock connector. Pull the loudspeaker
wires through the mounting hole and connect them to the
euroblock terminal.
+ + - -
The use of wire ferrules is strongly recommended when
stranded wire is used.
wiring: single cable wiring: daisy-chained to next unit
+ + - -
https://tm.by
Интернет-магазин TM.by

16
CM design loudspeaker with back can
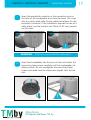
5Remove the grille from the loudspeaker. The grille is
connected to the loudspeaker frame with a detachable wire.
This enables the installer to install the loudspeaker more
easily without walking up and down the stairs multiple
times. It also serves as a grille safety restraint.
6Turn the mounting clamps inwards (a) and tighten the
screws slightly to make them stay in the inward position (b).
b
a
2x
https://tm.by
Интернет-магазин TM.by

Instruction manual
CM20DTS / CM30DTD / CM60DTD
17
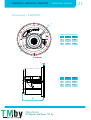
7Insert the euroblock connector in the connection box on
the back of the loudspeaker and close the cover. This cover
acts as a strain relief plate for the cable and retainer for the
euroblock connector. If the installation requires the use of a
cable gland, use the knockout of 22mm (0.87 inch) present
on the cover.
8Insert the loudspeaker into the pre-cut hole and fasten the
mounting clamp screws carefully until the loudspeaker sits
safely in place. Do not overtighten the mounting clamp
screws and make sure the clamps are aligned with the tile
rails.
WARNING Only use a non-conductive cable gland
https://tm.by
Интернет-магазин TM.by

18
CM design loudspeaker with back can
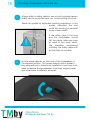
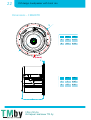
10 Set the power selector on the front of the loudspeaker in
the required position. This power selector switch makes it
very easy and fast to balance an installation since there is no
need to remove the loudspeakers from their support panel
and move wires to different terminals.
9Always attach a safety cable to one or both provided seismic
safety tabs to secure the back can to the building structure.
Please be guided by applicable building regulations in this
matter otherwise the unit
could fall, resulting in personal
injury or even death.
If the safety cable is too long
and the loudspeaker should
fall the safety cable may snap
as result of too much strain.
We therefore recommend
installing the safety cable with
as little slack as possible.
https://tm.by
Интернет-магазин TM.by

Instruction manual
CM20DTS / CM30DTD / CM60DTD
19
WARNING
The 16 ohm setting is not compatible with
70 volt or 100 volt line amplifiers!
WARNING
Set the power tapping prior to applying audio and only
change the setting while the audio amplifer is shut off.
WARNING
The highest 70 volt power setting is not compatible with
100 volt line amplifiers, only with 70 volt line amplifiers.
11 Install the thin-edge grille on the loudspeaker. The grille
is held in place by powerful magnets. Out of the box, the
loudspeaker’s colour is pure white (RAL9010). This white
finish complements most decors and does not require
further painting.
However, if the interior design
requires a custom loudspeaker
finish, these loudspeakers
are very easy to paint. Only
the speaker grille and trim
ring have to be painted. For
more information we refer
you to the dealer where you
purchased this product.
https://tm.by
Интернет-магазин TM.by

A
C
D
B (cutout)
A
C
D
B (cutout)
20
CM design loudspeaker with back can
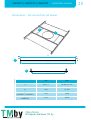
Dimensions - CM20DTS
mm inch
A 223 8.780
B 193 7.598
mm inch
C 5 0.197
D 84 3.307
https://tm.by
Интернет-магазин TM.by
La page est en cours de chargement...
La page est en cours de chargement...
La page est en cours de chargement...
La page est en cours de chargement...
La page est en cours de chargement...
La page est en cours de chargement...
La page est en cours de chargement...
La page est en cours de chargement...
-
 1
1
-
 2
2
-
 3
3
-
 4
4
-
 5
5
-
 6
6
-
 7
7
-
 8
8
-
 9
9
-
 10
10
-
 11
11
-
 12
12
-
 13
13
-
 14
14
-
 15
15
-
 16
16
-
 17
17
-
 18
18
-
 19
19
-
 20
20
-
 21
21
-
 22
22
-
 23
23
-
 24
24
-
 25
25
-
 26
26
-
 27
27
-
 28
28


dans d''autres langues
- English: APART CM20DTS User manual
Autres documents
-
Makita HP1630 Manuel utilisateur
-
Wilo Star-Z 20-1 Manuel utilisateur
-
EINHELL TE-PS 165 Manuel utilisateur
-
EINHELL GC-PC 1435 I TC Manuel utilisateur
-
Makita LS1219 Manuel utilisateur
-
EINHELL GC-PC 2040 I Manuel utilisateur
-
Metabo KS 66 FS Manuel utilisateur
-
Makita LS1019 Slide Compound Miter Saw Manuel utilisateur
-
EINHELL Power X-Fastcharger 4A Manuel utilisateur