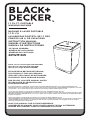
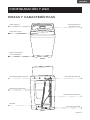
BLACK DECKER BPWM16W 1.7 Cu. Ft. Portable Washing Machine Manuel utilisateur
- Catégorie
- Machines à laver
- Taper
- Manuel utilisateur

INSTRUCTION MANUAL
MANUEL D’INSTRUCTIONS
MANUAL DE INSTRUCCIONES
1.7 CU. FT. PORTABLE
WASHING MACHINE
MACHINE À LAVER PORTABLE
1,7 PI. CU.
LAVARROPAS PORTÁTIL DE 1,7 PIES
CÚBICOS (48 L) DE CAPACIDAD
Thank you for choosing BLACK+DECKER!
Merci d’avoir choisi BLACK+DECKER!
¡Gracias por elegir BLACK+DECKER!
PLEASE READ BEFORE RETURNING
THIS PRODUCT FOR ANY REASON.
VEUILLEZ LIRE AVANT DE RETOURNER
CE PRODUIT POUR QUELQUE RAISON.
POR FAVOR, LEA ESTE MANUAL ANTES
DE DEVOLVER EL PRODUCTO POR
CUALQUIER RAZÓN.
If you have a question or experience a problem with your BLACK+DECKER purchase, go to www.blackanddecker.com/
instantanswers If you can’t find the answer or do not have access to the Internet, call 844-299-0879 from 10:30 a.m. to 6:30
p.m. EST Mon. - Fri. to speak with an agent. Please have the catalog number available when you call.
Si vous avez une question ou rencontrez un problème avec votre achat Black+Decker, allez sur
www.blackanddecker.com/instantanswers Si vous ne trouvez pas la réponse ou n’avez pas accès à l’Internet, appelez au 844-
299-0879 de 10h30 à 18h30 HNE du lun. au ven. pour parler avec un agent. Veuillez avoir le numéro de catalogue disponible
lorsque vous appelez.
Si tiene una pregunta o experimenta un problema con tu compra de BLACK+DECKER, vaya a
www.blackanddecker.com/instantanswers Si no puede encontrar las respuestas que necesita o no tiene acceso a Internet, llame
al 844-299-0879 desde las 10:30 a.m. a las 6:30 p.m. EST de lunes a viernes para hablar con un agente. Por favor, tenga el
número de catálogo a mano cuando llame.
SAVE THIS MANUAL FOR FUTURE REFERENCE.
CONSERVEZ CE MANUEL POUR TOUTE CONSULTATION ULTÉRIEURE.
GUARDE ESTE MANUAL PARA SU REFERENCIA FUTURA.
CATALOG NUMBERS
NUMÉRO DE CATALOGUE
NÚMEROS DE CATÁLOGO
BPWM16W

Page 3
ENGLISH
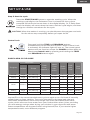
CONTENTS
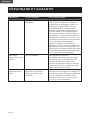
PRODUCT REGISTRATION
SAFETY INFORMATION
Important Safety Instructions ......................................................................................................................................... 4-6
Installation Warnings and Precautions .......................................................................................................................6-7
Grounding Instructions ........................................................................................................................................................... 7
Usage and Maintenance Warnings and Cautions ................................................................................................. 8-11
SET UP & USE
Parts & Features ........................................................................................................................................................................13
Installation Guide ................................................................................................................................................................15-19
Operation Guide ...............................................................................................................................................................20-23
CLEANING & CARE ............................................................................................................................................ 24
TROUBLE SHOOTING & WARRANTY
Before You Call For Service ...............................................................................................................................................25
Customer Service ....................................................................................................................................................................25
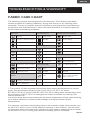
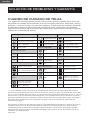
Troubleshooting ............................................................................................................................................................... 26-33
Limited Warranty .................................................................................................................................................................... 34
Staple your receipt to your manual.
You will need it to obtain warranty service.
Thank you for purchasing our
BLACK+DECKER product. This
easy-to-use manual will guide you
in getting the best use of your
product.
Remember to record the model and
serial numbers. They are on a label
on the back of the product.
_____________________________
Model number
_____________________________
Serial number
_____________________________
Date of purchase

Page 4
ENGLISH
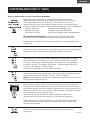
SAFETY INFORMATION
DANGER
DANGER - Immediate hazards
which WILL result in severe
personal injury or death
WARNING
WARNING - Hazards or unsafe
practices which COULD result in
severe personal injury or death
CAUTION
CAUTION - Hazards or unsafe
practices which COULD result in
minor personal injury
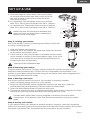
1. Read all instructions before using the appliance.
2. Use this appliance only for its intended purpose as described in this owner’s
Manual.
3. Before use, the washer must be properly installed as described in this manual.
4. ALWAYS follow the fabric care instructions supplied by the garment
manufacturer.
5. Do not wash articles that have been previously cleaned in, washed in, soaked in,
or spotted with gasoline, dry-cleaning solvents, other ammable or explosive
substances as they give off vapors that could ignite or explode.
6. Do not allow children to play on or in the appliance. Close supervision of children
is necessary when the appliance is used near children.
7. Before the appliance is removed from service or discarded, remove the lid of the
washing compartment.
8. Do not reach into the appliance if the tub or agitator is moving.
9. Do not install or store this appliance where it will be exposed to the weather or
freezing temperatures.
10. Do not tamper with the controls.
11. Do not repair or replace any part of the appliance or attempt any servicing
unless it is specically recommended in the user-maintenance instructions or in
published user-repair instructions that you understand and have the skills to carry
out.
12. Do not add gasoline, dry-cleaning solvents, or other ammable or explosive
substances to the wash water. These substances give off vapors that could ignite
or explode.
IMPORTANT SAFETY INSTRUCTIONS
WARNING
When using electrical appliances, basic safety precautions
should be followed, including the following:
READ ALL INSTRUCTIONS BEFORE USING THE UNIT

Page 5
ENGLISH
SAFETY INFORMATION
13. Under certain conditions, hydrogen gas may be produced in a hot water system
that has not been used for 2 weeks or more. HYDROGEN GAS IS EXPLOSIVE.
If the hot water system has not been used for 2 weeks or more, before using a
washer or combination washer-dryer, turn on all hot water faucets and let the
water ow from each for several minutes. This will release any accumulated
hydrogen gas. As the gas is ammable, do not smoke or use an open ame
during this time.
14. Keep the area underneath and around your appliances free of combustible
materials (lint, paper, rags, etc.), gasoline, chemicals and other ammable vapors
and liquids.
15. Do not place items exposed to cooking oil in your washer. Items contaminated
with cooking oils may contribute to a chemical reaction that could cause a load
to catch re.
16. This washer is not designed for maritime use or for mobile installations such as in
RVs, aircraft, etc.
17. Turn off the water faucets and unplug the washer if the machine is to be left for
an extended period of time, such as during vacations.
18. Packaging material can be dangerous for children. There is a risk of suffocation!
Keep all package away from children.
19. Always check the inside of the washer for foreign objects before loading laundry.
Keep the lid closed when not in use.
SAVE THESE INSTRUCTIONS
HOUSEHOLD USE ONLY

Page 6
ENGLISH
SAFETY INFORMATION
1. Failure to closely follow these instructions may result in an abnormal vibrating
and out-of-balance condition that could result in physical injury, property
damage, and/or appliance damage.
2. Plug the power cord into an AC 120V/60Hz wall socket rated at 15amps or
higher. Use the socket for this washer only.
3. Do not use an extension cord.
- Sharing a wall socket with other appliance, using a power strip, or extending the
power cord may result in electric shock or re.
- Do not use an electric transformer. It may result in electric shock or re.
- Ensure that the power voltage, frequency, and current match the product’s
specications. Failing to do so may result in electric shock or re.
4. Have this appliance installed by a qualied technician or service company.
- Failing to do so may result in electric shock, re, explosion, problems with the
product, or injury.
5. Remove all foreign substances such as dust or water from the power plug
terminals and contact points using a dry cloth on a regular basis.
- Unplug the power plug and clean it with a dry cloth.
- Failing to do so may result in electric shock or re.
6. Plug the power plug into the wall socket in the right direction so that the cord
runs towards the oor.
- If you plug the power plug into the socket in the opposite direction, the electric
wires within the cable may be damaged and this may result in electric shock or
re.
7. Plug the power plug into the wall socket rmly. Do not use a damaged power
plug, or loosen wall socket.
- This may result in electric shock or re.
8. Do not pull or excessively bend the power cord.
9. Do not twist or tie the power cord.
10. Do not hook the power cord over a metal object, place a heavy object on the
power cord, insert the power cord between objects, or push the power cord into
the space behind the appliance.
- This may result in electric shock or re.
11. Do not pull the power cord when unplugging the power plug.
- Unplug the power plug by holding the plug.
- Failing to do so may result in electric shock or re.
12. If the power plug or power cord are damaged, contact your nearest service
center. For a grounded, cord-connected appliance, see GROUNDING
INSTRUCTIONS.
13. Do not install this appliance near a heater or inammable material.
14. Do not install this appliance in a humid, oily, or dusty location, or in a location
exposed to direct sunlight or water (rain drops).
INSTALLATION WARNINGS
AND PRECAUTIONS
CAUTION

Page 7
ENGLISH
SAFETY INFORMATION
15. Do not install this appliance in a location where gas may leak.
- This may result in electric shock or re.
16. If the washer is moved to a new location, have it checked and re-installed by a
qualied service technician.
- Failing to follow this warning may result in electric shock or re.
17. Do not install on carpet. Install washer on a level and solid oor that can support
its weight.
- Failing to do so may result in abnormal vibrations, noise, or problems with the
product.
18. The washer is heavy. Two or more people may be needed to install and move the
appliance.
- Failing to do so may result in bodily or other injuries.
19. Store and install the washer where it will not be exposed to temperatures below
freezing or exposed to outdoor weather conditions.
- Failing to do so may result in serious leak damage.
20. Position the appliance so that the power plug is easily accessible.
- Failing to do so may result in electric shock or re due to electric leakage.
21. To reduce the risk of injury to persons, adhere to all industry recommended
safety glasses.
- Failing to follow all of the safety warnings in this manual may result in property
damage, or injury to persons.
GROUNDING INSTRUCTIONS
This appliance must be grounded. In the event of malfunction or breakdown,
grounding will reduce the risk of electric shock by providing a path of the last
resistance for electric current. This appliance is equipped with a cord having an
equipment-grounding conductor and a grounding plug. The plug must be plugged
into an appropriate outlet that is properly installed and grounded in accordance with
all local codes and ordinances.
Consult a qualied electrician or serviceman if:
1) The grounding instructions are not completely understood.
2) You are unsure that the appliance is properly grounded.
3) You have any questions about the grounding or electrical instructions.
Do not modify the plug provided with the appliance - if it will not t the outlet, have a
proper outlet installed by a qualied electrician.
WARNING
Improper use of the grounding plug can result in a risk of electric shock.
WARNING
Improper connection of the equipment-grounding conductor can result in a risk of
electric shock. Check with a qualied electrician or serviceman if you are in doubt as
to whether the appliance is properly grounded.

Page 8
ENGLISH
SAFETY INFORMATION
1. If the appliance is ooded, cut the power immediately and contact your nearest
service center.
2. If the appliance emits a strange noise, a burning smell, or smoke, unplug the
power plug immediately and contact your nearest service center.
- Failing to do so may result in electric shock or re.
3. In the event of a gas leak (such as propane gas, LP gas, etc.), ventilate the area
immediately. Do not turn any appliance or light on or off.
- Do not use a ventilating fan.
- A spark may result in an explosion or re.
4. Do not wash items contaminated with gasoline, kerosene, benzene, paint thinner,
alcohol, dry cleaning detergent or other ammable or explosive substances.
- This may result in electric shock, re, or an explosion.
5. Do not force the washer lid open while the washer is operating (hightemperature
washing / drying / spinning).
- Water owing out of the washer may cause burns or cause the oor to be
slippery. This may result in injury.
- Forcing the lid open can damage the product or cause injury.
6. Make sure to remove the packaging (sponge, styrofoam) attached to the bottom
of the washer before using it.
7. Do not insert your hand or a metal object under the washer.
- This may result in injury.
8. Do not attempt to operate this appliance if it is damaged, malfunctioning,
partially disassembled, or has missing or broken parts, including a damaged cord
or plug.
- This may result in electric shock, re or death.
9. Do not touch the power plug with wet hands.
- This may result in electric shock.
10. Do not turn the appliance off by unplugging the power plug while the washer is
in operation.
- Plugging the power plug into the wall socket again may cause a spark and
result in electric shock or re.
11. Keep all packaging material well out of the reach of children, as packaging
materials can be dangerous to children.
- If a child places a bag over its head, it may suffocate.
12. Do not let children or inrm persons use this washer unsupervised.
- Failing to do so may result in electric shock, burns or injury.
USAGE AND
MAINTENANCE WARNINGS
WARNING

Page 9
ENGLISH
SAFETY INFORMATION
13. Do not attempt to repair, disassemble, or modify the appliance yourself.
- Do not use any fuse (such as cooper, steel wire, etc.) other than the standard
fuse.
- If you need to repair or reinstall the appliance, contact your nearest service
center.
- Failing to do so may result in electric shock, re, problems with the product, or
injury.
14. If any foreign substance such as water enters the appliance in any area other than
the tub, unplug the power plug and contact your nearest service center.
- Failing to do so may result in electric shock or re.
15. If the water supply hose comes loose from the faucet and oods the appliance,
unplug the power plug.
- Failing to do so may result in electric shock or re.
16. Do not mix chlorine bleach with ammonia or acids such as vinegar.
- Incorrect usage can produce poisonous gas, result in serious injury.
17. Do not reach into the washer while parts are moving. Before loading, unloading,
or adding items, press the START/PAUSE button and allow the basket to come
to complete stop before reaching inside.
- Failing to do so may result in electric shock, injury or re.
18. Do not allow children to play on or in the washer. Close supervision of children is
necessary when the washer is used near children. As children grow, teach them
the proper, safe use of all appliances.
- Failing to do so may result in serious injury to persons.
19. Keep laundry products out of children’s reach. Observe all warnings on product
labels and follow to do.
- Failing to do so may result in serious injury to persons.
20. Disconnect this appliance from the power supply before attempting any user
maintenance. Turning the controls to the OFF position does not disconnect this
appliance from the power supply.
- Failing to do so may result in electric shock, injury or re.
21. Do not clean the appliance by spraying water directly onto it.
22. Do not use benzene, thinner, or alcohol to clean the appliance.
- This may result in discoloration, deformation, damage, electric shock or re.
23. Do not to wash water-resistant or water repellant-type clothing.

Page 10
ENGLISH
SAFETY INFORMATION
1. Unplug the power plug when the appliance is not being used for long periods of
time or during a thunder/lightning storm.
- Failing to do so may result in electric shock or re.
2. Keep hands and foreign objects clear of the lid and latch area when closing
the lid.
- Failing to do so may result in personal injury.
3. If the washer is contaminated by a foreign substance such as detergent, dirt, food
waste, etc., unplug the power plug and clean the washer with a damp, soft cloth.
- Failing to do so may result in discoloration, deformation, damage or rust.
4. The clear portion of the lid can be broken by a strong impact. Take care when
using the washer.
- If the clear portion is cracked or broken, it may result in injury.
5. After a water supply failure or when reconnecting the water supply hose, open
the faucet slowly.
6. Open the faucet slowly after a long period of non-use.
- The air pressure in the water supply hose or the water pipe may result in
damage to a part or in water leakage.
7. If a drain error occurs during an operation, check if there is a draining problem.
- If the washer is used when it is ooded because of a draining problem, it may
result in electric shock or re due to electric leakage.
8. Do not insert your hand or a metal object under the washer.
- This may result in injury.
9. Insert the laundry into the washer completely so that laundry does not get
caught in the lid.
- If laundry gets caught in the lid, it may result in damage to the laundry or the
washer, or result in water leakage.
10. Ensure that the faucet is turned off when the washer is not being used.
- Ensure that the water supply hose connectors are properly tightened.
- Failing to do so may result in property damage or injury.
11. Open the faucet and check if the water supply hose connector is rmly tightened
and that there is no water leaking before using the product.
- If the water supply hose connectors are loose, it may result in water leakage.
12. Do not stand on top of the appliance or place objects (such as laundry, lighted
candles, lighted cigarettes, dishes, chemicals, metal objects, etc.) on the
appliance.
- This may result in electric shock, re, problems with the product, or injury.
13. Do not operate the appliance with wet hands.
- This may result in electric shock.
14. Do not spray volatile material such as insecticide onto the surface of the
appliance.
- As well as being harmful to humans, it may also result in electric shock, re, or
problems with the product.
USAGE AND
MAINTENANCE CAUTIONS
CAUTION

Page 11
ENGLISH
SAFETY INFORMATION
15. Do not place an object that generates an electromagnetic eld near the washer.
- This may result in injury due to a malfunction.
16. Since the water drained during a high temperature wash or drying cycle is hot, do
not touch the water.
- This may result in burns or injury.
17. Do not wash, spin, or dry water-proof seats, mats, or clothing.
- Do not wash thick, hard mats even if the washer mark is on the care label.
- This may result in injury or damage to the washer, walls, oor, or clothing due to
abnormal vibrations.
18. Do not operate the washer when detergent dispenser is removed.
- This may result in electric shock or injury due to water leakage.
19. Do not insert your hand into the detergent dispenser after opening it.
- This may result in injury as your hand may be caught.
20. Do not place any non-laundry objects, such as shoes, food waste, or animals into
the washer.
- This can cause abnormal vibrations that can damage the washer, and, in the
case of pets, cause severe injury or death.
21. Do not press the buttons using sharp objects such as pins, knifes, ngernails, etc.
- This may result in electric shock or injury.
22. Do not wash laundry contaminated by oils, creams, or lotions usually found in
skincare shops or massage clinics.
- This may result in the rubber seal becoming deformed and water leakage.
23. Ensure that the water inlet pipe is connected and the tap is opened before
washing clothes.
24. Do not leave metal objects (safety pins, hair pins, etc.) or bleach in the tub for
long periods of time.
- This may cause the tub to rust.
- If rust appears on the surface of the tub, apply a neutral cleansing agent to the
surface and use a sponge to clean it. Never use a metal brush.
25. Do not use hot water from water cooling/heating devices.
- This may result in problems with the washer.
26. Do not use natural hand-washing soap in the washer.
- If it hardens and accumulates inside the washer, it may cause problems with the
product, discoloration, rust, or bad odors.
27. Do not wash large laundry items such as bedding in the washing net.
- Failing to do so may result in injury due to abnormal vibrations.
- Place smaller items, such as lace socks and lingerie in the washing net.
28. Do not use hardened detergent.
- If it accumulates inside the washer, it may result in water leakage.
29. Do not wash throw rugs or doormats.
- If you wash throw rugs or doormats, the sand will accumulate inside the washer.
- It may result in error such as no draining.

Page 12
ENGLISH
SAFETY INFORMATION
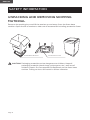
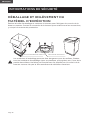
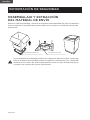
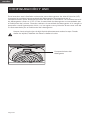
UNPACKING AND REMOVING SHIPPING
MATERIAL
Remove the packing box and lift the washer up and away from the foam base
cushion. Open the lid of washer to take out all accessories including protection foam.
CAUTION: Packaging materials can be dangerous to children; Keep all
packaging material (plastic bags, polystyrene, etc.) well out of
children’s reach. Do not operate this appliance on the foam base
cushion. Failing to do so will result in serious vibration.
Foam Base Cushion Protection Foam

Page 13
ENGLISH
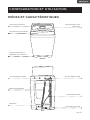
SET UP & USE
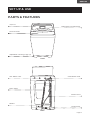
PARTS & FEATURES
Top Lid
Control Panel
Adjustable Leveling Legs (2)
Hot Water Inlet
Drain Hose
Rollers
Front
Back
Detergent Compartment
Cold Water Inlet
Power Cord
Pump Filter

Page 14
ENGLISH
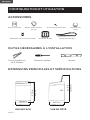
SET UP & USE
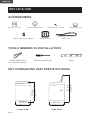
ACCESSORIES
TOOLS NEEDED IN INSTALLATION
KEY DIMENSIONS AND SPECIFICATIONS
Quick connection adaptor Bottom cover Drain hose
Owner's manual
Water supply hose Bottom cover screw
Water inlet cap
LevelAdjustable pliers
or spanner wrench
Phillip screwdriver
20.7 in
525 mm
20.3 in
515 mm
Front View Side View
37.0 in
938 mm
47.9 in
1215 mm

Page 15
ENGLISH
SET UP & USE
CHOOSE THE PROPER LOCATION
FLOORING
For best performance, you must install your washer on a solidly constructed oor. Wood
oors may need to be reinforced to minimize vibration and/or unbalanced load situations.
- Carpeting and soft tile surfaces are contributing factors to vibration which can cause
your washer to move slightly during the spin cycle.
CAUTION: Do not install your washer in areas where water may freeze, since
your washer will always retain some water in its water valve, pump, and hose areas.
Frozen water can damage the belts, the pump, hoses, and other components. Never
install on a platform or weakly supported structure.
ELECTRIC
Use 120Volt 60Hz 15 Amps fuse or circuit breaker. Individual branch circuit serving
only for your washer is recommended.
CAUTION: Never use an extension cord.
GROUNDING
Electrical grounding is required for this washer.
This appliance must be grounded. In the event of malfunction or breakdown,
grounding will reduce the risk of electric shock by providing a path of least resistance
for electric current. This appliance is equipped with a power cord having a three-
prong grounding plug for use in a properly installed and grounded outlet. The plug
must be plugged into an appropriate outlet that is properly installed and grounded in
accordance with all local codes and ordinances.
CAUTION: An improperly connected equipment-grounding conductor can
increase the risk of electrical shock. Check with a qualied electrician
or serviceman if you are not sure whether the appliance is properly
grounded. Do not modify the plug provided with the appliance. If it
does not t the outlet, have a proper outlet installed by a qualied
electrician. To prevent unnecessary risk of re, electrical shock or
personal injury, all wiring and grounding must be done in accordance
with the National Electrical Code ANSI/FNPA, No.70 Latest Revision
and local codes and ordinances. It is the personal responsibility of
the appliance owner to provide adequate electrical service for this
appliance.
WARNING: Never connect the ground wire to plastic plumbing lines, gas lines, or
hot water pipes.

Page 16
ENGLISH
CHOOSE THE PROPER LOCATION
WATER
To correctly ll your washer in the proper amount of time, water pressure of 14 to
70psi (100 to 500 kPa) is required. Water pressure less than 14psi may cause water
valve failure, or may not allow the water valve to shot off completely, or may extend
the ll time beyond what your washer controls allow, causing your washer to turn
off and alarm error. A time limit is built into the controls to prevent ooding in your
home if a hose becomes loose.
The water faucet must be within 4 feet / 122cm of the back of your washer to match
the inlet hoses provided with your washer.
To avoid the possibility of water damage:
- Operate with cold water only.
- Have water faucets easily accessible.
- Turn off faucets when the washer is not in use.
- Periodically check that there is no leakage from the water inlet hose ttings.
DRAIN FACILITY
The recommended height of the standpipe is 35in. or 90cm. The drain hose must be
routed through the drain hose clip to the standpipe. The standpipe must be large
enough to accept the outside diameter of the drain hose.
INSTALL YOUR WASHER
Before installing, make sure there are rubber gaskets inside the
ttings at both ends of the water supply hoses.
If there are no water inlet hoses packed with the washer or if the
hoses are damaged, Call the Customer Satisfaction Center at
1-844-299-0879. Installing the water supply hoses without rubber
gaskets can cause water leakage. When you initially install the
washer, be sure to use new hoses. Failing to do so may result in
a water leakage or overow and may damage your property. If a hose
is too short, replace the hose with a longer, high pressure hose.
Step 1: Move your washer to selected position
Tilt the unit back onto its rear rollers and push it forward as shown in the gure
below. Move the unit to a location as described in the previous Choose the Proper
Location section.
Make sure the location has a hard, level
surface without carpeting. There should
be no direct sunlight. Do not expose the
unit to freezing temperatures
(under 32° F or 0° C).
SET UP & USE
Coupling Rubber Gasket
O
60~70
Front of the
washer Back of the
washer

Page 17
ENGLISH
SET UP & USE
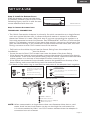
Step 2: Install the Bottom Cover
Slide the bottom cover into the slots
on bottom surface of the unit as in the
following gure, and x it with the one
screw attached with the unit.
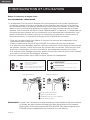
Step 3: Connect the water hose
TEMPORARY CONNECTION
• The Quick Connection Adaptor is primarily for quick connection to a single faucet,
such as a typical kitchen sink, in cases where the washer is stored in a different
place than where it is used. (Skip this step if you are connecting the washer to a
sink with separate hot and cold faucets. See PERMANENT INSTALLATION section
below.) The adaptor consists of two parts that quickly connect or disconnect. One
part, the faucet tting, is for connection to the faucet and the other part, the hose
tting, connects to the COLD water hose of the washer.
- Pull back on the white ring to free the faucet tting from the adaptor for
installation into the faucet.
- Screw the end of the COLD water hose onto the base of the hose tting.
- If the faucet has internal screw threads, unscrew the aerator if present from the tip
of the faucet. Then screw the faucet tting into the faucet. Make sure that the black
rubber gasket is on the top of the adaptor before screwing it in.
- If the faucet has external screw threads, remove the gasket from the top of the
faucet tting, and screw the tting over the external threads.
- Pull back on the white ring to connect the two parts of the adaptor back together.
NOTE: When connected to a single faucet that can dispense either hot or cold
water, both hot and cold water can be run through the cold water line.
It is recommended to ONLY run COLD water washes when the adapter is
connected to such a faucet.
Bottom Cover
Cold
Pull down on the white ring
to divide the adaptor into
two parts.
Rubber Gasket
Inner Threads for outer threaded faucet
Outer threads for inner threaded faucet
Top Part: Faucet fitting
Bottom Part: Hose Fitting
Internal Threads External Threads
Rubber Washer
Faucet Connector
Quick Connection Adaptor
Water Inlet Hose

Page 18
ENGLISH
PERMANENT CONNECTION
• Connect the ends of the water supply hoses to the HOT and COLD faucets. For
convenience, use the Quick Connection Adapter for connection to the cold water
faucet. See instructions for Quick Connection Adapter use in step 3 (previous
page).
• Tighten the ttings by hand until they are snug, and then tighten them an additional
two-thirds of a turn with a wrench/pliers.
When you fasten the tting, do not fasten it too tightly or apply tape or sealant
to the faucet or water supply inlet. This can damage the tting. After you have
connected the water supply hose to the faucet, ensure that it is connected
securely by pulling the water supply hose downwards.
• Place the unconnected end of the hose into a bucket and open
the faucet connected to the water supply hose for 10 or 15
seconds to remove any foreign substances from the hose. Close
the faucet before continuing.
• Connect the end of the water supply hose to the water supply inlet connection at
the top of the washer.
The water supply hose connected to the HOT faucet must be connected to
the HOT water supply inlet and the water hose connected to the COLD water
source must be connected to the COLD water supply inlet.
• Tighten the tting by hand until it is snug, and then tighten them an additional
two-thirds of a turn with a wrench/pliers.
Conrm that the water supply hoses are not twisted or bent. If the hoses are
twisted or bent, the hoses can leak and cause electric shock due to the water
leakage. To ensure the correct water usage, connect both the HOT and COLD
water faucets. If they are not both connected an error can occur.
If you do not want to use the HOT water supply hose, install the water inlet cap into
the HOT water supply inlet hole In this case, you must select cold water as the wash
temperature choice.
Turn on the HOT and COLD water supplies and check all the water supply inlet
connections and the faucets for water leaks.
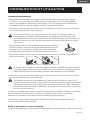
Step 4: Connect the drain hose
The drain hose is connected to the bottom side of the unit. The other end of the
hose should be positioned using one of the following methods:
SET UP & USE
Cold
Pull down on the white ring
to divide the adaptor into
two parts.
Top part: Faucet fitting
Bottom part: Hose fitting
Rubber gasket
Inner threads for outer threaded faucet.
Outer threads for inner threaded faucet
Cold

Page 19
ENGLISH
A. Over the edge of a wash basin. Secure the guide
to the side of the basin wall with a hook or to the
tap with a piece of string to prevent the drain
hose from moving.
B. In a standpipe The standpipe must be no shorter
than 32 in. (81cm) and no longer than 39 in. (100cm).
C. In a laundry tub. The laundry tub must be no shorter
than 32 in. (81cm) and no higher than 39 in. (100cm).
Make sure that the connection between the
drain hose and the wash basin, standpipe or
laundry tub is not airtight.
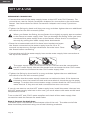
SET UP & USE
loosen lock
Adjustable legs
Leveling gauge
Pulsator
Step 5: Leveling your washer
See if the washer is level by checking the position of the tub
or using a leveling gauge.
1. Slide the washer into position.
2. Open the lid of the washer, and pour the water into the tub
to just below the pulsator level.
3. If the washer is level, the pulsator is positioned at the center
of the washer as shown in the gure above right. If not, level
your washer by turning the front leveling leg clockwise or
counterclockwise as necessary.
There are TWO adjustable legs.
Step 6: Powering your washer
Plug the power cord into a 3-prong, well grounded 120 volt 60 Hz approved
electrical outlet protected by a 15-amp fuse or comparable circuit breaker. Your
washer is grounded through the third prong of the power cord when plugged into a
3-prong grounded electrical outlet.
Step 7: Running a test cycle
Run a test cycle as follows to check if your washer is properly installed.
1. Press the Power button to turn on your washer.
2. Press the PROCEDURE button repeatedly until the rise and spin cycles are
selected and the corresponding indicator lights are illuminated.
3. Press the Start/Pause button to start the test cycle.
4. The washer should not rock or vibrate excessively when water is supplied or when
washing or spinning, and should drain well during the spin cycle.
If water leaks while water is being supplied or drained, check the water
connections. If the washer rocks and vibrates excessively, level your washer
again.
Step 8: Storing your washer
If you want to store your washer at another location, unplug it, drain any remaining
water from the drain pipe and hook the pipe onto the back of the washer. Disconnect
the water inlet hoses from the faucets and move washer to new location.
39 i n. Max
32 i n. Min
39 i n. Max
32 i n. Min
Standpipe
Hose
retainer
Tie
strap
Laundry tub
Hose
retainer
Tie
strap

Page 20
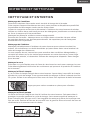
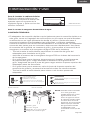
ENGLISH
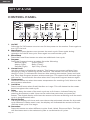
CONTROL PANEL
SET UP & USE
1245678910 3
1. On/Off
Press the On/Off button once to turn ON the power to the washer. Press again to
turn OFF the unit.
2. Start/Pause
Press Start/Pause button once to start the wash cycle. Press again during
operation to PAUSE the cycle. Press again to continue the cycle.
3. Extra Rinse
Press the Extra Rinse button to select an additional rinse cycle.
4. Program
Press the Program button to select from the following:
Normal (light) Quick (Flash)
Heavy (light) Bulky (Flash)
Delicate (light) Spin Only (Flash)
5. Control Lock
Use this option to disable the controls. This feature can prevent children from
changing cycles or powering off the machine. The washer can only be locked
during a cycle. To activate this function after starting the washer, press and hold
the Temp and Program buttons at the same time. The control lock indicator light
will turn on. To cancel this function select the Temp and Program buttons again.
6. Temperature
Press this button to select the water temperature for washing Cold, Warm or Hot
temperature selections.
7. Load Size
Press Load Size to select Small, Medium or Large. This will determine the water
level throughout the wash cycle
8. Delay
You can delay the start of the wash cycle up to 24 hours. Activate Delay by
pressing the button to add 1 hour to the start time each time you press the
button. The digital display will show the amount of hours remaining until the wash
cycle is programed to start.
9. Digital Display
The digital display will show and count down the estimated minutes for the wash
cycle selected. If delay start is set, the display will indicated the amount of hours
until the wash cycle is to begin.
10. Procedure
Press this button to select different cycles: Soak, Wash, Rinse and Spin. The light
will illuminate next to the selected cycles or combination of cycles.

Page 21
ENGLISH
SET UP & USE
WASHING A LOAD OF LAUNDRY
Step 1: Power on your washer
Press the ON/OFF button to power your washer on.
Step 2: Load your washer
Before loading your laundry, be sure to take out coins, keys
and other hard objects, and close all zippers to prevent the
clothes from damage.
Sort laundry by fabric type, soil level, color and load size as needed.
You can ll the tub with dry, unfolded clothes ,but DO NOT OVERLOAD
the tub. Load the tub no more than 3/4 full.
To ensure good cleaning results do not overload the tub, especially when washing
heavily soiled loads. Never load the tub more than 3/4 full.
Overloading may reduce washing efciency, cause excess wear, and possibly
cause creasing or wrinkling of items in the load.
NOTE: To add a forgotten item:
1. Press the START/PAUSE button to pause the washer.
2. Wait for the tub to stop turning, then open the door.
3. Add the item, close the door, and then press the START PAUSE button. The cycle
will resume.
Step 3: Add detergent
This washer is designed for high efciency (HE) detergent only.
Add the recommended amount of detergent directly into the
detergent compartment before starting your washer. The normal
amount of detergent to use is 1/4 to 1/2 of the maximum amount
recommended by the detergent manufacturer. Always reduce the
amount of detergent if the load is small or lightly soiled, or if your
water is very soft . Never use more than the maximum amount
recommended by the detergent manufacturer.
Never pour any liquid bleach directly onto the load. It can cause fabric
damage, such as weakening of cloth bers or color loss.
ON/OFF
WARNING
To reduce the risk of electric shock, or injury to persons, read the
important safety instructions before operating this appliance.
Detergent
Compartment
La page est en cours de chargement...
La page est en cours de chargement...
La page est en cours de chargement...
La page est en cours de chargement...
La page est en cours de chargement...
La page est en cours de chargement...
La page est en cours de chargement...
La page est en cours de chargement...
La page est en cours de chargement...
La page est en cours de chargement...
La page est en cours de chargement...
La page est en cours de chargement...
La page est en cours de chargement...
La page est en cours de chargement...
La page est en cours de chargement...
La page est en cours de chargement...
La page est en cours de chargement...
La page est en cours de chargement...
La page est en cours de chargement...
La page est en cours de chargement...
La page est en cours de chargement...
La page est en cours de chargement...
La page est en cours de chargement...
La page est en cours de chargement...
La page est en cours de chargement...
La page est en cours de chargement...
La page est en cours de chargement...
La page est en cours de chargement...
La page est en cours de chargement...
La page est en cours de chargement...
La page est en cours de chargement...
La page est en cours de chargement...
La page est en cours de chargement...
La page est en cours de chargement...
La page est en cours de chargement...
La page est en cours de chargement...
La page est en cours de chargement...
La page est en cours de chargement...
La page est en cours de chargement...
La page est en cours de chargement...
La page est en cours de chargement...
La page est en cours de chargement...
La page est en cours de chargement...
La page est en cours de chargement...
La page est en cours de chargement...
La page est en cours de chargement...
La page est en cours de chargement...
La page est en cours de chargement...
La page est en cours de chargement...
La page est en cours de chargement...
La page est en cours de chargement...
La page est en cours de chargement...
La page est en cours de chargement...
La page est en cours de chargement...
La page est en cours de chargement...
La page est en cours de chargement...
La page est en cours de chargement...
La page est en cours de chargement...
La page est en cours de chargement...
La page est en cours de chargement...
La page est en cours de chargement...
La page est en cours de chargement...
La page est en cours de chargement...
La page est en cours de chargement...
La page est en cours de chargement...
La page est en cours de chargement...
La page est en cours de chargement...
La page est en cours de chargement...
La page est en cours de chargement...
La page est en cours de chargement...
La page est en cours de chargement...
La page est en cours de chargement...
La page est en cours de chargement...
La page est en cours de chargement...
La page est en cours de chargement...
La page est en cours de chargement...
La page est en cours de chargement...
La page est en cours de chargement...
La page est en cours de chargement...
La page est en cours de chargement...
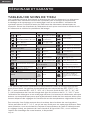
-
 1
1
-
 2
2
-
 3
3
-
 4
4
-
 5
5
-
 6
6
-
 7
7
-
 8
8
-
 9
9
-
 10
10
-
 11
11
-
 12
12
-
 13
13
-
 14
14
-
 15
15
-
 16
16
-
 17
17
-
 18
18
-
 19
19
-
 20
20
-
 21
21
-
 22
22
-
 23
23
-
 24
24
-
 25
25
-
 26
26
-
 27
27
-
 28
28
-
 29
29
-
 30
30
-
 31
31
-
 32
32
-
 33
33
-
 34
34
-
 35
35
-
 36
36
-
 37
37
-
 38
38
-
 39
39
-
 40
40
-
 41
41
-
 42
42
-
 43
43
-
 44
44
-
 45
45
-
 46
46
-
 47
47
-
 48
48
-
 49
49
-
 50
50
-
 51
51
-
 52
52
-
 53
53
-
 54
54
-
 55
55
-
 56
56
-
 57
57
-
 58
58
-
 59
59
-
 60
60
-
 61
61
-
 62
62
-
 63
63
-
 64
64
-
 65
65
-
 66
66
-
 67
67
-
 68
68
-
 69
69
-
 70
70
-
 71
71
-
 72
72
-
 73
73
-
 74
74
-
 75
75
-
 76
76
-
 77
77
-
 78
78
-
 79
79
-
 80
80
-
 81
81
-
 82
82
-
 83
83
-
 84
84
-
 85
85
-
 86
86
-
 87
87
-
 88
88
-
 89
89
-
 90
90
-
 91
91
-
 92
92
-
 93
93
-
 94
94
-
 95
95
-
 96
96
-
 97
97
-
 98
98
-
 99
99
-
 100
100


BLACK DECKER BPWM16W 1.7 Cu. Ft. Portable Washing Machine Manuel utilisateur
- Catégorie
- Machines à laver
- Taper
- Manuel utilisateur
dans d''autres langues
Autres documents
-
BLACK+DECKER BPWM16W Manuel utilisateur
-
BLACK+DECKER BPWM20W Manuel utilisateur
-
Samsung WA45H7000AW Mode d'emploi
-
Samsung WA48J7770AP/A2 Manuel utilisateur
-
-
-
Haier HLTW600AXW Manuel utilisateur
-
-
-