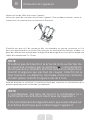
Valberg VC 60 4MFC S 373P2 Manuel utilisateur
- Catégorie
- Plaques de cuisson
- Taper
- Manuel utilisateur

975129 - VC 60 4MFC S 373P2
975130 - VC 60 4MFC X 373P2
EN
WARRANTY CONDITION
This product has a 2-year warranty as of the date of purchase*, covering any fault resulting from
a manufacturing or material defect. This warranty does not cover defects or damage resulting
from incorrect installation, improper use or abnormal wear of the appliance.
*upon presentation of the sales receipt.
FR
CONDITION DE GARANTIE
Ce produit est garanti pour une période de 2 ans à partir de la date d’achat*, contre toute
défaillance résultant d’un vice de fabrication ou de matériau. Cette garantie ne couvre pas les
vices ou les dommages résultant d’une mauvaise installation, d’une utilisation incorrecte ou
de l’usure anormale du produit.
*sur présentation du ticket de caisse.
NL
GARANTIEVOORWAARDEN
Dit product wordt gegarandeerd voor een periode van 2 jaar vanaf de aankoopdatum*, voor
elke storing die het gevolg is van een fabricagefout of het materiaal. Gebreken of schade door
slechte installatie, onjuist gebruik of abnormale slijtage van het product worden niet gedekt
door deze garantie.
*op vertoon van kassabon.
ES
CONDICIONES DE GARANTÍA
El certificado de garantía de este producto tiene una duración de 2 años a partir de la fecha de
compra* que se limita a los defectos de fabricación y averías del material. Se excluyen de la
garantía deficiencias o daños originados por una mala instalación, errores en la manipulación
o por un uso inadecuado.
*previa presentación del comprobante de compra.
MADE IN POLAND
ELECTRO DEPOT
1 route de Vendeville
59155 FACHES-THUMESNIL
FRANCE

975129 - VC 60 4MFC S 373P2
975130 - VC 60 4MFC X 373P2
INSTRUCTIONS FOR USE .....................02
CONSIGNES D'UTILISATION .....................34
GEBRUIKSAANWIJZINGEN .....................66
INSTRUCCIONES DE USO .....................98
03/2023 - V2
Cooker
Cuisinière
Fornuis
Cocina

1
2
3 4 5 6
78
M
10
9


2 EN
Thanks!
Thank you for choosing this VALBERG product.
Chosen, tested and recommended by ELECTRO DEPOT,
the products of the VALBERG brand are easy to use,
reliable and of an impeccable standard.
Thanks to this appliance, you can be sure that each
use will bring you satisfaction.
Welcome to ELECTRO DEPOT.
Visit our website: www.electrodepot.fr
www.electrodepot.be

3FR
Utilisation de l’appareil
A
3 EN
Table of contents
APreview of the
appliance
CUseful information
BUsing the appliance
Description of the appliance
Features of the appliance
Installation
Using the appliance
Oven cooking – practical tips
Test dishes
Cleaning and Maintenance
Troubleshooting

4EN
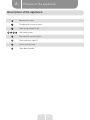
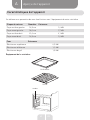
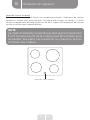
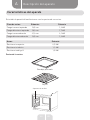
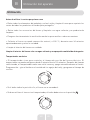
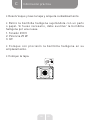
Preview of the appliance
A
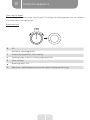
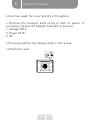
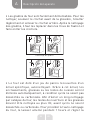
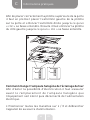
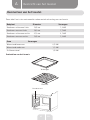
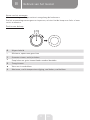
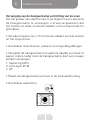
Description of the appliance
MMechanical timer
1Temperature control knob
2Oven programme knob
3 4 5 6Hob zone knobs
7Thermostat control light L
8Oven indicator light R
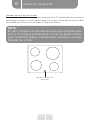
9Glass ceramic hob
10 Oven door handle

5EN
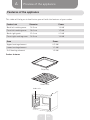
Preview of the appliance
A
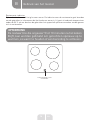
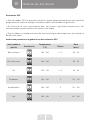
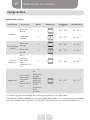
Features of the appliance
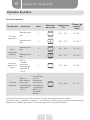
This table will help you to familiarise yourself with the features of your cooker.
Cooker hob Diameter Power
Back left cooking zone. 14.5 cm 1.2 kW
Front left cooking zone. 18.0 cm 1.7 kW
Back right grate 21.0 cm 2.1 kW
Front right cooking zone 14.5 cm 1.2 kW
Oven Power
Upper heating element 0.9 kW
Lower heating element 1.1 kW
Grill heating element 1.5 kW
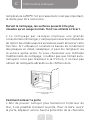
Cooker features
Drip tray
Shelf rack
Guide rails

6EN
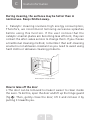
Using the appliance
B
Installation
Kitchen layout
• Make sure that the room in which the cooker is installed is well-ventilated. It must be easy
to access the control elements at all times.
• Integrated units require coverings and adhesives which can resist temperatures of up to
100 °C. If this is not followed, the surface may be deformed and the covering will lift.
• Install the cooker on a flat and solid surface.
• Cooker hoods must be installed in line with recommendations and their instructions for
use.
• Before use, the cooker must be levelled, which is important for ensuring that fats and
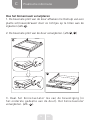
liquids are distributed evenly across cooking pans.
• To level the appliance, use the adjustment feet which can be accessed once the drawer is
removed. The adjustable feet measure 5 mm in height.

7EN
Using the appliance
B
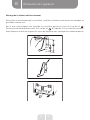
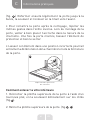
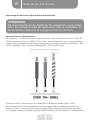
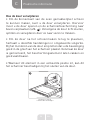
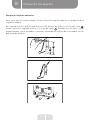
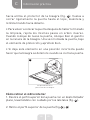
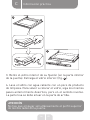
Installing the anti-tilt attachment
To avoid the cooker tilting, install the attachment provided with your product, following the
procedure below:
Drill a hole 6.0 cm from the floor in the wall against which your cooker will be installed A.
Then, drill a second hole 10.3 cm from the floor B. Using the two screws and dowels
provided, attach the flat angle bracket to the wall, aligning the holes in the bracket with the
ones you've just drilled in the wall.
A
B

8EN
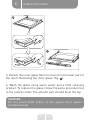
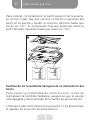
Using the appliance
B
Connecting the cooker to the electrical system
NOTE
The appliance must only be connected to the electrical
system by an approved professional. You must not carry
out any modifications to the electrical system.
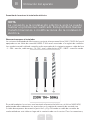
Indications for the installer
The device is configured at the factory for a single-phase AC power supply (230 V 1N ~ 50 Hz)
and equipped with a H05VV-F 3G 4 mm² connection cable connected to the terminal block.
The wires of the connecting cable are marked as follows : phase wire L - BN - brown, neutral
wire N - BU - blue, PE ground wire - GNYE - yellow + green.
You can configure the device for two-phase or three-phase (400 / 230V) power supply by
bridging the terminals of the terminal block according to the table and the connection
diagrams below, point 2 and point 3, then you must use a connection cable specified in the

9EN
Using the appliance
B
table instead of the cable supplied with the device. Use the connection bridges supplied
with the device. To access the terminal block, remove the cover by lifting it off with a
flathead screwdriver.
Remember that the connecting wire must match the type of connection and the power rating
of the stove.
Do not solder the cable ends. The cable sheath must be mounted in the strain relief device,
which is suitable for cables with a diameter of 7 to 15 mm.
NOTE
Ensure you connect the earth connection to the cooker's
terminal, indicated by the symbol. The cooker’s electrical
supply must be fitted with an emergency stop circuit breaker,
which allows the electrical supply to be shut off at any time.
There must be a minimum distance of 3 mm between the
emergency stop breaker contacts.
Before plugging the cooker into the electrical system, check the information provided on the
serial panel and in the connection diagram.
NOTE
• The installer is required to provide the user with the
«Electrical Connection Certificate of the appliance ».
• Connecting the unit in a manner other than that shown
on the wiring diagram may damage the unit.

10 EN
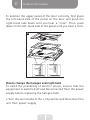
Using the appliance
B
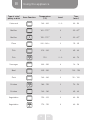
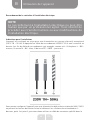
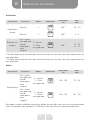
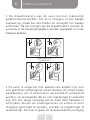
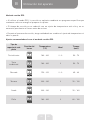
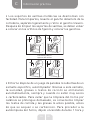
Possible connection diagram
NOTE
• The heating elements have a rated voltage of 230 V.
• For all connections, the earth connection must be
connected to the terminal next to the PE symbol.
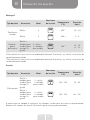
Recommended
connection
cable type
1
For a 230 V single-phase connection with a
neutral wire, terminals 1-2-3 and 4-5 are bridged,
and the ground wire is connected to the ground
terminal
1 N~
1
2
3
5
4
PE
L1
N
H05VV-F3G4
3x 4 mm2
2
For a two-phase 400/230 V connection with a
neutral wire, terminals 2-3 and 4-5 are bridged,
and the ground wire is connected to the ground
terminal
2N~
1
2
3
5
4
L1
L2
PE
N
H05VV-F4G2.5
4x 2.5 mm2
3
For a three-phase 400/230 V connection with
a neutral wire, terminals 4-5 are bridged, the
individual phase wires are connected to terminals
1, 2, 3 respectively, the neutral wire is connected
to terminals 4-5 in a bridge and the ground wire is
connected to the ground terminal
3 N~
1
2
3
5
4
L1
L2
PE
N
L3 H05VV-F5G1.5
5x 2.5 mm2
L1, L2, L3 - Wires under tension; N - Neutral wire; PE - Ground wire
The arrows in the diagrams above indicate where you should connect the individual cable
wires.

11 EN
Using the appliance
B
Use of the appliance
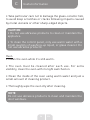
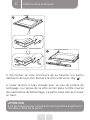
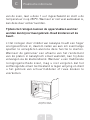
Before using the cooker for the first time
• Remove all packaging, empty the drawer, and clean the oven in order to eliminate any
residue of products used to protect it,
• Remove all accessories from the oven and clean them in warm water with a cleaning agent,
• Turn on the ventilation system, or air out the room by opening a window,
• Heat the oven to 250 °C, using the natural convection setting, for roughly 30 minutes,
remove all residue.
• Carefully clean the inside of the oven.
Clean the inside of the oven using warm water and a small amount of cleaning product
only.
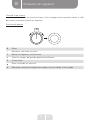
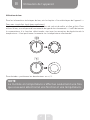
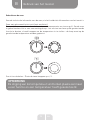
Mechanical timer
• The timer is used to set the cooking time on your electric oven. The timer can be set from
5 to 120 minutes. Once the specified time has elapsed, the timer will beep and the oven
automatically turns off. Programming – turn the knob clockwise and set the cooking time.
0
10
20
40
60
80
• If the knob is turned to the "0" position, the oven will not turn on.
• If you want to use the oven without the timer, the knob must be turned to the position.
0
10
20
40
60
80

12 EN
Using the appliance
B
NOTE
When setting the timer for 5 to 10 minutes, first turn the
knob a quarter turn (90 degrees), and then select the
required length of time.
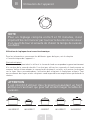
Using the glass ceramic hob
For information on the different types of cooking zone, see the "Appliance features"
section.
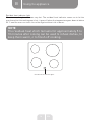
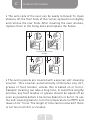
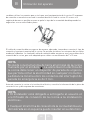
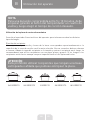
Choosing the saucepan
Choose pots and pans with a size and base shape which approximately matches the surface
of the heating zone. Do not use saucepans with a curved base. Make sure to use the right
size of lid for the pots or pans, and centre them over the cooking zone. We recommend using
pots and pans with flat, thick bottoms. Any dirt on cooking zones and saucepans prevents
optimal use of the heat.
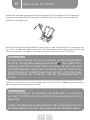
WARNING
You must not use pots and pans with damaged or sharp
bases, as this may damage the cooker surface.
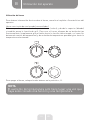
INCORRECT INCORRECT CORRECT INCORRECT INCORRECT

13 EN
Using the appliance
B
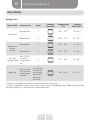
Choosing the power
The heating power varies from zone to zone. To change the heating power, you just need to
turn the knob to the right or left.
Button position
0
1
2
3
0Off
Minimum, reheating dishes
1Simmering vegetables, slow cooking
Cooking soups or batch-cooking large quantities
2Slow-cooking
Browning meat, fish
3Maximum, rapid temperature increase, quick cooking, quick frying

14 EN
Using the appliance
B
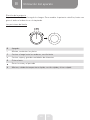
Residual heat indicator light
When in use, the glass becomes very hot. The residual heat indicator comes on to let the
user know that the cooking zone is hot; it goes off when the temperature goes down to below
50 °C and the user can touch the surface again without risk of burns.
NOTE
The residual heat which remains for approximately 5 to
10 minutes after cooking can be used to reheat dishes, to
keep them warm, or to finish off cooking.
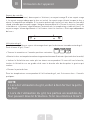
Residual heat indicator lights

15 EN
Using the appliance
B
Using the oven
See the "Appliance characteristics" section for technical information on the oven.
Oven with fan forced air circuit
The oven can be heated from above, below and with a grill. To use the oven, you have a knob-
type control – turn the switch to the selected function and the temperature regulation knobs
– you need to align the knob with the temperature selected.
5050
100
150
200
250
0
To turn it off - Set both buttons to • / 0.
NOTE
The temperature will only increase once you've selected a
function and temperature.

16 EN
Using the appliance
B
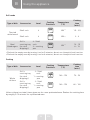
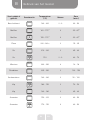
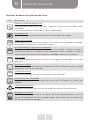
Positions of the oven function knob
0Zero setting
Fast heat-up time
The upper and lower heating elements, grill and fan are switched on.
This function allows the oven to be preheated quickly.
Defrosting
Only the fan operates to allow fast defrosting.
Super-ventilated grill
Using this function allows you to cook faster, cook larger quantities of food and
improve its flavour.
Enhanced grill (grill and top heating element)
The "enhanced grill" function allows you to grill while using the top heating
element at the same time. A higher temperature is achieved in the upper part of
the oven, in order to cook larger quantities and to brown the food.
Single oven rack
This function allows you to grill thin/shallow dishes placed in the middle of the
oven.
Bottom heating element
This function only triggers the bottom heating element. You can use it to cook the
base of your pastries or tarts, for example.
Natural convection
This function allows you to cook food on a single level.
Natural fan convection
This combination of functions makes it easier to cook pizzas, for example.
Oven light
When the knob is positioned on this function, only the oven light turns on.
ECO cooking mode
This function allows you to heat dishes with optimal energy efficiency. Cooking
times may be slightly longer. In this position, the oven light does not come on.

17 EN
Using the appliance
B
Indicator lights
When the oven is turned on, two lights - a red light L and an orange light R - come on. The
orange light indicates that the oven is on. The red light turns off when the oven has reached
the selected temperature. If the recipe states that the dish must be placed in a preheated
oven, wait until the red light switches off for the first time. During cooking, the light will
regularly switch on and off (keeping the oven temperature constant). The orange light also
turns on when you select the "Oven light" function.
L R
Using the grill
Dishes are grilled by infrared rays emitted by the grill's incandescent heating element.
To switch on the grill, you need to:
• Turn the knob to one of the following positions:
• Heat the oven for approximately 5 minutes (oven door closed).
• Insert the drip pan with your dish at the appropriate level. If you're using the spit, place the
drip tray on a level underneath the spit in order to collect any fat which runs off.
• Close the oven door.
See "Oven cooking" for temperatures corresponding to using the grill - Practical tips.
NOTE
• When using the grill, make sure that the oven door is
properly closed.
• When using the grill, the outside of the oven can become
extremely hot. Keep children away.
La page est en cours de chargement...
La page est en cours de chargement...
La page est en cours de chargement...
La page est en cours de chargement...
La page est en cours de chargement...
La page est en cours de chargement...
La page est en cours de chargement...
La page est en cours de chargement...
La page est en cours de chargement...
La page est en cours de chargement...
La page est en cours de chargement...
La page est en cours de chargement...
La page est en cours de chargement...
La page est en cours de chargement...
La page est en cours de chargement...
La page est en cours de chargement...
La page est en cours de chargement...
La page est en cours de chargement...
La page est en cours de chargement...
La page est en cours de chargement...
La page est en cours de chargement...
La page est en cours de chargement...
La page est en cours de chargement...
La page est en cours de chargement...
La page est en cours de chargement...
La page est en cours de chargement...
La page est en cours de chargement...
La page est en cours de chargement...
La page est en cours de chargement...
La page est en cours de chargement...
La page est en cours de chargement...
La page est en cours de chargement...
La page est en cours de chargement...
La page est en cours de chargement...
La page est en cours de chargement...
La page est en cours de chargement...
La page est en cours de chargement...
La page est en cours de chargement...
La page est en cours de chargement...
La page est en cours de chargement...
La page est en cours de chargement...
La page est en cours de chargement...
La page est en cours de chargement...
La page est en cours de chargement...
La page est en cours de chargement...
La page est en cours de chargement...
La page est en cours de chargement...
La page est en cours de chargement...
La page est en cours de chargement...
La page est en cours de chargement...
La page est en cours de chargement...
La page est en cours de chargement...
La page est en cours de chargement...
La page est en cours de chargement...
La page est en cours de chargement...
La page est en cours de chargement...
La page est en cours de chargement...
La page est en cours de chargement...
La page est en cours de chargement...
La page est en cours de chargement...
La page est en cours de chargement...
La page est en cours de chargement...
La page est en cours de chargement...
La page est en cours de chargement...
La page est en cours de chargement...
La page est en cours de chargement...
La page est en cours de chargement...
La page est en cours de chargement...
La page est en cours de chargement...
La page est en cours de chargement...
La page est en cours de chargement...
La page est en cours de chargement...
La page est en cours de chargement...
La page est en cours de chargement...
La page est en cours de chargement...
La page est en cours de chargement...
La page est en cours de chargement...
La page est en cours de chargement...
La page est en cours de chargement...
La page est en cours de chargement...
La page est en cours de chargement...
La page est en cours de chargement...
La page est en cours de chargement...
La page est en cours de chargement...
La page est en cours de chargement...
La page est en cours de chargement...
La page est en cours de chargement...
La page est en cours de chargement...
La page est en cours de chargement...
La page est en cours de chargement...
La page est en cours de chargement...
La page est en cours de chargement...
La page est en cours de chargement...
La page est en cours de chargement...
La page est en cours de chargement...
La page est en cours de chargement...
La page est en cours de chargement...
La page est en cours de chargement...
La page est en cours de chargement...
La page est en cours de chargement...
La page est en cours de chargement...
La page est en cours de chargement...
La page est en cours de chargement...
La page est en cours de chargement...
La page est en cours de chargement...
La page est en cours de chargement...
La page est en cours de chargement...
La page est en cours de chargement...
La page est en cours de chargement...
La page est en cours de chargement...
La page est en cours de chargement...
La page est en cours de chargement...
-
 1
1
-
 2
2
-
 3
3
-
 4
4
-
 5
5
-
 6
6
-
 7
7
-
 8
8
-
 9
9
-
 10
10
-
 11
11
-
 12
12
-
 13
13
-
 14
14
-
 15
15
-
 16
16
-
 17
17
-
 18
18
-
 19
19
-
 20
20
-
 21
21
-
 22
22
-
 23
23
-
 24
24
-
 25
25
-
 26
26
-
 27
27
-
 28
28
-
 29
29
-
 30
30
-
 31
31
-
 32
32
-
 33
33
-
 34
34
-
 35
35
-
 36
36
-
 37
37
-
 38
38
-
 39
39
-
 40
40
-
 41
41
-
 42
42
-
 43
43
-
 44
44
-
 45
45
-
 46
46
-
 47
47
-
 48
48
-
 49
49
-
 50
50
-
 51
51
-
 52
52
-
 53
53
-
 54
54
-
 55
55
-
 56
56
-
 57
57
-
 58
58
-
 59
59
-
 60
60
-
 61
61
-
 62
62
-
 63
63
-
 64
64
-
 65
65
-
 66
66
-
 67
67
-
 68
68
-
 69
69
-
 70
70
-
 71
71
-
 72
72
-
 73
73
-
 74
74
-
 75
75
-
 76
76
-
 77
77
-
 78
78
-
 79
79
-
 80
80
-
 81
81
-
 82
82
-
 83
83
-
 84
84
-
 85
85
-
 86
86
-
 87
87
-
 88
88
-
 89
89
-
 90
90
-
 91
91
-
 92
92
-
 93
93
-
 94
94
-
 95
95
-
 96
96
-
 97
97
-
 98
98
-
 99
99
-
 100
100
-
 101
101
-
 102
102
-
 103
103
-
 104
104
-
 105
105
-
 106
106
-
 107
107
-
 108
108
-
 109
109
-
 110
110
-
 111
111
-
 112
112
-
 113
113
-
 114
114
-
 115
115
-
 116
116
-
 117
117
-
 118
118
-
 119
119
-
 120
120
-
 121
121
-
 122
122
-
 123
123
-
 124
124
-
 125
125
-
 126
126
-
 127
127
-
 128
128
-
 129
129
-
 130
130
-
 131
131
-
 132
132


Valberg VC 60 4MFC S 373P2 Manuel utilisateur
- Catégorie
- Plaques de cuisson
- Taper
- Manuel utilisateur
dans d''autres langues
- English: Valberg VC 60 4MFC S 373P2 User manual
- español: Valberg VC 60 4MFC S 373P2 Manual de usuario
- Nederlands: Valberg VC 60 4MFC S 373P2 Handleiding
Autres documents
-
Indesit K3C76(W)/BG Mode d'emploi
-
-
Whirlpool AXMT 6534/IX Mode d'emploi
-
-
ROSIERES RCV 6474 Le manuel du propriétaire
-
ROSIERES RVC5318RB Manuel utilisateur
-
ZANKER ZKH7528W Manuel utilisateur
-
-
-