Powerfist 8990905 Le manuel du propriétaire
- Catégorie
- Cloueuse
- Taper
- Le manuel du propriétaire

V1.0 8990905
Please read and understand all instructions before use. Retain this manual
for future reference.

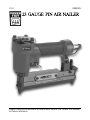
8990905 23 Gauge Pin Air Nailer V1.0
2 For technical questions call 1-800-665-8685
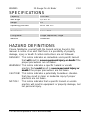
SPECIFICATIONS
Capacity
100 nails
Nail length
1/2 to 1 in.
Gauge
23
Operating pressure
60 to 100 PSI
Max. pressure
120 PSI
Air inlet size
1/4 in. NPT
Firing mode
Single sequential, single
Material
Aluminum
HAZARD DEFINITIONS
Please familiarize yourself with the hazard notices found in this
manual. A notice is an alert that there is a possibility of property
damage, injury or death if certain instructions are not followed.
DANGER! This notice indicates an immediate and specific hazard
that will result in severe personal injury or death if the
proper precautions are not taken.
WARNING! This notice indicates a specific hazard or unsafe
practice that could result in severe personal injury or
death if the proper precautions are not taken.
CAUTION! This notice indicates a potentially hazardous situation
that may result in minor or moderate injury if proper
practices are not taken.
NOTICE! This notice indicates that a specific hazard or unsafe
practice will result in equipment or property damage, but
not personal injury.

V1.0 23 Gauge Pin Air Nailer 8990905
Visit www.princessauto.com for more information 3
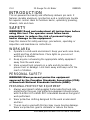
INTRODUCTION
This air-powered tool easily and effectively delivers pin nails. It
features durable aluminum construction and a comfort-grip handle
for superior control. Ideal for furniture backs, upholstery, paneling,
drawers, rails and more.
SAFETY
WARNING! Read and understand all instructions before
using this tool. The operator must follow basic
precautions to reduce the risk of personal injury
and/or damage to the equipment.
Keep this manual for safety warnings, precautions, operating or
inspection and maintenance instructions.
WORK AREA
1. Operate in a safe work environment. Keep your work area clean,
well-lit and free of distractions. Place lights so you are not
working in a shadow.
2. Keep anyone not wearing the appropriate safety equipment
away from the work area.
3. Store unused tools properly in a safe and dry location to
prevent rust or damage. Lock tools away and keep out of the
reach of children.
PERSONAL SAFETY
WARNING! Wear personal protective equipment
approved by the Canadian Standards Association (CSA)
or American National Standards Institute (ANSI).
PERSONAL PROTECTIVE EQUIPMENT
1. Always wear impact safety goggles that provide front and side
protection for the eyes. Eye protection equipment should comply
with CSA Z94.3-07 or ANSI Z87.1 standards based on the type of
work performed.
2. Wear protective clothing designed for the work environment
and tool.
3. The air source used with this tool may cause hearing damage.
Wear ear protection gear to eliminate or reduce the noise.

8990905 23 Gauge Pin Air Nailer V1.0
4 For technical questions call 1-800-665-8685
4. This tool can cause hearing damage. Wear hearing protection
gear with an appropriate Noise Reduction Rating to withstand
the decibel levels.
PERSONAL PRECAUTIONS
Control the tool, personal movement and the work environment to
avoid personal injury or damage to tool.
1. Do not operate any tool when tired or under the influence of
drugs, alcohol or medications.
2. Avoid wearing clothes or jewelry that can become entangled
with the moving parts of a tool. Keep long hair covered
or bound.
3. Do not overreach when operating a tool. Proper footing and
balance enables better control in unexpected situations.
4. Serious injury or death may occur from inhaling compressed air.
The air stream may contain carbon monoxide, toxic vapors or
solid particles. Never inhale compressed air directly from the
pump or air tool.
5. Keep your fingers away from the trigger/switch while carrying
the tool, handling the tool or attaching an air hose or an
accessory. Lock the trigger/switch safety if available.
6.Always keep the tool pointed away from yourself and others.
7. Keep hands and any body parts away from rear area to
prevent injury.
8. Do not allow children to hold or handle tool in any capacity.
9. Do not keep trigger or safety depressed while loading
or unloading.
SPECIFIC SAFETY PRECAUTIONS
WARNING! DO NOT let comfort or familiarity with
product (gained from repeated use) replace strict
adherence to the tool safety rules. If you use this tool
unsafely or incorrectly, you can suffer serious personal
injury.
1. Use the correct tool for the job. This tool was designed for a
specific function. Do not modify or alter this tool or use it for an
unintended purpose.

V1.0 23 Gauge Pin Air Nailer 8990905
Visit www.princessauto.com for more information 5
2. Do not use the tool if any parts are damage broken or
misplaced. Repair or replace the parts.
3. Do not drive fasteners into scaffolding, ladders, vehicles or
other similarly constructed items and materials.
4. Do not drive fasteners close to the edge of a work piece. This
may cause the work piece to split and for the fastener to fly free
or ricochet.
5. Do not drive fastener on top of nailed fastener.
6. Only operate tool when safety nose is in contact with the
work piece.
7. Do not operate tool without fasteners.
8. Never fire fasteners into the air or away from work piece.
AIR TOOL PRECAUTIONS
1. Use only clean and dry compressed air as a power source.
Contaminated or moist air will gradually damage the tool.
2. Install an in-line shutoff valve or regulator to allow immediate
control over the air supply in an emergency, even if a hose
is ruptured.
3. Discontinue tool use if it does not work properly or air is leaking.
Tag or mark the tool as ‘defective’ or ‘out of service’
until repaired.
4. Check the manufacturer’s maximum pressure rating for air tools
and accessories. Compressor outlet pressure must be
regulated to never exceed the maximum pressure rating of the
tool (see Specifications). Exceeding the maximum PSI rating
can create a bursting hazard, causing injury and
property damage.
5. Attach all accessories properly to the tool before connecting the
air supply. A loose accessory may detach or break
during operation.
6. Never use oxygen, combustible gas or any other bottled gas as
a power source. Any power source other than an
air compressor could cause an explosion and serious
personal injury.
7. Turn OFF the valve and discharge any remaining air pressure
after each use or before adjusting the tool.

8990905 23 Gauge Pin Air Nailer V1.0
6 For technical questions call 1-800-665-8685
8. Do not leave the air tool unattended with its compressed air
supply on. Turn off the compressed air supply and bleed the air
tool of any remaining compressed air before leaving the air
tool unattended.
9. Serious injury may occur from loose debris being propelled at high
speeds from the compressed air stream. Always wear OSHA
approved safety glasses to protect the eyes during operation of
the air compressor.
10. Always turn off the air compressor and drain tank pressure
completely before attempting maintenance or attaching air
tools. Release pressure slowly from the system.
11. A filter-regulator-lubricator should be kept as close to the tool
as possible.
AIR HOSE PRECAUTIONS
1. Inspect the tool's air hose for cracks, fraying or other faults
before each use. Discontinue use if the air hose is damaged or
hissing is heard from the air hose or couplers. Replace the
defective air hose.
2. Do not allow people, mobile equipment or vehicles to pass over
the unprotected air hose. Position the air hose away from high
traffic areas, in a reinforced conduit or place planks on both
sides of the air hose to create a protective trench.
3. Prevent damage to the air hose by observing the following:
a. Never carry the tool by the air hose.
b. Keep the air hose behind the tool and out of the tool's
work path.
c. Keep the air hose away from heat, oil, sharp edges or
moving parts.
d. Do not wrap the air hose around the tool as sharp edges
may pierce or crack the air hose. Gently coil the hose and
either hang on a hook or fasten with a device to keep hose
together when storing.
4. A damaged or disconnected air hose under pressure may whip
around and inflict personal injury or damage the work area.
Secure the compressor's air hose to a fixed or permanent
structure with clamps or cable ties.

V1.0 23 Gauge Pin Air Nailer 8990905
Visit www.princessauto.com for more information 7
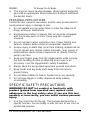
UNPACKING
WARNING! Do not operate the tool if any part is
missing. Replace the missing part before operating.
Failure to do so could result in a malfunction and
personal injury.
Remove the parts and accessories from the packaging and inspect for
damage.
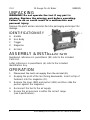
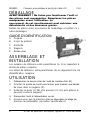
IDENTIFICATION KEY
A Handle
B Gun Body
C Trigger
D Magazine
E Air Inlet
ASSEMBLY & INSTALLATION
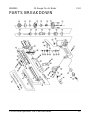
Numbered references in parenthesis (#1) refer to the included
Parts List.
Letter references in parenthesis (A) refer to the included
Identification Key.
OPERATION
1. Disconnect the tool’s air supply from the air inlet (E).
2. Keeping the point of the tool facing downwards, insert a strip of
fasteners into the magazine (D).
3. Release the lever (#38) and pusher (#41) and then slide the
pusher against the magazine.
4. Reconnect the tool to the air supply.
5. Ensure the air pressure is within the correct range
(see Specifications).

8990905 23 Gauge Pin Air Nailer V1.0
8 For technical questions call 1-800-665-8685
6. Choose appropriate operating mode for your job
a. When the red stop button is depressed on the fastener-
loading side, the tool is switched to single mode. This
means only a single fastener will be fired per each safety
depression and trigger squeeze. To fire the next fastener,
the actions must be repeated in that order.
7. Holding the handle (A) firmly, press the tool onto your work
piece in the desired location and hold steady.
8. Gently squeeze the trigger (B) to drive fastener into work piece.
9. Inspect work piece.
a. If fastener is driven too deep or too shallow into work
piece, adjust the air accordingly before continuing.
b. If results are as desired, continue.
CARE & MAINTENANCE
1. Maintain the tool with care. A tool in good condition is efficient,
easier to control and will have fewer problems.
2. Inspect the tool components periodically, including the trigger,
safety mechanisms and spring. Repair or replace damaged or
worn components. Only use identical replacement parts
when servicing.
3. Inspect the tool fittings, alignment, hoses and power supply cord
periodically. Have damaged or worn components repaired or
replaced by an authorized technician. Only use identical
replacement parts when servicing.
4. Follow instructions for lubricating and changing accessories.
5. Only use accessories intended for use with this tool.
6. Keep the tool handles clean, dry and free from oil/grease at
all times.
7. Maintain the tool’s labels and name plates. These carry important
information. If unreadable or missing, contact Princess Auto Ltd.
for replacements.
8. Check and change all worn or damaged O-rings and seals.
9. Tighten all screws and caps.

V1.0 23 Gauge Pin Air Nailer 8990905
Visit www.princessauto.com for more information 9
10. Keep magazine and nose of tool clean and free from any dirt, lint
or any other abrasive materials.
WARNING! Only qualified service personnel should
repair the tool. An improperly repaired tool may
present a hazard to the user and/or others.
LUBRICATION
If you’re using the tool without the in-liner automatic oilier, place 2 to
6 drops of pneumatic tool oil onto the air inlet before each session
or after 2 hours of use.
When replacing O-rings and cylinders lubricate with pneumatic
tool oil.
DISPOSAL
Recycle a tool damaged beyond repair at the appropriate facility.
Contact your local municipality for a list of disposal facilities or by-
laws for electronic devices, batteries, oil or other toxic liquids.
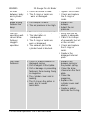
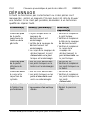
TROUBLESHOOTING
Visit a Princess Auto Ltd. location for a solution if the tool does not
function properly or parts are missing. If unable to do so, have a
qualified technician service the tool.
Problem(s)
Possible Cause(s)
Suggested
Solution(s)
Air leak near
top of tool or in
trigger area
1. The O-ring in the trigger
valve is damaged.
2. The trigger valve head is
damaged.
3. The trigger valve stem, seal
or O-ring is damaged.
1. Check and replace
the O-ring.
2. Check and replace
the trigger valve
head.
3. Check and replace
the trigger valve
stem, seal or O-
ring.
Air leak near
bottom of tool
1. There are loose screws.
2. The O-rings or bumper are
damaged.
1. Tighten the screws.
2. Check and replace
the O-rings or
bumper.

8990905 23 Gauge Pin Air Nailer V1.0
10 For technical questions call 1-800-665-8685
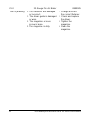
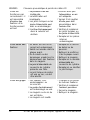
Air leak
between body
and cylinder
cap
1. There are loose screws.
2. The O-rings or seals are
worn or damaged.
1. Tighten the screws.
2. Check and replace
the O-rings or
seals.
Blade driving
fastener too
deep
1. The bumper is worn.
2. The air pressure is too high.
1. Replace the
bumper.
2. Adjust the air
pressure.
Tool not
operating well:
cannot drive
fastener,
sluggish
operation
1. The air supply is inadequate.
2. The lubrication is
inadequate.
3. The O-rings or seals are
worn or damaged.
4. The exhaust port in the
cylinder head is blocked.
1. Verify that the air
supply is adequate.
2. Place 2 to 6 drops
of pneumatic tool oil
on the air inlet.
3. Check and replace
the O-rings or
seals.
4. Replace the
damaged internal
parts.
Tool skips
fasteners
1. There is a worn bumper or
damaged spring.
2. Dirt is lodged in front plate.
3. Dirt or damage is preventing
fasteners from moving freely
in magazine.
4. The cylinder cover seal is
leaking.
5. The O-ring on the piston is
worn, dry or needs
lubrication.
1. Replace the
bumper spring or
the pusher spring.
2. Clean the drive
channel on the front
plate.
3. Clean the
magazine.
4. Replace the
cylinder cover seal
washer.
5. Replace and/or
lubricate the O-ring.

V1.0 23 Gauge Pin Air Nailer 8990905
Visit www.princessauto.com for more information 11
Tool is jamming
1. The fasteners are damaged
or incorrect.
2. The driver guide is damaged
or worn.
3. The magazine or nose
screw is loose.
4. The magazine is dirty.
1. Change and use
the correct fastener.
2. Check and replace
the driver.
3. Tighten the
magazine.
4. Clean the
magazine.

8990905 23 Gauge Pin Air Nailer V1.0
12 For technical questions call 1-800-665-8685
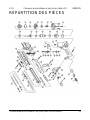
PARTS BREAKDOWN

V1.0 23 Gauge Pin Air Nailer 8990905
Visit www.princessauto.com for more information 13
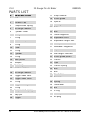
PARTS LIST
#
DESCRIPTION
1
Bolt
2
Exhaust cap
3
Compressed spring
4
Rectangle washer
5
Cylinder cover
6
O-ring
7
O-ring
8
Head valve piston
9
O-ring
10
Collar
11
O-ring
12
Cylinder
13
O-ring
14
Main piston
15
Bumper
16
Gun body
17
Rubber washer
18
Rectangle washer
19
Trigger valve seat
20
Trigger valve stem
21
O-ring
22
Trigger valve guide
23
O-ring
24
Compressed spring
25
Step pin
26
Trigger
27
Snap retainer
28
Driver guide
29
Spacer
30
Driver guide cover
31
Bolt
32
Bolt
33
Fixed magazine
34
Adjustable slice
35
Adjustable length bolt
36
Fixed pin
37
Moveable magazine
38
Adjustable lever
39
Mail length indicator
40
Driver guide piston
41
Pusher
42
Pipe
43
Pusher spring
44
Bolt
45
Bolt
46
Fixed slice
47
Bracket
48
Spring
49
Fixed lever
50
Nut
51
O-ring
52
End cap
53
Air plug

V1,0 8990905
Vous devez lire et comprendre toutes les instructions avant d'utiliser
l'appareil. Conservez ce manuel afin de pouvoir le consulter plus tard.

8990905 Cloueuse pneumatique à pointe de calibre 23 V1,0
2 En cas de questions techniques, appelez le 1-800-665-8685
SPÉCIFICATIONS
Capacité
100 clous
Longueur de clou
1/2 à 1 po
Calibre
23
Pression d’utilisation
60 à 100 lb/po carré
Pression max.
120 lb/po carré
Taille de l’entrée d’air
1/4 po NPT
Mode de tir
Mode séquentiel simple
Matériau
Aluminium
DÉFINITIONS DE DANGER
Veuillez-vous familiariser avec les avis de danger qui sont présentés
dans ce manuel. Un avis est une alerte indiquant qu'il existe un
risque de dommage à la propriété, de blessure ou de décès si on ne
respecte pas certaines instructions.
DANGER ! Cet avis indique un risque immédiat et particulier qui
entraînera des blessures corporelles graves ou
même la mort si on omet de prendre les
précautions nécessaires.
AVERTISSEMENT ! Cet avis indique un risque particulier ou une
pratique non sécuritaire qui pourrait entraîner des
blessures corporelles graves ou même la mort si
on omet de prendre les précautions nécessaires.
ATTENTION ! Cet avis indique une situation possiblement
dangereuse qui peut entraîner des blessures
mineures ou modérées si on ne procède pas de la
façon recommandée.
AVIS ! Cet avis indique un risque particulier ou une pratique
non sécuritaire qui entraînera des dommages au
niveau de l'équipement ou des biens, mais non des
blessures corporelles.

V1,0 Cloueuse pneumatique à pointe de calibre 23 8990905
Visitez www.princessauto.com pour plus d'informations 3
INTRODUCTION
Cet outil pneumatique distribue facilement et efficacement des
pointes. Il se caractérise par une construction en aluminium durable
et une poignée à prise confortable pour une maîtrise supérieure.
Idéale pour les dossiers de meuble, le garnissage, les panneaux,
les tiroirs, les glissières et plus encore.
SÉCURITÉ
AVERTISSEMENT ! Veuillez lire et comprendre toutes
les instructions avant d'utiliser cet outil. L'utilisateur
doit respecter les précautions de base lorsqu'il utilise
cet outil afin de réduire le risque de blessure ou de
dommage à l'équipement.
Conservez ce manuel qui contient les avertissements de sécurité, les
précautions, les instructions de fonctionnement ou d'inspection et
d'entretien.
AIRE DE TRAVAIL
1. Travaillez dans un environnement de travail sécuritaire. Gardez
votre aire de travail propre, bien éclairée et exempte de toute
distraction. Placez les lampes de façon à ne pas travailler
dans l’ombre.
2. Assurez-vous que les personnes qui ne portent pas
l'équipement de sécurité approprié ne se trouvent pas à
proximité de l'aire de travail.
3. Rangez les outils correctement dans un lieu sécurisé et sec.
Gardez les outils hors de la portée des enfants.
SÉCURITÉ PERSONNELLE
AVERTISSEMENT ! Portez de l'équipement de
protection personnelle homologué par l'Association
canadienne de normalisation (CSA) ou l'American
National Standards Institute (ANSI).

8990905 Cloueuse pneumatique à pointe de calibre 23 V1,0
4 En cas de questions techniques, appelez le 1-800-665-8685
ÉQUIPEMENT DE PROTECTION PERSONNELLE
1. Portez toujours des lunettes antiprojections qui offrent une
protection frontale et latérale pour les yeux. L'équipement de
protection des yeux devrait être conforme à la norme CSA
Z94.3-07 ou ANSI Z87.1 fonction du type de travail effectué.
2. Portez des vêtements de protection conçus pour
l'environnement de travail et pour l'outil.
3. La source d’air utilisée avec cet outil peut causer des
dommages auditifs. Portez une protection d’oreille afin
d’éliminer ou de réduire le bruit.
4. Cet outil peut causer des dommages à l'ouïe. Portez un
dispositif de protection anti-bruit présentant une cote de
réduction du bruit adéquate en fonction du niveau de décibels.
PRÉCAUTIONS PERSONNELLES
Gardez le contrôle de l'outil, de vos mouvements et de
l'environnement de travail pour éviter les blessures ou le bris de
l'outil.
1. N'utilisez pas l'outil si vous êtes fatigué ou sous l'effet de
drogues, d'alcool ou de médicaments.
2. Évitez de porter des vêtements ou des bijoux pouvant se prendre
dans les pièces mobiles d'un outil. Gardez les cheveux longs
recouverts ou attachés.
3. N'utilisez pas l'outil si vous devez étirer les bras pour vous en
servir. Une stabilité et un équilibre appropriés sont nécessaires
afin d'avoir un meilleur contrôle en cas de
situations inattendues.
4. Des blessures graves ou même la mort peuvent survenir en cas
d’inhalation de l’air comprimé. Le jet d’air peut contenir du
monoxyde de carbone, des vapeurs toxiques ou des particules
solides. N’inhalez jamais l’air comprimé provenant directement
de la pompe ou d’un outil pneumatique.
5. Gardez vos doigts à bonne distance de la
gâchette/commutateur lors du transport de l’outil ou du
branchement d’un tuyau à air ou d’un accessoire. Engagez le
verrou de gâchette/interrupteur, le cas échéant.

V1,0 Cloueuse pneumatique à pointe de calibre 23 8990905
Visitez www.princessauto.com pour plus d'informations 5
6. Ne pointez jamais l’outil vers vous-même ou les autres.
7. Gardez les mains et les autres parties du corps à bonne
distance de la partie arrière pour éviter les blessures.
8. Ne laissez en aucun cas les enfants manipuler ou utiliser
la cloueuse.
9. Ne gardez pas la gâchette ni la détente de sécurité enfoncée
pendant le chargement ou le déchargement.
CONSIGNES DE SÉCURITÉ SPÉCIFIQUES
AVERTISSEMENT! Ne permettez PAS au confort ou à
votre familiarisation avec l'outil (obtenus après un
emploi répété) de se substituer à une adhésion stricte
aux règles de sécurité de l'outil. Si vous utilisez cet
outil de façon dangereuse ou incorrecte, vous pouvez
subir des blessures corporelles graves.
1. Utilisez le bon outil pour la tâche à effectuer. Cet outil a été
conçu pour une utilisation spécifique. Évitez de modifier ou
d'altérer cet outil ou de l'utiliser à une fin autre que celle pour
laquelle il a été conçu.
2. N’utilisez pas l’outil si des pièces présentent des dommages ou
sont déplacées. Réparez ou remplacez les pièces.
3. N’installez pas de fixations dans un échafaud, une échelle ou
une plateforme ni dans tout autre objet ou matériau similaire.
4. N’installez pas de fixations près du rebord d’une pièce à
travailler. La pièce à travailler pourrait fendre et la fixation
pourrait être projetée ou ricocher.
5. N’installez aucune fixation sur le dessus d’une fixation clouée.
6. Ne faites jamais fonctionner l’outil lorsque le nez de protection
n’est pas en contact avec la pièce à travailler.
7. Ne faites pas fonctionner l’outil à vide (sans fixations).
8. Ne projetez jamais de fixations dans les airs ou dans la
direction opposée à la pièce à travailler.

8990905 Cloueuse pneumatique à pointe de calibre 23 V1,0
6 En cas de questions techniques, appelez le 1-800-665-8685
PRÉCAUTIONS RELATIVES AUX OUTILS
PNEUMATIQUES
1. Utilisez uniquement un air comprimé propre et sec comme
source d’énergie. L’air contaminé ou humide endommagera
progressivement l’outil.
2. Installez une soupape d'arrêt ou un régulateur sur la conduite
afin de permettre une commande immédiate de l'alimentation
en air, en cas d'urgence, même si un tuyau se fend.
3. Arrêtez d’utiliser l’outil s’il ne fonctionne pas correctement ou s’il
présente des fuites d’air. Attachez une étiquette sur l’outil
indiquant qu’il est « défectueux » ou qu’il est « hors service »,
jusqu’à ce qu’il soit réparé.
4. Consultez la pression nominale maximale du fabricant en ce qui
concerne les outils pneumatiques et accessoires. La pression
de sortie du compresseur doit être réglée de façon à ne jamais
dépasser la pression nominale maximale de l'outil (consultez
Spécifications). Si on dépasse la pression nominale maximale,
il pourrait en résulter un risque d’explosion capable d’entraîner
des blessures et des dommages aux biens.
5. Avant de relier l’alimentation en air, fixez correctement tous les
accessoires sur l’outil. Un accessoire mal attaché pourrait se
détacher et se briser durant l’utilisation.
6. N'utilisez jamais d'oxygène, de gaz combustible ou tout autre
gaz embouteillé en tant que source d'énergie. Une source
d'énergie autre qu'un compresseur d'air pourrait causer une
explosion entraînant ainsi des blessures corporelles graves.
7. Fermez la soupape et évacuez toute la pression d’air restante
après chaque utilisation ou avant d’ajuster l’outil.
8. Ne laissez pas l’outil d'air sans surveillance alors que la source
d'air comprimé est en fonction. Fermez la source d'air
comprimé et purgez l’outil d'air de tout air comprimé restant
avant de laisser celui-ci sans surveillance.
9. Des blessures graves peuvent se produire si des débris sont
propulsés à haute vitesse dans le jet d’air du compresseur.
Portez toujours des lunettes de sécurité approuvés OSHA afin
de vous protéger les yeux lorsque vous utilisez le
compresseur d’air.

V1,0 Cloueuse pneumatique à pointe de calibre 23 8990905
Visitez www.princessauto.com pour plus d'informations 7
10. Arrêtez toujours le compresseur d’air et évacuez complètement
la pression du réservoir avant de tenter de procéder à
l’entretien ou de fixer des outils pneumatiques. Évacuez
doucement la pression du système.
11. Un filtre-régulateur-lubrificateur doit être gardé le plus près
possible de l’outil.
PRÉCAUTIONS RELATIVES AUX TUYAUX À AIR
1. Inspectez le tuyau d’air de l'outil pour déceler des fissures, des
effilochures et tout autre défaut avant chaque utilisation. Arrêtez
l'utilisation si le tuyau d’air est endommagée ou si un sifflement
se fait entendre provenant du tuyau à air. Remplacez le tuyau
d’air ou le composant défectueux.
2. Veillez à ce que personne, ni aucun matériel mobile ou des
véhicules n'écrasent le tuyau d’air non protégée. Placez le
tuyau d’air à l'écart des zones de circulation intense, soit à
l'intérieur d'un conduit renforcé ou placez des planches des
deux côtés de le tuyau d’air afin de créer un couloir protecteur.
3. Pour éviter tout dommage au tuyau d'air, observez les
précautions suivantes :
a. Ne transportez jamais l'outil par le tuyau d'air.
b. Gardez le tuyau d’air derrière l'outil et hors du trajet
de l'outil.
c. Gardez le tuyau d’air à l'écart des sources de chaleur, de
l'huile, des bords coupants ou des pièces mobiles.
d. N'enroulez pas le tuyau d’air autour de l'outil, car les arêtes
vives risquent de percer ou de fissurer le tuyau d'air.
Enroulez délicatement le tuyau et suspendez-le à un
crochet ou attachez-le sur un support pour qu’il reste
enroulé pendant son rangement.
4. Un conduite d'air endommagée ou débranchée sous pression
peut se comporter à la façon d'un fouet et infliger des blessures
corporelles ou endommager l'aire de travail. Fixez le tuyau d’air
du compresseur à une structure fixe ou permanente au moyen
de serre-câbles ou d'attache-câbles.
La page est en cours de chargement...
La page est en cours de chargement...
La page est en cours de chargement...
La page est en cours de chargement...
La page est en cours de chargement...
La page est en cours de chargement...
La page est en cours de chargement...
La page est en cours de chargement...
-
 1
1
-
 2
2
-
 3
3
-
 4
4
-
 5
5
-
 6
6
-
 7
7
-
 8
8
-
 9
9
-
 10
10
-
 11
11
-
 12
12
-
 13
13
-
 14
14
-
 15
15
-
 16
16
-
 17
17
-
 18
18
-
 19
19
-
 20
20
-
 21
21
-
 22
22
-
 23
23
-
 24
24
-
 25
25
-
 26
26
-
 27
27
-
 28
28


Powerfist 8990905 Le manuel du propriétaire
- Catégorie
- Cloueuse
- Taper
- Le manuel du propriétaire
dans d''autres langues
- English: Powerfist 8990905 Owner's manual
Documents connexes
Autres documents
-
Power Fist 8990863 Manuel utilisateur
-
-
-
-
-
-
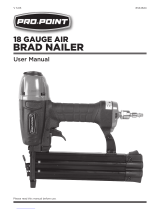 pro.point 18 GAUGE AIR BRAD NAILER Manuel utilisateur
-
PROPOINT 8844219 Le manuel du propriétaire
-
-
