

Young Explorer setup guide
page 2
Table of Contents
1. Introduction .................................................. 3
2. Things to Consider Before You Begin .............................. 4
2.1 Choose a location
2.2 Tools you will need
2.3 Take an inventory
2.4 Test the computer
3. Little Tikes Young Explorer Assembly and Setup Manual .............. 6

Young Explorer setup guide
page 3
1. Introduction
This guide was created by the IBM Corporate Citizenship & Corporate Affairs to provide
comprehensive advice with assembling and using a Young Explorer. It is intended to be used in
conjunction with a copy of the Little Tikes Young Explorer Instruction Manual (standard instruction
manual) that is included with the equipment, and makes many references to instructions shown in
the manual.
Note: The two documents differ in step order. Although we recommend the step order in the Assembly
and Setup Manual, references are made to the same step as shown in the standard instruction
manual (included with the equipment). These reference numbers appear in red brackets after the
instruction text.

Young Explorer setup guide
page 4
2. Things to consider before you begin
2.1 Choose a location
Construct the unit where it will stay. It is large, awkward and heavy once assembled. Don’t
build it in one place and try to move it into your classroom. It may be tool large to move through
doorways. The Young Explorer is approximately 30 lbs/14kg and approximately 45”/115cm wide,
47”/120cm high, and 55”/140cm deep. Once assembled, it weighs approximately 80 lbs/36kg.
The computer should be located:
• where care providers can easily see it;
• away from any direct sources of heat, such as radiators or sunny windows;
• away from messy areas such as the kitchen, chalkboards, water tables, or art center;
• away from science supplies, especially magnets;
• close to an electrical outlet the power strip cord is quite short and it is best not to run
extension cords in a busy childcare setting;
• in an area with other computers or Young Explorers; this will make it easier to supervise or
instruct children while they are using the computers; and
• away from windows, which may cause a glare, making it difficult to see the screen. An open
window may also be a source of dust or rain, both of which are harmful to the computer.
2.2 Tools you will need
• Drill or electric screwdriver (cordless preferred) with Phillips® head (cross-headed)
& 7/16” socket
• Pliers
• 7/16” socket & ratchet, combination wrench or nut driver
• Rubber hammer
Hints & Tips
• Using an electric screwdriver will be faster and will save your wrist a lot of aches and pains.
• The plastic screws need a lot of elbow grease to get them into the furniture—don’t give up.
They will eventually go in.

Young Explorer setup guide
page 5
• In a few instances, some holes may not be properly formed or pre-drilled and you may need
to create them. Having a drill handy may also be useful for this purpose.
• Be careful when using a power drill unless you are an experienced user. The plastic
screws are easy to strip using a power drill.
2.3 Inventory
• Using page two of the Little Tikes Young Explorer Instruction Manual, take inventory of
the Young Explorer parts and PC parts. 2.4 Test the computer.
• Set up the computer and test it. Don’t wait until everything is together and nesting in the
Little Tikes plastic housing to see if it works.
• Also consider setting the volume on the speakers – once you cover them with the plastic
plate in Step 28 it will be difficult to adjust the sound level. Be sure to have the power on
before you cover them.

Young Explorer setup guide
page 6
Young Explorer™ Computer Center
Ages 3-7 years
Adult assembly required
Tools needed: Pliers, hammer, Phillips® screwdriver,
safety glasses, a 7/16” socket and ratchet. Also, it
is highly recommended to have a drill or an electric
screwdriver (cordless preferred).
CAUTION:
• Electrically operated product. Not recommended
for children under 3
• Clean desk with damp cloth
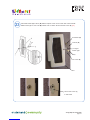
• Keep doors (N) locked to prevent child access
to computer
• Do not store any items in cabinet other than
those supplied by manufacturer.
• Lock caster (T) when product is in use. Do not
move computer center while the computer is
turned on.
Telephone numbers for furniture concerns:
1-800-321-0183 U.S. toll-free Monday–Friday
The Little Tikes Company
2180 Barlow Road
Hudson, Ohio 44236-0877
Other Little Tikes numbers:
UK: +0800 521 558AU: Headstart International Pty
Ltd ACN 109 429 503 is the Australian distributor
for The Little Tikes Company
Ph: (03) 9862 9600
France: (0)20 354 8024
Spain: 902 212 152
Mexico: 01-800-426-3355
For IBM computer hardware (PC, monitor) service:
U.S. toll-free You will need these two things when
you call in: Type (look for tag on equipment); and
serial number (also on equipment).
3. Little Tikes Young Explorer Assembly and Setup Manual
Note: Red numbers in brackets [x] refer to the
step numbers provided in the original technical man-
ual supplied with the product. The steps in this guide
differ from the original.


Young Explorer setup guide
page 8
PIÈCES COMPRISES :
A Mur avant
B Tablette
C Panneau inférieur de l’armoire
D Panneau arrière de l’armoire
E Panneau supérieur de l’armoire
F Banc
G Support de clavier didacticiel à membrane
H Console (2)
J Plaque métallique
JJ Isolation acoustique gauche
K Plaque du moniteur
KK Isolation acoustique droite
L Vitre de lunette de clavier à membrane
LL Plateau à clavier standard
M Rail de guidage (3)
MM Support de moniteur
N Porte (2)
Q Tapis à souris gauche
R Tapis à souris droit
S Courroie (2)
T Roulette (4)
MATÉRIELCOMPRIS :
U Serrure (2)
V Écrou de serrure (2)
W Came (2)
X Vis de serrage (2)
Y Clé (2)
Z Vis auto-taraudeuse de 1 7/8 po (14)
AA Vis auto-taraudeuse no 10 par 3 1/4 po
(8)
BB Couvre-vis (10)
CC Douille (4)
DD Oeillet supérieur (4)
EE Oeillet inférieur (4)
FF Rondelle (4)
GG Écrou de 1 7/8 po (4)
HH Attache en plastique (9)
NN Écrou de blocage du moniteur (2)
PARTES INCLUIDAS:
A Pared Frontal
B Estante
C Panel Inferior del Armario
D Panel Posterior del Armario
E Panel Superior del Armario
F Banco
G Soporte del teclado de membrana
H Abrazadera (2)
J Placa de Metal
JJ Panel acústico izquierdo
K Bisel del Monitor
KK Panel acústico derecho
L Bisel del teclado de membrana
LL Bandeja del teclado estándar
M Riel (3)
MM Abrazadera del monitor
N Puerta (2)
Q Almohadilla Izquierda para Mouse
R Almohadilla Derecha para Mouse
S Correa (2)
T Rueda (4)
PIEZAS DE FERRETERIAINCLUIDAS:
U Fuste de Fijación (2)
V Tuerca de Fijación (2)
W Leva (2)
X Tornillo de Fijación (2)
Y Llave (2)
Z Tornillo de 1 7/8 pulg. (14)
AA Tornillo de 10 x 3 1/4 pulg. (8)
BB Tapa del Tornillo (10)
CC Casquillo (4)
DD Corbata Superior del Tornillo (4)
EE Corbata Inferior del Tornillo (4)
FF Arandela (4)
GG Perno de 1 7/8 pulg. (4)
HH Perno de Plástico (9)
NN Botón de retención del monitor (2)
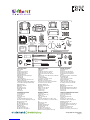
PARTS INCLUDED:
A Front Wall
B Shelf
C Cabinet Lower Panel
D Cabinet Back Panel
E Cabinet Upper Panel
F Bench with Seat
G Membrane Keyboard Support
H Bracket (2)
J Metal Plate
JJ Sound Pad left
K Monitor Bezel with protective lens
KK Sound Pad right
L Membrane Keyboard Bezel Window
LL Standard Learning Keyboard Tray
M Guide Rail (3)
MM Monitor Bracket
N Door (2)
Q Left Mouse Pad
R Right Mouse Pad
S Strap (2)
T Caster (4)
HARDWARE INCLUDED:
U Lock Barrel (2)
V Lock Nut (2)
W Cam (2)
X Lock Screw (2)
Y Key (2)
Z 1 7/8” Self-tapping Screw (14)
AA #10 x 3 1/4” Self-tapping Screw (8)
BB Screw Cover (10)
CC Bushing (4)
DD Upper Grommet (4)
EE Lower Grommet (4)
FF Washer (4)
GG 1 7/8” Bolt (4)
HH Plastic Fastener (9)
NN Monitor Locking Nut (2)
A
B
E
D
C
H - 2
J
N - 2
G
membrane keyboard support
(use with "L" only)
L
membrane keyboard
bezel window
K
QR
S - 2
M - 3
Y- 2
X - 2
W- 2U - 2 DD - 4
FF - 4
CC - 4
BB - 10
Z - 14
AA - 8
GG - 4
HH - 9
LL
standard learning
keyboard tray
F
NN - 2
MM
EE - 4
V- 2
JJ KK
T- 4

Young Explorer setup guide
page 9
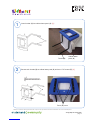
1
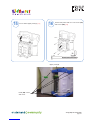
Secure each bracket (H) to cabinet lower panel (C) with two 1 7/8” screws (Z). [2]
Secure (Z) screws
Cabinet lower
panel (C)
Bracket (H)
Insert bracket (H) into cabinet lower panel (C). [1]*
2
* Numbers in red brackets which appear after the text correspond to the step numbers in the technical manual that came in the box with this product.


Young Explorer setup guide
page 11
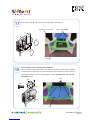
Attach cabinet lower panel assembly to
front wall (A) with four 1 7/8” screws (Z)
through brackets. [3]
56Install a 3 1/4” screw (AA) with cover (BB) at
the bottom on each side. [4]
Install (AA)
screws
w/covers
Install (AA) screws
w/covers
Install (Z)
screws
Front wall (A)
Install (Z) screws
w/covers
Note: Whenever you are using the screw covers, make sure you loop the circle of the screw cover onto the
screw before you screw it into the furniture. Then the top cover just snaps over the screw head once it is
all the way in.


Young Explorer setup guide
page 13
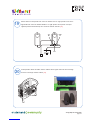
Install (Z) screw w/covers onto each side
Install a 1 7/8” screw (Z) with cover (BB) on each side into shelf (B). [7]
9
Install upper and lower grommets (DD & EE) into metal plate (J) and all three
guide rails. [10]
10
Install grommets (DD & EE)
Secure bolts/
washers (GG)
Metal Plate (J)
(DD)
(EE)

Young Explorer setup guide
page 14
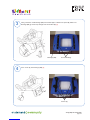
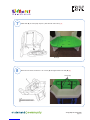
11
Guide rails (M)
Place metal plate, top side up, inside cabinet. Using pliers or 7/8 socket, secure metal
plate (J) to cabinet lower panel (C) with 1 7/8” bolts (GG) and washers (FF). [11]
GG
FF
FF
GG
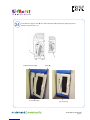
12 Slide computer in the direction of arrow on metal plate (J). Your computer will be one of
two styles: desktop or tower (refer to diagram). When inserting desktop style, make sure
the vent holes are at the top. [17]
Metal Plate (J)
desktop
style
tower
style


Young Explorer setup guide
page 17
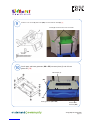
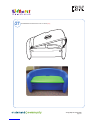
17 Place mouse pads (Q & R) and keyboard support (G) on shelf (B). [20]
Q
R
KK
JJ
Shelf (B)
Mouse pads (Q&R)
Sound panels (JJ & KK)
18
HH
LL
HH
B
For installation of the standard learning keyboard
Secure standard learning keyboard tray (LL) with 5 plastic fasteners (HH) using a Phillips®
screwdriver. Place keyboard on top of the standard learning keyboard tray. Route keyboard
signal cable through channel on shelf (B) and into cabinet. Continue on to step 23 in the
instructions. [21a]
(HH)
(LL)

Young Explorer setup guide
page 18
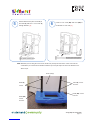
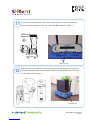
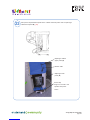
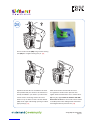
Attach cable from left speaker into connector marked “Left” on right speaker. Insert loose
signalcable into connector marked “Audio In” on right speaker. Insert power cord (end
opposite powercord transformer) into connector marked “12V DC.” [23]
thgiRtfeL
12V
DC
Audio
In
Left
19
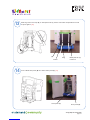
Install speakers. Route all cables into the cabinet. Route signal cord from mouse through
channel on shelf (B) and into cabinet. [24]
20


La page est en cours de chargement...
La page est en cours de chargement...
La page est en cours de chargement...
La page est en cours de chargement...
La page est en cours de chargement...
-
 1
1
-
 2
2
-
 3
3
-
 4
4
-
 5
5
-
 6
6
-
 7
7
-
 8
8
-
 9
9
-
 10
10
-
 11
11
-
 12
12
-
 13
13
-
 14
14
-
 15
15
-
 16
16
-
 17
17
-
 18
18
-
 19
19
-
 20
20
-
 21
21
-
 22
22
-
 23
23
-
 24
24
-
 25
25


dans d''autres langues
- English: KidSmart Young Explorer
Autres documents
-
eMachines H3120 Manuel utilisateur
-
Harmonic SystemManager 6.2.2 Guide d'installation
-
Panasonic PTL780U Manuel utilisateur
-
-
-
Sony PCV-L640 Manuel utilisateur
-
Matrox Maevex 6100 Manuel utilisateur
-
Lorex Technology LH3281001 Manuel utilisateur
-
Sony MFM-HT95 Manuel utilisateur
-
Monster 0401 Manuel utilisateur