FeinTech AX04101 Manuel utilisateur
- Catégorie
- Haut-parleurs de la barre de son
- Taper
- Manuel utilisateur

VAX04101
HDMI eARC Pass Switch 4×1
Bedienungsanleitung - Instruction manual - Instructions d‘utilisation

2
VAX04101
HDMI eARC Pass Switch 4×1
Bedienungsanleitung und technische Information
Sehr geehrter Kunde,
Wir bedanken uns für den Kauf dieses hochwertigen Produktes. Zum optimalen Einsatz und zur
sicheren Verwendung lesen Sie bitte diese Anleitung vor Inbetriebnahme. Bewahren Sie bitte die
Anleitung als Referenz für zukünftige Fragen auf.
Funktionen:
• HDMI-Switch zum Betrieb von bis zu 4 HDMI-Quellen an einer HDMI-Senke wie Fernseher
oder Beamer (bei Anschluss einer Soundbar können Sie 3 HDMI-Quellen direkt verbinden)
• Ein HDMI-Eingang davon unterstützt eARC (enhanced Audio Return Channel) und Sie kön-
nen den HDMI-eARC Anschluss einer Soundbar anschließen (abwärtskompatibel zu ARC)
• Audio EDID-Management
• Unterstützt Ultra-HD bis zu 4K 60Hz sowie HDR10, HLG-HDR und Dolby Vision
Hinweise:
Beachten Sie bei Änderungen der Einstellungen am TV oder Switch, dass ein Neustart der an-
geschlossenen Geräte notwendig sein könnte. Falls Sie nicht die gewünschte Ausgabe bzw.
Darstellung erzielen, gehen Sie bitte wie folgt vor:
1. Schalten Sie am Switch den gewünschten Audio EDID-Modus ein und wählen Sie die ge-
wünschte HDMI-Quelle aus.
2. Machen Sie alle Geräte für ein paar Sekunden stromlos, also Netzstecker ziehen.
3. Stecken Sie dann die Netzstecker ein und schalten Sie die Geräte an. Und zwar in folgen-
der Reihenfolge: Fernseher, Soundsystem, HDMI Switch, HDMI-Quelle
Audioformate
Die unterstützten Audioformate handeln die Geräte untereinander aus. Das können Sie über die
EDID-Steuerung beeinflussen (EDID = Extended Display Identification Data, damit identifiziert sich
eine HDMI-Senke gegenüber der HDMI-Quelle).

3
7.1
Durch diese Einstellung erkennt die HDMI-Quelle, dass alle Tonformate akzeptiert werden. Beach-
ten Sie dabei, dass Ihr Soundsystem dazu über einen eARC-Anschluss verfügen sollte. Über den
älteren ARC-Anschluss können nicht alle Audioformate übertragen werden. Falls Ihr Soundsystem
oder Fernseher stumm bleiben, unterstützen diese das jeweilige Tonformat nicht.
5.1
Durch 5.1 wird der HDMI-Quelle die Unterstützung von Formaten bis 5.1 mitgeteilt. Dazu gehören
Dolby Digital (AC3), DTS, PCM5.1 und PCM stereo. Falls Ihr Soundsystem oder Fernseher stumm
bleiben, unterstützen sie das jeweilige Tonformat nicht.
2.0
Wenn 2.0 eingestellt ist, wird der HDMI-Quelle die Unterstützung nur von Stereo-Ton mitgeteilt.
Soundsystem und Fernseher sollten daher auf jeden Fall Ton haben.
Auto
Es wird nicht in das Management des Tonformats eingegriffen und automatisch zwischen Quelle
und TV ausgehandelt. Der Fernseher begrenzt das benutzte Audioformat.
Beachten Sie: Bei einigen HDMI-Quellen können Sie die Audioausgabe manuell einstellen und
damit die Aushandlung per EDID außer Kraft setzen. eARC ist voll abwärtskompatibel zu ARC und
kann zusätzliche Audioformate wie Mehrkanal-PCM (Dolby MAT, Dolby Atmos vom Apple TV), Dolby
TrueHD und DTS-HD übertragen.
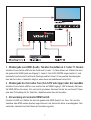
Installation und Betrieb
1. Schließen Sie 1 bis 4 HDMI-Signalquellen (z.B. Blu-ray-Player) an die HDMI-Eingänge.
Eingang 1 (ARC to Sound) dient zum Anschluss einer Soundbar mit HDMI-eARC.
2. Verbinden Sie eine HDMI-Senke (z.B. Fernseher oder Videoprojektor) mit dem HDMI-Ausgang
3. Verbinden Sie das Netzteil mit dem HDMI-Switch und stecken Sie es in eine Steckdose.
Schalten Sie dann den Fernseher / Videoprojektor ein, anschließend den Switch und eine
HDMI-Quelle.
4. Wenn Sie eine Soundbar angeschlossen haben, schalten Sie bitte eARC am Switch ein.
Achtung: Achten Sie beim Ein- und Ausstecken der HDMI Kabel darauf, dass die Steckerkontakte
nicht verschmutzt oder beschädigt werden. Nehmen Sie Anschlüsse stromlos vor und schalten
Sie die Geräte erst nach dem Verbinden ein. Achten Sie bitte auch auf eine gute Qualität der
HDMI-Kabel - insbesondere bei 4k Übertragung. Wir empfehlen maximal 5 m Kabellänge an den
Eingängen und maximal 3 m an den Ausgängen bei 4k HDR.

4
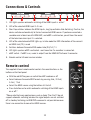
Fernbedienung
Die mitgelieferte Infrarot-Fernbedienung steuert die selben Funktionen
wie die Tasten auf der Gerätefront:
• Mit der roten ARC-Taste schalten Sie den eARC Modus ein oder aus
• Wählen Sie zwischen den Audio-EDID-Formaten durch Tastendruck
auf Auto / 2.0ch / 5.1ch / 7.1ch
• Wählen Sie die HDMI-Quelle mit den Tasten In1 bis In4.
• Schalten Sie durch Betätigen von Auto Source die automatische
Umschaltung der HDMI-Eingänge ein oder aus.*
*Bitte beachten Sie, dass einige Mediaplayer wie Apple TV oder Fire TV
eine automatische Umschaltung nicht unterstützen, weil die Signal-
ausgänge im Standby nicht abgeschaltet werden. Eine Umschaltung per
HDMI-CEC-Befehl ist so nicht möglich, weil zu nicht aktiven HDMI-Quel-
len keine Verbindung besteht.
1. LED leuchtet, wenn die automatische Umschaltung der HDMI-Eingänge aktiv ist*
2. LED des gewählten HDMI-Eingangs 1–4 leuchtet
3. Kurzes Tippen schaltet zwischen den HDMI Eingängen, langes Drücken aktiviert Auto-
Switching. In diesem Modus wird automatisch auf den zuletzt aktivierten Eingang geschaltet.
Wenn Sie eine Soundbar und einen Fernseher mit HDMI-ARC angeschlossen haben, und eARC
eingeschaltet ist, hören Sie bei Wahl des Eingangs 1 den Ton des Fernsehers.
4. LED der gewählten Audio-EDID leuchtet, bei Auto werden die EDID-Informationen der ange-
schlossenen HDMI-Senke (Fernseher) verwendet
5. Schaltet zwischen den Audio-EDID-Modi Auto/2.0/5.1/7.1
6. LED leuchtet bei eingeschaltetem eARC
7. Wenn eARC eingeschaltet ist, wird der Ton über das Soundsystem am Anschluss HDMI ARC to
Sound 1 ausgegeben.
8. Fenster für Infrarot-Empfänger der Fernbedienung
Bedienelemente und Anschlüsse

5
Sicherheitshinweise und Recycling
• Bitte decken Sie das Gehäuse oder Netzteil nicht ab und bauen Sie das Gerät nicht ein, um
eine Überhitzung zu vermeiden.
• Von Wärmequellen, Feuer, Wasser und Feuchtigkeit fernhalten.
• Stellen Sie keine schweren Gegenstände auf das Gerät oder die Anschlusskabel.
• Öffnen oder bohren Sie keine Löcher in das Gehäuse.
• Verwenden Sie nur das mitgelieferte Netzteil oder achten Sie beim Austausch auf identische
Leistungsdaten.
• Reinigen Sie die Geräteoberfläche nur mit einem weichen, trockenen Tuch. Benutzen Sie da-
für bitte kein scharfes Reinigungsmittel, Benzin oder Ähnliches.
• Bei längerem Nicht-Gebrauch oder Fehlfunktion ziehen Sie bitte den Netzstecker.
Service
Eine Überprüfung des Gerätes durch qualifiziertes Fachpersonal ist in folgenden Fällen nötig.
• Gegenstände oder Flüssigkeiten sind in das Gerät eingedrungen.
• Das Gerät arbeitet nicht normal oder die Leistung hat sich verändert.
• Das Gerät wurde fallen gelassen oder das Gehäuse ist beschädigt.
Ziehen Sie den Netzstecker und betreiben Sie das Gerät nicht weiter. Versuchen Sie nicht, das Ge-
rät selbst zu reparieren oder zu öffnen. Wenden Sie sich an geschultes Fachpersonal oder kontak-
tieren Sie den Verkäufer oder den FeinTech Service, z.B. per E-Mail an service@feintech.eu
Entsorgung der Verpackung
Die Verpackung Ihres Gerätes besteht ausschließlich aus wiederverwertbaren Materialien. Bitte
führen Sie diese entsprechend sortiert wieder dem „Dualen System” zu. Über aktuelle Entsor-
gungswege informieren Sie sich bitte bei Ihrem Händler oder Ihrer kommunalen Entsorgungsein-
richtung / Recyclinghof.
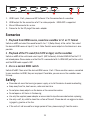
1. HDMI-Eingänge 1 bis 4, HDMI 1 mit eARC-Pass zum Anschluss einer Soundbar
2. HDMI-Ausgang zum Anschluss an den Fernseher oder Videoprojektor
3. Micro-USB Anschluss für Service-Zwecke
4. Buchse für DC-Hohlstecker 5.5 mm zur Stromversorgung

6
Entsorgung des Gerätes
Altgeräte sind kein wertloser Abfall. Durch umweltgerechte Entsorgung können wertvolle Rohstoffe
wieder gewonnen werden. Dieses Produkt darf am Ende seiner Lebensdauer nicht über den norma-
len Haushaltsabfall entsorgt werden, sondern muss an einem Sammelpunkt für das Recycling von
elektrischen und elektronischen Geräten abgegeben werden.
Das Symbol auf dem Produkt, der Gebrauchsanleitung oder der Verpackung weist
darauf hin. Die Werkstoffe sind gemäß ihrer Kennzeichnung wiederverwertbar. Mit der
Wiederverwendung, der stofflichen Verwertung oder anderen Formen der Verwertung
von Altgeräten leisten Sie einen wichtigen Beitrag zum Schutze unserer Umwelt.
CE Konformitätserklärung
Dieses Produkt entspricht den Richtlinien der EU und darf nur zusammen mit ab-
geschirmten Kabeln verwendet werden. Hiermit erklären wir, die Spreewald Kommu-
nikationstechnik GmbH, dass dieses Gerät der Niederspannungsrichtlinie 2014/35/EU, der EMV
Richtlinie 2014/30/EU, der RoHS Richtlinie 2011/65/EU und der Verordnung (EU) 2019/1782 der
Kommission entspricht. Die formelle Konformitätserklärung erhalten Sie unter
https://feintech.eu/ce oder auf Anforderung.
Angaben entsprechend der VERORDNUNG (EU) 2019/1782 DER KOMMISSION
Spreewald Kommunikationstechnik GmbH
HR B 1107 Cottbus
Radensdorfer Hauptstr. 45 a, 15907 Lübben (Spreewald), Deutschland
Netzteil-Modellkennung NBS05B050100VE
Eingangsspannung 100–240 V
Eingangswechselstromfrequenz 50/60 Hz
Ausgangsspannung 5 V DC
Ausgangsstrom 1,0 A
Ausgangsleistung 5,0 W
Durchschnittliche Effizienz im Betrieb 74,25 %
Leistungsaufnahme bei Nulllast 0,06 W

7
1 - Wiedergabe von HDMI-Quelle, Ton über Soundbar im 5.1 oder 7.1 Format
Schalten Sie am Switch eARC und das Tonformat 5.1 oder 7.1 (Dolby Atmos) ein. Wählen Sie dann
die gewünschte HDMI-Quelle am Eingang 2, 3 oder 4. Falls AUTO-SWITCH eingeschaltet ist, wird
automatisch auf die zuletzt aktivierte Quelle geschaltet. Hinweis: Eine parallele Soundausgabe
über den Fernseher ist ebenfalls möglich, wenn dieser das Audioformat unterstützt.
2 - Wiedergabe des Fernseher-Tons (Sat/CATV oder Apps) über die Soundbar
Schalten Sie am Switch eARC ein und schalten Sie auf HDMI Eingang 1 (ARC to Sound). Aktivieren
Sie HDMI-ARC am Fernseher, falls noch nicht geschehen. So hören Sie den Ton von Smart-TV Apps
oder dem TV-Empfangsteil für Satelliten-/Kabelfernsehen über die Soundbar.
3 - Verwendung als normaler HDMI Switch
Schalten Sie ARC aus. Wählen Sie dann die gewünschte HDMI-Quelle 1 bis 4 aus. Falls an Ihrer
Soundbar über HDMI weitere Quellen angeschlossen sind, können Sie diese so wiedergeben. Falls
vorhanden, können Sie auf das Menü der Soundbar zugreifen.

8
Häufige Fragen und Antworten
Wie schließe ich eine Soundbar für Dolby Atmos an, die nur einen HDMI-eARC-Anschluss hat?
• Verbinden Sie den HDMI-Anschluss der Soundbar mit dem HDMI-Eingang 1 des VAX04101.
Verbinden Sie den TV-Ausgang des VAX04101 mit Ihrem Fernseher, Monitor oder
Videoprojektor. Schalten Sie eARC am VAX04101 ein und wählen Sie die EDID 7.1. Diese
Einstellungen müssen Sie in der Regel nicht ändern.
Ich möchte den Ton von Smart-TV Apps oder Kabel-/Satellitenfernsehen über die Soundbar hören.
Was muss ich einstellen?
• Schalten Sie am TV die Audioausgabe über eARC oder ARC ein. Wählen Sie am VAX04101 den
Eingang 1 aus. eARC muss am VAX04101 eingeschaltet sein.
Welchen EDID-Modus soll ich einstellen?
• Wenn die Soundbar höhere Audioformate wie Dolby Atmos, DTS-HD oder PCM7.1 unterstützt,
wählen Sie „7.1“. Die Einstellung „Auto“ ist nur sinnvoll bei ausgeschalteter Soundbar.
Mein Videoprojektor hat keinen Anschluss mit HDMI-ARC. Wie schließe ich diesen an?
• Ein ARC- oder eARC-Anschluss ist nicht nötig. Verbinden Sie den Videoprojektor mit dem TV-
Ausgang des VAX04101.
Meine Soundbar oder deren App liefert eine Fehlermeldung, dass kein Fernseher mit HDMI-ARC
angeschlossen wäre. Was kann ich tun?
• Die Soundbar ist mit dem VAX04101 verbunden und daher ist ein Fernseher weder nötig noch
erkennbar. Bitte ignorieren Sie diese Meldung. Sie können Ihr System dennoch einrichten, in-
dem Sie die Geräte verkabeln. Eine Dialog-gestützte Installation beenden Sie bitte.
Ich möchte alles mit der TV-Fernbedienung automatisch steuern. Wie geht das?
• Mediaplayer wie Apple TV oder Fire TV können nur automatisch steuern oder gesteu-
ert werden, wenn eine aktive Verbindung zwischen Fernseher und Mediaplayer besteht.
Der VAX04101 muss also auf den Anschluss vom Apple TV geschaltet werden (mit der
VAX04101 Fernbedienung oder am HDMI-Switch). Falls der VAX04101 auf einen anderen
Eingang geschaltet wird, ist keine Steuerung des Apple TV mehr möglich. Eine automatische
Umschaltung auf den HDMI-Eingang funktioniert bei HDMI-Quellen, die im Standby inaktiv
oder ganz ausgeschaltet sind. Die automatische Gerätesteuerung über den VAX04101 ist
also gegenüber einer direkten HDMI-Verbindung zum Fernseher etwas eingeschränkt, wenn
mehrere HDMI-Quellen benutzt werden.
Wann muss ich eARC am VAX04101 ausschalten?
• Sie brauchen eARC nur ausschalten, wenn Sie eine Soundbar mit mehreren HDMI-Eingängen
betreiben und dort eine weitere HDMI-Quelle abgespielt werden soll.

9
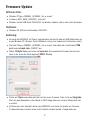
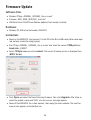
Firmware-Update
Software-Files:
• Windows PC App „GENERAL_UPGRADE_Vxx.xx.xx.exe“
• Firmware „MCU_MAIN_VAX04101_xxxxx.bin“
• Windows Treiber USB-Serial CH340/341 via Windows Update, sofern noch nicht vorhanden
Hardware:
• Windows-PC, USB micro Data cable, VAX04101
Anleitung
• Versorge den VAX04101 mit Strom. Verbinde dann den Switch über ein USB Datenkabel mit
einem Windows PC. (Hinweis: Viele USB Kabel sind nur zum Laden und funktionieren nicht).
• Start die PC App „GENERAL_UPGRADE_Vxx.xx.xx.exe“ und wähle den zusätzlichen COM
port und die baud rate „115200“ aus
• Wähle 13 Byte Modus und klicke auf connect. Die momentane Firmware Version wird
dann in der untersten Zeile angezeigt (MCU: Vx.xx).
• Klicke auf Open und wähle die Datei mit der neuen Firmware. Dann klicke auf Upgrade.
Nach ein paar Sekunden ist das Updae zu 100% abgeschlossen und eine Erfolgsnachricht
erscheint.
• Entferne dann kurz den Netzstecker vom VAX04101 und stecke ihn wieder ein. Die neue
Firmware Version erscheint unten in der Fußzeile und das Update ist abgeschlossen.

10
VAX04101
HDMI eARC Pass Switch 4×1
Instruction manual and technical information
Dear customer,
Thank you for purchasing this high quality product. Please read these instructions before installa-
tion to ensure optimum use and safety. Please keep this manual for future reference.
Functions:
• HDMI switch for the operation of up to 4 HDMI sources on one HDMI sink (TV / projector)
• One HDMI input supports eARC (enhanced Audio Return Channel) and can be connected to
the HDMI-eARC connector of a soundbar
• Audio EDID management
• Supports Ultra-HD up to 4K 60Hz as well as HDR10, HLG-HDR and Dolby Vision
Hint:
When changing the settings on the TV or Audio-EDID on the switch, please note that it may be
necessary to restart the connected devices. If you do not obtain the desired output or display,
please proceed as follows:
• Switch on the desired Audio EDID mode on the switch and select the desired HDMI source.
• Disconnect all devices from the power supply for a few seconds, i.e. pull the power plug.
• Then plug in the power plugs and switch on the devices in the following order: TV, sound sys-
tem, HDMI switch, HDMI source
Audio formats
The supported audio formats are negotiated between the devices. You can influence this using the
EDID control (EDID = Extended Display Identification Data, this data identifies an HDMI sink to the
HDMI source).
7.1
If set to 7.1 this allows the HDMI source to recognize that all audio formats are accepted. Please
note that your sound system should support eARC to process all audio formats including Dolby

11
TrueHD, Dolby Atmos, DTS-HD Master Audio, Dolby MAT and PCM7.1. If your sound system or TV is
muted, they do not support the respective sound format.
5.1
If set to 5.1 the HDMI source is informed about the support of formats up to 5.1. These include
Dolby Digital (AC3), DTS, PCM5.1 and PCM stereo. (If your sound system or TV remains mute, they
do not support the respective sound format.)
2.0
If set to 2.0 the HDMI source will detect that only stereo is supported. Sound system and TV should
therefore have sound in any case.
Auto
If set to Auto the switch does not interfere with the management of the sound format. Audio is
automatically negotiated between source and TV.
Note: For some HDMI sources, you can manually adjust the audio output to override EDID nego-
tiation. eARC is fully backward compatible to previous ARC protocol and supports further audio
formats like Dolby TrueHD and Dolby MAT. Therefore you can connect both ARC and eARC devices.
But your sound system requires eARC to receive advanced audio formats like Dolby TrueHD or
Dolby MAT (Atmos from Apple TV) .
Installation and Operation
• Connect 1 to 4 HDMI signal sources (e.g. Bluray player) to the HDMI inputs. Input 1 ARC to
Sound is designed for connecting a soundbar with HDMI-eARC.
• Connect an HDMI sink (e.g. TV or video projector) to the HDMI output
• Connect the power adapter to the HDMI switch and plug it into an electrical outlet. Then turn
on the TV / video projector, then the switch and an HDMI source.
• If a soundbar is connected, please active eARC by pressing the corresponding button
Caution: When plugging and unplugging the HDMI cables, take care not to dirty or damage the
plug contacts. Make connections without power and only switch on the devices after connecting
them. Please also make sure that the HDMI cables are of good quality - especially for 4k transmis-
sion. Good cables usually have a large diameter. We recommend a maximum cable length of 5 m
at the inputs and 3 m at the outputs for 4k HDR. For a longer cable run you can use a Hybrid Fibre
HDMI cable. Please make sure that HDMI-CEC and HDMI-eARC are supported by such cables!

12
Remote control
The supplied infrared remote control controls the same functions as the
buttons on the front panel:
• With the red ARC key you can switch the eARC mode on or off
• Select between the audio EDID formats by pressing Auto / 2.0ch /
5.1ch / 7.1ch
• Select the HDMI source using the buttons In1 to In4.
• Press Auto Source to switch automatic switching of the HDMI inputs
on or off.*
*Please note that many media players such as Apple TV or Fire TV do not
support automatic switching because the signal outputs are not switched
off in standby. Switching via HDMI CEC command is not possible because
there is no connection to non-active HDMI sources.
Connections & Controls
1. LED lights up when automatic switching of the HDMI inputs is active*
2. LED of the selected HDMI input 1–4 is on
3. Short tap switches between the HDMI inputs, long tap activates Auto-Switching. If active, the
device switches automatically to the last connected HDMI source. If you have connected a
soundbar and a television with HDMI-ARC, and eARC is switched on, you will hear the sound
of the television when input 1 is selected.
4. LED of the selected audio EDID lights up, in Auto mode the EDID information of the connect-
ed HDMI sink (TV) is used
5. Switches between the audio EDID modes Auto/2.0/5.1/7.1
6. LED lights up when eARC is activated - must be active if a soundbar is connected.
7. eARC switch - if eARC is on, sound is output from the HDMI ARC to Sound 1 connector.
8. Remote control infrared receiver window

13
1. HDMI inputs 1 to 4, please use ARC to Sound 1 for the connection of a soundbar
2. HDMI output for the connection of a TV or video projector - HDMI-ARC is supported
3. Micro-USB connector for service
4. Connector for the DC plug of the mains adaptor
Scenarios
1 - Playback from HDMI source, sound via soundbar in 5.1 or 7.1 format
Switch on eARC and select the sound format 5.1 or 7.1 (Dolby Atmos) at the switch. Then select
the desired HDMI source at input 2, 3 or 4. Note: Parallel sound output via the television is also
possible.
2 - Playback of the TV sound (Sat/CATV or Apps) via the soundbar
Switch on eARC at the switch and select input 1 (ARC to Sound). Activate HDMI-ARC on the TV if
not already done. Please make sure that the TV is connected with its HDMI-ARC port to the switch
and the HDMI cable supports ARC.
3 - Use as a normal HDMI switch
Switch off eARC. Then select the desired HDMI source 1 to 4. If there are other sources connected
to your soundbar via HDMI, they can be played. If available, you can access the soundbar menu
this way.
Safety
• Please do not cover the housing or power supply, or install the device to avoid overheating.
• Keep away from fire, heat sources, water and moisture.
• Do not place heavy objects on the device or the connection cables.
• Do not open or drill holes in the housing.
• Use only the supplied power adaptor or ensure identical performance data when replacing.
• Use only a soft, dry cloth to clean the surface of the unit. Please do not use aggressive clean-
ing agents, gasoline or the like.
• If the unit will not be used for a longer period of time, please unplug it from the mains.

14
Service
The device must be inspected by qualified personnel in the following cases.
• Objects or liquids have penetrated into the device.
• The unit does not operate normally or its performance has changed.
• The device has been dropped or the housing is damaged.
Disconnect the mains plug and do not continue to operate the device. Do not attempt to repair or
open the unit yourself. Contact a trained technician or contact the seller or FeinTech Service
Disposal of the device after use
Old appliances are not worthless waste, but contain valuable raw materials. At the
end of its life, this product should not be disposed of with normal household waste,
but should be taken to a collection point for the recycling of electrical and electronic
equipment. Contact your local authority for information about recycling points.
CE Declaration of Conformity
This product complies with EU directives and may only be used in conjunction with
shielded cables. We, Spreewald Kommunikationstechnik GmbH, hereby declare that
this device complies with the Low Voltage Directive 2014/35/EU, the EMC Directive 2014/30/EU,
the RoHS Directive 2011/65/EU and the Commission Regulation (EU) 2019/1782. You can obtain
the formal declaration of conformity at https://feintech.eu/ce or on request.
Information according to the COMMISSION REGULATION (EU) 2019/1782
Spreewald Kommunikationstechnik GmbH
Country court Cottbus HR B 1107
Radensdorfer Hauptstr. 45 a, 15907 Lübben (Spreewald), Germany
Power supply model identifier NBS05B050100VE
Input voltage 100–240 V
Input AC frequency 50/60 Hz
Output voltage 5 V DC
Output current 1.0 A
Output power 5.0 W
Average active efficiency 74.25 %
No-load power consumption 0.06 W

15
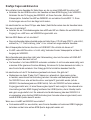
Frequently asked questions and answers
How do I connect a soundbar for Dolby Atmos that has only one HDMI-eARC connection?
• Connect the HDMI connection of the soundbar to HDMI input 1 of the VAX04101. Connect
the TV output of the VAX04101 to your TV, monitor or video projector. Switch on eARC on the
VAX04101 and select EDID 7.1. You usually do not have to change these settings.
I want to hear the sound from Smart TV apps or cable/satellite TV through the soundbar. What do
I need to set?
• Switch on the audio output on the TV via eARC or ARC. Select input 1 on the VAX04101. eARC
must be switched on on the VAX04101.
My video projector does not have a connection with HDMI-ARC. How do I connect it?
• An ARC or eARC connection is not necessary. Connect the video projector to the TV output of
the VAX04101.
My soundbar or its app gives an error message that no TV with HDMI-ARC is connected. What can
I do?
• The Soundbar is connected to the VAX04101 and therefore a TV is neither necessary nor rec-
ognisable. Please ignore this message. You can still set up your system by wiring the devices.
Please exit a dialogue-based installation.
I want to control everything automatically with the TV remote control. How can I do this?
• Media players such as Apple TV or Fire TV can only be controlled or operated automati-
cally if there is an active connection between the TV and the media player. The VAX04101
must therefore be switched to the connection from the Apple TV (with the VAX04101 remote
control or on the HDMI switch). If the VAX04101 is switched to another input, it is no longer
possible to control the Apple TV. Automatic switching to the HDMI input works with HDMI
sources that are inactive or completely switched off in standby. Automatic device control via
the VAX04101 is therefore somewhat limited compared to a direct HDMI connection to the
TV when several HDMI sources are used.
When do I have to switch off eARC on the VAX04101?
• You only need to switch off eARC if you are operating a soundbar with several HDMI inputs
and another HDMI source is to be played there.

16
Firmware-Update
Software-Files:
• Windows PC App „GENERAL_UPGRADE_Vxx.xx.xx.exe“
• Firmware „MCU_MAIN_VAX04101_xxxxx.bin“
• USB Serial driver CH340 from Windows Update (if not already installed)
Hardware:
• Windows-PC, USB micro Data cable, VAX04101
Instructions
• Power on the VAX04101, then connect it to the PC with a Micro USB cable (Data cable requi-
red, not only a cable for charging only)
• Run PC App „GENERAL_UPGRADE_Vxx.xx.xx.exe“ and select the correct COM port and
baud rate „115200“.
• Select 13 Byte mode and click connect. The current Firmware version is displayed then
(MCU: Vx.xx).
• Click Open and select the file with the new firmware. Then click Upgrade. After a few se-
conds the update is done and 100% plus the success message appears.
• Power off the VAX04101 for a short moment, then replug the mains adaptor. The new firm-
ware version appears on the bottom line.

17
VAX04101
Commutateur de passage HDMI eARC 4×1
Manuel d‘instruction et informations techniques
Cher client,
Nous vous remercions d‘avoir acheté ce produit de haute qualité. Veuillez lire ces instructions
avant l‘installation afin de garantir une utilisation et une sécurité optimales. Veuillez conserver ce
manuel pour toute référence ultérieure.
Fonctions :
• Commutateur HDMI permettant de faire fonctionner jusqu‘à 4 sources HDMI sur un puits
HDMI (TV / projecteur).
• Une entrée HDMI prend en charge l‘eARC (enhanced Audio Return Channel) et peut être
connectée au connecteur HDMI-eARC d‘une barre de son.
• Gestion de l‘EDID audio
• Supporte l‘Ultra-HD jusqu‘à 4K 60Hz ainsi que HDR10, HLG-HDR et Dolby Vision.
Conseil :
Lorsque vous modifiez les paramètres du téléviseur ou de l‘Audio-EDID sur le commutateur, veuil-
lez noter qu‘il peut être nécessaire de redémarrer les appareils connectés. Si vous n‘obtenez pas
la sortie ou l‘affichage souhaité, veuillez procéder comme sui:
• Activez le mode Audio EDID souhaité sur le commutateur et sélectionnez la source HDMI
souhaitée.
• Déconnectez tous les appareils de l‘alimentation électrique pendant quelques secondes,
c‘est-à-dire retirez la fiche d‘alimentation.
• Branchez ensuite les fiches d‘alimentation et allumez les appareils dans l‘ordre suivant : TV,
système audio, commutateur HDMI, source HDMI.
Formats audio
Les formats audio pris en charge sont négociés entre les appareils. Vous pouvez influencer cette
négociation à l‘aide de la commande EDID (EDID = Extended Display Identification Data, ces
données identifient un puits HDMI à la source HDMI).

18
7.1
S‘il est réglé sur 7.1, cela permet à la source HDMI de reconnaître que tous les formats audio
sont acceptés. Veuillez noter que votre système audio doit prendre en charge l‘eARC pour traiter
tous les formats audio, y compris Dolby TrueHD, Dolby Atmos, DTS-HD Master Audio, Dolby MAT
et PCM7.1. Si votre système de sonorisation ou votre téléviseur est coupé, cela signifie qu‘ils ne
prennent pas en charge le format sonore correspondant.
5.1
S‘il est réglé sur 5.1, la source HDMI est informée de la prise en charge des formats jusqu‘à 5.1. Il
s‘agit notamment de Dolby Digital (AC3), DTS, PCM5.1 et PCM stéréo. (Si votre système de sono-
risation ou votre téléviseur reste muet, c‘est qu‘ils ne prennent pas en charge le format sonore
correspondant).
2.0
Si elle est réglée sur 2.0, la source HDMI détectera que seule la stéréo est prise en charge. Le
système de sonorisation et le téléviseur devraient donc avoir du son dans tous les cas.
Auto
S‘il est réglé sur Auto, le commutateur n‘intervient pas dans la gestion du format sonore. Le son
est automatiquement négocié entre la source et le téléviseur. Le téléviseur limite le format audio
utilisé.
Remarque: pour certaines sources HDMI, vous pouvez régler manuellement la sortie audio pour
annuler la négociation EDID. eARC est entièrement rétrocompatible avec le protocole ARC précé-
dent et prend en charge d‘autres formats audio comme Dolby TrueHD et Dolby MAT. Vous pouvez
donc connecter à la fois des appareils ARC et eARC. Mais votre système audio nécessite l‘eARC
pour recevoir des formats audio avancés comme Dolby TrueHD ou Dolby MAT (Atmos de l‘Apple
TV).
Installation et fonctionnement
Connectez 1 à 4 sources de signaux HDMI (par exemple, un lecteur Bluray) aux entrées HDMI.
L‘entrée 1 ARC to Sound est conçue pour connecter une barre de son avec HDMI-eARC.
Connectez un récepteur HDMI (par exemple, un téléviseur ou un vidéoprojecteur) à la sortie HDMI.
Connectez l‘adaptateur d‘alimentation au commutateur HDMI et branchez-le sur une prise élec-
trique. Allumez ensuite le téléviseur / vidéoprojecteur, puis le commutateur et une source HDMI.
Si une barre de son est connectée, veuillez activer l‘eARC en appuyant sur le bouton correspon-
dant.
Attention: Lorsque vous branchez et débranchez les câbles HDMI, veillez à ne pas salir ou en-
dommager les contacts de la fiche. Effectuez les connexions sans alimentation et n‘allumez les

19
appareils qu‘après les avoir connectés. Veillez également à ce que les câbles HDMI soient de
bonne qualité, notamment pour la transmission 4k. Les bons câbles ont généralement un grand
diamètre. Nous recommandons une longueur de câble maximale de 5 m aux entrées et de 3 m
aux sorties pour le 4k HDR. Pour une plus grande longueur de câble, vous pouvez utiliser un câble
HDMI à fibre hybride. Veuillez vous assurer que ces câbles prennent en charge les technologies
HDMI-CEC et HDMI-eARC !
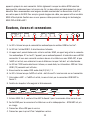
Boutons, écrans et connexions
1. La LED s‘allume lorsque la commutation automatique des entrées HDMI est active*.
2. La LED de l‘entrée HDMI 1-4 sélectionnée est allumée.
3. Un appui court permet de basculer entre les entrées HDMI, un appui long active la commuta-
tion automatique. S‘il est actif, l‘appareil passe automatiquement à la dernière source HDMI
connectée. Si vous avez connecté une barre de son et un téléviseur avec HDMI-ARC, et que
l‘eARC est activé, vous entendrez le son du téléviseur lorsque l‘entrée 1 est sélectionnée.
4. La LED de l‘EDID audio sélectionné s‘allume, en mode Auto, les informations EDID de l‘évier
HDMI (TV) connecté sont utilisées.
5. Bascule entre les modes EDID audio Auto/2.0/5.1/7.1
6. La LED s‘allume lorsque l‘eARC est activé - doit être actif si une barre de son est connectée.
7. Interrupteur eARC - si l‘eARC est activé, le son est émis par le connecteur HDMI ARC to
Sound 1.
8. Fenêtre du récepteur infrarouge de la télécommande
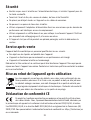
1. Entrées HDMI 1 à 4, veuillez utiliser ARC to Sound 1 pour la connexion d‘une barre de son.
2. Sortie HDMI pour la connexion d‘un téléviseur ou d‘un vidéoprojecteur - HDMI-ARC est pris
en charge.
3. Connecteur Micro-USB pour le service
4. Connecteur pour la prise DC de l‘adaptateur secteur.

20
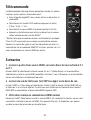
Télécommande
La télécommande infrarouge fournie permet de contrôler les mêmes
fonctions que les boutons du panneau avant :
• Avec la touche rouge ARC, vous pouvez activer ou désactiver le
mode eARC.
• Sélectionnez les formats EDID audio en appuyant sur Auto /
2.0ch / 5.1ch / 7.1ch.
• Sélectionnez la source HDMI à l‘aide des touches In1 à In4.
• Appuyez sur Auto Source pour activer ou désactiver la commu-
tation automatique des entrées HDMI.*
*Veuillez noter que de nombreux lecteurs multimédia tels que Apple
TV ou Fire TV ne prennent pas en charge la commutation automa-
tique car les sorties de signal ne sont pas désactivées en veille. La
commutation via la commande HDMI CEC n‘est pas possible car il n‘y
a pas de connexion aux sources HDMI non actives.
Scénarios
1 - Lecture à partir d‘une source HDMI, son via la barre de son au format 5.1
ou 7.1
Allumez l‘eARC et sélectionnez le format sonore 5.1 ou 7.1 (Dolby Atmos) sur le commutateur.
Sélectionnez ensuite la source HDMI souhaitée à l‘entrée 2, 3 ou 4. Remarque: la sortie parallèle
du son via le téléviseur est également possible.
2 - Lecture du son du téléviseur (Sat/CATV ou Apps) via la barre de son
Activez l‘eARC sur l‘interrupteur et sélectionnez l‘entrée 1 (ARC to Sound). Activez HDMI-ARC sur
le téléviseur si ce n‘est pas déjà fait. Assurez-vous que le téléviseur est connecté avec son port
HDMI-ARC au commutateur et que le câble HDMI supporte l‘ARC.
3 - Utilisation comme un commutateur HDMI normal
Désactivez l‘eARC. Sélectionnez ensuite la source HDMI 1 à 4 souhaitée. Si d‘autres sources sont
connectées à votre barre de son via HDMI, elles peuvent être lues. Si disponible, vous pouvez
accéder au menu de la barre de son de cette façon.
La page est en cours de chargement...
La page est en cours de chargement...
La page est en cours de chargement...
La page est en cours de chargement...
-
 1
1
-
 2
2
-
 3
3
-
 4
4
-
 5
5
-
 6
6
-
 7
7
-
 8
8
-
 9
9
-
 10
10
-
 11
11
-
 12
12
-
 13
13
-
 14
14
-
 15
15
-
 16
16
-
 17
17
-
 18
18
-
 19
19
-
 20
20
-
 21
21
-
 22
22
-
 23
23
-
 24
24


FeinTech AX04101 Manuel utilisateur
- Catégorie
- Haut-parleurs de la barre de son
- Taper
- Manuel utilisateur
dans d''autres langues
- English: FeinTech AX04101 User manual
- Deutsch: FeinTech AX04101 Benutzerhandbuch
Documents connexes


Autres documents
-
Samsung HW-Q70T Manuel utilisateur
-
-
-
-
-
Samsung HW-Q950T Manuel utilisateur
-
-
Samsung HW-Q900T Manuel utilisateur
-
-