
BCR690E
HITCH MOUNTED EBIKE CARRIER
2 BICYCLE CAPACITY HITCH MOUNTED PLATFORM DESIGN
USER MANUAL
1 (888) 277-6960 (ENGLISH / FRENCH) | MONDAY - FRIDAY 8AM - 4PM EST | WWW.DETAILK2.COM
MADE IN CHINA
IMPORTANT, RETAIN FOR FUTURE REFERENCE: READ CAREFULLY
DK2 USA WEST
4301 S VALLEY VIEW BLVD.
SUITE 10-11 LAS VEGAS, NEVADA
89103 USA
DK2 USA EAST
3750 SOUTH AVENUE,
NORTH UNIT TOLEDO, OHIO
43615 USA
DK2 CORPORATE HEAD OFFICE
5330 MAINWAY
BURLINGTON, ONTARIO
L7L6A4 CANADA

2 | BCR690E man. v.201215
ENGLISH
SECTION I: WARNINGS
GENERAL REMARKS ..................................................................5
SAFE AND PROPER USE ..............................................................5
ROAD SAFETY .......................................................................6
MAINTAINING YOUR BICYCLE RACK ....................................................6
SECTION II: ASSEMBLY
PACKAGE CONTENTS .................................................................8
STEP 1: INSTALL THE REAR WHEEL CRADLE .............................................9
STEP 2: INSTALL THE FRONT WHEEL CRADLE ..........................................10
STEP 3: FASTEN CROSSBARS TO THE FRAME ...........................................11
STEP 4: ATTACH THE BIKE RACK TO THE HITCH RECEIVER ..............................12
STEP 5: ADJUSTING THE SAFETY CRADLES ............................................13
STEP 6: SAFE FOLDING PROCEDURE .................................................. 14
PRODUCT DIAGRAM .................................................................15
FULL PARTS LIST ....................................................................16
LIMITED 1 YEAR WARRANTY .......................................................... 17
TABLE OF CONTENTS

BCR690E man. v.201215 | 3
ENGLISH
SPECIFICATIONS
ITEM NUMBER BCR690E
CONSTRUCTION Powder-coated steel
COMPATIBILITY Most E-Bikes
TIRE SIZE COMPATIBILITY 40.6 cm - 73.6 cm / 15.9 in - 28.9 in
MAX TIRE WIDTH 12.1 cm / 4.7 in
FOLDED DIMENSIONS 157 cm (h) x 44 cm (w) x 87 cm / 61.8 in (h) x 17.3 in (w) x 34.2 in
UNFOLDED DIMENSIONS 157 cm (h) x 110 cm (w) x 84 cm (depth from vehicle hitch) /
61.8 in (h) x 43.3 in (w) x 33 in (depth from vehicle hitch)
WEIGHT 20 kg / 44 lb
RACK WEIGHT CAPACITY 32.8 kg / 72.3 lb
TOTAL WEIGHT CAPACITY 65.7 kg / 144.8 lb
RECEIVER Fits on a 5cm / 2 in hitch receiver

SECTION I
WARNINGS

BCR690E man. v.201215 | 5
ENGLISH
GENERAL REMARKS
1. Please read and observe the instructions carefully before you use the product, and keep
them in a safe place for future use. Check the part list after opening the package. Make sure
that all parts are fully assembled according to the instruction before fitting it on your car.
2. The user is responsible for assembly and installation of this product, and the manufacturer
disclaims any liability due to improper fitting or use of the product.
3. Failure to properly install this bike carrier and/or the bikes may cause damage to the vehicle
and/or the bikes, and may result in personal injury.
4. Do not use this product for purposes other than those for which it is designed. Do not modify
any components of the product. Remove the carrier if not in use.
5. Do not use the carrier to carry more bikes than recommended. The weight of each bike
cannot exceed 32.8 kg / 72.3 lbs.
6. The bike carrier is designed to be fitted directly on vehicles with a 5 cm / 2 in hitch receiver.
7. This bike rack is not intended for transporting tandem, or recumbent bicycles.
8. Do not transport bicycles with attached baby seats, panniers, wheel covers, or full bike
covers.
SAFE AND PROPER USE
1. Please make sure you clean the surface of the hitch receiver completely before installing the
rack.
2. Always use the safety strap to attach the bikes to the bike carrier.
3. Check if distance from the exhaust pipe to the bicycle tires is safe for your bicycles or the
straps of the carrier. The heat of the exhaust could damage the bike or bicycle racks.
4. If your vehicle is equipped with an automatic tailgate opening system, disable this function
when using the bike carrier, and open the tailgate manually.
5. When loading the bicycles, remove all loose parts and accessories from bicycles (toolbars,
baby carriers, pumps, etc.).
6. Always position the biggest/heaviest bike first and closest to the vehicle, and then position
the smaller bike after that.
7. The user is responsible for periodically verifying that all hardware, straps, knobs, hubs are
securely tightened for safety purposes.
8. You might have to use extra precautions to protect the bikes and the tailgate from scratches.
9. The locks used on this rack are theft deterrent.
WARNINGS
PLEASE READ BEFORE STARTING

6 | BCR690E man. v.201215
ENGLISH
WARNINGS
PLEASE READ BEFORE STARTING
ROAD SAFETY
1. Check before departure that the light board of the carrier is properly functioning.
2. The bicycle rack increases the vehicle’s length, and the bicycles may increase its width and
height. Be aware of this when passing through narrow or low clearance spaces and when
reversing. Any loads exceeding the indicated dimensions must nevertheless respect existing
regulations and be properly strapped down.
3. The load of the rack and bicycles will aect driving. Do not exceed the speed limit, and do
not drive faster than 120km/h (74.5mph).
4. Drive slowly over speed bumps. Respect the speed limit, and adapt your speed to the
condition of the road.
5. O-road driving is not recommended and could result in damage to your vehicle, hitch
receiver, bike carrier, or your bikes.
6. If you hit a bump or hole in the road, stop your vehicle and inspect the bikes and the carrier.
If you notice anything wrong, remove the bikes and do not use the bike carrier.
7. Make sure there is a safe distance between the bikes and the ground, especially when
entering the driveway.
MAINTAINING YOUR BICYCLE RACK
1. Periodically inspect the product for signs of wear, corrosion, and fatigue.
2. Do not use the carrier with defective parts, contact the dealer to replace them before using it
again.
3. Remove the product before entering an automatic car wash.
4. To keep your product in the best condition, it is recommended to remove the product
from the car when not in use. Please be advised that this product is not designed to resist
extreme weather conditions, especially seacoast air.
5. Lubricate the bolts in order to avoid corrosion.
MAX 65.7 KG / 144.8 LB
*
KG
MAX
LOAD
Car manual
5 cm / 2 in size

SECTION II
ASSEMBLY

8 | BCR690E man. v.201215
ENGLISH
ASSEMBLY
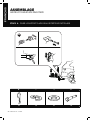
PACKAGE CONTENTS
A B
1x 2x
C D E F
x2
2x 2x 2x 2x
G H I J
1x 4x 1x 1x
K L M N
1x 1x 4x 2x
O P Q
8x 1x 1x

BCR690E man. v.201215 | 9
ENGLISH
ASSEMBLY
STEP BY STEP INSTRUCTIONS
STEP 1: INSTALL THE REAR WHEEL CRADLE
B D N P
2x 2x 2x 1x

10 | BCR690E man. v.201215
ENGLISH
ASSEMBLY
STEP BY STEP INSTRUCTIONS
STEP 2: INSTALL THE FRONT WHEEL CRADLE
C M H Q
2x 4x 4x 1x

BCR690E man. v.201215 | 11
ENGLISH
ASSEMBLY
STEP BY STEP INSTRUCTIONS
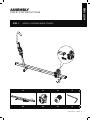
STEP 3: FASTEN CROSSBARS TO THE MAINFRAME
>18cm / 7 in
≈23cm / 9 in
1/2 L 1/2 L
A E F L O P
x2
1x 2x 2x 1x 8x 1x

12 | BCR690E man. v.201215
ENGLISH
ASSEMBLY
STEP BY STEP INSTRUCTIONS
STEP 4: ATTACH THE BIKE RACK TO THE HITCH RECEIVER
A
CD
B
5cm / 2 in
G I J K
1x 1x 1x 1x

BCR690E man. v.201215 | 13
ENGLISH
ASSEMBLY
STEP BY STEP INSTRUCTIONS
STEP 5: ADJUSTING THE SAFETY CRADLES

14 | BCR690E man. v.201215
ENGLISH
ASSEMBLY
STEP BY STEP INSTRUCTIONS
STEP 6: SAFE FOLDING PRODEDURE
C
A
B
1
2
Carrier can fold when
not in use.

BCR690E man. v.201215 | 15
ENGLISH
NOTE: If you need replacement parts please use this diagram and list to ensure the right part is
ordered for you.
ASSEMBLY
PRODUCT DIAGRAM

16 | BCR690E man. v.201215
ENGLISH
No Description Qty
1 bike hook 2
2 front wheel 2
3 tube cap 2
4 hexagon round head screw M5*25 half thread 2
5 hook tube profile 2
6 washer M5*10*1 2
7 M5 lock nut 2
8 bike tube profile 2
9 washer M8*20*1.5 4
10 cross hexagon head screw M8*25 4
11 plastic cover for hook tube 4
12 hexagon round head screw M6*40 2
13 washer M6*12*1 4
14 hook round tube cap 2
15 flex round pin for hook 4
16 lock nut M6 2
17 hexagon screw M12*85 half thread 1
18 quick fixing pin 1
19 washer 12*24*2.5 6
20 hexagon screw M12*80 half thread 2
21 hitch basic plate 1
22 hitch pin M16*95 1
23 flex washer M16 1
24 washer M16*30*2 1
25 2 in hitch receiver 1
26 B pin 4*85 1
27 2 in hitch receiver cap 2
28 lock nut M12 3
29 left plastic sheet for hitch plate 1
30 right plastic sheet for hitch plate 1
31 spring 1
32 tube inside pin 12*17*50 1
33 metal matt 1
34 tilting handle 1
35 tube connector plate with nut 2
36 tube connector plate 2
37 head hexagon screw M8*30 8
38 head hexagon screw M6*12 2
39 rear wheel holder 2
40 tube profile cap 4
41 tilting tube 1
42 hook round tube ending cap 2
ASSEMBLY
FULL PARTS LIST

BCR690E man. v.201215 | 17
ENGLISH
WARRANTY
LIMITED 1 YEAR WARRANTY
WHAT IS COVERED
Detail K2 INC. warrants to the original purchaser of a Detail K2 item that the product will be
warrantied for a period of one (1) year from the date of the original purchase.
If within one (1) year from the original date of purchase this product fails due to defect in material
or workmanship, Detail K2 will repair, replace, or supply any defective part at our option. Upon
expiry of one (1) year, Detail K2 will have no further liability related to the product.
Detail K2 does not authorize any party, including its authorized distributors or dealers, to oer
any other warranty on behalf of Detail K2 Inc.
THIS WARRANTY DOES NOT COVER OR APPLY TO:
a) Damage to the product due to misuse, mishandling and abuse
b) Improper installation, maintenance and storage
c) Expendable parts such as nuts and bolts, pins and springs
d) Normal wear and tear
e) Consequential damage and incidental damages such as damage to persons or property
This Detail K2 product is intended for personal use only. It is not intended for commercial use
and subsequent use in this capacity will void all warranty claims.
PROCEDURE FOR OBTAINING A RETURN AUTHORIZATION
Within the one (1) year warranty period, the purchaser of the product must notify an authorized
distributor or dealer of the claimed defect and provide proof of original purchase. At this
time the validity of the claim will be determined and a Return Goods Authorization Number
(RGA) will be issued if approved. No returned product will be accepted under warranty unless
accompanied by an RGA# issued by Detail K2 Inc.
RESOLUTION FOR A DEFECTIVE PRODUCT
Detail K2 Inc. will at its option repair or replace the defective product covered by this warranty.
The repaired product will be shipped to the purchaser upon completion. All transportation
charges shall be the responsibility of the purchaser. Any damage in transit will be the
responsibility of the carrier or at the risk of the purchaser.
REGISTERING YOUR PRODUCT
Please take a minute and visit our website to register your product at www.detailk2.com

This page is left blank intentionally.

BCR690E
SUPPORT À VÉLO ÉLECTRIQUE MONTÉ SUR ATTELAGE
CAPACITÉ DE 2 VÉLOS MONTÉ SUR L’ATTELAGE CONCEPTION SPÉCIALE DE LA PLATEFORME DE SUPPORT
MANUEL DE L’UTILISATEUR
1 (888) 277-6960 (ANGLAIS / FRANÇAIS) | LUNDI - VENDREDI 8H00 - 16H00 HNE | WWW.DETAILK2.COM
FABRIQUÉ EN CHINE
IMPORTANT, À CONSERVER POUR DE FUTURS BESOINS DE RÉFÉRENCE : À LIRE SOIGNEUSEMENT
DK2 ÉTATS-UNIS OUEST
4301 S VALLEY VIEW BLVD.
SUITE 1011 LAS VEGAS, NEVADA
89103 ÉTATSUNIS
DK2 ÉTATS-UNIS EST
3750 AVENUE SUD,
UNITÉ NORD TOLEDO, OHIO
43615 ÉTATSUNIS
SIÈGE SOCIAL CORPORATIF DK2
5330 MAINWAY
BURLINGTON, ONTARIO
L7L6A4 CANADA

20 | BCR690E man. v.201215
FRANÇAIS
SECTION I: MISES EN GARDE
REMARQUES GÉNÉRALES ............................................................23
UTILISATION SÉCURISÉE ET APPROPRIÉE ..............................................23
SÉCURITÉ ROUTIÈRE ................................................................24
ENTRETENIR VOTRE SUPPORT À VÉLOS ...............................................24
SECTION II: MONTAGE
CONTENU DE L’EMBALLAGE ..........................................................26
ÉTAPE 1: INSTALLER LE BERCEAU DE ROUE ARRIÈRE ....................................27
ÉTAPE 2: INSTALLER LE BERCEAU DE ROUE AVANT .....................................28
ÉTAPE 3: FIXER LES BARRES TRANSVERSALES AU CADRE PRINCIPAL ....................29
ÉTAPE 4: FIXEZ LE SUPPORT AU RÉCEPTEUR D’ATTELAGE. . . . . . . . . . . . . . . . . . . . . . . . . . . . . . .30
ÉTAPE 5: RÉGLAGE DES ATTACHES DE SÉCURITÉ ......................................31
ÉTAPE 6: PROCÉDURE DE PLIAGE SÉCURISÉ ...........................................32
DIAGRAMME DU PRODUIT ...........................................................33
LISTE DES PIÈCES COMPLÈTE ........................................................34
GARANTIE LIMITÉE DE 1 AN ..........................................................35
TABLE DES MATIÈRES
FRANÇAIS
La page charge ...
La page charge ...
La page charge ...
La page charge ...
La page charge ...
La page charge ...
La page charge ...
La page charge ...
La page charge ...
La page charge ...
La page charge ...
La page charge ...
La page charge ...
La page charge ...
La page charge ...
-
 1
1
-
 2
2
-
 3
3
-
 4
4
-
 5
5
-
 6
6
-
 7
7
-
 8
8
-
 9
9
-
 10
10
-
 11
11
-
 12
12
-
 13
13
-
 14
14
-
 15
15
-
 16
16
-
 17
17
-
 18
18
-
 19
19
-
 20
20
-
 21
21
-
 22
22
-
 23
23
-
 24
24
-
 25
25
-
 26
26
-
 27
27
-
 28
28
-
 29
29
-
 30
30
-
 31
31
-
 32
32
-
 33
33
-
 34
34
-
 35
35


Detail K2 Hitch Mounted Dual E-Bike Carrier Manuel utilisateur
- Taper
- Manuel utilisateur
- Ce manuel convient également à
Autres documents
-
DK2 PPS200 Manuel utilisateur
-
DK2 PPS100 Manuel utilisateur
-
 Towing Master 9040155 Le manuel du propriétaire
-
DK2 OPB480EV 57.6V Battery Powered Walk Behind Leaf Blower Manuel utilisateur
-
 Malone MPG2114 Manuel utilisateur
-
 Malone MPG2115 Manuel utilisateur
-
-
 Malone MPG2138 Manuel utilisateur
-
 Malone MPG2116 Manuel utilisateur
-
 Malone MPG2130 Manuel utilisateur


