
ADAPTOR PLATE INSTRUCTIONS FOR THE
FLUSH FIT™ REGISTER BOOSTER™ MODEL HC500
INSTRUCTIONS DE PLAQUE ADAPTRICE POUR
FLUSH FIT™ REGISTER BOOSTER™ MODÈLE HC500
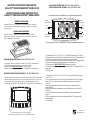
Insert the HC500 Flush Fit™ Register Booster™ into the adaptor plate. The small tabs on
the side of the Flulsh Fit™ Register Booster™ should snap into place when unit is installed
in the adaptor plate.
1. Locate and drill the 6” X 12” or 4” X 12” or 6” X 10” wall mount holes using a 3/16” drill bit.
2. Drill (two) holes with a 3/16” drill bit from the bottom side of the Flush Fit™ Register Booster™
grille. The holes should be drilled in the pre-molded location as pictured below.
3. Plug the small molded end of the power cord into the top of the Flush Fit™ Register Booster™.
4. Plug the wall transformer end of the power cord into a 120 Volt AC outlet.
5. Follow directions for OPERATION SETTINGS before placing in register.
6. Remove the wall register and replace with the assembled Flush Fit™ Register Booster™ and
adaptor plate.
7. Secure in place.
FLOOR MOUNT INSTRUCTIONS 4” X 12”, 6” X 10” & 6” X 12”
INSTRUCTIONS DE BÂTI DE MUR 4” X 12”, 6” X 10” & 6” X 12”
WALL MOUNT INSTRUCTIONS 4” X 12”, 6” X 10” & 6” X 12”
ASSEMBLY INSTRUCTIONS
Insérez HC500 Flush Fit™ Register Booster™ dans la plaque adaptrice. Les petites
étiquettes du côté du Flush Fit™ Register Booster™ devrait se casser dans l'endroit quand
l'unité est installée dans la plaque adaptrice.
INSTRUCTIONS D'ASSEMBLÉE
Remove tabs with pliers for 6” X 10” floor / wall installation.
Enlevez les étiquettes avec des pinces pour 6” X 10” installation de plancher/mur.
4” X 12”
&
6” X 12”
6” X 10”
Please snap the Flush Fit™ Register Booster™ into the adaptor plate before drilling.
S’il vous plaît intercaler Flush Fit™ Register Booster™ dans la plaque adaptatrice avant de percer.
WNT500-1015-C01-HD
Made in China
1. Plug the small molded end of the power cord into the top of the Flush Fit™ Register Booster™.
2. Plug the wall transformer end of the power cord into a 120 Volt AC outlet.
3. Follow directions for OPERATION SETTINGS before placing in register.
4. Remove floor register and replace with the Flush Fit™ Register Booster™ and adaptor plate.
INSTRUCTIONS DE BÂTI DE PLANCHER 4” X 12”, 6” X 10” & 6” X 12”
1. Branchez la petite extrémité moulée du cordon de secteur au dessus du Flush Fit™ Register Booster™.
2. Branchez l'extrémité de transformateur de mur du cordon de secteur à une sortie à C.A. de 120 volts.
3. Suivez les directions pour des arrangements d'opération avant le placement dans le registre.
4. Enlevez le registre de plancher et le remplacez par Flush Fit™ Register Booster™ et plaque adaptrice.
1. Localisez et forez 6” X 12” or 4” X 12” or 6” X 10” murez les trous de bâti utilisant peu de
foret de 3/16“ un.
2. Forez (deux) trous avec peu de foret de 3/16” un du côté inférieur du Flush Fit™ Register
Booster™ gril. Les trous devraient être forés dedans l'endroit pré-moulé comme décrit
ci-dessous.
3. Branchez la petite extrémité moulée du cordon de secteur au dessus du Flush Fit™
Register Booster™.
4. Branchez l'extrémité de transformateur de mur du cordon de secteur à une sortie à C.A.
de 120 volts.
5. Suivez les directions pour des arrangements d'opération avant le placement dans le
registre.
6. Enlevez le registre de mur et le remplacez par assemblé Flush Fit™ Register Booster™
et plaque adaptrice.
7. Fixez en place.
Mounting
Hole Locations:
Endroit de trou
de montage:
Mounting
Hole Locations:
Endroit de trou
de montage:
4” X 12”
&
6” X 12”
6” X 10”
-
 1
1

Suncourt HC5PL1-B Mode d'emploi
- Taper
- Mode d'emploi
- Ce manuel convient également à
dans d''autres langues
Autres documents
-
Bertazzoni REF31BMFXL Manuel utilisateur
-
Electrolux ultrapower Manuel utilisateur
-
-
Wilson Electronics Drive 3G-X Fiche technique
-
Chamberlain HC100ML-2 Le manuel du propriétaire
-
Hatco DL Series Le manuel du propriétaire
-
-
Harmony DEFENDER 360 Manuel utilisateur
-
 Phonetone AN-L65AV Manuel utilisateur
